Showing posts with label Anniversary Cards. Show all posts

Friday, 25 April 2025

Pop Up Anniversary Card


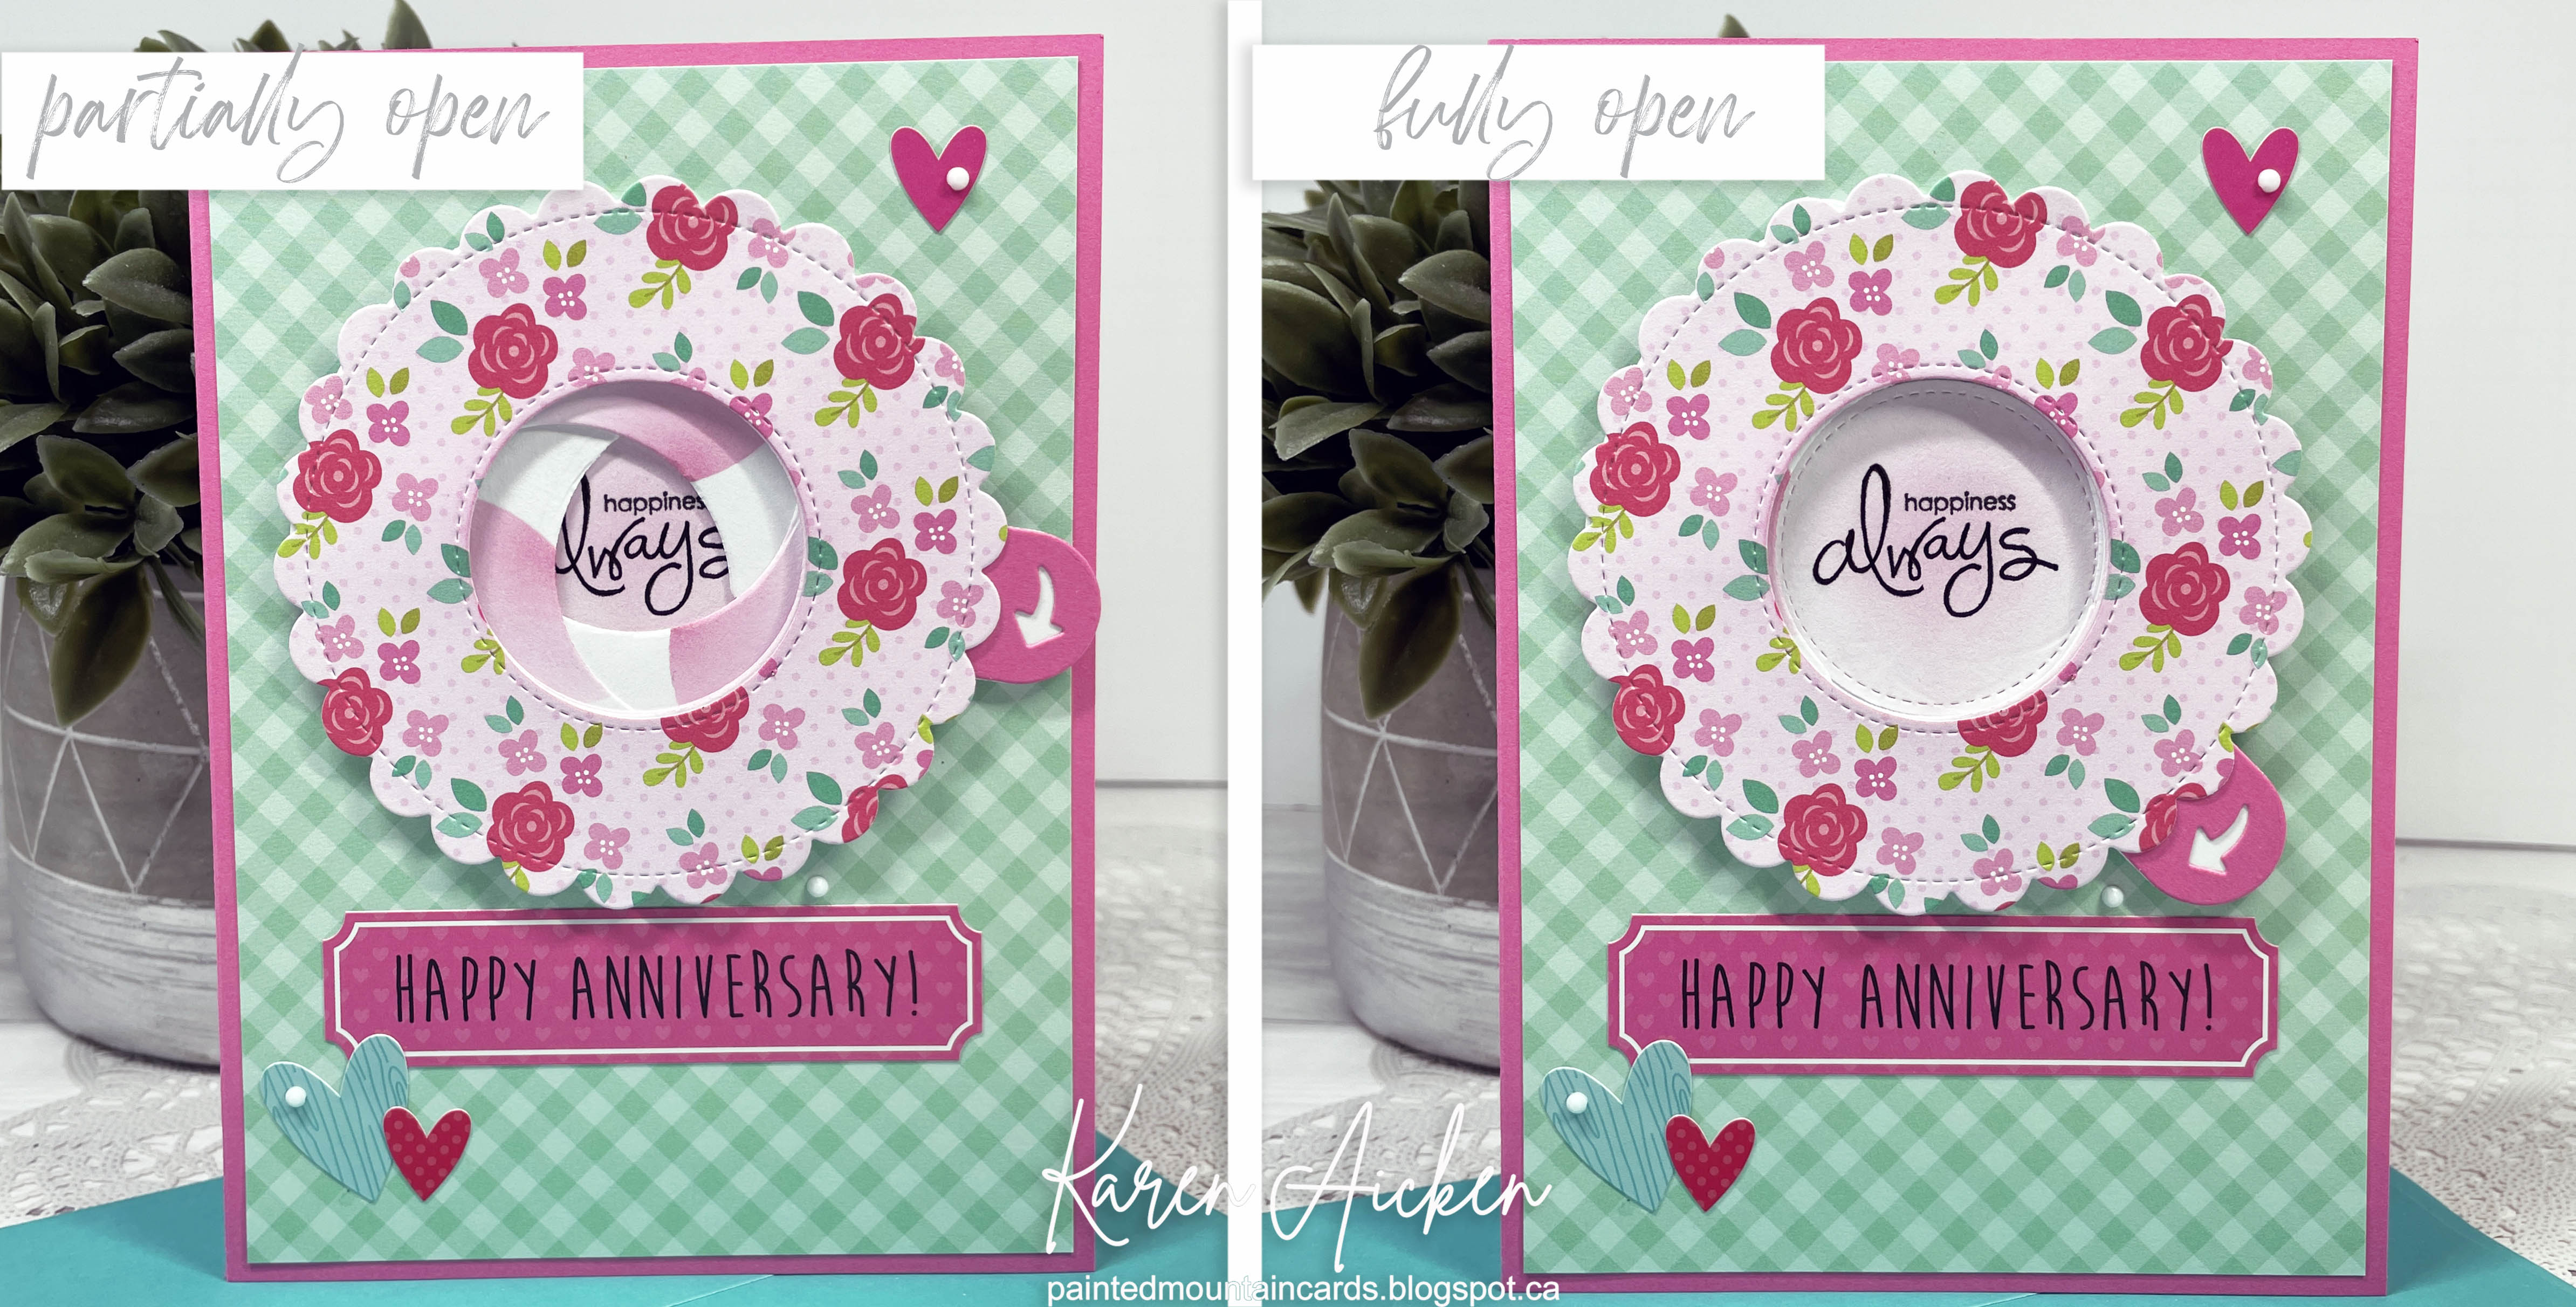
Welcome to Fun Fold Friday here on my blog!  Today I’m sharing a fun pop-up card made for our eldest daughter and hubby for their anniversary. I found this patterned paper in my stash - there was no cover sheet, so I don’t know who made it, but I love the colours so that is what inspired the start to my card.


Both the scribble heart and the love are older dies by Stampin’ Up. 


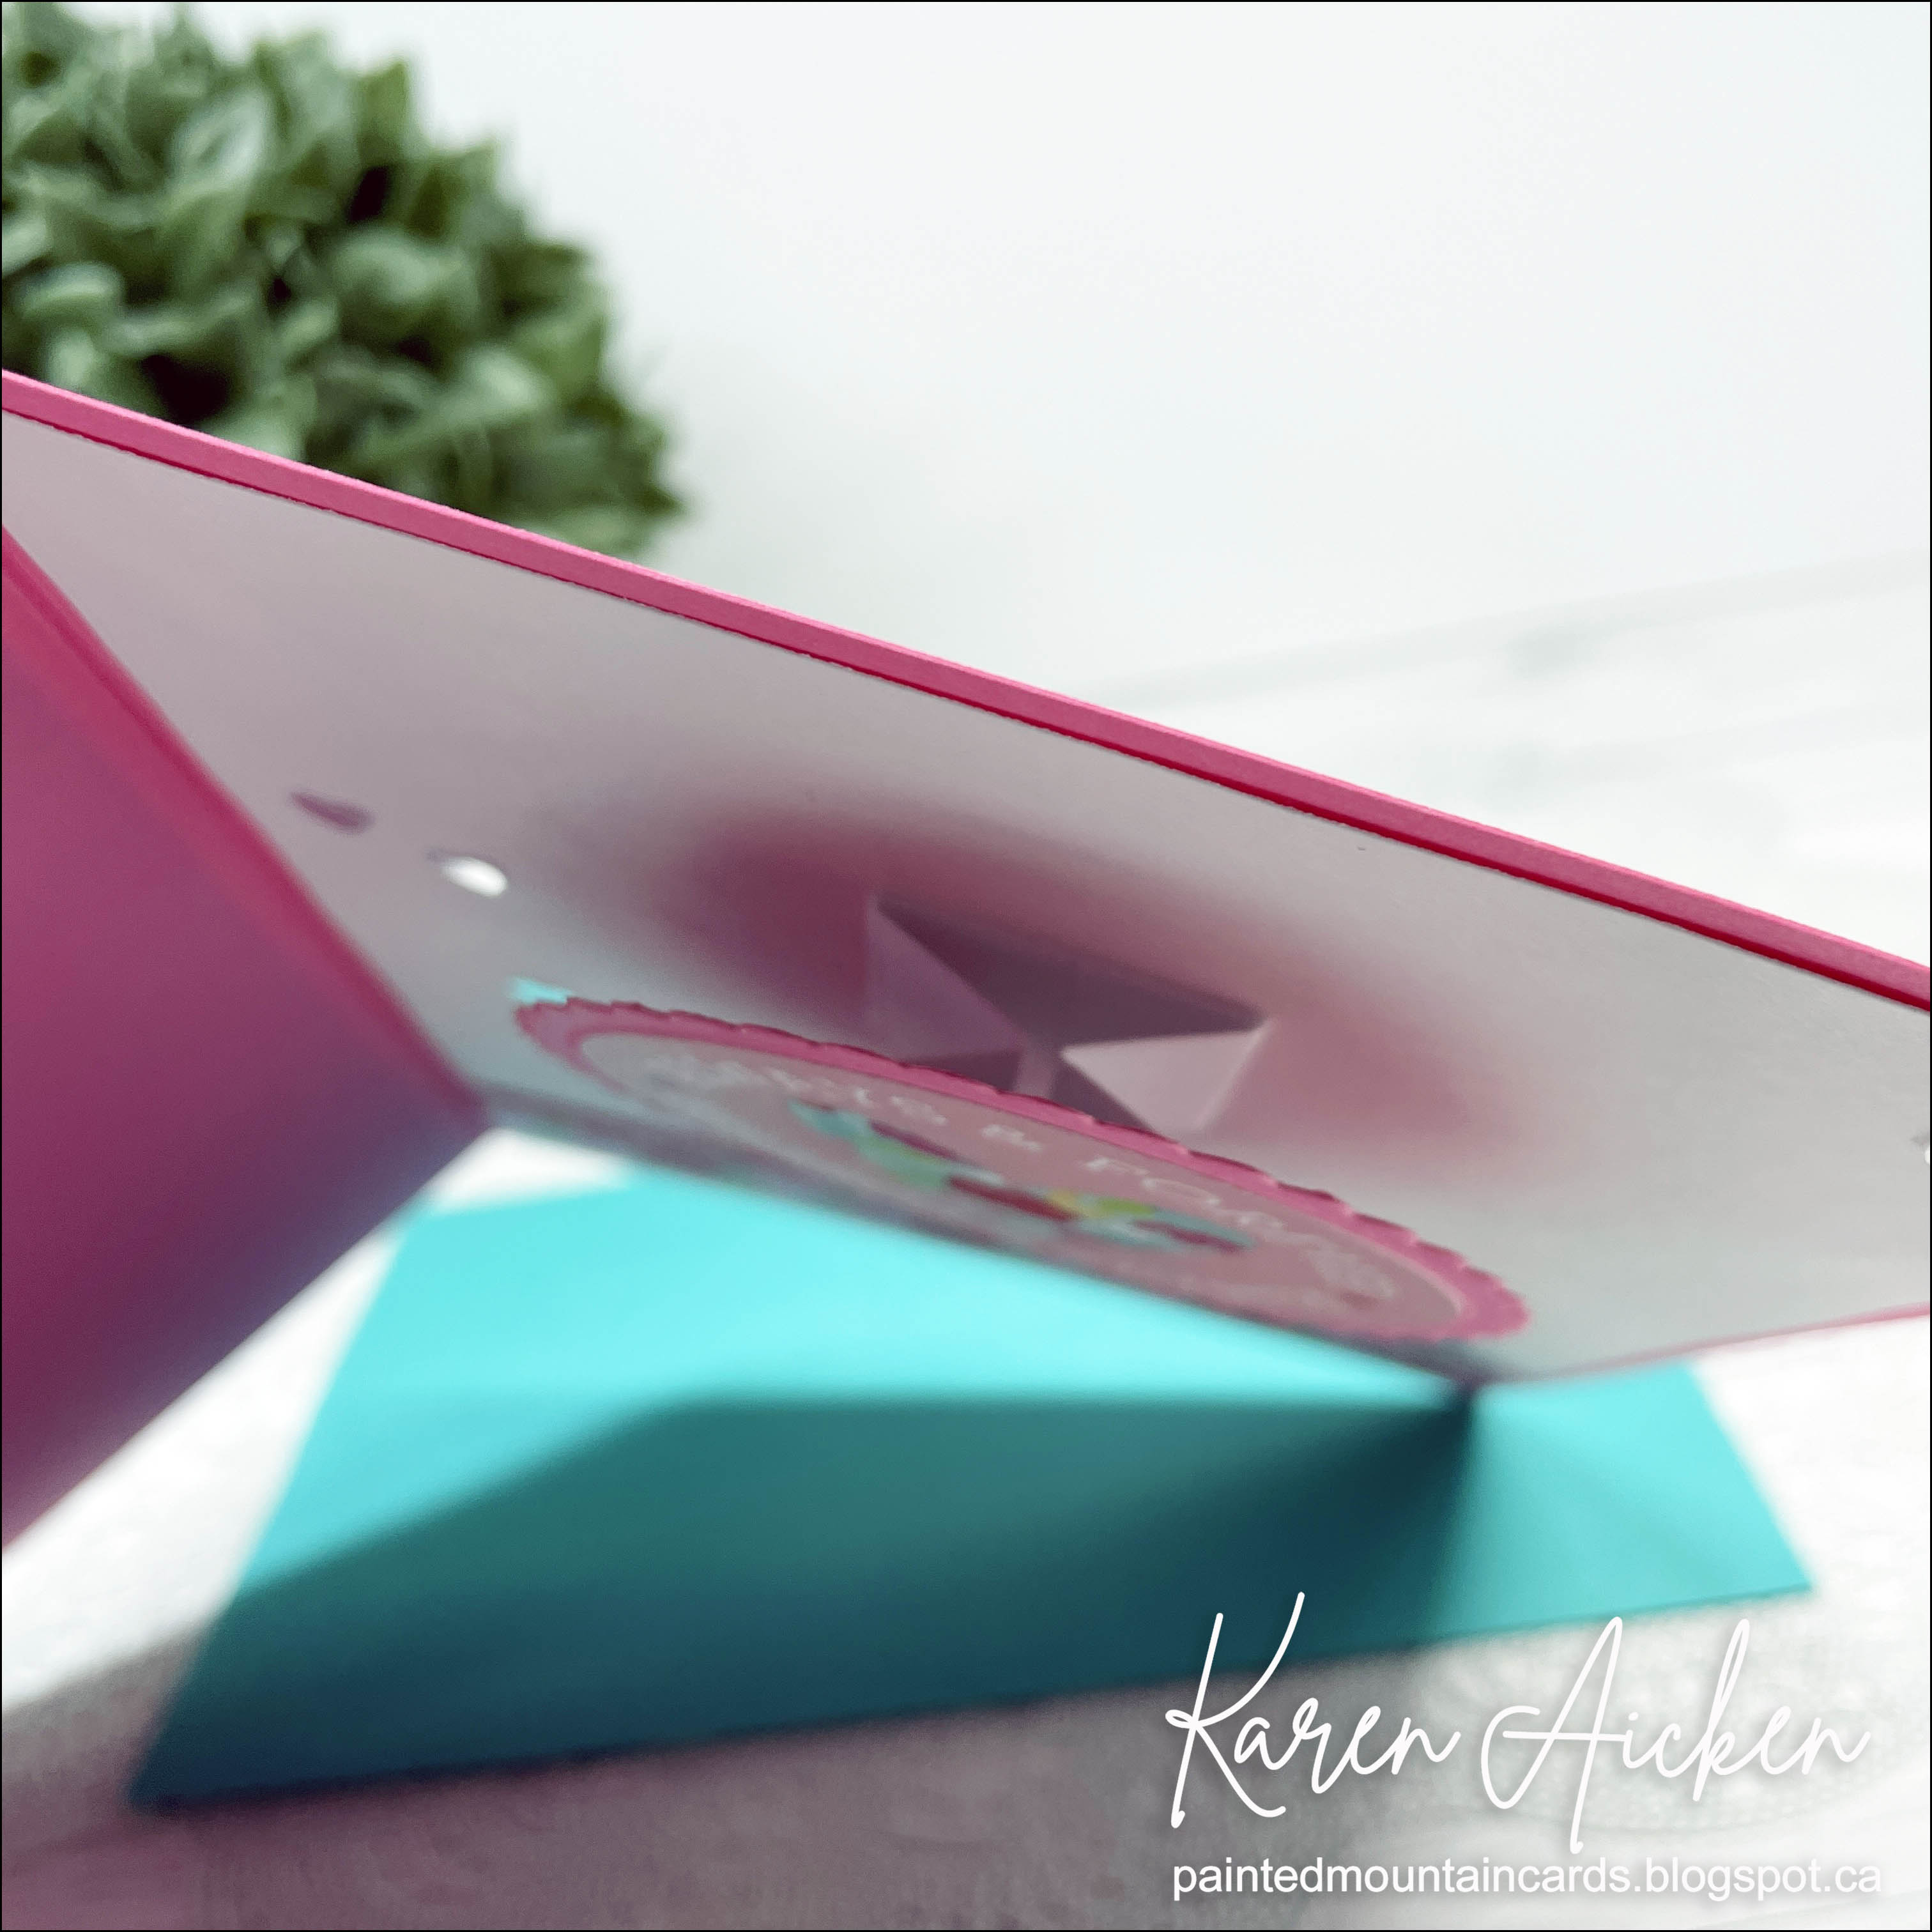
Inside is all the fun, with Karen Burniston’s Photo Fan Pop Up. I added lots of hearts using dies from her Heart Collage Pop Up and a leftover photo I had printed back when I did hubby’s birthday card in December. 

The Happy Anniversary is a sticker printed with my little Nimbot printer …  a gift Santa left for me under the tree and I just love it.  There was lots of room on the right side of the card for us to write a message and the card was hand delivered with love.


Supplies used:
5 x 6.5" card & envelope
patterned paper - old, from my stash. No cover sheet anymore!
Photo Fan Pop Up - Karen Burniston
Heart Collage Pop Up - Karen Burniston
Rainbow Holographic cardstock - Michaels
Photo -  Walgreens
Scribble heart & love dies - Sunshine Wishes, Stampin' Up (old)
Nimbot printer

Thursday, 13 February 2025

Pop Up Anniversary Card


Welcome to Fun Fold Friday here on my blog!  (EDITED - I am so mixed up I thought it was Friday. However, I'm leaving my post up 😂)  Today I'm sharing the pop up Anniversary card I made for our middle daughter and hubby and I made it a pop-up using dies by Karen Burniston. I started with a paper/sticker package I've had for over a year, and added one of the journal cards/cut aparts to the front with foam tape after matting it with white card stock. I used some crinkled, narrow seam binding to create the bow on the front, then sprinkled some holographic hearts. It still needed something else, so I pulled out a glitter glue to add to the flower centres on the background paper.


The tiny hearts come with an included decorator die in the Paper Frames Pop Up and there were some leftover which I'm sure I will add to future projects. They give just the right amount of shine!


Here is a peek at the inside where I used the Paper Frames Pop Up. I have used this die so many times over the years because it gives such dimension! Santa brought me a cute little printer this year, so I used it here with circle labels to print the two sentiments and I added some more stickers from the paper package.


Supplies used:
5x6.5" card & envelope - Michaels (old, from my stash)
Patterned paper, cut aparts & stickers - Flora #3, Carta Bella
Paper Frames Pop Up - Karen Burniston
Nimbot printer
Rainbow Holographic cardstock - Recollections
Narrow crinkles Seam Binding - Stampin' Up


Saturday, 30 November 2024

Heart Flip Anniversary Card


I love this little heart-flip die set (Studio Light), so pulled it out again to make an Anniversary card for friends.


Rather than use the included layering dies to add patterned paper to the card base, I die cut the card base from this sparkly metallic printed paper. I did cut the two side pieces from white card stock with the layering dies and added them on the back. That made the card a little sturdier - if you follow me you know I don't like 'wussy' cards.


The flip side of the heart has a gold foil mat ... the stamps I've had for many years and I was happy with how well they fit on this card. Finally, some gold foil flat gem stickers and my card was ready to pop in the envelope. Folded, the card measures about 4" so it fits in a standard A2 envelope.


Supplies used:
SL Heart Essentials - Studio Light
6x6" patterned paper - Metallic Shimmer, Stampin' Up
Inside Out Anniversary - Taylored Expressions
Metallic gem stickers - either Dazzles or Stamp On It

Wednesday, 31 July 2024

Anniversary Z-Fold Card


I used the March 2024 Paper Pumpkin kit for this card but of course changed it up from the kit instructions. I'm always a fan of the envelopes that are included with the Paper Pumpkin kit and this one is printed inside and has a rounded flap.

I stamped the sentiment on a stitched circle die cut which was matted with a crosshatch circle die cut from vellum. I added three mirrored hearts above and below the sentiment.


Here is a look at the inside. The patterned card base was turned inside out, so it was white on the outside front & back and all the pattern was inside. The centre score line was already there, so I just scored a second line on the left side of the (opened) card in the centre of that panel. Then, simply fold as shown! I used a corner rounder to punch the top two corners which ties in with the rounded flap on the envelope.

The greeting was stamped on a same size stitched circle as on the front, and placed so it cannot be seen when the card is closed. While I could have stamped the greeting directly on the card base, I liked the look of the stitched circle better.


One more look ...


Supplies used:
March 2024 Paper Pumpkin kit "Memorable Meadows", Stampin' Up
Circles Crosshatch - Karen Burniston
Stitched circles - MFT Stamps
Vellum - Stampin' UP
Word stamps - The Inside Scoop Anniversary, Taylored Expressions
Mirrored hearts - Kat Scrapiness
Corner Rounder - Amazon .ca


Friday, 3 May 2024

Pop Up Anniversary Card


Welcome to Fun Fold Friday here on my blog!

This is one of those cards that are just better in real life. The gold just POPS! Since hubby and I both like to visit Arizona, I used Southwest papers, stamps and dies, and the pop up inside is Karen Burniston's Raising Platform Pop Up.  I have a walkthrough of my card on YouTube:  


I was happily surprised at how well I liked the cactus pieces cut from gold!


I added an extra fold inside the pop up heart, for even more hearts. 


The sentiment is just perfect for our Anniversary. 🥰


Supplies used:
Patterned paper - Golden Desert, Prima
5 x 6.5" card & envelope - Michaels
Gold foil card stock - Recollections
Hearts Crosshatch - Karen Burniston
Raising Platform Pop Up - Karen Burniston
Cactus Builder dies - Mama Elephand
Douple Stitched Circle dies - Divinity Designs
Sentiment inside - Green Thumb, Catherine Pooler
Stamps - Boho, Michaels

Tuesday, 16 April 2024

Mini Slimline Pop Up Anniversary Card

 
Today I'm sharing the shiny anniversary card I made for our eldest daughter & hubby. I started by die cutting the sunburst heart out of rainbow holographic card stock - I love that die and finding reasons to use it. 😂.  Last year I made a bunch of alcohol inked backgrounds on vellum and have managed to hoard every single one. Sheesh. So I pulled one out to put behind the die cut then mounted it to a Mini Slimline card base.


Wanting to keep the front nice and simple, I added a gold heart to the center of the sunburst and a gold Glitter Dot as well.


Inside I used the Twist Flower Pop Up die (Karen Burniston) to animate a crosshatch heart cut from the same rainbow holographic cardstock as I used on the front. I die cut more hearts, both from the alcohol inked scrap pieces, gold foil card stock and the rainbow holographic cardstock scraps.


The Happy Anniversary was done with Sharpie markers.


Supplies used:
Rainbow Holographic cardstock - Recollections
Mini Slim Heart Sunburst
Alcohol Inked vellum
Twist Flower Pop Up - Karen Burniston
Hearts Crosshatch - Karen Burniston
Gold foil card stock - Recollections
Wink of Stella
Sharpie markers

Tuesday, 28 November 2023

Anniversary Card


Today's card was made to coordinate with the Anniversary Gift Card Holder I shared yesterday. I started with a card & envelope from Stampin' Up that has these gold brush marks which are really pretty. I love that the envelopes also have the touches of gold.

Since the cards are printed front and back, I cut one apart to give me two panels and die cut them with a stitched rectangle.  For the front panel I also embossed it with a textured embossing folder. The scribble heart and love dies are ones I've had for years and are long retired - but I still love and use them.


The sentiment inside is a two part stamp from Verve, again - long retired. Verve isn't even around anymore but I still have a great collection of their images. I always loved their stuff and would have bought more if I lived in the US where shipping costs are reasonable. 😊


One more look ...


Having been asked how many cards I make I thought it would be fun to keep track this year. Many of my posts include more than a single card or project and below is my tally. 

Card Tally for 2023
January - 53 cards
February - 56 cards
March - 55 cards
April - 32 cards
May - 43 cards
June - 34 cards
July - 56 cards
August - 106 cards
September - 61 cards
October - 51 cards & 5 Tags
November so far - 43 cards

I decided to cancel the subscription that provided linked thumbnails to what products I used on my cards. It was costing me out of pocket each month, so I’m back to listing what I used 

Supplies:
Gold foiled A2 card base & envelope - Brushed Gold Cards, Stampin' Up
Stitched rectangle dies - Pink & Main Set #2
Blue foiled cardstock - Damask, Hunky Dory
Heart & Love dies - Sunshine Wishes, Stampin' Up
Gold foiled cardstock
Embossing folder - Tasteful Textile, Stampin' Up
Wishing you - Verve
Wishing You stamps - Verve
Blending Brushes - Taylored Expressions
Catherine Pooler inks
Glitter Dots - Ecstasy Crafts 

Friday, 24 November 2023

60th Anniversary Card and Gift Card Holder


It's Fun Fold Friday here on my blog and today I'm sharing a card and gift card holder that a family member asked if I could make for them. I was happy to do so ... and since the couple celebrating their 60th Anniversary love to spend time in the Muskoka's this is what I came up with.


I used several different dies by Karen Burniston, including the Label Charm Pop Up for the card. The scenic paper was a good match but since it was a special occasion I also wanted some sparkle & shine. That came from the rainbow holographic cardstock.


I have had the Pop Up Gift Card Holder for several years and I still get a lot of use out of it. This time I turned it so the gift card slides in from the bottom and their personal message would be revealed when the gift card was removed. 


Having been asked how many cards I make I thought it would be fun to keep track this year. Many of my posts include more than a single card or project and below is my tally. 

Card Tally for 2023
January - 53 cards
February - 56 cards
March - 55 cards
April - 32 cards
May - 43 cards
June - 34 cards
July - 56 cards
August - 106 cards
September - 61 cards
October - 51 cards & 5 Tags
November so far - 36 cards

I decided to cancel the subscription that provided linked thumbnails to what products I used on my cards. It was costing me out of pocket each month, so I’m back to listing what I used with a few affiliate links included.

Supplies:
5 x 7" card and envelope
Rectangle and Labels Crosshatch - Karen Burniston
Mini Alpha & Numbers - Karen Burniston
Numbers - Karen Burniston
Word Set 8 Celebrate - Karen Burniston
Word Set 12 Anniversary - Karen Burniston
Word Set 17 Congrats - Karen Burniston
Rectangle Crosshatch - Karen Burniston
Cheers - Karen Burniston
Corner rounder punch
Adirondack chair die - Colourful Seasons, Stampin' UP
Flat gem stickers - Dazzles
Patterned paper - Scenic View - Reminisce
Rainbow Holographic cardstock - Hunkydory
Forest Trees - Echo Park
Pop Up Gift Card Holder - Lynda Kanase, Sizzix (old)

Wednesday, 15 November 2023

Bee Anniversary Card


Months ago I purchased 'The Little Book of Bees' ... which is a thick booklet of bee printed panels along the same lines of 'The Little Book of Muddy Paws' which I use a lot for dog themed cards. The bee images are just SO cute, and this is the first card I made using it. I adhered the panel to brown cardstock, then created an infinity shaker with a transparency and sequins/filler from my stash. 


I cut the transparency to 5 x 7" and scored the outer edges so the matted panel would fit inside it. Then I mitred the corners of the transparency and adhered it to the back of the bee panel on three sides. I poured the filler inside then adhered that final side, and mounted the whole thing onto the card base. Oh, and I lightly stencilled the card front and envelope as well.


Here is a peek at the inside with a stamped greeting and some cute little bees.


Having been asked how many cards I make I thought it would be fun to keep track this year. Many of my posts include more than a single card or project and below is my tally. 

Card Tally for 2023
January - 53 cards
February - 56 cards
March - 55 cards
April - 32 cards
May - 43 cards
June - 34 cards
July - 56 cards
August - 106 cards
September - 61 cards
October - 51 cards & 5 Tags
November so far - 17 cards

I decided to cancel the subscription that provided linked thumbnails to what products I used on my cards. It was costing me out of pocket each month, so I’m back to listing what I used. 

Supplies:
Little Book of Bees - Hunkydory
Stickles
Transparency
Sequins - my stash
5 x 7" Card blank and envelope
The Inside Scoop Anniversary - Taylored Expressions
Catherine Pooler Inks
Stencil - Clear Scraps
Blending Brushes - Taylored Expressions
A7 Lacy Layers - Waffle Flower
Patterned Paper inside - K & Co
Bee Mine - Lawn Fawn

Tuesday, 2 May 2023

Slimline Anniversary Card


Welcome to Karen Burniston's May Designer Challenge, and this is the challenge she gave the Design Team :  "Theme: "BEJEWELED" - Incorporate shiny sparkly things into your card of any theme. This can be glitter, foil, mirrors, jewelry, gems, rhinestones, etc." While I didn't add any jewels, I did use several different mirrored card stocks and this card is VERY shiny! 🥰


I wanted to make an Anniversary card, and since I haven't used any of the Pivot Panel die sets in awhile I pulled out the Heart Pivot Panel and created an off-set Slimline card. I did this type of card back in January 2021, and have a YouTube video as well - you can find that HERE.


Below you can see all the dimension you get with the die set. I didn't use foam tape on any of the layering hearts, so this card folds flat and will mail for a single stamp.


I keep all but the tiniest pieces of these specialty foiled/mirrored cardstock, and those scraps were perfect to die cut all the hearts from! The 'love' is from the Pop 'n Swap die set and it was cut from black glossy card stock.


Even the champagne layer on the glasses, was cut from mirrored card stock! Snipping off the hanging holes from any of Karen Burniston's Charm die sets, allows you to create cute little embellishments. 


One more look ...


The rest of the Design Team is linked on the right side of my blog and I hope you will check out what they came up with for the challenge. Karen Burniston will have her post tomorrow (Wednesday) on her BLOG.

Having been asked how many cards I make I thought it would be fun to keep track this year. Many of my posts include more than a single card or project and below is my tally. 

Card Tally for 2023
January - 53 cards
February - 56 cards
March - 55 Cards
April - 32 Cards
May so far - 2 Cards

Additional Supplies:
White cardstock
8-1/2 x 3-1/2, 6 x 3-1/2 scored at .5
Rainbow Holographic cardstock - Recollections
Scraps of red & different pink mirrored cardstock
Inside Scoop Anniversary stamps - Taylored Expressions

This blog uses affiliate links whenever possible. This means, if you make a purchase through one of my affiliate links that you pay the same amount but I may receive a small commission from your purchase. I only link products that I own, love and use for my card making and not every link below is an affiliate one! 😊


Friday, 28 April 2023

Family Room Pop Up Anniversary Card


It's Fun Fold Friday here on my blog! Last week I shared a Family Room Pop Up birthday card, and since I had the dies out anyhow I decided to make another one. This time I made an Anniversary Card for my hubby. 😊 Once again, those stamps (linked below) are just perfect to use with this die set! I added a TV from the Memory Charms onto the card front with a rainbow holographic tv screen. That black heart was sitting on my stamping table, a fallaway piece from a dog card I'd made earlier so I added that as well as the Happy Anniversary.


Here is a peek at the inside ...


I used some older patterned paper from my stash (Basic Grey) and some of those mirrored hearts I love so much.


Such perfect sentiments for hubby's Anniversary card!


Even though there is a lot of dimension with this die set, it folds down completely flat for mailing! Not that I was mailing it to my hubby, ha ha.


Having been asked how many cards I make I thought it would be fun to keep track this year. Many of my posts include more than a single card or project and below is my tally. 

Card Tally for 2023
January - 53 cards
February - 56 cards
March - 55 Cards
April so far - 32 Cards

Additional Supplies:
Patterned paper - Ambrosia, Basic Grey (stash)
Rainbow Holographic cardstock - Recollections
Blue cardstock
White cardstock

This blog uses affiliate links whenever possible. This means, if you make a purchase through one of my affiliate links that you pay the same amount but I may receive a small commission from your purchase. I only link products that I own, love and use for my card making and not every link below is an affiliate one! 😊


Friday, 27 January 2023

Magic Iris Anniversary Card


As I've mentioned in other posts this month, I am going to start running several different series, and today's card is the first in the Series: Magic IrisIf you would like more information on those plans, you can find them  ****HERE****.  

For this card I chose to make a 5 x 7" Anniversary card using older papers and stamps from my stash. Below you can see what happens when you start to slide the lever downwards ... the 'shutters' open to reveal the sentiment! 

It took me a long time to finally purchase the Magic Iris (by Lawn Fawn) and I haven't used it nearly enough. Thus the series ... by the end of the year I hope to have shared twelve different cards using this die set!


Inside, I popped up the element with one of Sam Calcott's cardstock springs. I stumbled on them back in November, and have been using them a lot since. I will link her card video below, and you can scroll through to see how she makes these springs.


If you would like to see Sam Calcott's video on these paper springs, click HERE.

I have been asked how many cards I make but I didn't have a clear number. Since many of my posts include more than a single card or project, I thought it would be fun to keep track this year. 
2023 Tally: 50 cards

Additional Supplies:
White cardstock
Sentiment on front - Whimsical Words, Stampin' Up (long retired)

This blog uses affiliate links whenever possible. This means, if you make a purchase through one of my affiliate links that you pay the same amount but I may receive a small commission from your purchase. I only link products that I own, love and use for my card making and not every link below is an affiliate one! 😊