I love this little heart-flip die set (Studio Light), so pulled it out again to make an Anniversary card for friends.
Rather than use the included layering dies to add patterned paper to the card base, I die cut the card base from this sparkly metallic printed paper. I did cut the two side pieces from white card stock with the layering dies and added them on the back. That made the card a little sturdier - if you follow me you know I don't like 'wussy' cards.
The flip side of the heart has a gold foil mat ... the stamps I've had for many years and I was happy with how well they fit on this card. Finally, some gold foil flat gem stickers and my card was ready to pop in the envelope. Folded, the card measures about 4" so it fits in a standard A2 envelope.
Supplies used:
SL Heart Essentials - Studio Light
6x6" patterned paper - Metallic Shimmer, Stampin' Up
Inside Out Anniversary - Taylored Expressions
Metallic gem stickers - either Dazzles or Stamp On It
Happy April, friends! Today I'm sharing a flip style card using older papers & ephemera and a die set by Sam Calcott (Mixed Up Crafts). The die set actually cuts two flip frames and fits perfectly on a 7 x 5" card, but this one is an A2 sized card and a single one works great on this size of card.
I likely wouldn't have thought to alter the die cut frame to be a single, but in Sam's assembly video (linked below) she shared that it would work and I have done it a couple of times now. I love that it makes this die set more versatile.
The chipboard elements are ones I have had for several years, having ordered them by mistake. Well I ordered them by choice but didn't read the description carefully enough - I don't find that chipboard elements make a card very mailable so I tend not to use them. For these ones, I peeled off several layers from the back and that made them much flatter - thus mailable. This card will mail for a single stamp!
You can have the frame pull to the left or to the right, for this card I have it pulling to the right. I added the PULL on a scalloped circle die and below is what you see when you pull that frame.
Here is a peek at the inside where there is lots of room to write a personal message.
If you would like to see Sam's assembly video, click HERE.
Supplies used:
5x7" Flip Mechanism, Made to Surprise (Sam Calcott)
The last card I made with this heart flip die set was a Thanksgiving card (see that one HERE) so with Valentine's Day coming up I decided to bring it out again. Because those cute little bees are paper pieced and I wanted to pop them up with foam tape, I have a YouTube video showing my process.
Of course the card started with the patterned paper, which is an older one by Doodlebug.
The holographic cardstock for the bee wings give the card so much shine! ❤️
Supplies used:
SL Heart Essential die set - Studio Light
Patterned paper - Sweet Things - Doodlebug
Rainbow Holographic cardstock - Recollections
Honey Bees Paper Piecing - Honey Bee Stamps
Circle - Tasteful Label Dies, Stampin' Up
Happy Valentine's Day - Sending Love, Waffle Flower
Welcome to Fun Fold Friday here on my blog. A few months ago I was placing an order at Ecstasy Crafts (Ontario Canada) for some Glitter Dots and Peel Off border stickers. They also carry the Studio Light line and I ended up adding a couple of those fun fold die sets to my online cart. This is one of them - the SL Heart Essentials die set. This is also the November edition to my monthly series "New Fun Folds".
It folds 'backwards' to any of the Flip-It cards I have made before and is also smaller than A2. This one creates a 4" square card which fits nicely in an A2 envelope. While initially I wasn't sure how I felt about it, once I made the card up I was quite happy with it. I actually made a video walkthrough but it has since disappeared. So instead I have a video showing how the card looks from different angles.
I used some years old patterned paper and 3-d border stickers from my stash as well as some narrow gold tape for some shimmer. And those Glitter Dots as well!
The acorn is an older Stampin' Up punch and I love getting it out for my fall cards.
Having been asked how many cards I make I thought it would be fun to keep track this year. Many of my posts include more than a single card or project and below is my tally.
Card Tally for 2023 January - 53 cards February - 56 cards
March - 55 cards
April - 32 cards
May - 43 cards
June - 34 cards
July - 56 cards
August - 106 cards
September - 61 cards
October - 51 cards & 5 Tags
November so far - 7 cards
I decided to cancel the subscription that provided linked thumbnails to what products I used on my cards. It was costing me out of pocket each month, so I’m back to listing what I used .
Supplies:
Patterned paper - Amber Moon, Prima (old)
SL Heart Essentials - Studio Light
Narrow gold tape - Amazon
Catherine Pooler Inks
Blending Brushes - Taylored Expressions
Give Thanks - Give Thanks Sentiments, Catherine Pooler
Each week I've been sharing my alternate cards using the March 2020 Paper Pumpkin kit called No Matter The Weather. For these ones I made two nearly identical cards using the 5 x 7" Flip Mechanism by Sam Calcott. In her assembly video she mentioned being able to use the double flip as a single, and I just had to try it out. I still made larger cards - these ones are 5 x 6.5" because I wanted to use the umbrella patterned paper and it was in a 6 x 6" paper pad.
Folding the stitched circle pieces in half (from the kit) I stamped PULL on them and added them to the side you would pull to flip the rain boot piece over. I did one that pulls to the right and one that pulls to the left and I cannot decide which one I prefer. 😊
Inside the cards I stamped the rain boots and greenery, as well as a lovely Easter sentiment that I've had for a couple of years. I love the size of it!
... one more look ...
I'll be back next week with another alternate project with this kit.
If you would like to see Sam's assembly video, click HERE.
Having been asked how many cards I make I thought it would be fun to keep track this year. Many of my posts include more than a single card or project and below is my tally.
Card Tally for 2023
January - 53 cards February - 56 cards
March - 55 cards
April - 32 cards
May - 43 cards
June so far - 19 cards
Supplies: (NOTE our internet has been either intermittent or out completely, so I'm not able to add the linked thumbnails for this post. I am not even sure if it will even post - I've been trying since the 15th! 😳 Eventually it will get sorted out though)
No Matter The Weather Paper Pumpkin kit, March 2020 (Stampin' Up)
5 x 7 Flip Mechanism - Sam Calcott, Made to Surprise
Patterned paper - Blank Canvas, 1st Edition (old, from my stash)
White cardstock
Umbrella patterned paper, 6 x 6" Spring - Echo Park
Pull stamp - Paper Pumpkin Feb 17, Many Happy Birthdays (Stampin' Up)
Spring Sentiments - Elizabeth Craft Designs
5 x 6.5" Card blank and envelope - Michaels
Alcohol markers
Slimline ATC Windows Die - Whimsy Stamps
Catherine Pooler inks: Date Night, Do Si Do, In the Park, Aquatini
Today I'm sharing the Flip Card I made for our middle daughter for Mother's Day ❤️
Once again I used this beautiful patterned paper. I had purchased it specifically for our May Birthdays and Mother's Day and I have made good use out of it! I am also really enjoying the 5 x 7" Fabulous Flip die set by Sam Calcott, especially on cards that I will hand deliver. That way I'm free to add as many layers as I want without worrying about extra postage.
In her tutorial (linked below) she suggests cutting the frame a second time (which adds to the weight) and I used a heavy weight card base as well. The Flip pieces also have a couple of layers on them. I was really happy with the card (and our daughter liked it too) so I'm just giving you the heads up about adding layers and additional postage.
My friend Frances had has this die set for awhile, and she made a card with an accordion strip along the inside bottom edge to help the card stand nicely for display. I tried it out and it worked like a charm!
Below you can see the sentiments that are revealed when you pull the frame to the right, but you also have the option of having it pull to the left when you are assembling your card.
Since this card doesn't open like a traditional card, I added a decorated panel to the back where we wrote our personal message. The Happy Mother's Day is by Karen Burniston, and I love the shadow cut from that holographic cardstock. ❤️
If you would like to see Sam's assembly video, click HERE.
I'm not sure what measurements Frances used for her card, but I took a 7 x 3" strip of white card stock, and scored it down the 3" side at .5, 1.5 and 2.5" to create the accordion folded strip. If you are making a different sized card, you would change your measurements for that size ... this one is a 5 x 7" card.
Having been asked how many cards I make I thought it would be fun to keep track this year. Many of my posts include more than a single card or project and below is my tally.
Card Tally for 2023 January - 53 cards February - 56 cards
March - 55 Cards
April - 32 Cards
May so far - 29 Cards
Additional Supplies:
5 x 7" Fabulous Flip die set, Sam Calcott (Made to Surprise)
White cardstock
5 x 7" Card blank and envelope
Pink cardstock
Rainbow Holographic Cardstock - Recollections
Pull stamp - from an old Stampin' Up set
Sequins - the Cat's Pajamas
This blog uses affiliate links whenever possible. This means, if you make a purchase through one of my affiliate links that you pay the same amount but I may receive a small commission from your purchase. I only link products that I own, love and use for my card making and not every link below is an affiliate one! 😊
This is my first play with a new to me die set, and it's also the 4th edition to my monthly series New Fun Folds! I received some fun dies for my birthday - this one is the 5 x 7" Flip Mechanism by Sam Calcott at Mixed Up Crafts. We were in Arizona at the time, so I was able to order from CraftStash US which worked out well. I didn't purchase any craft supplies during the November Black Friday sales or at Christmas, so I was pretty happy to get some new goodies for my late February Birthday!
When you pull the frame panel to the right, a trio of sentiments is revealed. I kept things simple for this first card, but I am really looking forward to playing with this set a lot more. I have so many ideas! I used some Mirri cardstock from Hunky Dory, so the frame panel is bright and shiny. Then I cut some of Karen Burniston's Big Birthday Charms from leftover pieces of the mirrored cardstock and loved how they turned out,.
Inside is a stitched frame, a stamped sentiment and a balloon from the same charm set.
One more look ... The card stands nicely for display but it is a little front-heavy. My KB teammate Frances has had this die set for awhile and she made one with an accordion fold inside the card so it stands up more like a tent. I think I will try that idea next!
If you would like to see Sam's assembly video, click HERE.
Having been asked how many cards I make I thought it would be fun to keep track this year. Many of my posts include more than a single card or project and below is my tally.
Card Tally for 2023 January - 53 cards February - 56 cards
March - 55 Cards
April so far - 11 Cards
Additional Supplies:
Patterned paper - Mirri Card - Time to Celebrate, Hunky Dory
5x7” Flip Mechanism - Made to Surprise (Sam Calcott)
5 x 7” Card and Envelope
Wish Big, Taylored Expressions
Single Gem - leftover from Stampin' Up
Pull Stamp, Many Happy Birthdays (Stampin' Up Paper Pumpkin Kit)
This blog uses affiliate links whenever possible. This means, if you make a purchase through one of my affiliate links that you pay the same amount but I may receive a small commission from your purchase. I only link products that I own, love and use for my card making and not every link below is an affiliate one! 😊
Hello my crafty friends! I'm excited to a part of this Inspiration Hop put on by Scrap'n Stamp, celebrating a new line - Tracey Hey - available in the shop. I created two projects for the Hop, a Fold Flap Slimline and a Shutter Card and I have all the details on YouTube:
First up is the Fold Flap Slimline - I went over all the measurements in the video - and this adorable Be A Warrior stamp set.
The Lion was stamped on Bristol Smooth cardstock, and I did the colouring with Zig Clean Color markers and a water brush. The eyes and nose are shiny because of a black glaze pen and there are white gel pen highlights. After fussy cutting the lion out, I added it to a stencilled oval then to the card front along with a stamped sentiment strip. It's hard to see in the photos but the lion also got a spritz with shimmer spray.
Here is a peek at the inside - were I used the remaining sentiments on the stamp set onto an inked oval.
My second card uses the Lawn Fawn Shutter Card and Shutter Card Add On set - also available at Scrap'n Stamp. I am loving this die set - and for today's card I didn't use any patterned paper (gasp!) but instead went with mirror card stock for lots of shimmer and shine.
You slide off the belly band, which is decorated with the seahorse from the Sea You Later stamp set. The sequins were added to resemble bubbles.
Below is what the card looks like in the open position, with two more images from the stamp set and the sentiment is revealed as the shutters pull back. These images were coloured the same as the lion, on Bristol Smooth cardstock with Zig Clean Color Markers and a Water Brush. I added some Wink of Stella too.
Since there wasn't room to add a signing block on the inside, I added a decorative panel on the back with more images from the Seas The Day stamp set and some ink blending.
Here is the list for the Inspiration Hop! Hop along, be inspired and have fun! There is also a chance to win a Tracey Hey stamp set at each stop along the hop. Make sure to leave us some way to get in touch with you if your name is chosen from the comments!
This blog uses affiliate links whenever possible. This means, that at no cost to you, if you make a purchase through one of my affiliate links that I may receive a small commission from your purchase. I only link products that I own, love and use for my card making!
Any supplies I'm unable to link are listed at the very bottom of my post.
Additional Supplies: Shimmer Spray Apple Green Card Stock
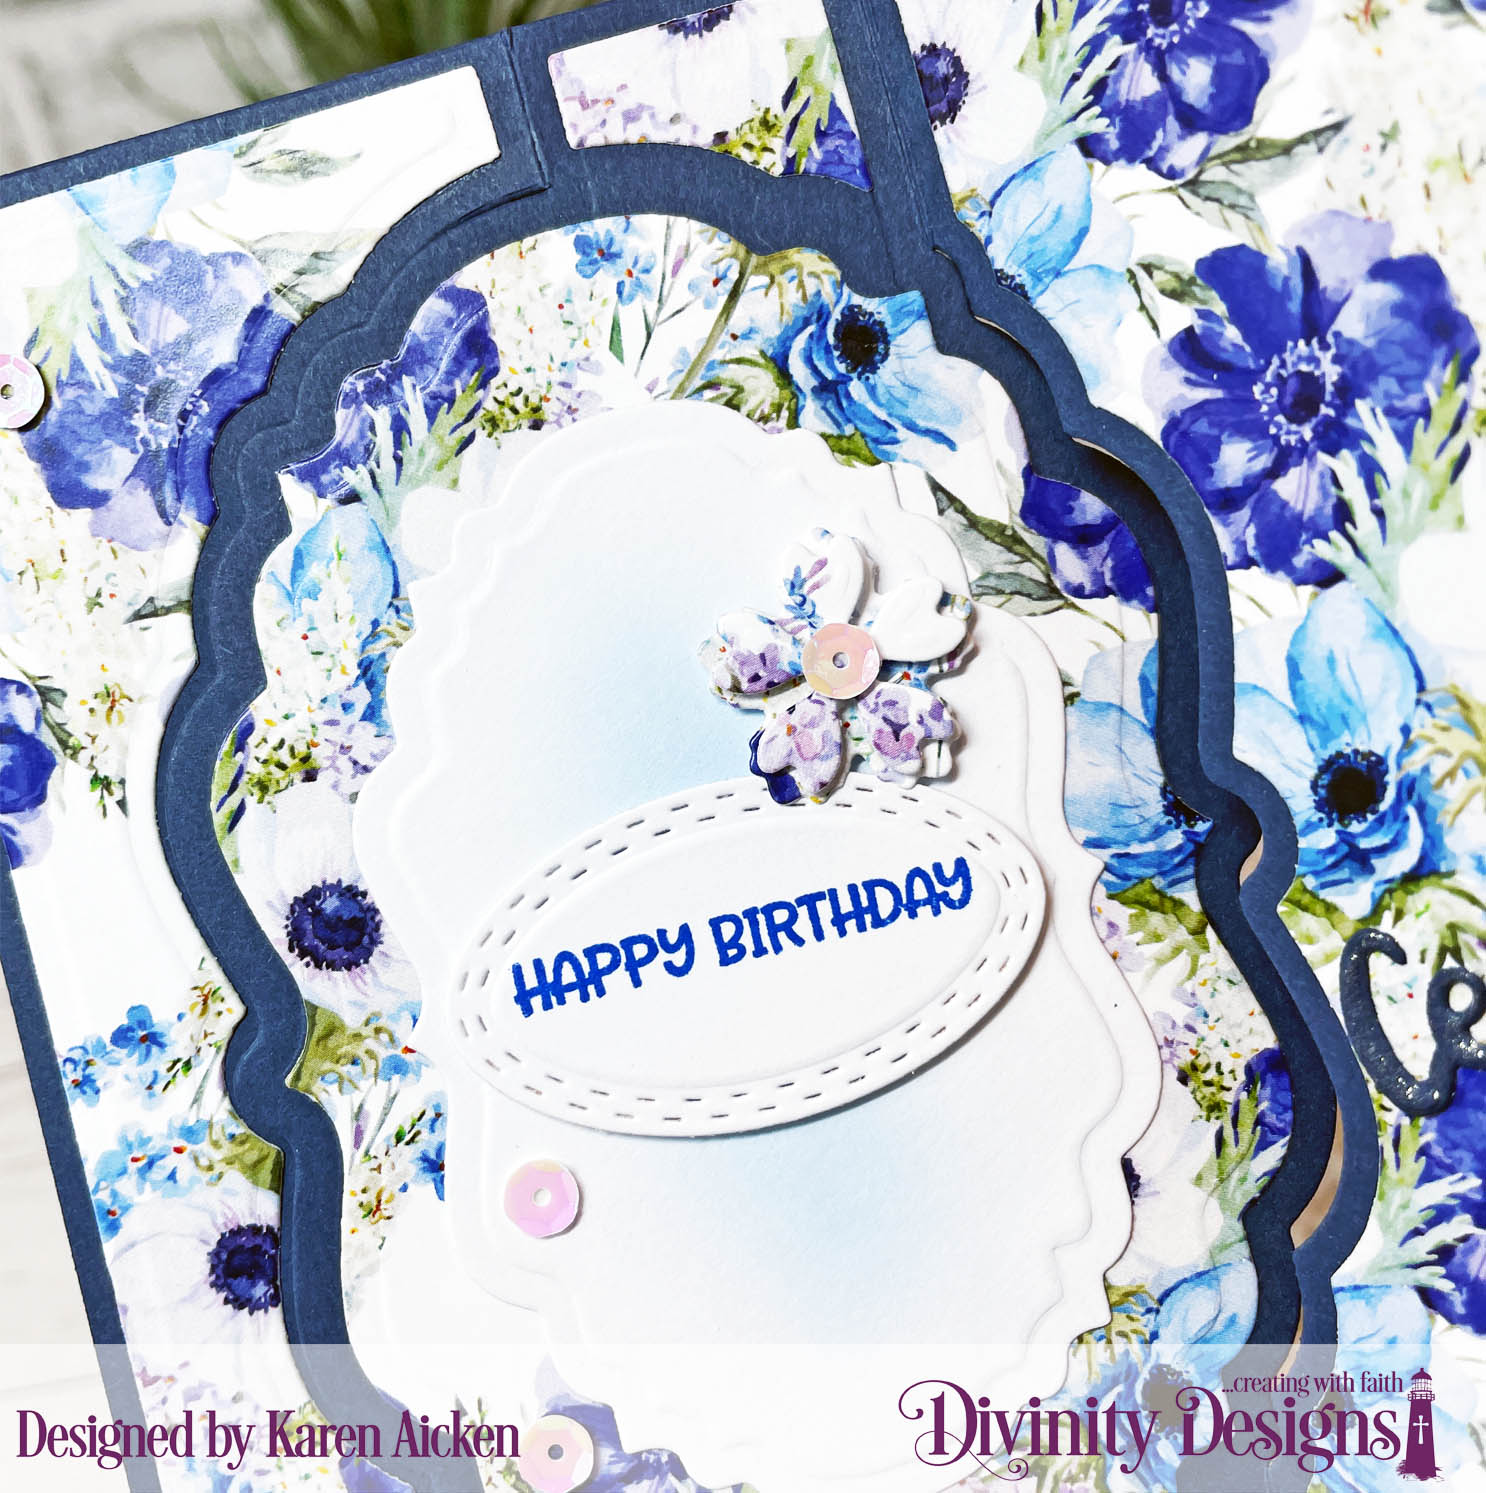
Hello! Today I'm sharing two cards with the June release at Divinity Designs.
Here is the first card, and I went with a vintage feel with copper metallic accents. The sentiment is from the new Scripture Collection 14 added to the Oval Stitched Rows. Also in the new release are two Flower Layering Combo's and this first card uses the Flower Layering Combo 2 along with the new Fancy Flourish Die. The patterned paper is from the Rustic Beauty Collection and I used the A2 Portrait Card Base with Layer as well. Everything is linked below!
The photo below gives you a better idea of the pretty layers in the Flower Layering combo and the shine from the copper foil.
Here is a peek at the inside, where I also used the Double Stitched Rectangles and added another sentiment from the Scripture Collection 14. I also added the little sprig from Bitty Blossoms.
This second card uses the Vintage Label Flip Fold With Layers die set, the new Three Strands stamps, the Butterfly Trio and the Flowering Layering Combo 1 dies.
See all the layers on this pretty Flower Layering Combo 1? So many possibilities with different colours, using fewer or more layers, cutting from patterned papers etc.
Below is the card opened, with one of the sentiments from the Three Strands set on a Double Stitched Circle and Scallop Circle. I really like the butterflies from the Butterfly Trio, so added two of them here and you can see that I added some light shading in and around the white heat embossed rope strand image.
For your convenience I have linked many of the products used below. Some may be affiliate links which means if you use these links to purchase I may earn a small commission at NO extra cost to you.
Hello! I'm on the Divinity Designs Blog today, with these two Fun Fold Cards. I have a walkthrough on YouTube as well if you are interested in more details or want to see the cards in action:
This first card uses the Vintage Label Flip Fold with Layers and beautiful paper from the Floral Favorites Paper Pad. The adorable bear is from the new Hog Wild Stamp/Die Duo and I added a couple of flowers from the Bitty Blossoms too.
Here is the card partially open ...
There is room to sign below the sentiment, which comes included in the Hog Wild Stamp/Die Duo set. The Celebrate comes in the Celebration Word dies and after adhering it I went over the letters with a Wink of Stella for additional shimmer.
Next up is the Z Fold Card along with the new Happy Mail Stamp/Die Duo set and the same patterned paper as above.
Below is the card open ...
This is the back view, with a sentiment stamp from the My World stamp set and lots of room to write a message. The pierced strips use the smallest dies from the Slimline Pierced Rectangles and Slimline Pierced Layering Rectangle die sets.
The list below contains some affiliate links. If you use these links to purchase I may earn a small commission at NO extra cost to you.
Additional Supplies: Ohuhu markers 12 x 12" card stock - stash Card sizes: Vintage Label Flip Fold Card is 4.25 x 5.5" Z Fold Card is 4 x 5.5"