Showing posts with label CAS Card. Show all posts

Friday, 4 March 2022

Scrap'N Stamp Birthday Bash Inspiration Hop

Hello my crafty friends! I'm excited to say that I am joining the Scrap'N Stamp Whimsy Inspiration Hop this month and the theme is Birthday Inspiration. Scrap'N Stamp is celebrating 14 years and they are celebrating with a Weekend Sale: Save 14% on select birthday items (Offer valid 03/04/2022 - 03/07/2022)

I made two cards for the hop and have all the details in my YouTube video:   

This first card is a great layout to make multiples of AND use up scraps of patterned paper. I combined both the Birthday Cupcakes and the Birthday Banner sets for this 'Clean and Simple" card. There is a surprise though - the cupcake is actually peeking through a circle opening! 


The cupcake was adhered inside the card, and I stamped a greeting that is hidden until you open the card.

After colouring with Zig Clean Color Markers, I went over the top of the cupcake with glossy accents and set it aside to dry overnight.

Cutting an aperture in the front of your card is an easy way to elevate a simple card.


For my second card, I used the Birthday Wishing stamp set from Colorado Stamp Company.

This one is a Z Fold card that is also a Trifold and it also has a surprise inside ...


... it's a Gift Card Holder!

I used the Diagonal Gift Card pocket die set for the pocket, taking advantage of the layering piece to stamp another one of those adorable critters. The banners are from Hampton Art's Birthday Banners - they make great sentiment and signing blocks too.


There is also a sale


All the fun starts on the Scrap'N Stamp Blog:

Wednesday, 11 August 2021

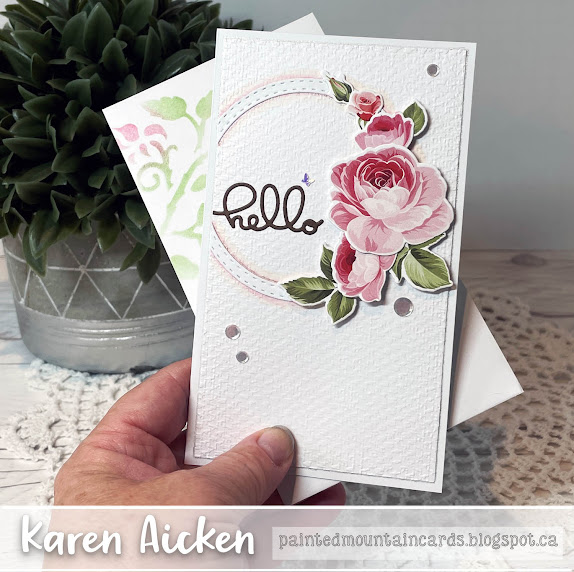
Clean and Simple Mini Slimline with Roses


Hello! I don't often make a CAS card but this was one of the ideas I'd had when I first opened the April '21 Blessings Box from Divinity Designs. I have already made a dozen cards with these beautiful florals, so thought it was time that I got this idea out of my head. 

I used one of the Beautiful Blossoms Paper/Die duo's from the Blessings Box - I love that the colouring is already done and you just have to die cut and use! The 'ring' was created by die cutting two of the Double Stitched Circles and the sweet hello is one of the decorator dies included in Karen Burniston's Waterfall Die Set. I added everything to an embossed background and then some lovely sequins for sparkle. I have a linked supply list for the available products I used on my card at the end of my post.

Studio Katia no longer has those beautiful iridescent butterflies, so I fought the urge to hoard mine and added one above the hello. Oh, I hope they get more in!


Here is a peek at the inside, with a stitched panel for lots of room to write a note and more of the printed florals. I pulled out a VERY old stencil and added a rose to the front of my envelope with blending sponges. 


... one more look ...


This blog uses affiliate links whenever possible. This means, that at no cost to you, if you make a purchase through one of my affiliate links that I receive a small commission from your purchase. I only link products that I own, love and use for my card making!

Additional Supplies:
Tasteful Textile 3D Embossing Folder - Stampin' Up
Brown Card Stock
Blue Laser Stencil
Copic Marker
Iridescent Butterfly - Studio Katia (unavailable 😩)

Thanks for stopping by

Thursday, 13 May 2021

Mini Slimline Sunburst Card Duo


Hello!  The Fun Friday Challenge #164 is SCRAPS. I don't know about you, but I have LOTS of scraps of card stock and patterned paper in my craft room so this was a fun challenge for sure. I
 used the SCRAPworks Mini Sunburst die set, cutting it from SCRAPS of card stock & patterned paper. The images were stamped on SCRAPS of white card stock.  :-)  

The Scrapworks Mini Sunburst die set is very versatile, and I cut the sunburst portion three times from scrap blue card stock, once from scrap green card stock and twice from scraps of green patterned paper. That gave me all the pieces I needed to create a full sunburst but instead I made it into two halves and created twoMini Slimline  Birthday Cards.


I used two different embossing folders to add texture to these 'Clean and Simple' cards, and a few Gumdrops as well. All the Your Next Stamp supplies I used are linked below. Both cards will be donated to my Mom's old nursing home.


Our challenges always come with 2 ways to win:

#1 – Would you like the chance to win a YNS stamp set? Leave a comment on the Your Next Stamp Blog by May 19, 2021 at midnight est to be entered in the random drawing. Want more entries in the drawing? Leave comments on YNS’ IG and FB pages too!

#2 – Would you like the chance to win a YNS store e-gift card? Play along with the challenge! Link up your creation at the bottom of this post by May 27, 2021 at midnight est to be entered in the random drawing to win a $15.00 YNS gift certificate. If your creation contains YNS products and you are the random winner then you receive an extra $5.00.


This list contains some affiliate links. If you use these links to buy something I may earn a small commission at NO extra cost to you.  


Additional Supplies:
Copics
Tasteful Textile Embossing Folder - Stampin' Up
Subtle Dynamic Embossing Folder - Stampin' Up

Thanks for stopping by

Sunday, 29 March 2020

Four Washi Tape Birthday Cards

Hello crafty friends ...

Here are a few more photos I found in the file ... cards that didn't get shared here for some reason. I remember making these and being just tickled with how bright and cheery they turned out!


I pulled out some Washi Tape and added it to die cut panels wrapping the edges around to the back side. That way I could secure the panel to the card base and not worry about any of the tape lifting up at the edges.


The Stampin' Up images were coloured with Copic markers, die cut with a stitched circle die, matted and popped up over the washi tape area with foam tape.


Here is a peek at the inside, using the same stamp set as the cake on the front.


Definitely going to have to remember this layout and use it again soon. It would also work great using strips of patterned paper and I know I have LOTS of scraps that would work.

Thanks for stopping by today

Saturday, 28 December 2019

Monochromatic Moose Birthday Cards

Hello my crafty friends!

A few months ago, I ordered what was called an 'A2 sized' card set. There were brightly coloured panels/post cards and coordinating envelopes. I thought they would be great for the cards I donate to my Mom's nursing home so ordered them. Well they are actually smaller than A2, so I was very disappointed.

But after some thought I decided not to return them. One, the price point was really good. Two, they are only 1/4" smaller than standard A2 ... so the envelopes hold a card that is 5.25 x 4". That is still easy enough to use and not too small to give the seniors. I  did know that the panels were not folded cards, and I had planned on using them as matting layers which I can still do. Especially when I realized that they are proportionate to A2 cards so my rectangle dies will still work perfectly. So, wanting a quick break from the frenzy of gift wrapping, tidying up for company etc before Christmas I ducked into the craft room and made these three cards.


They are sweet and simple - I don't often do CAS cards but that is what appealed to me when I was making them. I die cut the coloured panels with a stitched rectangle die, then punched a moose out of the lower right corner of each panel. I actually really liked the cards with the white card base showing through the moose opening but in the end I decided to add the moose pieces back into the openings with foam tape for some dimension.

I stamped the greeting and sentiment inside in coordinating colours, and die cut the greeting with a stitched fishtail banner. That was also popped up with foam tape. I tried a twine bow on the moose to dress up the card a little, but didn't like it. I added some small circles to see if Nuvo or Gum Drops would look good - they didn't. So in the end I decided to just go with the clean and simple look. The matching envelopes help elevate the cards a little.


The sentiment inside all three are the same, just stamped in coordinating colours.


Looking at these photos, if I were to make this design again I would move the greeting on the banner all the way to the right, then tie some coordinating coloured bakers twine around the left end. At least, I would have a look at doing that - no way I'm peeling up the banners on these three as they are stuck down good. Ha.

Supplies:
Card panels and matching envelopes - American Crafts
White card stock
Moose punch - Stampin' Up
Fishtail banner - MFT Stamps
Happy Birthday To You stamp - Cool Tag Sentiments, Your Next Stamp
Stitched rectangle die - Your Next Stamp
Inside greeting stamp - In and Out Birthday, Taylored Expressions
MISTI - My Sweet Petunia

Card size - 5.25 x 4"


Thanks for stopping by today

Saturday, 16 November 2019

Rainbow Penguins

Hello my crafty friends

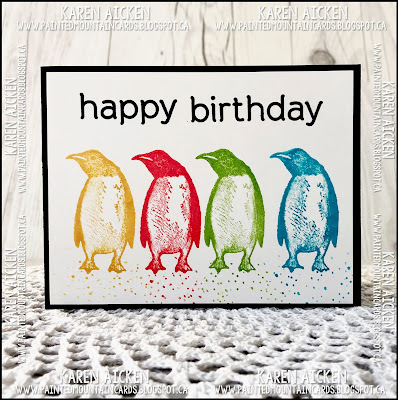
I'm playing with the Playful Penguin stamps again, which are in the Stampin' Up Holiday catalogue. I still haven't made a Christmas or Winter card with them, which I think is funny. But when I saw the stamps I knew I could use them all year long so that is why I purchased them. When the stamps arrived this is one of the first ideas that I had, so jotted it down in my notebook. 

As you can see, I ended up making four identical cards to donate to my Mom's old nursing home. I will put two in the bag for December, and save the other two for next year as I don't like to send more than two of a single design in a single month so the residents feel special when they get their cards. These would also work for the men at the nursing home.


There is just something about rainbow colours that just makes me HAPPY! Note, I used a matte glossy card stock, so I had to be very careful about smudging as dye inks take a long time to dry on coated papers. I very carefully stamped the penguins then left the panels to dry overnight. They wouldn't have needed that long but I was done for the evening anyways.
The next morning I stamped the words above the penguins and left them to dry while I ran errands. Then I was able to complete the cards without any smudging at all.


Inside I used the MISTI stamp positioning tool to ink up the greeting in the same colours as I used on the card front. While they look rather blotchy in the photos, the colours blend much smoother in real life.


Even without allowing for the drying time though, these Clean and Simple (CAS)  cards took me about as long as pop ups do. 

Supplies:
Matte Gloss card stock
Catherine Pooler and Stampin' Up Inks
Playful Penguins - Stampin' Up
Dot stamp - Stamps by Judith
Black and white card stocks
Fun foam
MISTI - My Sweet Petunia
Happy Birthday - Birthday Builder, Altenew
Inside stamp - Ombre Sentiments Birthday, Papertrey Ink

Card size - standard A2, 4.25 x 5.5" 

Thanks for stopping by today

Thursday, 14 November 2019

Valentine Circle Charm Card

Hello my crafty friends

Today I'm sharing another Sneak Peek of Karen Burniston's new release - this card features the new Happy Valentine's Day and the new Love Charms. It's a CAS (Clean and Simple) card, which is rare for me - but it is still interactive. I chose the Circle Charm Pop Up for my card base.


Below is a short YouTube video showing the card in action ...


I added some small adhesive gems for a little sparkle, and used bright and fun prints on the elements.


Since I have been using Kraft card stocks so much these past months, I purchased a package of  110#, which is what I used for this card base. It's nice and sturdy and just feels good in your hands. A good quality card stock is a must when making a CAS card.


We will sign our names with a white gel pen - I didn't want to add a signing block and change the fresh and clean look of the card. Below is a view from the top - people always turn over these cards to look at them from the top so that is why I'm including that view for you. 


Karen Burniston's new release includes a few Valentine themed dies since doing one in January or February doesn't leave enough time for you to make your Valentine projects.

Supplies:

Kraft, Pink and white card stocks
1046 Circle Charm Pop Up - Karen Burniston
Circle dies - Hero Arts
Patterned Paper - Playful Patterns Valentine's, Taylored Expressions
1114 Happy Valentine's Day - Karen Burniston
1083 Word Set 9 Love - Karen Burniston
1113 Love Charms - Karen Burniston
Sakura white gel pen
Bling - Q & Company

Card size - 4.25 x 6", fits in an A6 envelope


Thanks for stopping by today

Thursday, 26 September 2019

'Eat Cake' Birthday Card

Hello my crafty friends

Today I'm playing along with Your Next Stamps Fun Friday Challenge #123, with the theme "Just for Fun - what do you find fun?" You can find all the details for the challenge HERE.

I'm generally a happy person and find a LOT of things fun. So narrowing it down to my papercrafting, I have fun making Birthday Cards and donating them to my Mom's old nursing home. Your Next Stamp is celebrating a 10 year anniversary and their new release is chock full of FUN images for birthdays.  I've used a couple of them on my card today. How cute is that dog, wearing a party hat and carrying a sweet layered cake?


I can think of some FUN ways to use the new Circle Burst die!. I die cut it from the stitched panel, then backed each of the rows with narrow scraps of bright card stock.  When I placed the word bubble and dog image where I wanted them, I realized I liked the card how it was, and chose to leave it as a CAS (Clean and Simple) card which is rare for me.

The dogs eyes and nose are glossy and shiny.  The cake icing is done with Nuvo drops so it's raised and sparkly and I added a sparkle gel pen to the candle flames.


Here is a peek at the inside, where I used two of the three different sizes of Circle Burst images (also in the new release). Yup - I definitely had FUN making this card!


Supplies:
Stitched Rectangle die set - Your Next Stamp
Black Olive ink - Your Next Stamp
Silly Fun Birthday (stamps and coordinating dies) - Your Next Stamp
Circle Burst (stamps and coordinating die) - Your Next Stamp
Kraft, orange, green, teal and yellow card stocks
Bristol Smooth card stock
Zig clean color markers
Water brush
Sakura black glaze, white gel and sparkle pens
Prismacolor pencil crayons
Nuvo glitter drops

Card size - standard A2 (4.25 x 5.5")

Thanks for stopping by today

Friday, 26 April 2019

Four Panel Monster Pop-Up Card

Hello my crafty friends

It's Fun Fold Friday here on my blog and I have a fun card to share today. I have had this idea in my head for awhile, and since the Fun Friday Challenge #112 at Your Next Stamp is 'Clean and Simple', I thought I'd finally get it made and enter it in the challenge. Below is the card front:


I am liking black card bases more and more these days so that is what I used for my card today.  The Silly Trash Monsters are such fun stamps. I bought them back when they were released at Your Next Stamp, because having 3 grandsons I figured they would get a good work-out on birthday cards. Especially as they get older and don't like 'cutesie' anymore. Your Next Stamp has several popular monster stamp sets that I also have my eye on.

The Trash Can was die cut from black card stock, then I fussy cut a small scrap of glossy black card stock to glue behind it. The glossy black shows through the cut-away strips on the can and give the card a little interest. Black glossy card stock is also something I am using a lot these days.


 This '4 Panel Pop-Up' is one I have done a couple of times before. It makes a quick and easy pop-up that is fun for all ages. I die cut the YNS scalloped border four times, once from each colour of card stock. Then I adhered the borders inside the card. After adhering the four panel pop-up strip, I added a monster to each of four matted & coloured circles. Two of the monsters were added to the centre of the pop-up strip and the other two were adhered right to the card base over the strip ends. I staggered their height for a fun look.


The monsters were fun to colour with Chameleon Color Tone markers. I used the markers and also Color Tops to get the blends between blue and green.  I simply added a green Color Top to the blue Color Tone marker for about 5 seconds then coloured. Instant blend! Same for the orange and yellow color blend.


I white embossed the greeting on a black stitched fishtail banner and adhered that below the four panel pop-up strip.


I think this will make a fun Birthday card for the grandkids to take to a birthday party.

Supplies:
Fancy Double Scalloped Edge border die - Your Next Stamp
Stitched Fishtail Banner dies - Your Next Stamp
Stitched Rectangle Dies - Your Next Stamp
Tropical Paradise Gumdrops - Your Next Stamp
Silly Trash Monster stamps - Your Next Stamp 
Trash Can die set - Your Next Stamp
Black, yellow, orange, green, blue and white card stock
Circle dies - Hero Arts
Chameleon Color Tones and Colour Top markers
Sakura white gel pen
White embossing powder
Black glossy card stock - recycled scrap
Sakura black glaze pen

Thanks for stopping by today

Thursday, 18 April 2019

Your Next Stamp 'Fun Friday Challenge #112'

Hello my crafty friends

Today I'm playing along with the Fun Friday Challenge #112 at Your Next Stamp.  The challenge runs through midnight EST May 2nd and a lucky commenter will win a gift certificate to the Your Next Stamp store! You can also comment to win a free stamp set on the Your Next Stamp Blog, Instagram and Facebook - but those comments need to be left by April 24th with the winner being announced on April 26th. Two chances to win!! Check out the Your Next Stamp Blog for all the details.

The challenge is 'Clean and Simple' - which for me is quite the challenge. I knew I wanted to pair the new Photo Booth Thumbs Up stamps with the Photo Booth Polaroid Frame, so this is what I came up with.


OMGosh, aren't those critters just too much fun? They were stamped with YNS Black Olive Ink, die cut with the coordinating die then coloured with Chameleon markers. The eyes and nose are shiny because of a black glaze pen. I die cut the smallest Stitched Fishtail Banner three times from bright card stock and layered everything towards the top of my white card base.


A few coordinating Gumdrops were added to the bottom right corner.


I like to decorate the inside of my cards as well, so white embossed the words 'LAUGH' and 'BE SILLY' from the Photo Booth stamp set on a green Stitched Wavy Circle die cut. I stamped 'It's Your Birthday' on the smallest Stitched Fishtail Banner and popped it up with foam tape.

I save every little piece of this pretty striped patterned paper and a little snippet was sitting on my stamping table from a different project. So I added it on the right edge of the Stitched Fishtail Banner for an additional pop of colour.


I hope you will stop by the Your Next Stamp Blog and leave a comment so you have a chance to win, and also play along with the Fun Friday #112 Clean And Simple Challenge for another chance to win!

Supplies:
White, orange, green, and teal card stocks
Photo Booth Thumbs Up stamp and die set - Your Next Stamp
Black Olive ink - Your Next Stamp
Stitched Fishtail Banner dies - Your Next Stamp
Photo Booth Polaroid die - Your Next Stamp
Tropical Paradise Gumdrops - Your Next Stamp
Stitched Wavy Circle dies - Your Next Stamp
Photo Booth stamps for inside words  - Your Next Stamp
Chameleon Colortone markers
Sakura black glaze pen
Sakura white gel pen
Fun foam
Spectrum Noir Glitter pen
White embossing powder
Scrap of patterned paper - Doodlebug Designs

Thanks for stopping by today

Monday, 7 January 2019

Eight Bright Balloon Birthday Cards

Hello my crafty friends

I make a lot of Birthday Cards. I'm donating at least 25 Birthday cards each month to my Mom's nursing home, and I make the Birthday Cards that our grandkids take to birthday parties. I also love balloons. Funny, I tell my family I love balloons on a regular basis and they have yet to pick up on that fact and bring me balloons. Ha. Anyhow, I resisted this MFT Blueprints #26 die set for long enough and finally added it to my craft room in November. These are the first cards I made with it:


It's a basic design that is perfect for making multiple cards and I love the bright cheerful colours in the patterned paper. For the nursing home donations I work on 4 months at a time. So I will put two of these cards into each bag. That way there aren't a whole bunch of the same card being opened at the same time by the residents. These cards are handed out at the monthly Birthday Party in the atrium at the nursing home.


Note to self  - use double sided adhesive on the thin white pieces. I didn't, and it was a little fiddly glueing down the thin bows and balloon strings. Impressive at how well they cut with the dies though!


The nice big 'Celebrate' is a die by Karen Burniston ... it was perfect to use with the balloons. The insides were stamped onto a rounded stitched rectangle die and I added a fishtail banner to each one as well. The MISTI makes the stamping a breeze and I especially love it for stamping multiples like this.


I will have fun with this Blueprints set working on Birthday cards and I'm so glad to have it now! Because you know, I love balloons!

Supplies:
Blueprints #26 - MFT Stamps
Patterned paper - Tailored Expressions
1067 Celebrate - Karen Burniston
White sharpie marker
Double Stitched Rounded Rectangles - Divinity Designs (formerly Our Daily Bread Designs)
MISTI - My Sweet Petunia
Words inside - Picture Perfect Birthday, Stampin' Up

Thanks for stopping by today