Showing posts with label Owls. Show all posts

Friday, 24 January 2025

Four Rainbow Birthday Cards


This is a cutting layout I came up with, to use two 12x12" patterned papers for four 5x7" cards.  Since I continue using what I already have in my craft room, this will be a great way to go through my huge stack of patterned papers!

I added a quick wash of colour on die cut banners, so the puffy owl stickers would be 'grounded', and stamped the sentiment along the top edge of the banner. The banners were popped up with foam tape for some dimension. Oh, and the patterned paper has random glittered areas so that's always fun for a birthday card.


Inside, I added two separate stamps in different colours, and a little fishtail banner to bring in some colour to the inside.


Supplies used:
Patterned paper - Over the Rainbow, Recollections (old, from my stash)
5x7" card bases & envelopes
Banners Crosshatch - Karen Burniston
Happy Birthday To You stamp - Cool Tag Banner Sentiments, Your Next Stamp
Puffy Owl stickers - The Paper Studio (old, from my stash)
Water brush
Happy Birthday Sentiments (for the inside) - Pink Fresh Studios

Monday, 8 January 2024

Scenic Birthday Pop Up Card with Owls


Welcome to Masculine Card Monday here on my blog!

Today I'm sharing the birthday card I made for my brother's birthday. Once again I pulled out the Winter Owl bundle (Stampin' Up) and some scenic patterned paper (Paper Rose). The owl was cut from white pearl card stock and popped up with foam tape.


The owl was die cut from white pearl cardstock for some slight shimmer and I added narrow gold tape along the left side.


Inside I used Karen Burniston's Twist Flower Pop Up for that circle that raises up when you open the card. I wanted to carry the feeling of the scene from the front patterned paper, so did that with a cloud mask/stencil, torn paper strips and a blending sponge. The tree trunk and tree branch dies were included in the Winter Owl bundle. The stamp (Catherine Pooler) is one I have been using a lot for my nursing home donation cards as well.


One more look ...


Supplies used:
Patterned paper - Water Color Landscapes 1.0, Paper Rose
Winter Owls bundle - Stampin' Up
White pearl cardstock
Inside Out Sympathy - Catherine Pooler
Succulent sentiments - Ellen Hutson
Momento black ink
Circle stickers - Dazzles
Narrow gold tape
Cloud mask - MFT Stamps
Blending brushes - Taylored Expressions
Twist Flower Pop Up - Karen Burniston
Everybody Say Happy Sentiments - Catherine Pooler
Wink of Stella
5 x 7" card base and envelope

Friday, 29 December 2023

Winter Owl Birthday Card

Welcome to Fun Fold Friday here on my blog!

This is the card I made for hubby's December birthday and I used my favourite scene in the paper pad for it. I bought this paper (linked below)  back in October and love that it can be used all winter long rather than just at Christmas. The 5x7" card was also perfect to feature this beautiful Winter Owl die. It was cut from white pearl cardstock and then the edges inked with a blending sponge for definition.

I stamped the sentiment with dye ink, but set it aside to dry for an hour or so since the paper has a glossy sheen to it. I could have clear embossed the sentiment as well, which I will have to do more of in the future.


Inside I used Karen Burniston's Twist Flower Pop Up with a stamped sentiment. I am just loving this die set and am getting a lot of use out of it. I also stamped a curved sentiment below the pop up label. 


One more look ...


Having been asked how many cards I make I thought it would be fun to keep track this year. Many of my posts include more than a single card or project and below is my tally. 

Card Tally for 2023
January - 53 cards
February - 56 cards
March - 55 cards
April - 32 cards
May - 43 cards
June - 34 cards
July - 56 cards
August - 106 cards
September - 61 cards
October - 51 cards & 5 Tags
November - 46 cards
December - 25 cards (& 16 simple tags)

I decided to cancel the subscription that provided linked thumbnails to what products I used on my cards. It was costing me out of pocket each month, so I’m back to listing what I used with a few affiliate links included.

Supplies:
Solids - Frosted Christmas, Hunkydory
Winter Owls bundle - Stampin' Up
White pearl cardstock
Blending sponges - Ranger
Catherine Pooler coloured inks
Happy Birthday - Happy Birthday Many Ways, Catherine Pooler
Label die - Rectangles & Labels Crosshatch - Karen Burniston
Inside sentiment - Inside Out Birthday, Catherine Pooler
Love you stamp - Something for Everyone, Catherine Pooler
5 x 7"  card blank and envelope

Friday, 22 December 2023

Mini Slimline Christmas Duo


Welcome to Fun Fold Friday on my blog! Today I'm sharing my final Christmas cards for 2023 and these two Mini Slimline cards helped me use up the last of a 6x6" paper pad. 


The first card also uses the Winter Owl bundle (Stampin' Up) with a simple box pop up. The sentiment was trimmed from a sheet of borders in the pad - it was the last one!


 The Pop Up strip measures 1 x 3", scored at .5, 1.5 and 2". I have several video tutorials on creating this type of Pop-Up, here are a couple:  Slimline Pop Up Tutorial (but the technique and measurements work for A2 cards as well) or Quick and Easy Pop Up Tutorial (from 2 years ago but I use it all the time).


The second card has a piece of snowflake printed acetate over the ornament patterned paper - I don't do this nearly enough as I really like how it looks. The ornament decoration is a Peel Off sticker I've had in my stash for many years - originally it was from Elizabeth Craft Designs. As was the Seasons Greetings Peel Off sticker.

The navy cardstock strip goes over the patterned paper but under the acetate, and the Seasons Greeting is on top of the acetate. 


Inside I used my new favourite die by Karen Burniston ... the Twist Flower Pop Up. I love that it fits inside a Mini Slimline and Slimline card!


One more look ...


Having been asked how many cards I make I thought it would be fun to keep track this year. Many of my posts include more than a single card or project and below is my tally. 

Card Tally for 2023
January - 53 cards
February - 56 cards
March - 55 cards
April - 32 cards
May - 43 cards
June - 34 cards
July - 56 cards
August - 106 cards
September - 61 cards
October - 51 cards & 5 Tags
November - 46 cards
December so far - 22 cards (& 16 simple tags)

I decided to cancel the subscription that provided linked thumbnails to what products I used on my cards. It was costing me out of pocket each month, so I’m back to just listing what I used .

Supplies:
Patterned paper - A Winter's Night, Recollection (old)
Mini Slimline Embossed Edge Rectangle dies - Kat Scrappiness
Snowflake Luxury Foiled Acetate - Hunkydory
Snowflake Peel Off's - Ecstasy Crafts
Ornament Peel Off''s - Elizabeth Craft Designs
Copics to colour the snowflakes copper
Catherine Pooler Inks
Water Brush
Seasons Greetings Peel Off's - stash
Twist Flower Pop Up - Karen Burniston
Double Stitched Circles - Divinity Designs
Magic Holiday Messages - Lawn Fawn
Glitter Dots - Ecstasy Crafts
Large Snowflake Peel Off's - Elizabeth Craft Designs
Wink of Stella
Wonder & Cheer - Above it All, Stampin' Up
Winter Owls (stamps & dies) - Stampin' Up
Fishtail banners - MFT Stamps
Short Crosshatch Rectangles - Karen Burniston 

Tuesday, 19 December 2023

Winter Owl Card


You will be seeing a lot of this winter scene patterned paper on my holiday cards! Even though I have more than enough Christmas cards for this year, I continue to make more and will do that in January as well. I like to work on next years cards while I'm in the holiday spirit but without the stress of a mailing deadline Don't worry though, I will share the new holiday cards sparingly until late 2024. 😊

It looks like this is the first card I'm sharing with these beautiful Winter Owls, a stamp and die bundle I bought back in October from Stampin' Up. I just love the set and have made some winter birthday cards with it and this paper as well. I'll be sharing those soon.  This owl & the sentiment were stamped on white pearl cardstock for some subtle shimmer. I also added Stickles to the stamped snowflakes and a couple of dots with Pops of Colour for a translucent, sparkly enamel dot look.


Having been asked how many cards I make I thought it would be fun to keep track this year. Many of my posts include more than a single card or project and below is my tally. 

Card Tally for 2023
January - 53 cards
February - 56 cards
March - 55 cards
April - 32 cards
May - 43 cards
June - 34 cards
July - 56 cards
August - 106 cards
September - 61 cards
October - 51 cards & 5 Tags
November - 46 cards
December so far - 17 cards (& 16 simple tags)

I decided to cancel the subscription that provided linked thumbnails to what products I used on my cards. It was costing me out of pocket each month, so I’m back to listing what I used with a few affiliate links included.

Supplies:
Coordinating Solids, Frosted Christmas - Hunkydory
White pearl cardstock
Winter Owl bundle - Stampin' Up
Sentiment - In the Meadow, Papertrey Ink (old)
Catherine Pooler inks
Stickles
5 x 7" Card blank and envelope

Sunday, 2 January 2022

January 2022 Sheetload of Cards


Hello my crafty friends! It's the second of the month and that means it's time for a new Sheetload of cards! I have all the details on my YouTube video:  


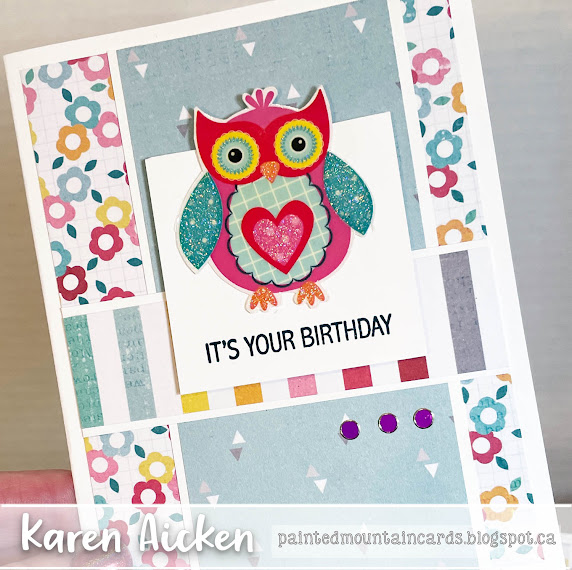
The yield this month is NINE cards and you use three 12 x 12" sheets of patterned paper. As usual, I made mine Birthday Cards to donate to my Mom's old nursing home. I pulled out some older patterned paper and stickers from my stash for my cards.


The owl stickers have some sparkle on them - after peeling them off the clear backing sheet I adhered them to white card stock for stability and fussy cut them out. These stickers have been in my stash for so long they were really difficult to remove from the backing sheet. The sentiment inside is a Divinity Designs stamp and I really like the font and size.


As I said in the video, I used the scraps from the floral paper and the striped one to create two additional cards. Here is the one with the floral pieces...


The second card uses the striped patterned paper and the owl stickers did NOT go with that colour scheme. So I pulled out a boat sticker from my stash, outlined it with a black marker and went with that instead. Now I have nine Birthday cards to donate!


#SLCTJan2022

This blog uses affiliate links whenever possible. This means, that at no cost to you, if you make a purchase through one of my affiliate links that I may receive a small commission from your purchase. I only link products that I own, love and use for my card making!

Any supplies I'm unable to link are listed at the very bottom of my post.

Additional Supplies:
Patterned paper - unknown (old, from my stash)
White card stock - Accent Opaque Digital Super Smooth (Amazon .ca)
Owl Stickers - Paper Studio (old, from my stash)
Pearls & Gems stickers - Stamp On It (linking them here as I'm unable to link them in Link Deli above)
The Inside Scoop, Birthday - Taylored Expressions (Retired)
Boat sticker - Echo Park (old, stash)
Yellow card stock - backing sheet from a Waffle Flower stamp set
The Inside Scoop, Birthday - Taylored Expressions (Retired)
Boat sticker - Echo Park (old, stash)

Tuesday, 23 March 2021

Owl Love Slimline Card


Hello! I'm back today with my weekly Design Team Post and today's card is a Slimline featuring the cute owls from Owl Yours. I started my card by cutting a white card base 7 x 8.5" and scoring it down the centre at 3.5". I set that aside then cut the 3 Room Studio Slimline Die from Kraft card stock and stamped the words "owl you need is love" on an angle over the entire panel. Inking the edges with brown ink finished that off.

I then turned it over and adhered a same size piece of transparency across the back and set the panel aside. A same sized white card stock panel was dipped into puddles of diluted blue water colour marker and that was set aside to dry. I stamped and coloured the images from Owl Yours then the card was ready to be assembled!

The (now dry) white inked panel was adhered behind the Kraft window panel so the blue areas showed through the windows. The transparency gives the card lots of shine as it catches the light! After adhering this to my folded white card base I added the stamped images as shown.

The sentiment comes from  Essential Sentiments by MFT Stamps and I added sequins for additional sparkle and shine.


Since I like to decorate the insides of my cards as well, I added a stitched scalloped panel from the Slimline Pull Tab Dies by Heffy Doodle and another white panel. Finally, I stamped a single owl, used a water brush & diluted dye ink to add some blue behind him then added two more sequins.


One more look ...


"Crafty Meraki is a tribe of women who are all creators but more importantly, love helping others in any way we can! 

Meraki (may-rah-kee) a verb, or adverb, a Modern Greek word, derived from the Turkish “Merak” (Labor of love, to do something with pleasure), is applied to tasks, usually, creative or artistic tasks, but can be applied to any task at all. Meraki means to do something with passion, with absolute devotion, with undivided attention.

Crafty Meraki was born out of a vision to help creators do what they love doing the most- to create!"


Supplies:
3 Room Studio Slimline Die - Crafty Meraki
Owl Yours - Crafty Meraki
Scalloped rectangle inside - Slimline Pull Tab Dies - Heffy Doodle
Essential Sentiments - MFT Stamps
Card stocks
Water Brush
Shimmer Spray
Jane Davenport Water Colour Markers
Copic markers
White gel pen
Transparency 
Wink of Stella
Sequins
Card Size - 3.5 x 8.5", fits in a #9 or #10 Business Envelope

Thanks for stopping by today

Monday, 25 January 2021

Crafty Meraki "Meraki Hugs" Release Week 4


Hello!  Welcome to another week of sharing the new release from Crafty Meraki. The release is called Meraki Hugs and there are even more fun products being released today!

This was actually the very first card I made when I opened my Design Team package because I just couldn't wait to play with these adorable owls. My card combines the new Owl Yours with the View From My Window Slimline die for a sweet card you could send out for happy mail.

I used some of the smaller images in the Owl Yours stamp set to create the background pattern, then added splatters of ink. The owls were coloured with Ohuhu markers  and I used my Scan 'n Cut to cut them out. I went over their eyes with a black glaze pen for some shimmer and shine.


For the bottom right owl, I carefully cut his head away from his body then reattached it with foam tape. This allowed me to adjust the angle of his head.

Of course, I decorated the inside as well ...


 'And now for something completely different', ha ha. My second Design Team card for this release features the Thanks die and a LOT of shimmer and shine. I knew I wanted to cut all the layers of the Thanks from different colours and when pink glittered card stock caught my eye I knew exactly what I wanted to do. I also pulled out white pearl card stock and pink mirror card stock and cut some 1/2" strips from all three.

After cutting a 8.5 x 3.5" panel of lightweight card stock, I started adding alternate coloured strips  until it was filled. Flipping the panel over, I trimmed off all the overhanging strips and then cut the panel down to 8.25 x 3.25" and added it to the folded card base.


The Thanks die gives you a lovely wide shadow layer with a press dots feature, as well as a pretty script Thanks word and smaller shadow layer too. You can combine them in different ways or only use the pieces you wish - so fun! I have a couple more ideas with this one so you will be seeing it again for sure.


I cut the 'thanks' piece from both white and pink glittered card stocks, then pieced them together alternating colours. That left me with a second 'thanks' to use on another project.!

I maybe should have done a quick video to show you this card - it's definitely one that is better in real life. I took over a dozen photos trying to tone down the rainbow reflection in the pink mirrored card stock, and these photos were the best I could do. The card is SO sparkly and shimmery and shiny - it's very elegant in person where the photos make it look a little dull.


The Design Team will be sharing all the fun items from the release today, and we will be having an Instagram Hop on January 30th. So fun!

"Crafty Meraki is a tribe of women who are all creators but more importantly, love helping others in any way we can! 

Meraki (may-rah-kee) a verb, or adverb, a Modern Greek word, derived from the Turkish “Merak” (Labor of love, to do something with pleasure), is applied to tasks, usually, creative or artistic tasks, but can be applied to any task at all. Meraki means to do something with passion, with absolute devotion, with undivided attention.

Crafty Meraki was born out of a vision to help creators do what they love doing the most- to create!"


Supplies:
Owl Slimline Card:
View From My Window Slimline Die - Crafty Meraki
Owl Yours - Crafty Meraki
White card stock
Mini Misti
Broken China Distress Oxide Ink
Ohuhu markers
Sakura white gel and black glaze pens
Hand made cloud mask
Water Brush
Card size - 3.5 x 8.5", fits in a #9 or #10 Business Envelope


Thanks Slimline Card:
Thanks die - Crafty Meraki
Pink glitter card stock - Stampin' Up
Pink mirror card stock - Tonic Studios
White pearl card stock
Majestic Confetti - Studio Katia
Card size - 8.5 x 3.5", fits in a #9 or #10 Business Envelope


Thanks for stopping by today

Wednesday, 30 October 2019

Owl Shaker Halloween Card

Hello my crafty friends

Today I'm playing along with Your Next Stamp's Fun Friday Challenge #125 which is 'TRICK or TREAT'. You can find all the details for the challenge HERE.


Yesterday I made a shaker card for the challenge, and since I still had shakers on the brain, I made another one. I think yesterdays card can go to our Granddaughter Alma next year, and Ilai can have this one. Now I'm two cards ahead for 2020, ha ha. Actually I do enjoy working ahead so this is not all that unusual for me. 


I have had this owl die for years, and I thought the fall away eyes would be the perfect area for a shaker card. I added two YNS Gumdrops on top of the acetate to make the eye stand out a little more.


This Happy Halloween from Karen Burniston's Halloween Charms cuts as a single piece and that makes it so easy to adhere. I cut it twice from black card stock, then stacked them on top of each other for a nice sturdy element.


Inside I added the greeting from Your Next Stamp's Spooky Fun stamp set, which is part of their mini release for October. I love it when stamp companies include an actual greeting in their sets and not just the typical 'Happy Halloween' etc.


The patterned paper has embossed sparkly bits in it, so I clear embossed the greeting to match.


Supplies:

Owl die - Sizzix Bigz
Patterned paper - Night and Fall, Recollections
Acetate
Filler - stash
Yellow, black and cream card stocks
Sakura white gel pen
Fun foam
1058 Halloween Charms - Karen Burniston
Retro Gumdrops - Your Next Stamp
Spooky Fun Stamps - Your Next Stamp
Wink of Stella
MISTI - My Sweet Petunia
Clear embossing powder

Card size 5 x 6" which fits in a 5 x 7 envelope


Thanks for stopping by today

Sunday, 13 October 2019

Owl & Pumpkin Halloween Card

Hello my crafty friends

I'm so happy to be Guest Designing at Your Next Stamp this month! They released two new stamp sets with the character and fun I love about their stamps.

For today's card, I used the owl and pumpkin from the new Spooky Fun stamp set. I really like the YNS Scrapworks Large Sunburst die set and used it again here with a bunch of scrap papers to create the vintage vibe background.


I love this owl! I coloured the image with my Chameleon markers and coloured pencils then fussy cut it out and added it to the YNS Cool Tag One die. You can see I also added some YNS Gumdrops as well.


Here is a peek at the inside, where I used some of the off cuts from the card background. Fun that the background was made from scraps and I used a scrap of those scraps for the inside. Ha.


There are gold sparkly Gumdrops on the banners for a little sparkle.


Supplies:
Cool Tag 1 die set - Your Next Stamp
Stitched rectangle dies - Your Next Stamp
Black Olive Ink - Your Next Stamp
Spooky Fun stamp set - Your Next Stamp
Pixie Dust Gumdrops - Your Next Stamp
Retro Gumdrops - Your Next Stamp

Chameleon Color Tone Markers
Chameleon Coloured pencils
Gold Shimmer Pen
Patterned paper - Prima
Circle die - Hero Arts
Peach, white card stocks

Card size - standard A2 (5x5 x 4.25)

Thanks for stopping by today

Saturday, 5 January 2019

C4C465 Peeking Owl Birthday Pop-Up Card with Matching Gift Card Holder

Hello my crafty friends

Welcome to a new year, a new month and a new challenge at the Crazy4Challenges Blog. I am the hostess for January 2019 and our Guest Designer is my friend and Design Teammate Kelly Booth

I had fun thinking of the challenges for this month, making them generic enough that they would suit everyone. Here is my challenge for this week:  What is your favourite card type to make? Pop-up? Shaker? Birthday? One Layer? Make one!

My favourite card type would be Interactive. But I also really enjoy making Birthday Cards and cards with Windows ... so I combined them all to make a masculine Birthday card.


The window has acetate behind the stitched frame, and I added a couple of sprigs from Karen Burniston's Autumn Elements. That die set stays close to my stamping table because I use it so often.


Sorry for the colour cast on the photo below, which shows the card as it is opening.


When the card is fully open, the leafy wreath and Happy Birthday sentiment spin down and fully into view. I used the Spinner Square Pop-Up by Karen Burniston for the mechanism.


The filigree owl was not my favourite of the stamp & die set when I saw it online, but now I am really liking it. It was die cut from brown card stock and adhered to kraft, then fussy cut.

On the far right of the Spinner Square, I fussy cut the spinner rectangle to follow along the leaf lines on the wreath.


I made a coordinating Gift Card holder as well, using Lynda Kanase's Pop-Up Gift Card Holder.


I decorated the front with bakers twine and a few die cut leaves from the Autumn Elements with white sketchy lines drawn on with a gel pen.


The set has a die for the front and the Pop-Up inside and it goes together quick and easy. The gift card pictured is one I use for photos, and not the one we actually gifted.


When you remove the gift card, you see a stitched circle which is the fallaway piece from the card front window. I like that it visually ties the card to the Gift Card Holder.


Check out the C4C blog to see how the Crazies have been inspired by the challenge. We'd  love to see your take on it, so be sure to stop by the Crazy 4 Challenges blog and link up your creations. If you are uploading to an online gallery, please use the keyword C4C465.

Supplies:
Brown, tan and kraft card stocks
Owl, Still Night stamps and dies - Stampin' Up
Treeline die - Tim Holtz, Sizzix
Patterned paper - Paper Studio
Acetate - Hero Arts
Stitched circle frame - MFT Stamps
1042 Spinner Square Pop-Up - Karen Burniston
1059 Autumn Elements - Karen Burniston
Wreath - Katelyn Lizardi, Sizzix
Happy Birthday Day stamp - MFT Stamps
Copic Marker
Bakers Twine
Card, Gift Card Pop-Up - Lynda Kanase (Sizzix)
5-1/2" Square card


Thanks for stopping by today