Showing posts with label Christmas Tags. Show all posts

Monday, 22 November 2021

Snowman Tag


Hello!  Today I'm sharing a holiday tag created with this adorable new stamp set from Your Next Stamp called Magical Winter Wishes. There is a coordinating die set as well. 

I stamped the images on white card stock using my Mini MISTI and YNS Black Olive Ink then cut them out with the coordinating dies. Some colour was added with Copic Markers and then I added some sparkle with Stickles and set the images aside to dry.

The tag base is the largest die from the Wavy Stitched Circles die set. I cut it twice, once from white card stock and once from red. Then they were adhered together offsetting the red one for a different look. I stamped the sentiment and punched a hole to tie the red twine through.

When the glitter was dry, I adhered the images with different heights of foam tape for dimension.


This blog uses affiliate links whenever possible. This means, that at no cost to you, if you make a purchase through one of my affiliate links that I may receive a small commission from your purchase. I only link products that I own, love and use for my card making!

Any supplies I'm unable to link are listed at the very bottom of my post

Additional Supplies:
Copic markers
Red twine

Thursday, 10 December 2020

Scalloped Holiday Tag Trio


Hello crafty friends ...

Today I'm sharing a trio of holiday tags made with the new Holiday Charms by Karen Burniston.


I love this scalloped rectangle from the Pop 'n Swap so used that to adhere the snowflake ornament charm & bough. I die cut it twice for each tag ... once from patterned paper and once from white card stock. 

The white ones got the 'to & from' and a single red snowflake and I adhered the two scalloped rectangles together sandwiching red seam binding in between them.


There is lots of sparkle in the patterned paper, and the white bough was die cut from a pearlized card stock.


I hope you liked seeing how you can stretch your supplies to create something completely different than they are intended for!

Supplies:
1133 Pop 'n Swap (Scalloped Rectangle) - Karen Burniston
Patterned paper - I Believe, My Minds Eye
1143 Holiday Charms - Karen Burniston
Various card stocks - stash
White pearl card stock
Bakers Twine
Seam Binding
Black marker
Glitter Dots - Elizabeth Craft Designs

Thanks for stopping by today

Monday, 7 December 2020

Cute Holiday Ornament Shakers


Hello crafty friends ...

How CUTE are these sparkly shaker tags? I am loving shaker cards and the November release at Your Next Stamp included these Cute Ornament stamps and dies and I couldn't wait to play with them.


The images are small and were quick and easy to colour ... I chose some fine point markers and then flicked a Copic marker into the sky for some definition.


I took this photo so you can see the petite size of those little shakers. I cut the top piece from white glitter paper so these are super sparkly - perfect for the holidays!.


Supplies:
Black Olive Ink - Your Next Stamp
Cute Holiday Ornaments - Your Next Stamp
Cute Holiday Ornaments Die Set - Your Next Stamp
MISTI - My Sweet Petunia
Circle die - Hero Arts
Aceetate
Adhesive backed fun foam
Shaker filler - stash
Twine - Stampin' Up
Copics
Chameleon Fineline Markers
Sakura white gel pen
Glitter card stock - Stampin' Up
Narrow Seam Binding - Stampin' Up

Thanks for stopping by today

Saturday, 28 November 2020

More November Paper Pumpkin Projects


Hello crafty friends ...

Today I'm back with the rest of my projects from the November 2020 Paper Pumpkin kit from Stampin' Up. There is another Slimline Card, an Accordion Card, and six tags and I have a walkthrough on YouTube as well! 


First up are the tags. I didn't need anymore holiday tags because I have SO many leftover from other years. But I couldn't resist making these up and have already added three of them to gifts for Porch Visits. They were Easy Peasy and they are SO nice and sturdy. {I love a sturdy tag.}


I made them the same as everyone else, trimming off the flap that you would use to make the Gift Card Pocket. I did add some Nuvo Drops for some dimension and sparkle!  I also put some vellum in behind the white scalloped doorways on the Gingerbread Houses with the yellow doors because I wasn't a huge fan of that yellow and coral combination. The adorable Gingerbread men are from the Winter Charm set by Karen Burniston and I simply snipped off the hanging holes and used a white gel pen for details.


The resin hearts are clear, so I added colour with a Copic marker before adhering them to the backs of the tags.


Next I made this little Accordion Card! It needed an envelope so I used an Envelope Punch Board to create one. While the card JUST fits into one of the included envelopes you would have to tear it to remove the card. So I trimmed the front off of one of those ones and adhered it to my hand made envelope and added a stamped greeting too.  I used the Punch Board measurements for a 3 x 4.5" card and adhered the sides/bottom together with the accordion card inside so there would be lots of room for the card.


The envelope seal was created by adding strips of Washi Tape to a scrap of white card stock then I die cut it with a fancy edge circle die.


Here is the front of my Accordion Card, using sparkly patterned paper and the large Gingerbread Man from Karen Burniston's Winter Charms.The card stock covers measure 2.5 x 3-7/8", with the patterned paper measuring  2.25" x 3.5".


Here is the card displayed open. I attached two of the Gingerbread house pieces together and then trimmed off the remaining flap from the house on the right. The small Gingerbread Man from the same charm set as above worked so perfectly in the doorways!


Below is the card from the back and where we will sign our name. As I said in the video, this is not a card that would go through the mail, but will be fun to attach to a box of chocolates that we will be delivering to a friends front porch over the holidays.


Then, all I had left was the front of one Gingerbread House and one scalloped piece ... so I made a Slimline Card!


I snipped the puffy Candy Dots in half and tucked them under the sentiment piece.


Inside, the greeting comes from the October Paper Pumpkin kit.


So the November Paper Pumpkin came with enough supplies to create fifteen pocket gift card holders with envelopes.

This is what I made with the kit:

  • Three Pocket Gift Card Holders
  • Two Gift Card Holders with a strip inside to hold the Gift Carad
  • Two single sided tags
  • Six Sturdy Double Sided Tags
  • Two Slimline Cards
  • One Accordion Card with Envelope

I just love how you can customize these kits and create all kinds of alternates. 


Supplies:

Unless indicated below, everything came from the November 2020 Paper Pumpkin Kit

Six Double Sided Tags 
Mini MISTI - My Sweet Petunia
Resin hearts - Stampin' Up
Copic Marker
Nuvo Drops
1018 Winter Charms - Karen Burniston
Stickles
Sakura white gel pen
Vellum scraps
Shimmer Spray
Twine with silver thread

Accordion Card
1018 Winter Charms - Karen Burniston
Sakura white gel pen
Card Stocks
Patterned paper - Winter Wonderland, Recollections (old)
Nuvo Drops
Shimmer Spray
White pearl card stock
Words on front & flourish - Merry Christmas to All, Stampin' Up (retired)
Green circle (in my stash)
October 2020 Paper Pumpkin (greeting on back)
Snowflake embellishments - Stampin' Up
Envelope Punch Board - We R Memory Keepers
Washi tape - Recollections
Tasteful Label dies - Stampin' Up


Slimline Card
Patterned paper - Winter Wonderland, Recollections
1018 Winter Charms - Karen Burniston
Banner Pick A Punch - Stampin' Up
October 2020 Paper Pumpkin (greeting inside)
Torn paper mask
I-crafter Blending Brushes
Nuvo Drops

Thanks for stopping by today

Sunday, 22 November 2020

Five Gift Card Holders, Two Tags and One Slimline Card!


Hello crafty friends ...

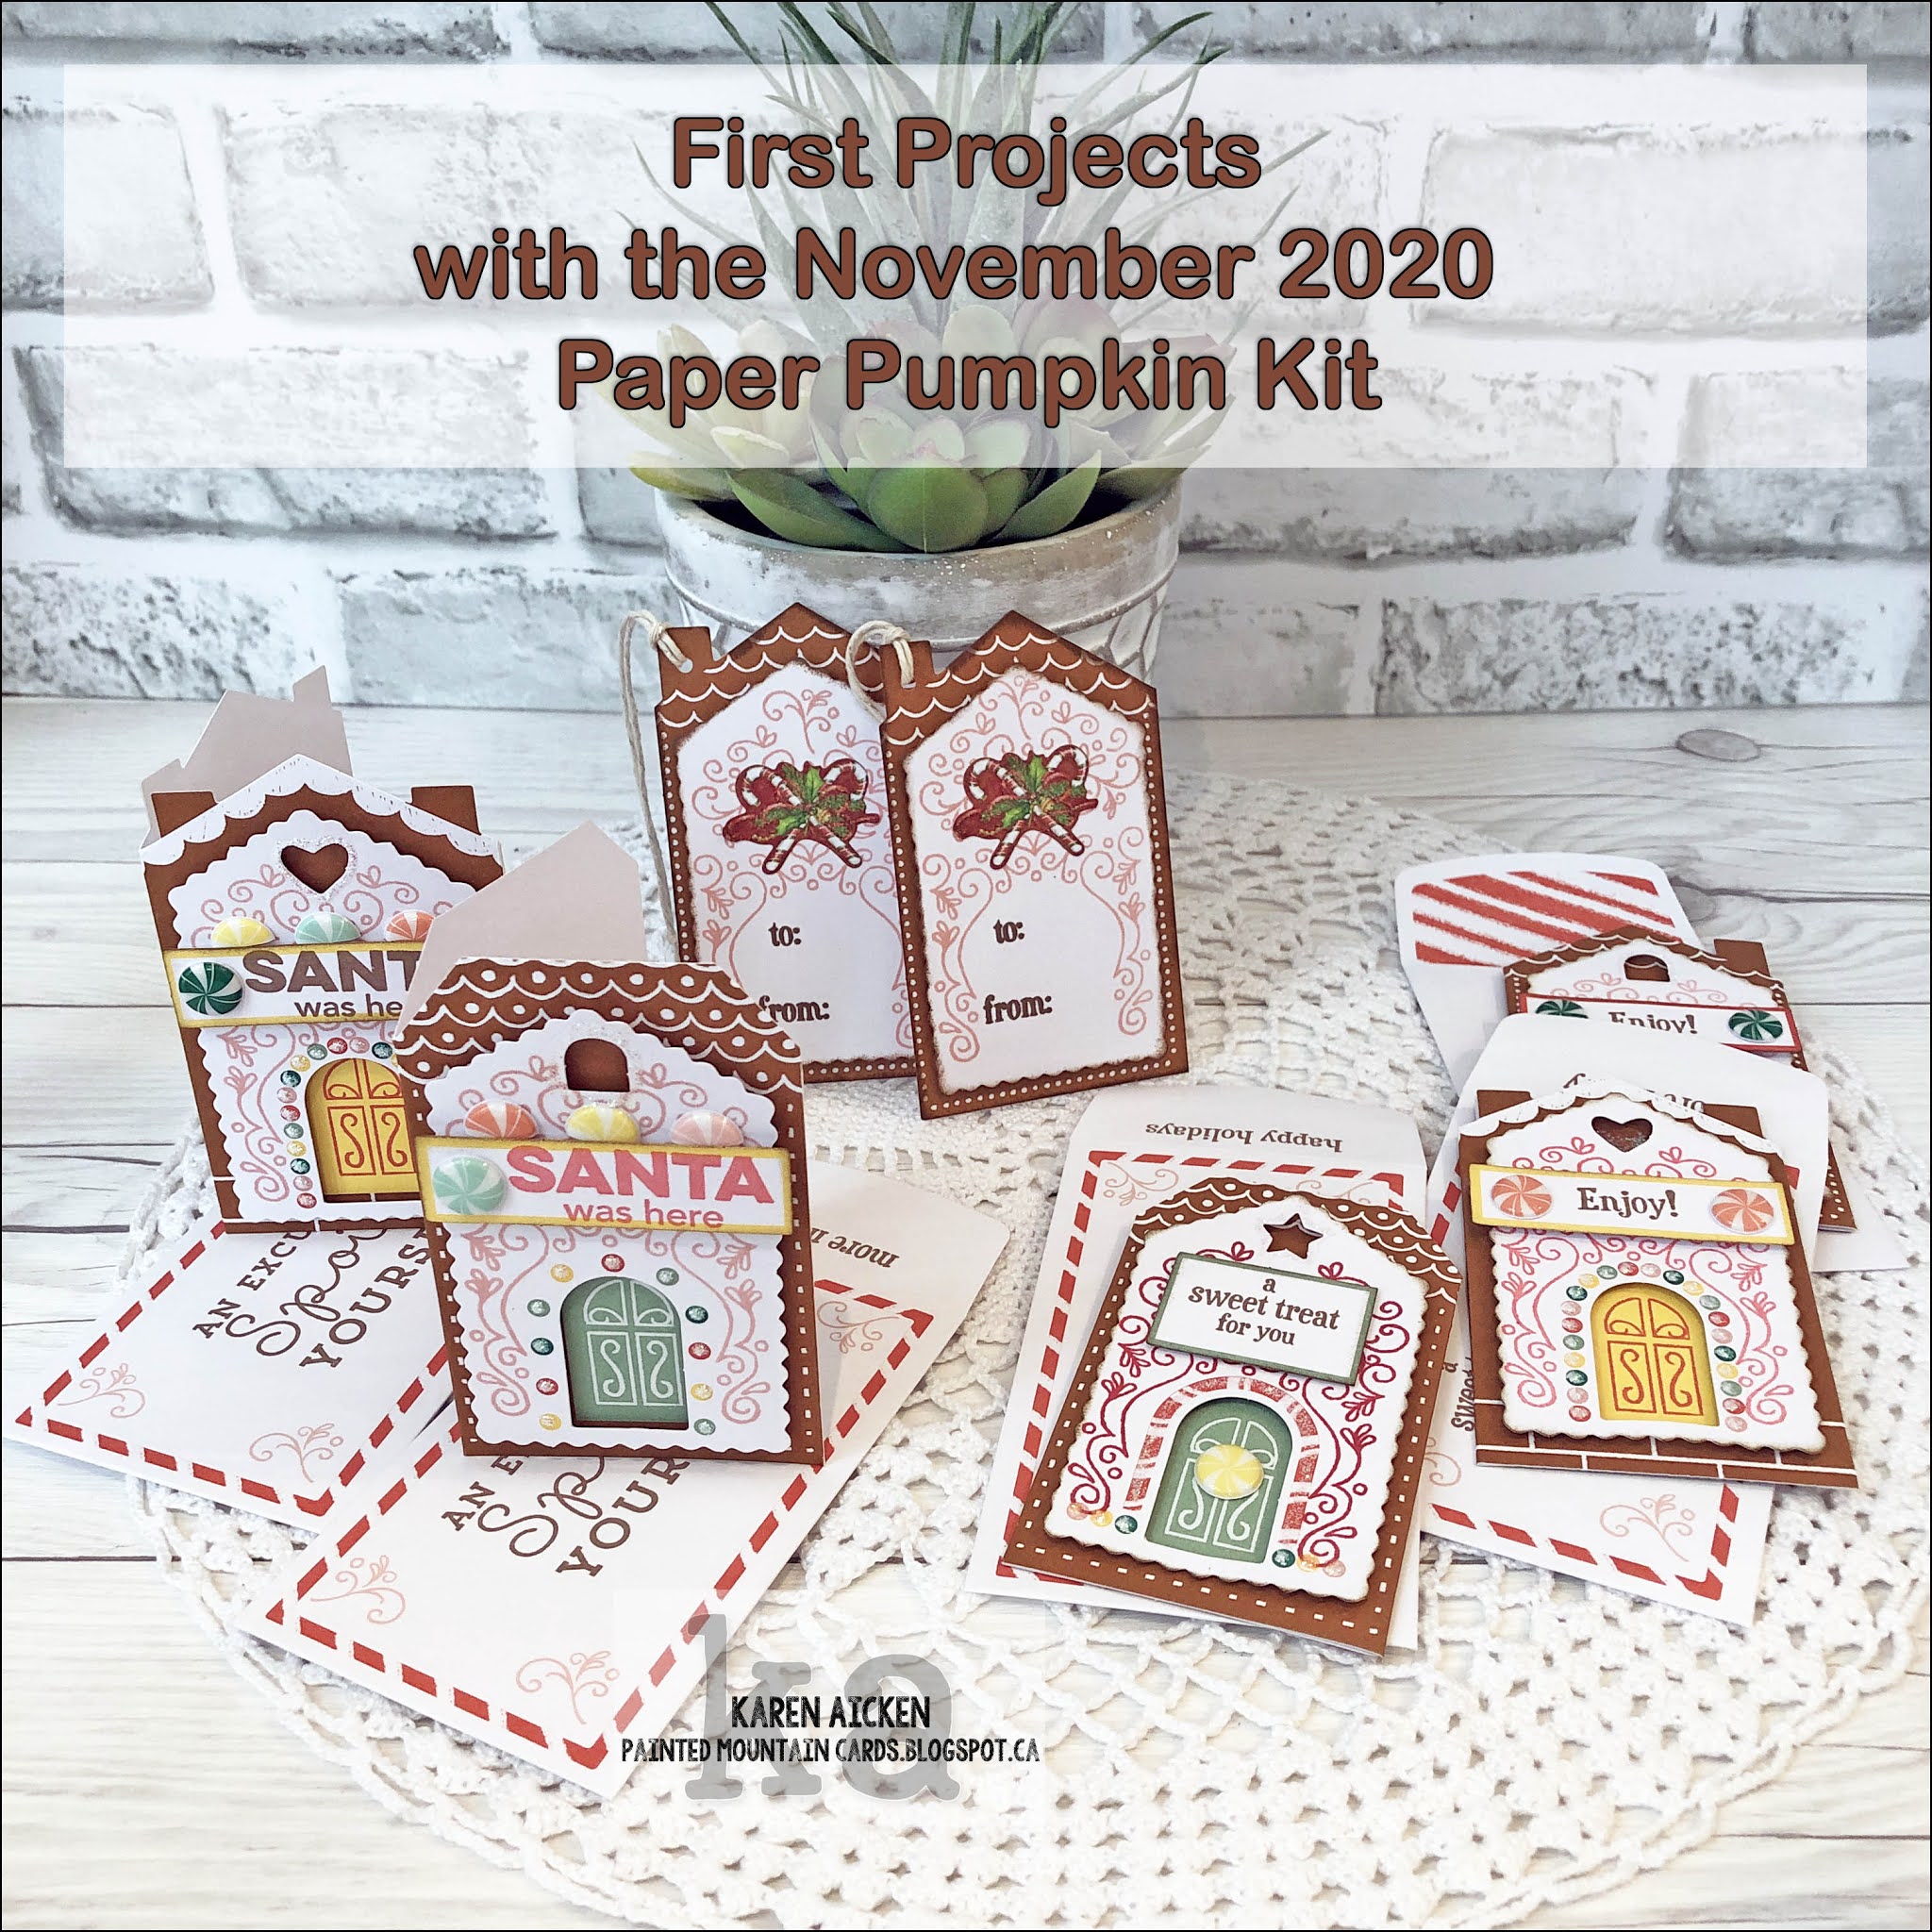
I got my November 2020 Paper Pumpkin kit on Tuesday evening which was perfect timing as I was getting a Christmas parcel ready to take to the post office and I needed a Gift Card Holder. This kit makes FIFTEEN cute pocket Gift Card Holders with coordinating envelopes ... see what I mean about perfect timing?

I also did a YouTube Video with a walkthrough of my first November 2020 Paper Pumpkin Projects!  I have a lot of photos, mostly for other Paper Pumpkin subscribers who love to see what everyone does with their kits. I won't be offended if you just quickly scroll by and move on with your day. 😉


Now I make a lot of Gift Card Holders, so I don't need fifteen more - but the fun thing about Paper Pumpkin is you can make all kinds of things other than the suggested projects and Stampin' Up is very generous with their supplies. So I only made five Gift Card Holders, three as per the instructions with the little pocket and two that open like a card with a strip to hold the gift card. I will share the rest of my November 2020 Paper Pumpkin projects in a week or two.

This was the first one I made ... those puffy Candy Dots are just ADORABLE! I added lots of Stickles too, because ... well ...  you know me and sparkle. I also gave these white panels a blast with my shimmer spray.


Below is the back side of the Gift Card Holder. How cute are those coordinating envelopes?


I did two nearly identical ones and then this one with the 'more squarish' rectangle on the front.


For the next two, I cut off the side tab that you would use to create the pocket and that left me with a little Gingerbread House Shaped card! I decorated it with the stamps that were included but also pulled in an MFT stamp set for the envelope front and the sentiment stamped on the bordered rectangle.


I sacrificed one of the envelopes so I could use the striped paper on the inside to create my little strip that is glued to the inside of the Gift Card Holder with two flaps that fold underneath the Gift Card.


Below you can see what it looks like with the gift card removed. While the windows on the stamped house look blurry in the photos ... it's actually the light reflecting on the gold Nuvo Shimmer Pen glitter. 


Next, I made two tags by cutting two of the Gingerbread House pieces in half so I could use the back sides only.  Now the puffy Candy Dots would have been SO cute on these tags, but I am trying to use up these candy cane border stickers so I snipped two from one of the borders and glued them down instead. We were also doing a porch drop off of my kids & Grandkids' December First Gifts this week and these two tags are going on the white gift bags for our son and his girlfriend. The cute Candy Dot would be lost on him and I wanted the tags to match.


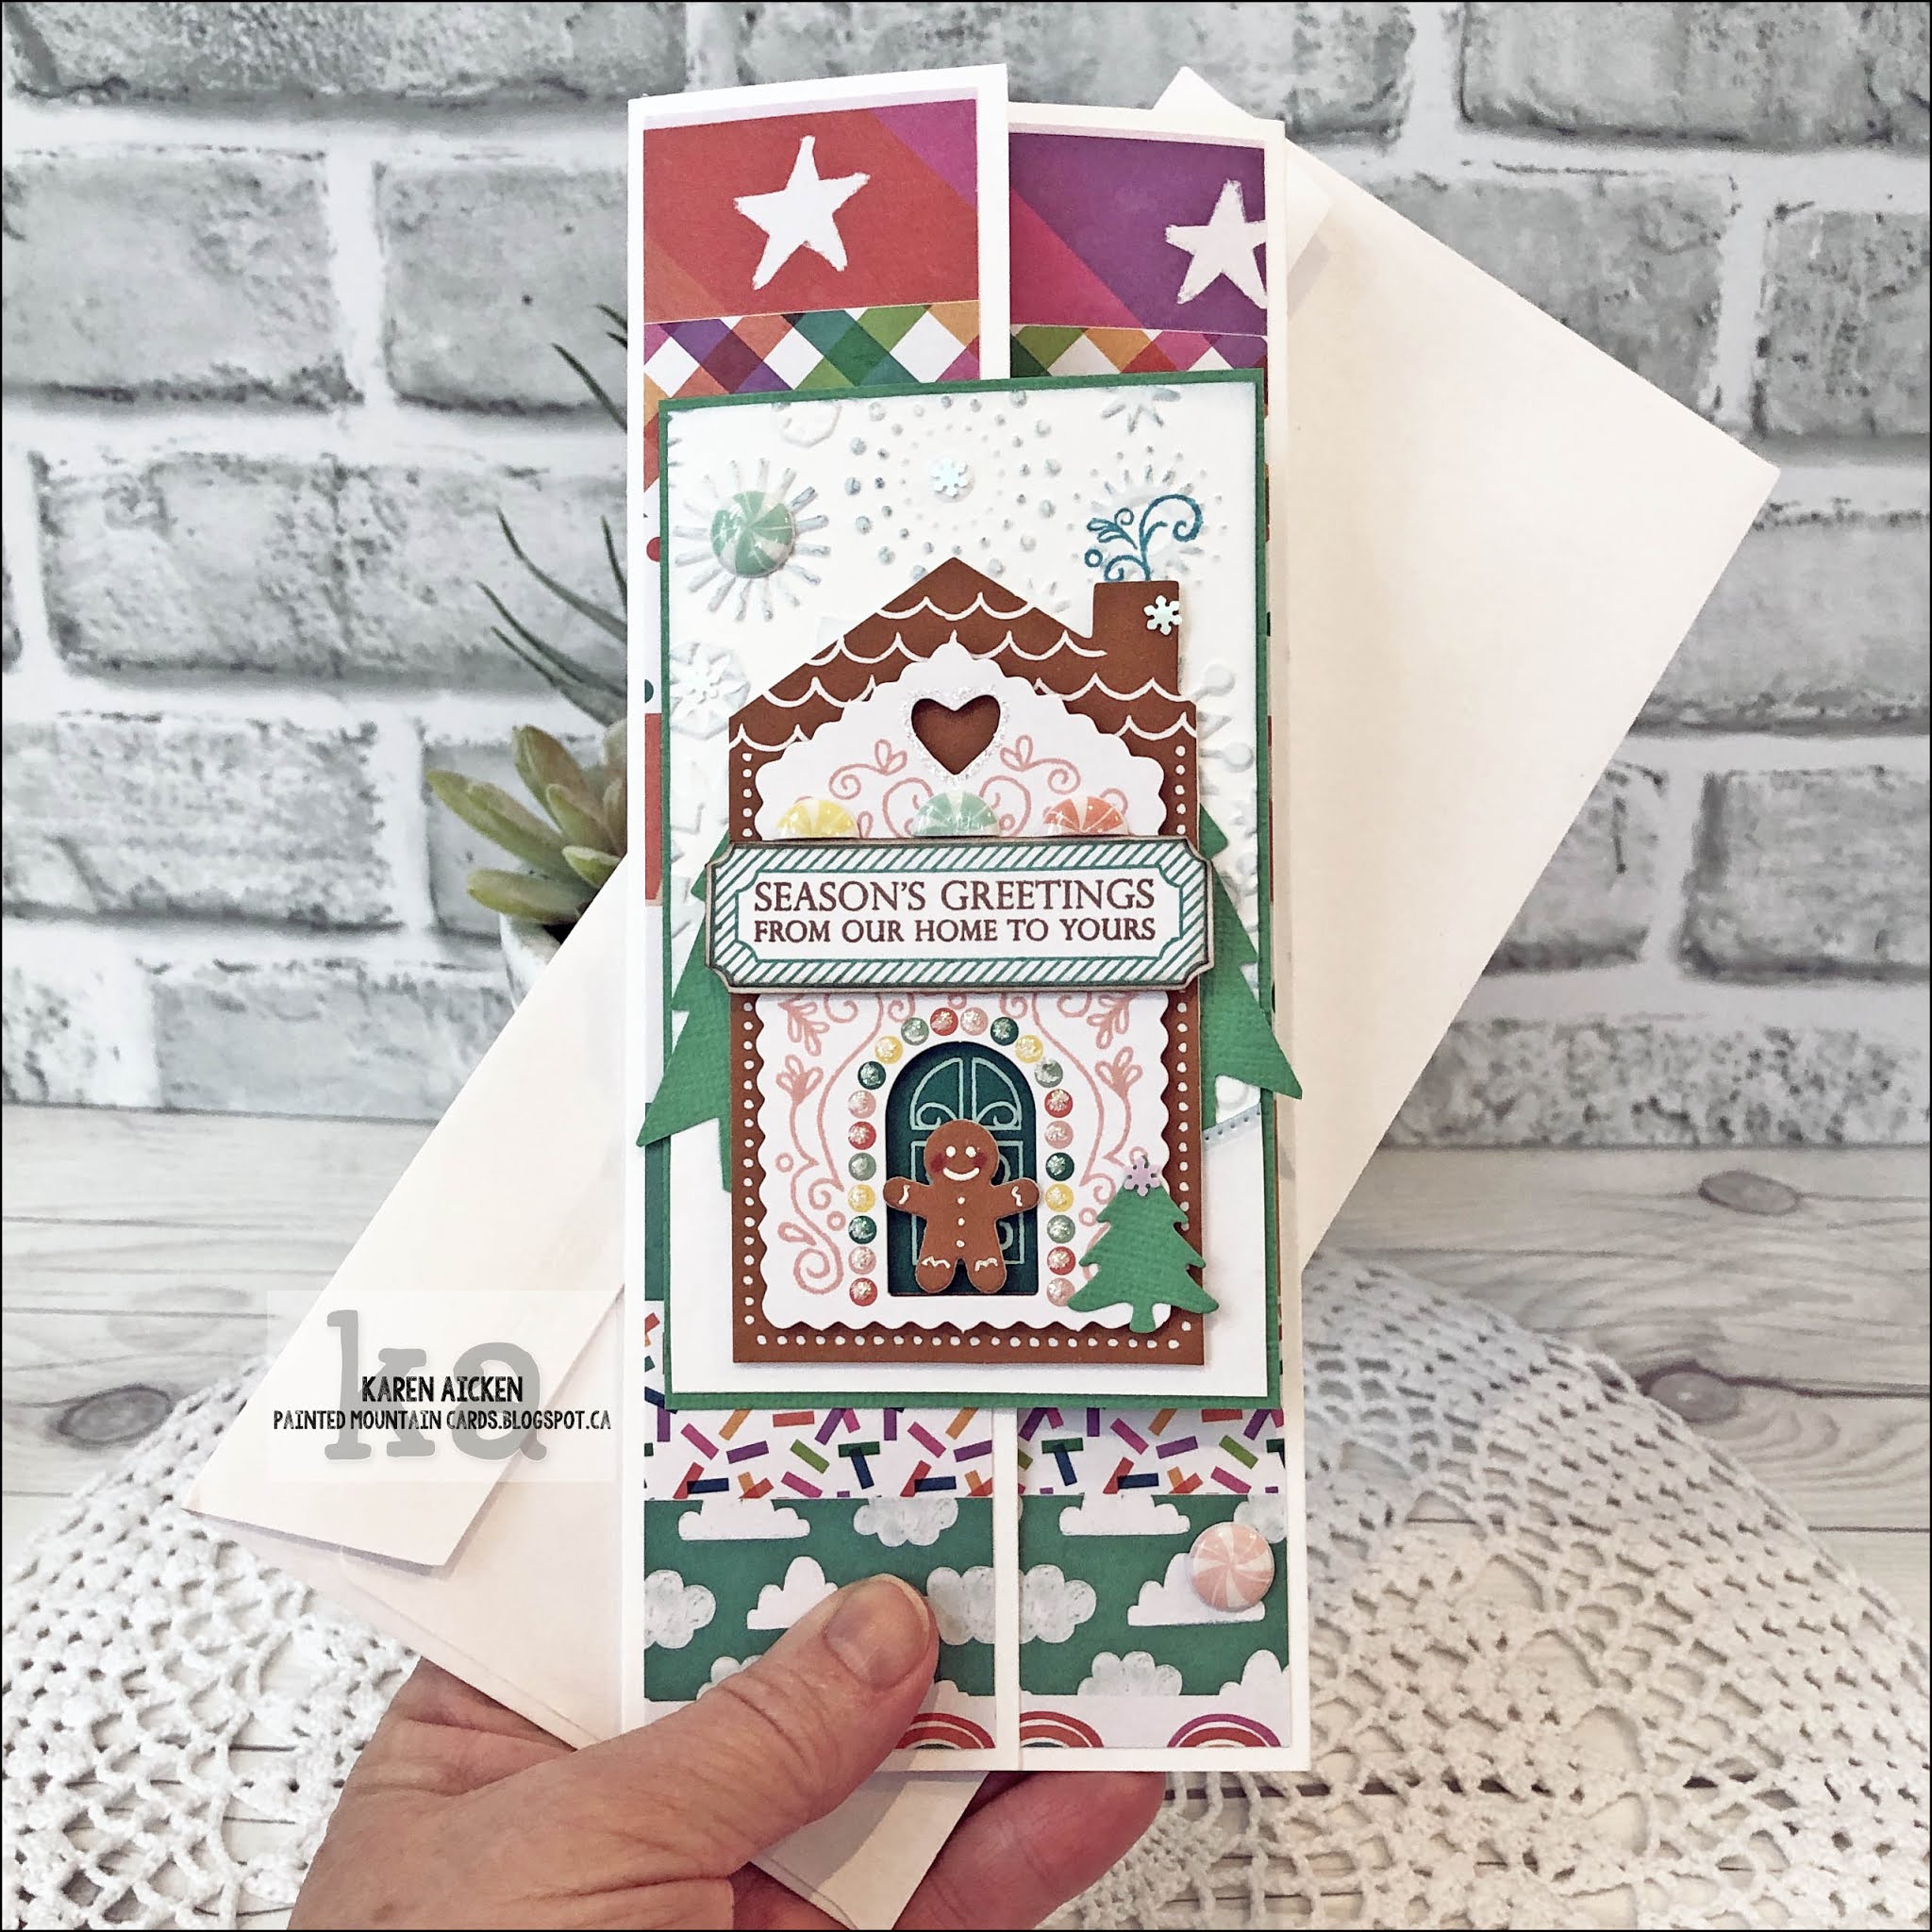
I used one of the Gingerbread House fronts (from the tags above) to create this BRIGHT and cheery Slimline Trifold card! Check out the little Gingerbread Man standing in the doorway. 


I used the Winter Charms by Karen Burniston to create the Gingerbread Man, and since I didn't have any of the same coloured card stock as in the Paper Pumpkin kit, I die cut the Gingerbread Boy charm from an area of the Gingerbread House that would be hidden by the white scalloped layer! Now this is a charm, but I snipped off the hanging hole so I would just have a Gingerbread Boy as he didn't need to hang in the doorway. 😊


I love those puffy Candy Drops, and I cut three different colours in half and added them at the top of the stamped label. Both the label and sentiment are from a retired SU set and not from the Paper Pumpkin kit.  The cute little tree beside the doorway is also from the Winter Charms and a SU iridescent snowflake hides the hanging hole. I also added two punched trees behind the house - the snow hill was sitting on my stamping table from a different project so it worked out perfectly for this card.

When you open the left side, you see another Gingerbread Man and a punched tree along with one of the puffy Candy Dots.


Finally, when you open the right flap the greeting is revealed, along with some more stamping etc!


For those of you who want to make one of these Slimline Trifold cards, here are the measurements. Since I talk about making these in other videos,  this is just a quick measurement guide.
  • Cut your card base 8.5 x 8.5".
  • Score 2" from the left side and 3" from the right side. This gives you your 3.5 x 8.5" Slimline card when it's folded.
  • My decorated panel on the front measures 3 x 5".
  • I cut my patterned paper layers 1/4" smaller, so if the left flap is 2 x 8.5", then my patterned paper (or DSP if you are a SU customer/demonstrator) is cut 1/4" smaller at 1.75 x 8.25".


Supplies: Unless listed below, everything came in the November 2020 Paper Pumpkin Kit from Stampin' Up


Gift Card Holders 1, 2 & 3 
Mini MISTI - My Sweet Petunia
Shimmer Spray
Stickles
Clear heart resin sticker - Stampin' Up

Gift Card Holders 4 & 5
Extra stamps - Gifting Fun, MT Stamps
Banners Pick A Punch - Stampin' Up
Card stocks 
Gold Nuvo Shimmer Pen
Wink of Stella
Clear heart resin sticker - Stampin' Up
Copic marker
Stickles

#6 - Slimline Card
Patterned paper - Over the Rainbow, Recollections
Card stocks
1018 Winter Charms - Karen Burniston
Sakura white gel pen
Stickles
Copic markers
Snowflake embellishments - Stampin' Up
Double Pierced Hills - Your Next Stamp
Snowflake embossing folder - Cuttlebug
Stamps on front - Merry Christmas to All, Stampin' Up (retired)
Torn mask and
I-crafter blending brushes
Tree punch - McGill??
Greeting inside - October 2020 Paper Pumpkin

#7 and 8 - Tag duo
Candy cane embellishment - trimmed from long K & Co border sticker I've had for years. 
Bakers Twine

Thanks for stopping by today

Wednesday, 21 October 2020

Reindeer Gift Tag


Hello crafty friends ..

Today I'm sharing another Sneak Peek of Karen Burniston's new release, which is available for preorder now! As soon as I saw the new Animal Add Ons 3, I knew exactly what I wanted to do first. While these dies are meant to work with both the Surprise Ball and Bitty Ball Pop Up's, I wanted to show you that they can be used independently as well!

I have made a couple of reindeer tags using dies by Karen Burniston over the years, so it's no surprise I wanted to do it again with this release. I did try to find some to link here for you, but obviously I did not do a good job with tagging the others as I couldn't find the photos without going through years worth of posts.

The Animal Add Ons 3 comes with a 'widows peak' to use if you are making a penguin, and I used that as a stencil to lightly ink some definition on the deer's head.


The ears, antlers and twine were sandwiched between the front circle and the one at the back, making this a nice sturdy tag. If I were making it again though, I would do a double layer of brown card stock for each antler to make them more sturdy as well. I used a black marker to write the TO & FROM on the back and the heart comes from the Bitty Ball Pop Up die set.


Supplies:

1147 Animal Add Ons - Karen Burniston (shipping early November 2020)

1057 Circles Crosshatch - Karen Burniston

1131 Bitty Ball Pop Up (eyes, heart and bow) - Karen Burniston

Various card stocks

Red glitter fun foam

I-crafter Blending Brushes

Sakura white gel pen

Black Sharpie

Twine

Shimmer Spray


Thanks for stopping by today

Thursday, 19 December 2019

Reindeer Shaker Card and Two Tags

Hello my crafty friends

I did it! I used up this entire paper package/stickers and all but two of the printed elements this year! Since I generally hop from pad to pad, this year I challenged myself to choose three and only use those for my holiday cards. Other than my Light Up Surprise Ball Designer Challenge card, I stuck to my challenge, and made a dent in the other two packages. Looking at the Christmas embellishment bin and remaining holiday paper stack,  I won't be needing any new papers or stickers next year either.


While there is no shaker sound, sometimes it's fun to see what a shaker card looks like being shaken. I would have left the sound on so you could hear the micro beads - it's very satisfying - but the dogs barked at something and nobody needs to hear THAT.  So ... here you go! (You can also see the video larger HERE on my YouTube Channel)  


Here is a peek at the inside:


I had a look at the leftover snowflake print paper and a couple of the elements and decided to make a pair of holiday tags as well. 


Supplies:
Patterned paper and elements - Comfort and Joy, My Minds Eye
Acetate
Various filler
Black and white card stocks
Grid die - Stephanie Barnard
White shimmer card stock
Snowflake die - Special Delivery, Queen & Company
Stitched Rectangle die - Your Next Stamp
Mini Strips Christmas, stamp and die - Taylored Expressions

Card size - standard A2 (4.25 x 5.5")


Thanks for stopping by today

Monday, 16 December 2019

Westie Gift Tags

Hello my crafty friends

I love getting out my older dies - especially when they will work just perfectly for a project. This BigZ die is one I've had for years and I wanted to use it for making our friends a set of Westie Gift Tags. They have two adorable West Highland Terriers. 


I cut the dogs twice, the top layer is from white shimmer card stock and the back layer is kraft. They were attached together with foam tape, and that allowed me to secure bakers twine in between the layers so they can tie the tags onto  packages. I used big shiny brads for their eyes, and added glossy accents onto the black noses.


I had made Scottie dog tags several years ago but couldn't find the template I'd made for the little coat so I went ahead and made another one. I was able to use up a whole bunch of foiled scraps in a paper package for their little jackets!


On the back side, I adhered a scalloped oval with a To & From stamped, and also a little holly.


Supplies for tags:
White shimmer card stock
Kraft and black card stocks
Dog, Scottie W/Bone - BigZ die - Sizzix
Patterned paper - lots of scraps from my stash, smaller pieces from different paper pads
Black brads - Recollections
Stitched Mini Scallop Ovals - MFT Stamps
To & From - Gift Tag Greetings, MFT Stamps
MISTI - My Sweet Petunia
Bakers Twine
Seam Binding
Glossy Accents

Thanks for stopping by today

Friday, 21 December 2018

Pop-Up Gift Card Holder with Coordinating Tag

Good morning friends

I have had this paper stack for too many years and was hoping to use it up this year. I did my best, but there is still some 12 x 12" sheets left and lots of smaller pieces left so I'll be hanging onto it for another year. Which is OK, I think it's a really cute paper stack!

I used it to make a Pop-Up Gift Card Holder, using dies from Lynda Kanase's 'GIFT AND GATHER' collection for Sizzix.


 The paper has lovely foiled bits, and I fussy cut the elements from other patterned paper scraps in the stack


The 'THANKS' dies are included in the Pop-Up Gift Card Holder, and since this was a thank you gift for friends who help us out a lot, it was perfect to use for this card.


Since I was putting this in a gift bag, I needed a tag too! I die cut the tag from another sheet of paper in the stack using Lynda's Tag Pocket with Phrases. The 'For You' dies are included with the Pop-Up Gift Card Holder, Here, I matted it with a red patterned paper layer. Since the edges were straight, it was easy to scissor cut the mat layer.


I used my Envelope Punch Board to make a coordinating envelope to add the Gift Card Holder to, tucked it into a gift bag along with special treats for their furry kids and added the tag to the bag handle.


Supplies:
Card, Gift Card Holder Pop-Up - Lynda Kanase, Sizzix
Patterned Paper - Recollections
Tag Pocket with Phrases - Lynda Kanase, Sizzix

Thanks for stopping by today