Showing posts with label Easel Card. Show all posts

Friday, 12 April 2024

Mother's Day Easel Card


Welcome to Fun Fold Friday here on my blog!

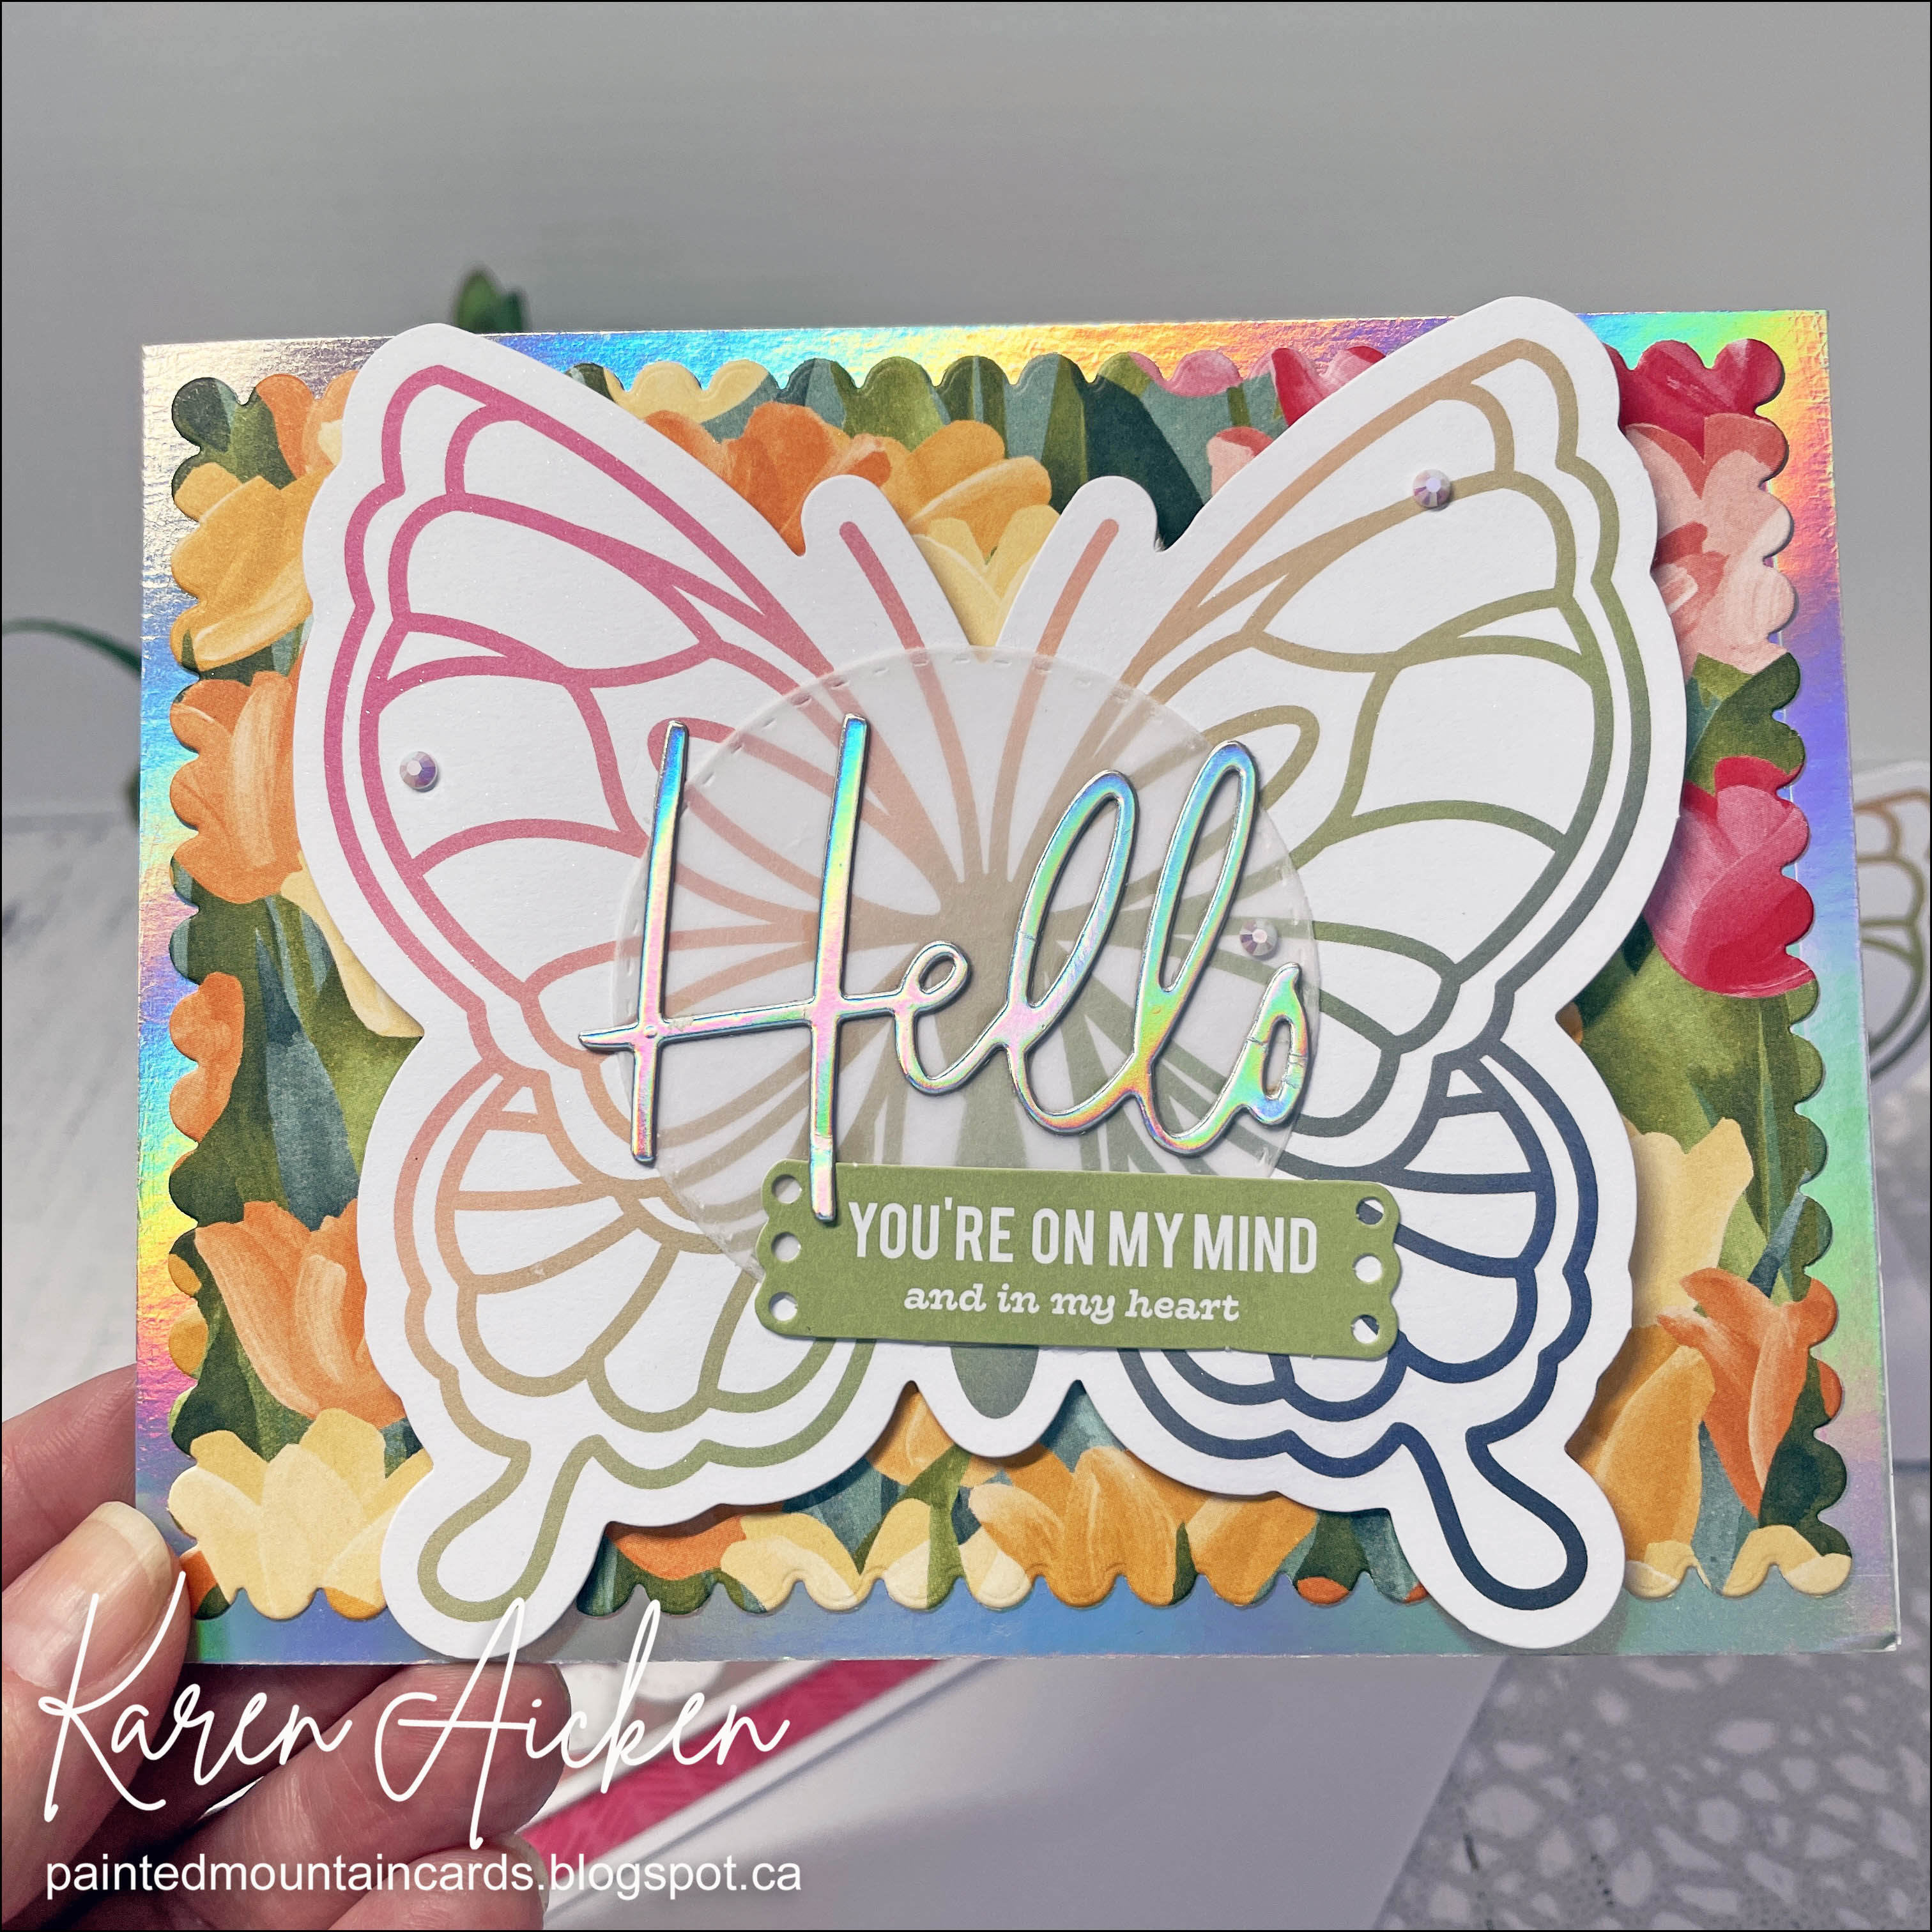
I try really hard not to purchase any patterned paper, since I have a H*U*G*E stash of it. But every so often I see some that I just cannot pass up and this 6 x 8" pad by 49 & Market was one of them last year. Florals, a little grunge, beautiful colours ... yep - 'add to cart'. 😊.  I used it a lot for awhile, then put it away. Got it out again for this Mother's Day card for our eldest daughter - it's a 5 x 7" Easel Card.


Below you can see how the card front folds and rests on those two little butterfly bumpers to stand for display.


Below is a peek at the inside. Honestly, that printed border along the bottom of the page just makes me happy! 


Supplies used:
Nested Butterfly Shapes - Hero Arts
Patterned paper - Art Options Rouge, 49 Market
Rainbow Holographic cardstock -  Recollections
Stardream cardstock
Pink cardstock scrap
Happy Mother's Day - Karen Burniston
Water Brush
Bling - Queen & Co
Pops of Color, Snowflake - Scrapbook .com
Blue Skies Ahead - MFT stamps
Catherine Pooler coloured inks
 5 x 7" Card blank and envelope

Friday, 13 October 2023

Halloween Book Easel Card


It's Fun Fold Friday here on my blog and todays card is for the October edition of my Monthly Series "New Fun Folds". I admit to purchasing this die set on a whim - I had some staples in my online shopping basket at R&R Scrapbooking and was randomly scrolling through pages. I have probably looked at this die set many times but on that day it really appealed to me. 

Add To Cart 😂


I have lots of ideas for it and had fun making this one up for Halloween. Initially I wanted to make a 'Book of Spells" ... but it morphed into a cute Halloween Easel Card instead. The Book of Spells is still on my list of ideas though!


The papers and ephemera are all by Doodlebug and have been in my stash for a long time. I  added a sparkly spider sticker as well. The wings on the bat element got some sparkle using a Wink of Stella pen and the black ribbon is also sparkly. 

While I did add foam tape to each of the page layers, I used thin foam tape so the card would be mailable. The lift to the pages shows better in real life. If I were hand delivering the card, I would use thicker foam tape. One of my ideas is to make a music book for our granddaughters piano teacher at the end of the year and for that one I will be using lots of foam tape!


Below is a peek at the inside, and where I will write my personal message when I send this card off to a paper crafting friend. The 'Boo To You' is one of the punch out elements that were included on a 12 x 12" sheet in the sample Doodlebug package and was popped up with foam tape to act as the bumper for the Easel part.

The card base itself was easy peasy - black cardstock cut 10 x 7" and scored at 5" to create a 7 x 5" card. The front was scored at 2.5" across the 7" side and the assembled book was adhered to the bottom flap - not crossing that 2.5" score line. That way it stands up nicely for display!


The card folds flat for mailing and fits in a standard 5 x 7" envelope.


Having been asked how many cards I make I thought it would be fun to keep track this year. Many of my posts include more than a single card or project and below is my tally. 

Card Tally for 2023
January - 53 cards
February - 56 cards
March - 55 cards
April - 32 cards
May - 43 cards
June - 34 cards
July - 56 cards
August - 106 cards
September - 61 cards
October so far - 20 cards

I decided to cancel the subscription that provided linked thumbnails to what products I used on my cards. It was costing me out of pocket each month, so I’m back to listing what I used.

Supplies:
Beautiful Book Pages - Moonstone (Hunkydory)
Patterned paper & punch outs - Doodlebug Designs (old variety pack)
Black Sparkle Ribbon - Stampin' Up
Stickers - Dollar Store
Nuvo Glaze
Wink of Stella

Thursday, 27 April 2023

Notes of Cheer, Butterfly Card Trio


Stampin' Up has had this butterfly themed card kit in their catalogue for a couple of years and I kept 'adding it to cart', then removing it. When I found out a friend was having eye surgery and could be laid up for several weeks though - I bought the kit. She works with butterflies at our zoo so it seemed appropriate. 😊

I have a walkthrough of the first three cards on YouTube:  


Of course the first card I made was a shaped card, and the first one I sent to my friend.


I spritzed the butterfly with shimmer spray, added a stitched vellum circle and a die cut HELLO cut from mirrored card stock.


The second card was an easel card. I cut the back off of this butterfly then adhered the back to the back of the shaped card to make it more stable.


Finally, a bright and happy card that I sent to my Mother In Law for Happy Mail. Since I added that busy patterned paper to the card base, it really didn't go with the envelopes from the kit. I pulled out a bright yellow envelope from my stash instead.


Having been asked how many cards I make I thought it would be fun to keep track this year. Many of my posts include more than a single card or project and below is my tally. 

Card Tally for 2023
January - 53 cards
February - 56 cards
March - 55 Cards
April so far - 31 Cards

Additional Supplies: 
Notes of Cheer card kit - Stampin' Up
Shimmer Spray
Rainbow Holographic cardstock - Recollections
Patterned paper - Flowering Fields, Stampin' Up

This blog uses affiliate links whenever possible. This means, if you make a purchase through one of my affiliate links that you pay the same amount but I may receive a small commission from your purchase. I only link products that I own, love and use for my card making and not every link below is an affiliate one! 😊

Friday, 24 February 2023

'Hi Ya' Easel Card


When I was ordering a couple of Funny Bones stamps from Riley & Company, I also added a couple of their Cut Ups dies to my order. One is this 'Hi Ya' die and I like that it also comes with a shadow die.

For my card today, I made an easel card using some bright and happy papers, and added some sparkly. butterflies for good measure. Below you can see how the card looks on display.


Here is a peek at the inside, and the label where we can write a personal message.


The card folds down flat and fits in a standard A2 envelope for mailing!


Late last year I was asked how many cards I make but I didn't have a clear number. Since many of my posts include more than a single card or project, I thought it would be fun to keep track this year. 

Card Tally for 2023
January - 53 cards
February so far - 50 Cards

Additional Supplies:
Patterned paper - Spring, Echo Park
Green Fine Point Marker
More Essential Sentiments - MFT Stamps

This blog uses affiliate links whenever possible. This means, if you make a purchase through one of my affiliate links that you pay the same amount but I may receive a small commission from your purchase. I only link products that I own, love and use for my card making and not every link below is an affiliate one! 😊

Thursday, 12 January 2023

Hello Butterfly Easel Card


Today's card is the first one in my series 'Throwback Fun Fold Dies'. As I mentioned in **THIS** post, I am going to start running several different monthly series this year. That will allow me to use a lot more of the stamps & dies already in my craft room and share even more ideas with you.

The die I used is called "Lively Stand Up" card, and I bought it many years ago from the Stamps of Life. Since it creates an A2 sized Easel Card I carefully lined up the die on a printed & foiled A2 notecard also from my stash. This card was truly a 'stash buster', as even the butterfly on the front is from an Ideology package I've had for years.
 

While the die cuts a small notch that you would normally tuck the front into to make it 'stand up', I prefer adding a bumper raised up with foam tape. That was cut from another one of the printed/foiled note cards in the same package. I added some brown patterned paper and a few gems as well as the die cut hello. That die was in the same package as the Lively Stand Up.


Inside you can see the remainder of that second note card panel and a stamped sentiment. 


... another look at the pretty foiling from the note cards ...

A couple of times last year, I was asked how many cards I make but I didn't have a clear number. Since a lot of my posts include more than a single card or project, I thought it would be fun to keep track this year. 
2023 Tally:  22 Cards

Additional Supplies
Lively Stand Up - the Stamps of Life (retired)
Printed Card Foiled - Hobby Lobby
Brown patterned paper - Natural Botanical, Hobby Lobby
Lively Frameless - Sizzix (retired)
Butterfly - Tim Holtz Ideology 93554

This blog uses affiliate links whenever possible. This means, if you make a purchase through one of my affiliate links that you pay the same amount but I may receive a small commission from your purchase. I only link products that I own, love and use for my card making and not every link below is an affiliate one! 😊

Monday, 9 January 2023

Pop Up Camping Easel Card


It's Masculine Card Monday here on my blog and today I'm sharing the Birthday card I made for my hubby. I just love the water coloured mountain/nature scenes in this patterned paper. The Happy Birthday and Happy Birthday Shadow (by Karen Burniston) are popped up with foam tape, and I added a die cut tree-line for even more trees.


Inside, the new Bam Box allows the camper to spring up and is also the bumper that keeps the card front in the easel position. I have had the camper die for over a year, and can't believe this is the first time I've used it. Sheesh ... 


Inside, I added another panel of the patterned paper - this one features a campfire in the foreground with mountains in the distance. I stamped an older Funny Bones sentiment from my stash. 

This card was very meaningful, since not only was it a milestone birthday for my hubby, we had just bought a camper!! So the sentiment, while funny and true - hit home as our bank account is still in shock. Ha.

The card started out as 5 x 6.5" - it was a card and envelope set I picked up at Michaels many years ago - but I trimmed it to 5 x 6.25" as that worked better with the 6 x 6" patterned paper.


I rooted through my embellishments looking for a small dog sticker, but most of the ones I had were too big for the camper. However - the Doodlebug Designs one fit and it was blue so matched the card!


... one more look ...   I gave the card to him on his birthday last month, and it is still out on display. He really liked it!


A couple of times recently, I was asked how many cards I make but I didn't have a clear number. Since a lot of my posts include more than a single card or project, I thought it would be fun to keep track this year. 
2023 Tally: 19 Cards

Additional Supplies:
5 x 6.5" Card and envelope - Michaels
White cardstock
Camping sentiment - Funny Bones R & Co
Treeline die - Tim Holtz/Sizzix 
Dog - Puppy Love, Shape Sprinkles, Doodlebug Designs
Black cardstock scrap

This blog uses affiliate links whenever possible. This means, if you make a purchase through one of my affiliate links that you pay the same amount but I may receive a small commission from your purchase. I only link products that I own, love and use for my card making and not every link below is an affiliate one! 😊

Thursday, 22 December 2022

'Get Your Fat Pants Ready" Easel Card


Hello my crafty friends! I've been having fun creating Easel Cards lately, so I have another 5 x 7" one to share today. I got this humorous stamp set from Scrap 'n Stamp Canada and have been using it a fair bit as well. I have it linked below for you but it may now be retired. I went over all the details in my YouTube Video:


The patterned paper is an older pad from Michaels. This cute polar bear scene was actually just along the bottom edge of one of the 12 x 12" sheets in the package so I added it to the front of my Easel Card and used the top part for the decorative panels.


The 'bumper' was created with one of the border strips on a sheet from the package and is popped up with foam tape.


Additional Supplies:
5 x 7" card and envelope
Patterned paper - Holiday Bash, Recollections
Sentiment inside - Hero Arts (old)

This blog uses affiliate links whenever possible. This means, if you make a purchase through one of my affiliate links that you pay the same amount but I may receive a small commission from your purchase. I only link products that I own, love and use for my card making and not every link below is an affiliate one! 😊

Friday, 18 November 2022

Winter Coffee Easel Card


Hello my crafty friends and welcome to Fun Fold Friday her on my blog. Today is also the last day of the Coffee Lover's Blog Hop and I really wanted to play along. Nothing like squeaking in at the last minute!  


I will be taking part in a video hop on December 3, put on by Scrap 'n Stamp Canada. I chose to work with this Echo Park collection 'The Magic Of Winter' and have been having fun using it to create lots of other cards as well. When I saw this cut apart on one of the 12 x 12" sheets, I knew it would be perfect for the Coffee Lover's Blog Hop! 

I created a 5 x 7" Easel Card using it, the coordinating solids and the ephemera as well. While it's hard to see in the photos, I added some sparkly Paper Glaze to the whipped cream and the heart on the coffee.


The card folds flat for mailing, then stands up for display. The 'bumper' is popped up with foam tape and that is what keeps the card from collapsing.


I added a white rectangle as a place to write a personal greeting, and added one of the stickers that were included into the paper package.


... one more look, which is how it will come out of the envelope.


Additional Supplies:
5 x 7" Card & Envelope
Sequins - stash
White cardstock

This blog uses affiliate links whenever possible. This means, that at no cost to you, if you make a purchase through one of my affiliate links that I may receive a small commission from your purchase. I only link products that I own, love and use for my card making and not every link below is an affiliate one! 😊

Friday, 11 November 2022

Happy Fall Slimline Easel Card


Hello my crafty friends and welcome to Fun Fold Friday here on my blog. Today I'm sharing another Easel Card, this time a Slimline sized one.

Die cutting the Slimline leaves background die from Pink & Main, I backed it with a transparency because I love the shine that gives. I added patterned paper behind the transparency before adhering the panel to the front of the easel.


To create the Slimline easel card base, I cut the pumpkin cardstock 8.5 x 7". With the longer side along the top I scored at 1.75 and 3.5". The center of the card is that 3.5" scoreline, and the remaining shorter score is where I attached the bottom portion of the leaf panel.

The Happy Fall with shadow (also from Pink & Main) is a relatively new die in my craft room, so I added it to the card front with thin foam tape and then added some Copper Pops of Color for extra sparkle. Tapping the card on my desktop flattened out those drops to resemble enamel dots.


Here is the inside and you can get a better look at the score lines. The sentiments are from Picket Fence Studio's and I fussy cut one to add to the bumper. The bumper is raised up with foam tape and that is what holds the Easel front from collapsing.


Below is what the card would look like coming out of the envelope.


This blog uses affiliate links whenever possible. This means, that at no cost to you, if you make a purchase through one of my affiliate links that I may receive a small commission from your purchase. I only link products that I own, love and use for my card making and not every link below is an affiliate one! 😊

Any supplies I'm unable to link are listed at the very bottom of my post.

Additional Supplies:
Transparency - office supply store
Patterned paper - Guilded Ink, Michaels (old - from my stash)
White cardstock
Oval Set 1 - Dees Distinctively