Showing posts with label Diamond Z Fold. Show all posts

Wednesday, 17 July 2024

'Sweet Friend' Slimline Diamond Z-Fold Card


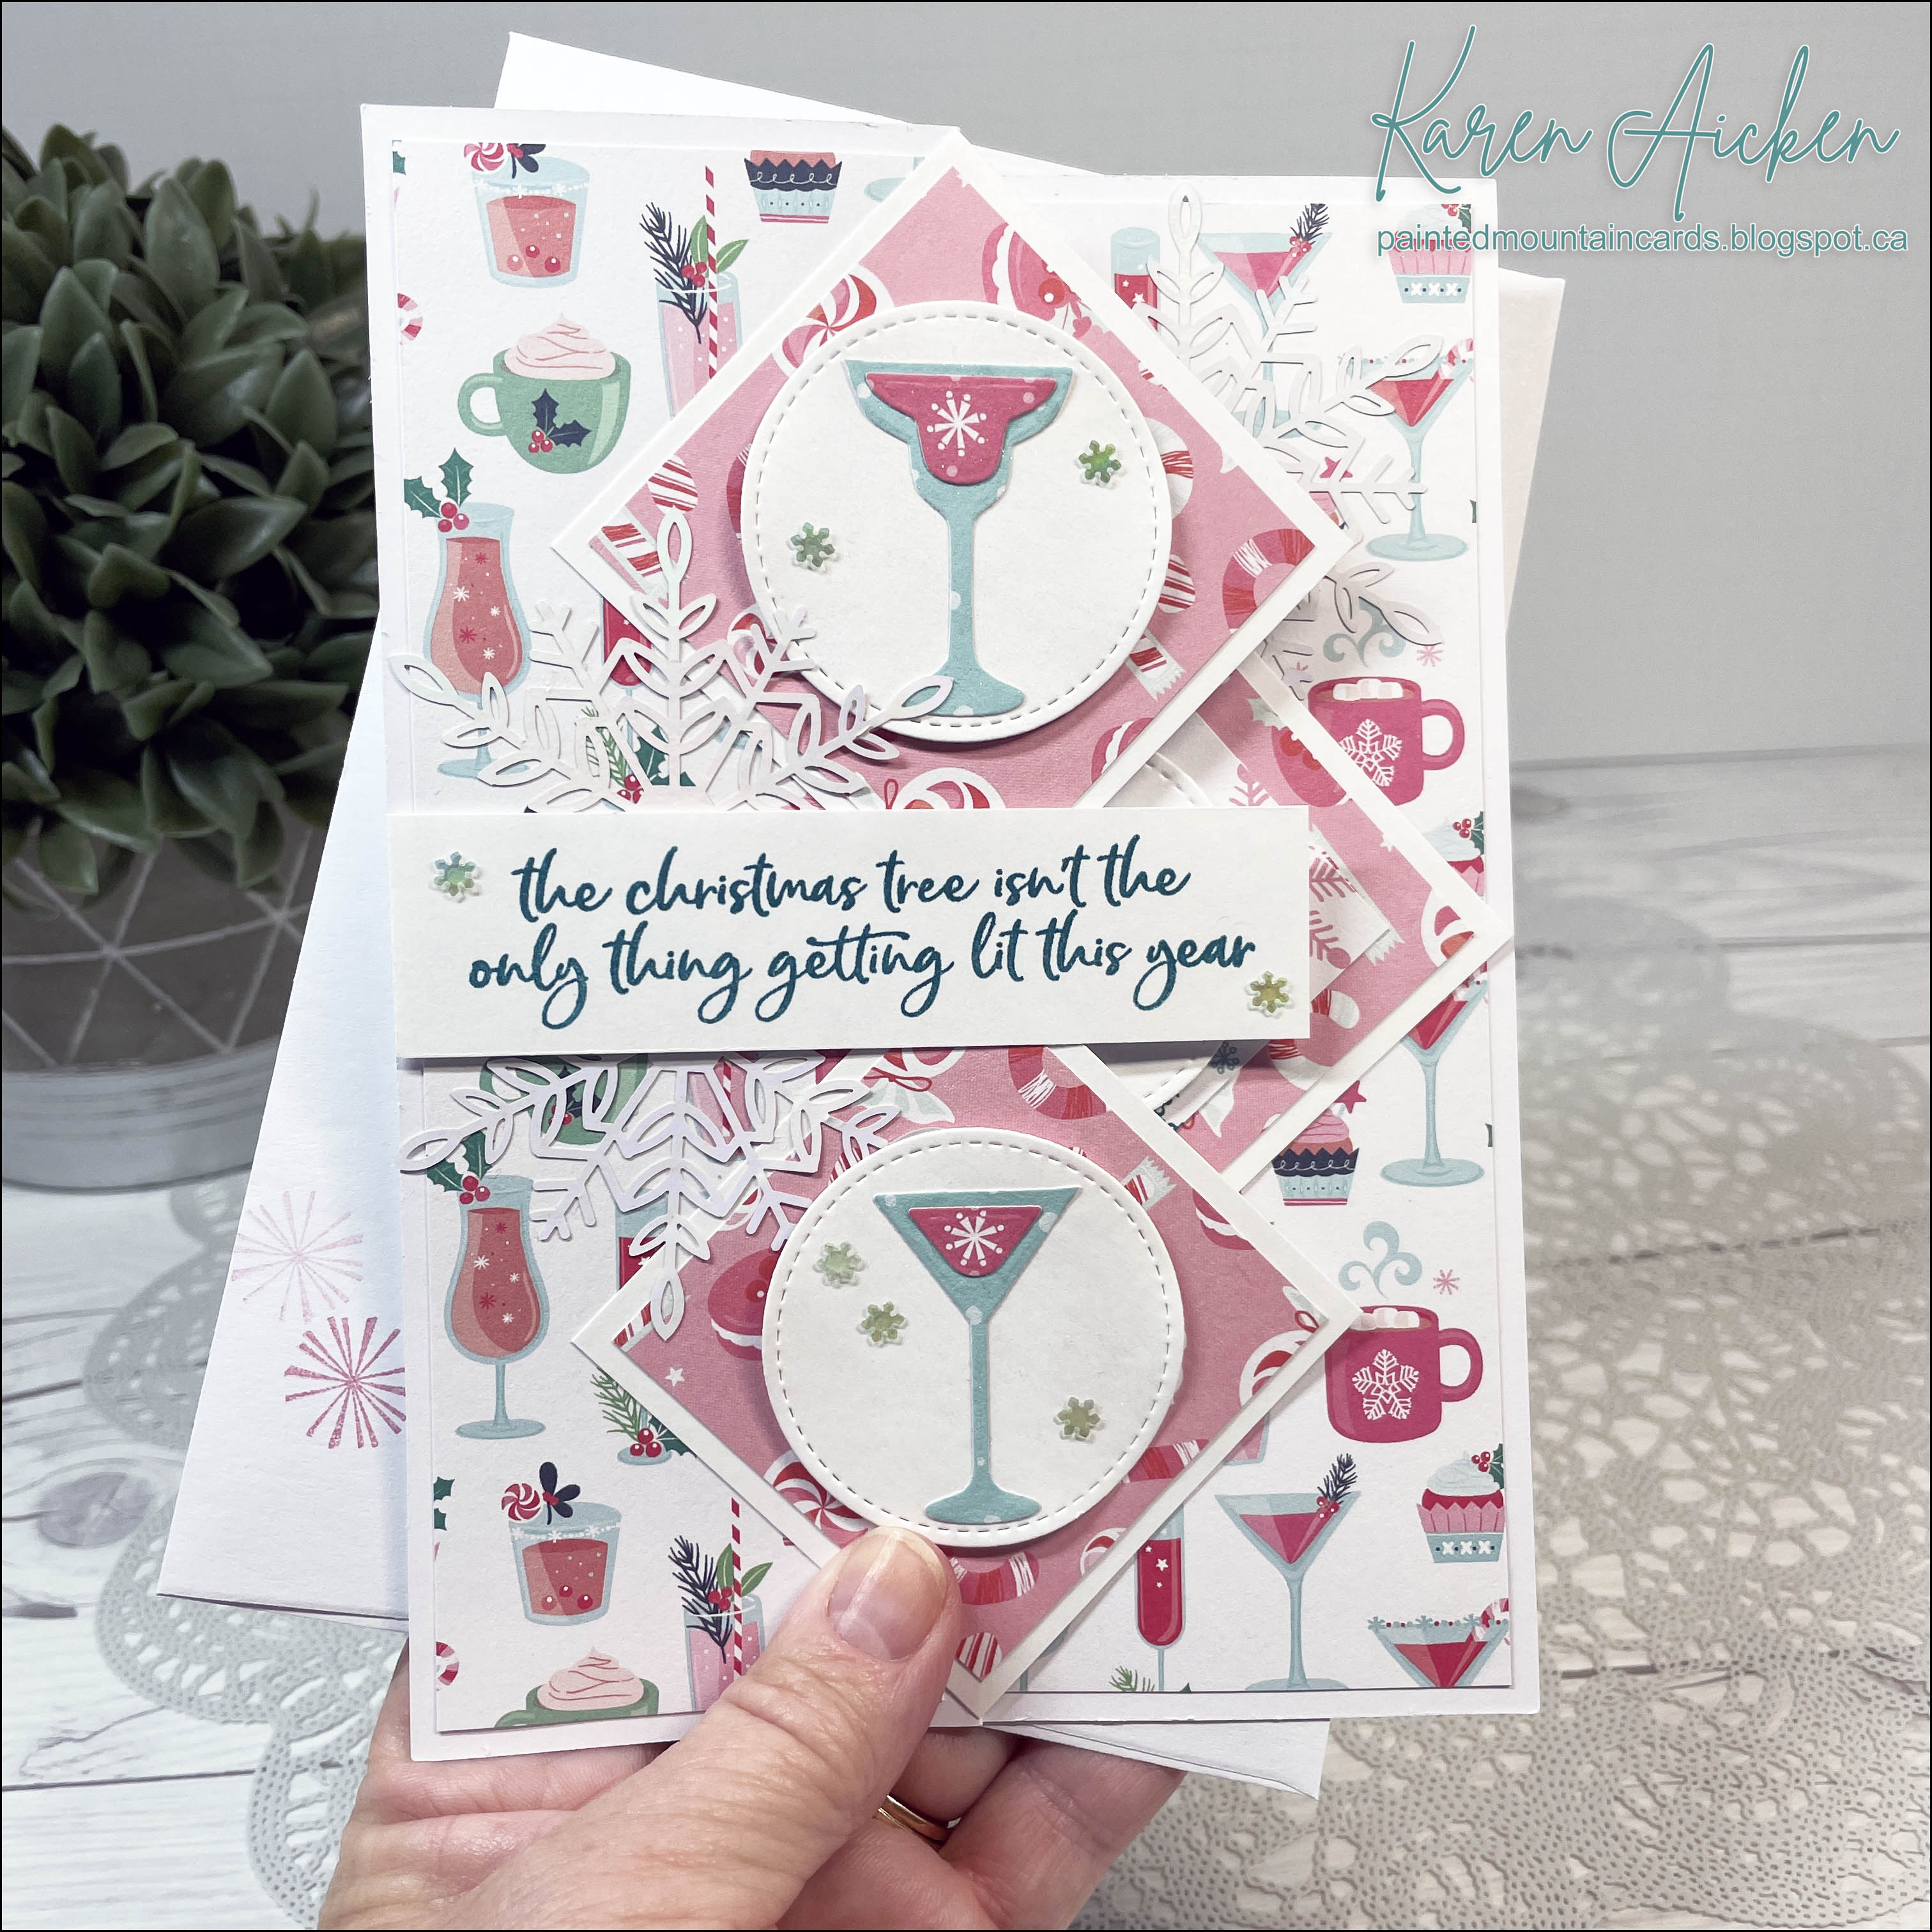
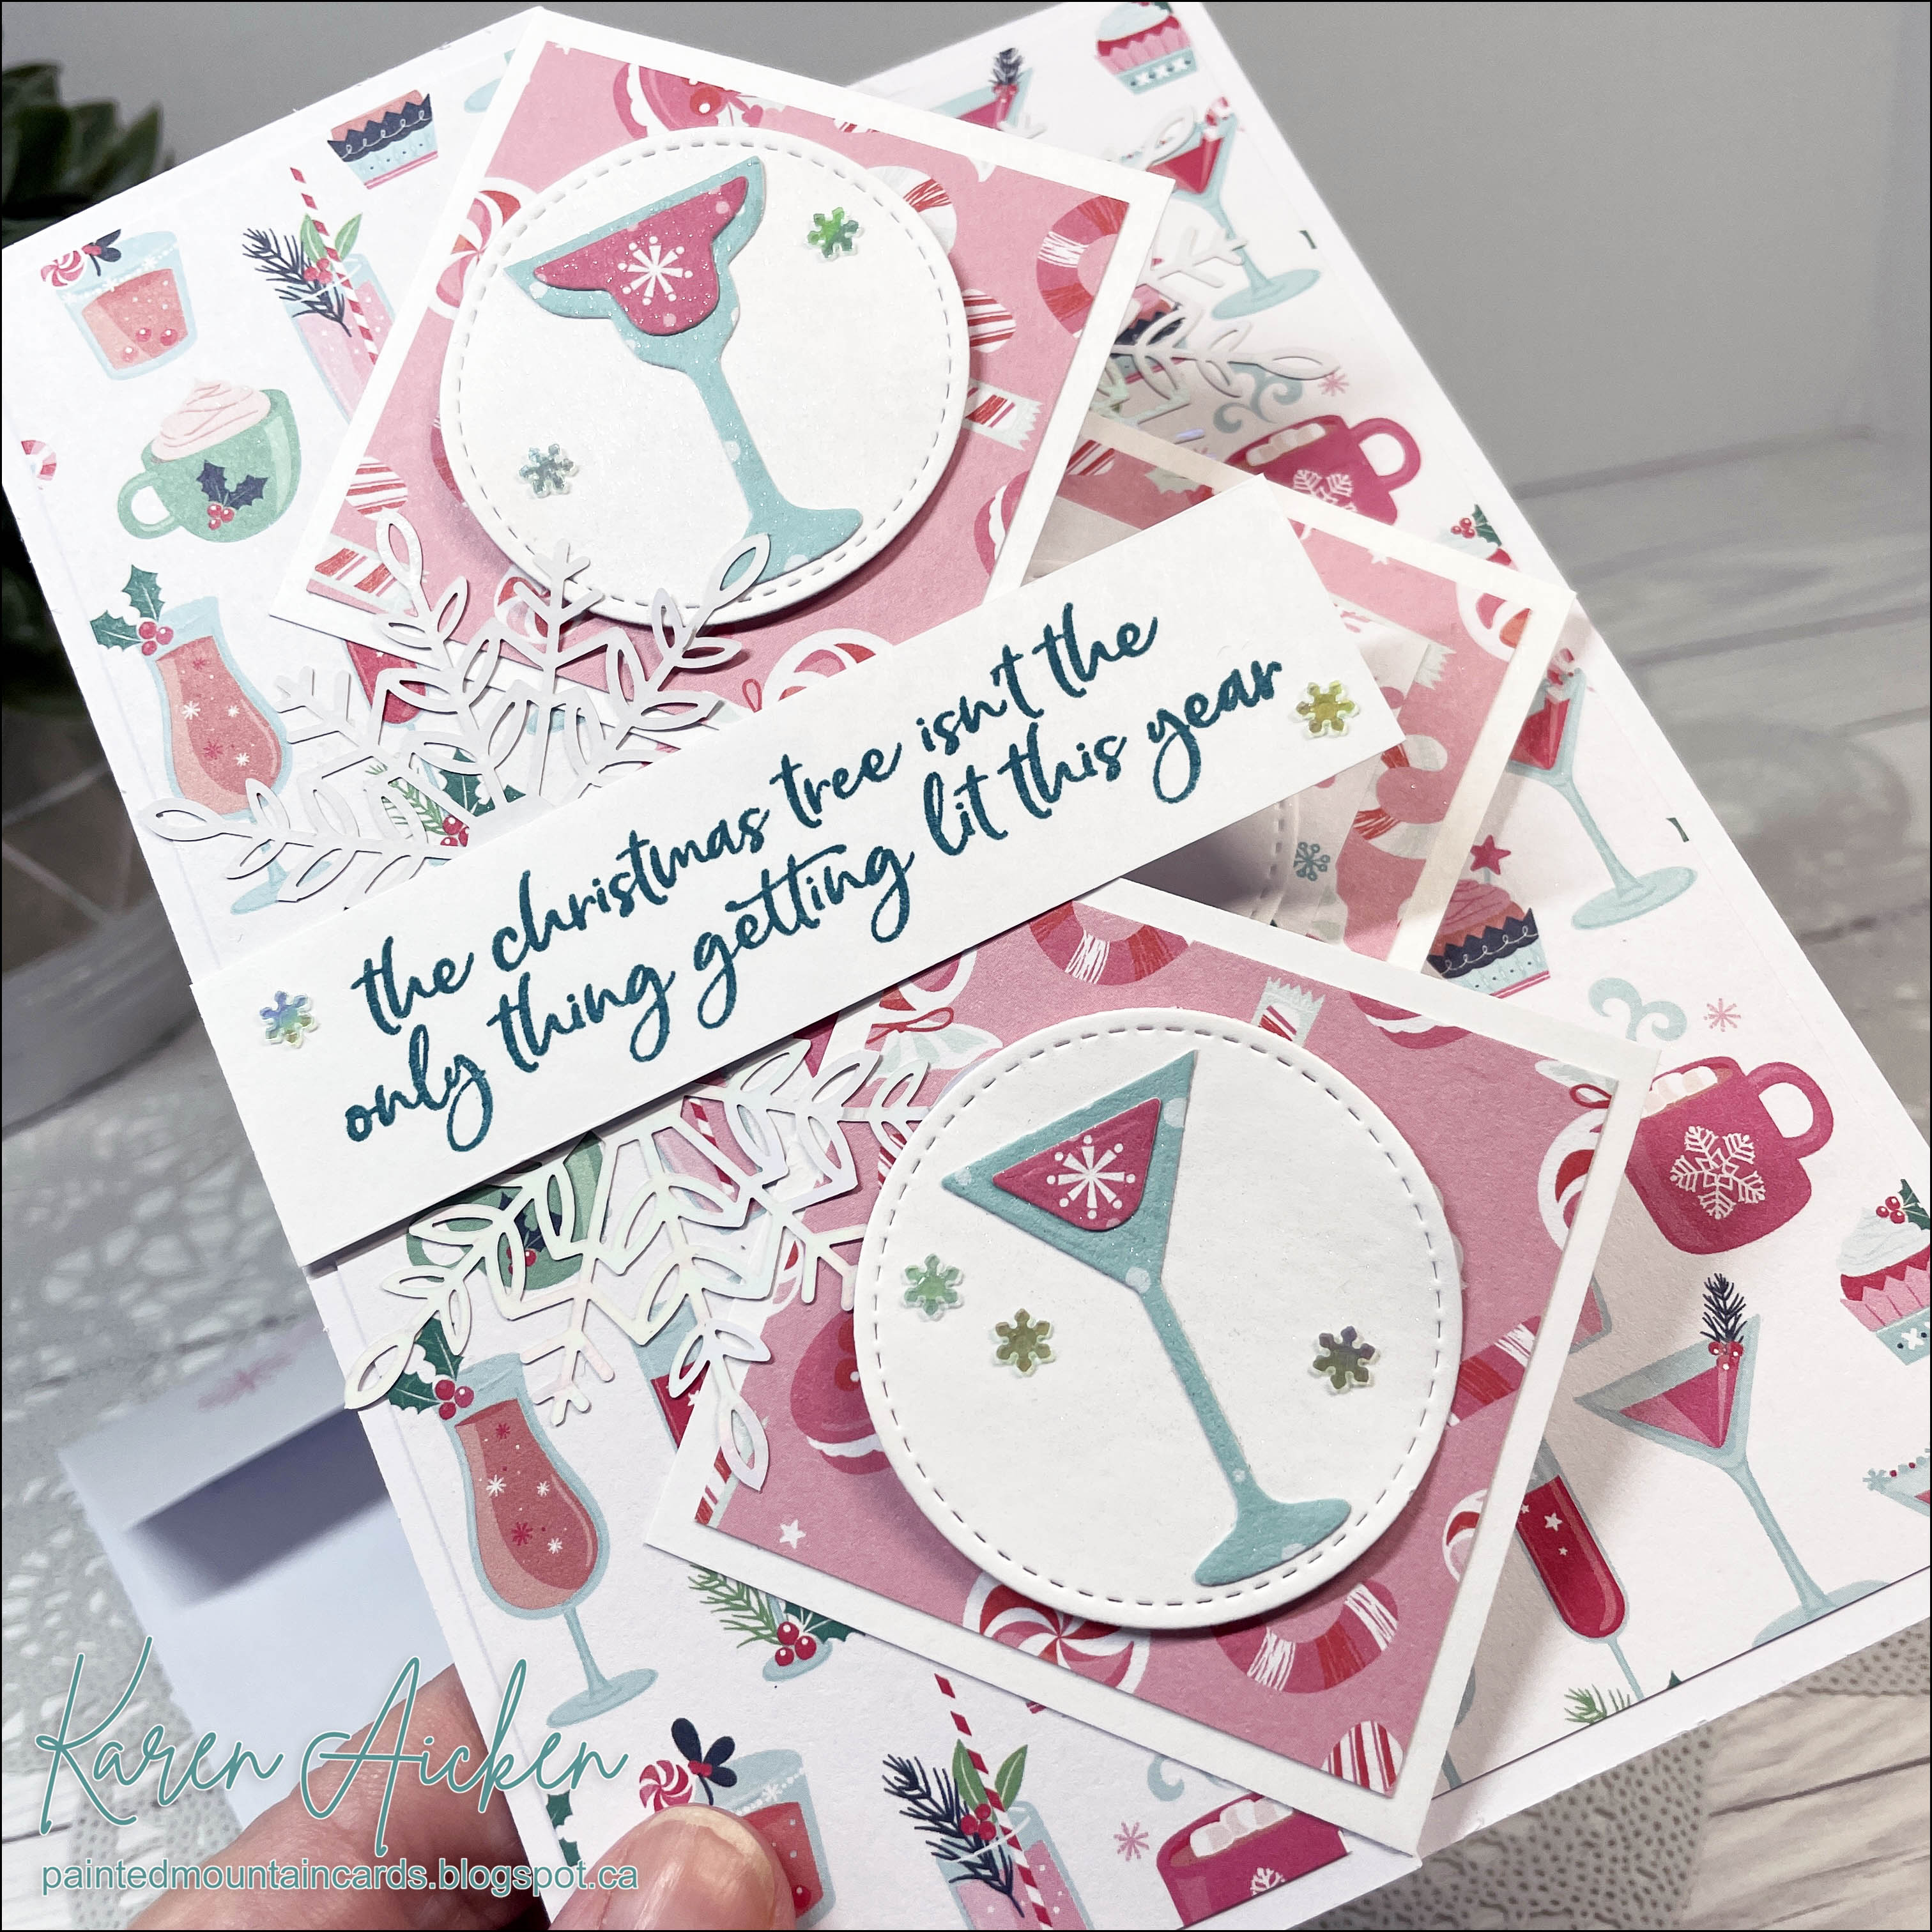
I have a couple of friends dealing with health issues, so I've been making cards to send for Happy Mail. This is one of them ... a Slimline Diamond Z-Fold Card. I made a number of this type of card back in 2022 in a 5x7" size. I loved making them, so I also came up with the measurements and a tutorial for making this Slimline size. You can find that tutorial HERE, and the measurements are at the end of my post.


I usually have a Wish List for Stampin' Up items but rarely order everything on that list. Sometimes I wait and wait and by the time I decide I'd really like/use a set, it's either discontinued or out of stock or .....     So I keep an eye on a Facebook group for Canadian's selling retired SU products. This Honey Bee Bundle is one of those sets - it had been retired for a while before it popped up on that group and I claimed it right away. I've had it for over a year now, and it's one of those sets I get a lot of use out of. 


The stamped & die cut bees were coloured with alcohol markers and I added Wink of Stella glimmer paint to their wings. On the inner diamond, there is the honeycomb die cut as well as a small sentiment (from a different set). I will sign on the blank white diamond when I go to send the card.


While I prefer a Slimline card to measure 3.5 x 8.5", this one is a full 4 x 8.5" to give me room to make the diamonds this size. It fits perfectly in a #10 business envelope for mailing, and this one will mail for a single stamp!


Measurements for Diamond Z-Fold Slimline Card by Karen Aicken 

Card base - 8 x 8.5". With the 8" side at the top, score at 2" and 4". The 4" scoreline is the center, so fold your card in half along that scoreline. Then fold the front right flap back to the outside along the 2" scoreline.

Patterned paper - TWO 1.75 x 8.25" pieces and ONE 3.75 x 8.25" piece. I don't always use the two smaller ones, often just adding one to the front and leaving the inside one undecorated. It's entirely up to you.

Diamonds - TWO 2.75" squares and ONE 2-1/2" square

Patterned paper (BE MINDFUL OF THE PATTERNED PAPER IF IT HAS A DIRECTIONAL PATTERN) TWO 2.5" squares and ONE 2.25" square.

Signing block - 2.25" cardstock square with a 2" square of white or light cardstock of your choice.

Pop Up strip - 4 x 3". With the 4" side at the top, score at 1, 2 & 3"
Assemble as shown in the video.


Supplies used:
Patterned paper - Bee Happy, Echo Parl
Honey Bee Bundle - Stampin' Up
Catherine Pooler coloured inks
Alcohol markers
Tasteful Label dies - Stampin' Up
1-1/2" square die - Hero Arts
Inside sentiment - Hand Delivered, Stampin' Up
Nesting circles - Hero Arts
Blending sponges
Wink of Stella


Thursday, 1 December 2022

Christmas Cocktails Diamond Z Fold Card


Hello my crafty friends and Happy December! December 1st is always the start of the Christmas season for our family, so of course I had to start the month by sharing a Christmas card.

I have a walkthrough of my card on YouTube


I made several of these Diamond Z Fold holiday cards to send out - I love how easily they work up but how much dimension you get from them. This one is 5 x 7" - I prefer either this size or a Slimline sized one.  The cocktails themselves were made using Karen Burniston's Happy Hour Charms.

I do have a tutorial for creating a Slimline version of this type of fun fold card, and you can find that HERE


The patterned paper I have had in my stash for a couple of years and I was able to make a number of cards using it this year. Still, it didn't seem to make a dent in the pad. 😊  The iridescent snowflake is also an older embellishment, but the sentiment is new to my craft room. It was sent to me by Scrap 'n Stamp Canada and is by Picket Fence Studios. This one was just too perfect with this patterned paper.


The sentiment inside is one I've had a few years so I'm not able to link it for you. The stitched circles are the fallaway pieces from when I make a Magic Iris card.


There are a lot of tutorials online for this type of card, but I really liked the 5 x 7" version as then the diamonds are a nice size for decorating. I found a tutorial to link for you, but of course, she doesn't refer to it as a Diamond Z-Fold. 😂  I always find it funny when stampers come up with their own names for a popular fun fold, not realizing it makes it hard for people to find your blog or YouTube video when searching. Anyhow, her finished card is BEAUTIFUL, which is why I chose to share her tutorial.  NOTE:  I didn't add all the layering panels that are often shown in these cards, as they are heavy enough and with even more layers the card would require extra postage. Click HERE to see Heather's tutorial and card.

This blog uses affiliate links whenever possible. This means, that at no cost to you, if you make a purchase through one of my affiliate links that I may receive a small commission from your purchase. I only link products that I own, love and use for my card making and not every link below is an affiliate one! 😊

Additional Supplies:
Patterned paper - Holiday Bash, Recollections (old)
Cheers - Avery Elle (inside sentiment)
5 x 7" Card and envelope
White cardstock
Shimmer Spray
Alcohol markers
Wonderful Snowflakes - Stampin' Up (retired)
Adhesive backed snowflakes - Stampin' Up (retired)

Wednesday, 30 November 2022

Snowman & Snowflakes Diamond Z Fold Card


Hello my crafty friends! Today I have another Diamond Z Fold card for the holidays - this time I used square dies to cut the diamonds instead of cutting by hand. They worked out SO much better - and I have all the details in my YouTube video:   


Below is what the card looks like open ...


I mentioned in the video, that I wasn't really happy with how that center diamond looked on the  white pop up base. I cut a 1.25 x 4" strip of the snowman print and glued it over the top of the white pop up piece. It hangs over on all three sides but that means you don't see any of the white and I was much happier with how it looked.

Everything I used was in my stash and at least a year old ... I think the newest thing used was the Pops of Color and I have had that since before last Christmas. Everything else is a lot older than that so it felt good to use it up.


With blue mirror cardstock and the glitter, this card is nice and sparkly! The 'let it snow' was die cut three times, twice from white card stock and once from the blue mirror. They were stacked together with the blue one on top for a nice sturdy element.


*****There are a lot of tutorials online for this type of card, but I really liked the 5 x 7" version as then the diamonds are a nice size for decorating. I found a tutorial to link for you, but of course, she doesn't refer to it as a Diamond Z-Fold. 😂  I always find it funny when stampers come up with their own names for a popular fun fold, not realizing it makes it hard for people to find your blog or YouTube video when searching. Anyhow, her finished card is BEAUTIFUL, which is why I chose to share her tutorial.  NOTE:  I didn't add all the layering panels that are often shown in these cards, as they are heavy enough and with even more layers the card would require extra postage. Click HERE to see Heather's tutorial and card.

Additional Supplies:
5 x 7" card and envelope
Patterned paper - Holiday Bash, Recollections (old, from my stash)
White cardstock
Blue mirror cardstock - Hunkydory
Snowflake dies - Impress
Blue mirror cardstock - Hunkydory


This blog uses affiliate links whenever possible. This means, that at no cost to you, if you make a purchase through one of my affiliate links that I may receive a small commission from your purchase. I only link products that I own, love and use for my card making and not every link below is an affiliate one! 😊

Friday, 25 November 2022

Diamond Z Fold for Hanukkah


Hello my crafty friends and welcome to Fun Fold Friday here on my blog. I pulled out this 12 x 12" patterned paper to make a Hanukkah card and got looking at the sticker sheet that was included.  I hadn't planned on making ANOTHER Diamond Z Fold card but with the partial paper sheet and those stickers ... it seemed to be the perfect choice.


I added some gold gel pen highlights and Pops of Color for shimmer and shine. The two navy stitched circles were the fallaway pieces from when I made a Magic Iris Card  and they were popped up with foam tape.


There are a lot of tutorials online for this type of card, but I really liked the 5 x 7" version rather than an A2 as then the diamonds are a nice size for decorating. I found a tutorial to link for you, but of course, she doesn't refer to it as a Diamond Z-Fold. 😂  I always find it funny when stampers come up with their own names for a popular fun fold, not realizing it makes it hard for people to find your blog or YouTube video when searching. Anyhow, her finished card is BEAUTIFUL, which is why I chose to share her tutorial.  NOTE:  I didn't add all the layering panels that are often shown in these cards, as they are heavy enough and with even more layers the card would require extra postage. Click HERE to see Heather's tutorial and card.

Additional Supplies:
5 x 7" card and envelope
White cardstock

This blog uses affiliate links whenever possible. This means, that at no cost to you, if you make a purchase through one of my affiliate links that I may receive a small commission from your purchase. I only link products that I own, love and use for my card making and not every link below is an affiliate one! 😊

Wednesday, 16 November 2022

Thanksgiving Diamond Z-Fold Card


Hello my crafty friends. Today I'm sharing a Diamond Z Fold card using older patterned papers and stickers from my stash. These cards work up so quick and easy and I love how they look! 


Since the stickers have gold foiling on them, I die cut the Happy Thanksgiving out of a metallic gold & copper cardstock. I also added Copper Pops of Colour to resemble enamel dots. There is lots of sparkle on this card!


... one more look ...


There are a lot of tutorials online for this type of card, but I really liked the 5 x 7" version as then the diamonds are a nice size for decorating. I found a tutorial to link for you, but of course, she doesn't refer to it as a Diamond Z-Fold. 😂  I always find it funny when stampers come up with their own names for a popular fun fold, not realizing it makes it hard for people to find your blog or YouTube video when searching. Anyhow, her finished card is BEAUTIFUL, which is why I chose to share her tutorial.  NOTE:  I didn't add all the layering panels that are often shown in these cards, as they are heavy enough and with even more layers the card would require extra postage. Click HERE to see Heather's tutorial and card.

Additional Supplies:
5 x 7" Card and envelope
Patterned paper - K & Co, old From my stash
White cardstock
Metallic cardstock - Damask Dreams - Hunky Dory
Stickers - Paper Studio

This blog uses affiliate links whenever possible. This means, that at no cost to you, if you make a purchase through one of my affiliate links that I may receive a small commission from your purchase. I only link products that I own, love and use for my card making and not every link below is an affiliate one! 😊

Tuesday, 8 November 2022

Snowflake Diamond Z-Fold Slimline


Hello my crafty friends.  Today I'm sharing the Snowflake Diamond Z-Fold Slimline Card created for my tutorial video back in September. I had wanted to show some different ideas in the video so quickly showed this card. If you would like to see the tutorial for these Slimline Z-Fold Cards, click HERE.


I love sparkle on a holiday card, and this card has LOTS of sparkle. The patterned paper was one that Lawn Fawn had last year and it has silver foiled snowflakes printed all over it. I die cut the Lawn Fawn stitched snowflakes from silver mirrored card stock and also added some prism gems. 😊


The 'let it snow' sentiment was die cut from silver and twice more from white card stock. Then I adhered them together with wet glue to make a nice sturdy sentiment. since so much of it hangs over the edge and I didn't want it to be floppy.


I really wanted to use a specific stamp on the inside, but I couldn't find that stamp set. So I chose an older Stampin' Up Paper Pumpkin sentiment. I did finally find the missing stamp set - whew. (It's an older set I've had it for years.)

I'm not sure if the papers or snowflake dies are still available, but I will try to link them for you below.

Measurements for Diamond Z-Fold Slimline Card by Karen Aicken 

Card base - 8 x 8.5". With the 8" side at the top, score at 2" and 4". The 4" scoreline is the center, so fold your card in half along that scoreline. Then fold the front right flap back to the outside along the 2" scoreline.

Patterned paper - TWO 1.75 x 8.25" pieces and ONE 3.75 x 8.25" piece. I don't always use the two smaller ones, often just adding one to the front and leaving the inside one undecorated. It's entirely up to you.

Diamonds - TWO 2.75" squares and ONE 2-1/2" square

Patterned paper (BE MINDFUL OF THE PATTERNED PAPER IF IT HAS A DIRECTIONAL PATTERN) TWO 2.5" squares and ONE 2.25" square.

Signing block - 2.25" cardstock square with a 2" square of white or light cardstock of your choice.

Pop Up strip - 4 x 3". With the 4" side at the top, score at 1, 2 & 3"
Assemble as shown in the video.

This blog uses affiliate links whenever possible. This means, that at no cost to you, if you make a purchase through one of my affiliate links that I may receive a small commission from your purchase. I only link products that I own, love and use for my card making and not every link below is an affiliate one! 😊

Any supplies I'm unable to link are listed at the very bottom of my post.

Additional Supplies:
White carestock 
Sentiment - October '21 Paper Pumpkin, Peaceful Christmas

Tuesday, 25 October 2022

Pumpkin Season Diamond Z-Fold Card


Hello my crafty friends. If you follow me, you know that I rarely post my cards in the same order I make them.  Today I'm sharing the second Diamond Z-Fold card I made last month. I had made a Halloween one as my first one and enjoyed it so much I immediately created this one! Then, I figured out the measurements for a Slimline version so I've been doing more with that layout than this 5 x 7" one. 

You can always click the label Diamond Z Fold on the right side of my blog to see the cards I've shared so far. (There are several more finished which will be shared in the coming weeks)

This card uses a pretty A4 patterned paper pad from Prima that I've had for years. I fussy cut the butterflies from one of the cut apart sheets included in the pad.


Inside I added another one of the cut aparts instead of a diamond for a different look.


There are a lot of tutorials online for this type of card, but I really liked the 5 x 7" version as then the diamonds are a nice size for decorating. I found a tutorial to link for you, but of course, she doesn't refer to it as a Diamond Z-Fold. 😂  I always find it funny when stampers come up with their own names for a popular fun fold, not realizing it makes it hard for people to find your blog or YouTube video when searching. Anyhow, her finished card is BEAUTIFUL, which is why I chose to share her tutorial.  NOTE:  I didn't add all the layering panels that are often shown in these cards, as they are heavy enough and with even more layers the card would require extra postage. Click HERE to see Heather's tutorial and card.

This blog uses affiliate links whenever possible. This means, that at no cost to you, if you make a purchase through one of my affiliate links that I may receive a small commission from your purchase. I only link products that I own, love and use for my card making and not every link below is an affiliate one! 😊

Any supplies I'm unable to link are listed at the very bottom of my post.

Additional Supplies:
Kraft card & envelope - 5 x 7"
Sequins - Purple Rita, Picket Fence Studios
White cardstock
Patterned paper & cut aparts - Amber Moon, Prima

Wednesday, 12 October 2022

'Happy Fall' Diamond Z-Fold Slimline


Hello my crafty friends!  I had been flipping through some of my fall patterned papers and saw this (12 x 12") sheet. There were two of them actually - they were from a retired package by Stampin Up and these were the only two sheets I had left. So I pulled one out and knew I would make a Slimline with it - but decided to make a Diamond Z-Fold Slimline instead.

The stitched leaves and the Happy Fall were die cut from a metallic card stock so there is lots of shine. You know I love shimmer and shine!


These cards are quick and easy to put together anyhow, but I kept it really simple by just adding a few metallic leaves and not a lot of other decorating. You can see my tutorial for this style of card on YouTube HERE.


Measurements for Diamond Z-Fold Slimline Card by Karen Aicken 

Card base - 8 x 8.5". With the 8" side at the top, score at 2" and 4". The 4" scoreline is the center, so fold your card in half along that scoreline. Then fold the front right flap back to the outside along the 2" scoreline.

Patterned paper - TWO 1.75 x 8.25" pieces and ONE 3.75 x 8.25" piece. I don't always use the two smaller ones, often just adding one to the front and leaving the inside one undecorated. It's entirely up to you.

Diamonds - TWO 2.75" squares and ONE 2-1/2" square

Patterned paper (BE MINDFUL OF THE PATTERNED PAPER IF IT HAS A DIRECTIONAL PATTERN) TWO 2.5" squares and ONE 2.25" square.

Signing block - 2.25" cardstock square with a 2" square of white or light cardstock of your choice.

Pop Up strip - 4 x 3". With the 4" side at the top, score at 1, 2 & 3"
Assemble as shown in the video.

This blog uses affiliate links whenever possible. This means, that at no cost to you, if you make a purchase through one of my affiliate links that I may receive a small commission from your purchase. I only link products that I own, love and use for my card making and not every link below is an affiliate one! 😊

Any supplies I'm unable to link are listed at the very bottom of my post.

Additional Supplies:
Patterned paper - Stampin' Up (retired)
Rust cardtocks - old, stash
Metallic cardstock - Glitter Ombre, Hunky Dory

Monday, 3 October 2022

Lumberjack Diamond Z-Fold Slimline


Hello my crafty friends and welcome to Masculine Card Monday here on my blog.  Today I'm sharing the Diamond Z-Fold Slimline card I completed in the video tutorial last week. If you would like to see the tutorial for creating one of these cards, click HERE.


The center diamond is on a simple box platform, so it floats above the inside back of the card. After I finished the video and taking the photos, I decided this would be a great birthday card for my brother. So I dug around in my stash and found some retired Happy Birthday peel off stickers in black. I added one at the top left inside, and it is hidden when the card is closed. I didn't take a photo though.

I'm pretty happy with how these cards work out, and how easy they are to put together.


Measurements for Diamond Z-Fold Slimline Card by Karen Aicken 

Card base - 8 x 8.5". With the 8" side at the top, score at 2" and 4". The 4" scoreline is the center, so fold your card in half along that scoreline. Then fold the front right flap back to the outside along the 2" scoreline.

Patterned paper - TWO 1.75 x 8.25" pieces and ONE 3.75 x 8.25" piece. I don't always use the two smaller ones, often just adding one to the front and leaving the inside one undecorated. It's entirely up to you.

Diamonds - TWO 2.75" squares and ONE 2-1/2" square

Patterned paper (BE MINDFUL OF THE PATTERNED PAPER IF IT HAS A DIRECTIONAL PATTERN) TWO 2.5" squares and ONE 2.25" square.

Signing block - 2.25" square with a 2" square of white or light cardstock of your choice.

Pop Up strip - 4 x 3". With the 4" side at the top, score at 1, 2 & 3"


This blog uses affiliate links whenever possible. This means, that at no cost to you, if you make a purchase through one of my affiliate links that I may receive a small commission from your purchase. I only link products that I own, love and use for my card making and not every link below is an affiliate one! 😊

Any supplies I'm unable to link are listed at the very bottom of my post.


Additional Supplies:
White cardstock

Tuesday, 27 September 2022

Diamond Z-Fold Slimline Card with Flowers


Hello my crafty friends!  Last week I shared a Diamond Z-Fold card that was a 5 x 7" size. I really enjoyed making that card (and a second one that hasn't been shared yet) but wanted to figure out how to adapt the measurements for a Slimline card. Today, I have a YouTube video with a tutorial showing how to do that!  


This is the card I featured in the video, but the tutorial was for a masculine Diamond Z-Fold Slimline and I shared a peek at two others I've made. I'm really having fun with this!


The gold mirror card stock shows up much better in real life (and in the video) than in the photos.


That center diamond is actually mounted to a pop-up platform so it floats above the back panel.


NOTE:  in the video I shared several other samples. Those have not yet been posted here on my blog or on my other social media platforms. I will be sharing them in the coming weeks though!

Measurements for Diamond Z-Fold Slimline Card by Karen Aicken 

Card base - 8 x 8.5". With the 8" side at the top, score at 2" and 4". The 4" scoreline is the center, so fold your card in half along that scoreline. Then fold the front right flap back to the outside along the 2" scoreline.

Patterned paper - TWO 1.75 x 8.25" pieces and ONE 3.75 x 8.25" piece. I don't always use the two smaller ones, often just adding one to the front and leaving the inside one undecorated. It's entirely up to you.

Diamonds - TWO 2.75" squares and ONE 2-1/2" square

Patterned paper (BE MINDFUL OF THE PATTERNED PAPER IF IT HAS A DIRECTIONAL PATTERN) TWO 2.5" squares and ONE 2.25" square.

Signing block - 2.25" cardstock square with a 2" square of white or light cardstock of your choice.

Pop Up strip - 4 x 3". With the 4" side at the top, score at 1, 2 & 3"
Assemble as shown in the video.

This blog uses affiliate links whenever possible. This means, that at no cost to you, if you make a purchase through one of my affiliate links that I may receive a small commission from your purchase. I only link products that I own, love and use for my card making and not every link below is an affiliate one! 😊

Any supplies I'm unable to link are listed at the very bottom of my post.


Additional Supplies:
Patterned paper - Flower Market, CartaBella
Off-white cardstock - scrap

Tuesday, 20 September 2022

Diamond Z-Fold For Halloween


Hello my crafty friends. Today I'm back with another Halloween card using papers & ephemera from Doodlebug Designs. I don't know what I was thinking when I bought several different Halloween Odds & Ends packages last November when they went on sale. Each package has a LOT of ephemera ... I now have enough to make Halloween cards for the rest of my life. And beyond! 😂  

That being said, it IS fun that I don't feel the need to be stingy with these cute pieces! Today's card is a Fun Fold card - a Diamond Z-Fold. Although they seem to go by a number of different names and they have been around for quite a while. I finally made my first one and immediately made a second that will be shared another day. And I have so many ideas for more!  Z-Fold Cards are my very favourite type of Fun Fold cards to make, so this variation is right up my alley. I can't believe it took me so long to make one.  

I have also figured out the measurements to make a Slimline version and will be sharing that - along with a full tutorial - next week! In fact, I can't seem to stop making the Slimline version and will have several to show in the video. 


I've had this patterned paper for a very long time, so it was fun to actually use it as well. 


This is a 5 x 7" card, and is nice and flat when it comes out of the envelope. When it's fully open, the middle diamond floats above the back of the card. It's mounted with a simple box pop up platform. 


I still have a some Doodlebug spider embellishments left from last years cards so I'm having fun adding them to my cards this year too. They might be retired now, but if not I will link them for you. You can see the shine they give on the ghost truck grill.


There are a lot of tutorials online for this type of card, but I really liked the 5 x 7" version as then the diamonds are a nice size for decorating. I found a tutorial to link for you, but of course, she doesn't refer to it as a Diamond Z-Fold. 😂  I always find it funny when stampers come up with their own names for a popular fun fold, not realizing it makes it hard for people to find your blog or YouTube video when searching. Anyhow, her finished card is BEAUTIFUL, which is why I chose to share her tutorial.  NOTE:  I didn't add all the layering panels that are often shown in these cards, as they are heavy enough and with even more layers the card would require extra postage. Click HERE to see Heather's tutorial and card.

Since the Doodlebug patterned paper I used is retired, I am linking a different package for you. I'm such a huge Doodlebug fan!

This blog uses affiliate links whenever possible. This means, that at no cost to you, if you make a purchase through one of my affiliate links that I may receive a small commission from your purchase. I only link products that I own, love and use for my card making and not every link below is an affiliate one! 😊

Any supplies I'm unable to link are listed at the very bottom of my post.


Additional Supplies:
5 x 7" card and envelope
White cardstock
Patterned paper - Doodlebug Sook Alley (double sided)