Showing posts with label Spellbinders. Show all posts

Friday, 19 July 2024

Sending Hugs Pop-Up Card w/ July's Sheetload of Cards


Welcome to Fun Fold Friday here on my blog!  I finished off another one of my floral Sheetload cards, and made it a pop-up using Karen Burniston's Katherine Label Pop Up die set. This is my second play with the July Sheetload, and this time I made all eight cards but didn't finish off the insides. I wanted to take my time and make them into cards I will want/need in the coming months, and also make some of them into pop-up cards. You can see my original post HERE.   This is a fun Sheetload sketch, and I especially like that it's made for a 5x7" card size. I'll be using it again and again!


For today's card, I made it to send for Happy Mail. I did some hot foiling several months ago, putting the sentiments etc into a little plastic bin. So I rooted through the bin for the sentiments used on today's card.  (My Spellbinders Glimmer Foil machine is REALLY difficult to use - the platform that needs to be moved after heating up is extremely stiff so it isn't something I do very often.)


I've realized that I don't often use the Katherine Label Pop Up in the horizontal position, but it's something I'm going to do more. It's probably my most used die set - it's quick and easy to use and you get great dimension and lift to your pop-up.


The friend sentiment is also foiled in the same rainbow foil as the words on the front, and I stamped another sentiment on the signing block inside.


Supplies used:
Patterned paper - Brianna, K & Company (old, from my stash)
Narrow gold foil tape - Amazon .ca
Gold foil paper - Recollections
Floral cluster die - Hand Penned, Stampin' Up
Stardust glitter pen - Sakura
Catherine Pooler coloured inks
Blending sponges - Tim Holtz
Stitched Scalloped circle nesting dies - Tutti Designs
5x7" card bases & envelopes - Ohuhu (Amazon .ca)
Vellum - Stampin' Up
Katherine Label Pop Up - Karen Burniston
Spellbinders Glimmer foil machine
Sentiments - my stash 
Glitter Dot stickers - Ecstasy Crafts
Happy Thoughts - Stampin' Up


Friday, 12 July 2024

Pop Up Birthday Card w/ July's Sheetload of Cards

Welcome to Fun Fold Friday here on my blog!  I finished off another one of the July Sheetload of Cards - this time it's a fancy-dancy pop-up Birthday Card. 😊

I added a foiled sentiment strip to the front. I haven't used my glimmer machine in months - it's REALLY difficult to remove the hot tray from the base so I tend not to want to use it. I actually wrenched my shoulder one time using it and was in pain for a few days. However, I did do a batch of foiling the last time I had it out and this sentiment is from the little bin of foiled words I have. 


Inside I used Karen Burniston's Little Labels Pop Up - and added it to a simple box pop up to raise it up a bit inside the card. This is totally Karen B's idea - I think she taught in in a class last year and I have wanted to try it ever since. I tried to find the link for you but I have no idea where I ended up finding it when I was ready to make this card.

I added more of the patterned paper inside the card, and realized that the Washi Tape Balloons from Pinkfresh Studios matched the patterned paper AND the theme of the card. The entire roll of Washi Tape had been adhered to white card stock last year so I simply fussy cut the ones I wanted to use. I added another foiled sentiment, and a washi tape flower from a different PFS roll. Oh, and I added a stitched, scalloped circle to the centre label of the Little Labels Pop Up for a different look.


The final sentiment was stamped on one of the Labels Crosshatch and I added it inside the card, trimming off the bottom edge. 


If you are curious about the pop up box, I used a strip of patterned paper that measured 6.75 x 3".  It was scored at .5", 1.5" and 2.5" then adhered inside the card. When it was dry I added the Little Labels Pop Up on top of it. Definitely a technique I will use again, since I love this die set with a 5x7" card.

I will keep working on finishing off this second Sheetload of cards and sharing them as I do.


Supplies used:
Patterned paper - Brianna, K & Company (old, from my stash)
Narrow gold foil tape - Amazon .ca
Gold foil paper - Recollections
Floral cluster die - Hand Penned, Stampin' Up
Little Labels Pop Up - Karen Burniston
Labels Crosshatch - Karen Burnistson
Balloon Washi Tape - Pinkfresh Studios
Floral Washi Tape - Pinkfresh Studio's
Foiled sentiments - my stash
Glimmer Foil machine - Spellbinders
Birthday Wishes - Honey Bee
Alcohol Markers
Stardust glitter pen - Sakura
Catherine Pooler coloured inks
Blending sponges - Tim Holtz
Stitched Scalloped circle nesting dies - Tutti Designs
5x7" card bases & envelopes - Ohuhu (Amazon .ca)
Vellum - Stampin' Up

Monday, 15 April 2024

Mini Slimline Butterfly Pop Up Card


I have a fairly new 8x8" paper pad that includes a sheet with panels & tags to fussy cut. Since the panels fit perfectly on a Mini Slimline card, that is what I used for the front of this card. I have both the printed papers and the coordinating solids and used both as it's nice not to have to try to match up random cardstock colours. I added a stamped and die cut circle over the open circular area on the panel and some glittery ephemera for a pop of colour. I also added a small gold foil butterfly and gold glitter dots for additional shimmer & shine.


I haven't used the Butterfly Pop up die set in awhile, so pulled it out again. I wasn't sure if it would work in a 3.5" width - but it fits easily!


The butterfly base was die cut from gold foil card stock and I ended up cutting the wings and body from scraps of patterned paper that were sitting on my stamping table. The colours worked out well and I was able to use them up. Finally, a stamped sentiment from Catherine Pooler and some glitter dots and my card was finished. I know just who this is going to 😊


Supplies used:
Patterned paper (and coordinating solids)- The Paper Boutique
Ephemera - Woodland Stories, Little Birdie
Double Stitched Circle dies - Divinity Designs
Hexagon Punch - Stampin' Up
Pop Up Butterfly die set - Spellbinders
Gold foil card stock
Little Etched Butterflies - Paper Rose
Happy Birthday Many Ways - Catherine Pooler
Inside Out Birthday - Catherine Pooler
Glitter Dots

Friday, 19 January 2024

Butterfly Pop Up Card


Today I'm sharing a thinking of you card I made for my stash. I like having these on hand, as I can send it out for several different reasons or occasions. I'm working on using up this paper as well. This one was the 8x8" package but I also have a 12x12" package and I find the prints are just too big for cardmaking. I'm trying to make the best use out of it but have accepted that there are a lot of sheets that will not work and I'm going to give those to the grandkids for their craft box.


I used Hero Arts nesting butterfly shapes for the additional butterflies then the Thinking of You which is from the Stamps of Life. I like it when word dies come with a shadow!


Inside is the Butterfly Pop Up die set by Spellbinders, which I haven't used for awhile. Before adhering it down though, I cut a Crosshatch Oval from floral paper then cut it down the center. It was glued on either side of the center fold to relieve any bulk from the 'fold in a fold'.


The butterfly wings lift as the card is opened, and will be a nice surprise for the recipient.


Supplies used:
Patterned paper - Circle of Love 8 x 8" Stamperia
Thinking of You - the Stamps of Life
Glitter Dots
Stickles
Ovals Crosshatch, Karen Burniston
Pop Up Butterfly - Spellbinders
Nested Butterfly shapes - Hero Arts
Shimmer Spray
Lacy Layers dies - Waffle Flower
5 x 7 card blank and envelope

Tuesday, 29 August 2023

Foiled Lantern Birthday Card


I really enjoyed creating this Birthday card for a friend and I used hot foiling and metallic cardstocks for LOTS of shimmer & shine.


After hot foiling the Sunburst hot foil plate, I heated up a Mirror Rectangle hot foil plate with the used foil for this stunning reverse foiled sunburst background. Oh, it just makes me happy!  The sentiment was also foiled with the same rainbow foil.

The lantern was die cut from a mottled metallic cardstock and backed with vellum. 


Here is a peek at the inside ...


One more look ...


Having been asked how many cards I make I thought it would be fun to keep track this year. Many of my posts include more than a single card or project and below is my tally. 

Card Tally for 2023
January - 53 cards
February - 56 cards
March - 55 cards
April - 32 cards
May - 43 cards
June - 34 cards
July - 56 cards
August so far - 103 cards

I decided to cancel the subscription that provided linked thumbnails to what products I used on my cards. It was costing me out of pocket each month, so I’m back to listing what I used.

Supplies:
Glimmer Foil system - Spellbinders
Rainbow foil - Spellbinders
Mirror Rectangle Hot Foil Plate - Pinkfresh Studio
5 x 7" Nesting Rectangles - Waffle Flower
Glitter Ombre Mirri Card - HunkyDory
Vellum
Wink of Stella
Glitter Dots - Ecstasy Crafts
Sending Birthday Wishes - Everyday Sentiments Hot Foil Plate - Spellbinders
Patterned paper inside - Vivid Drops VIVID, Craft Consortium
Words inside - Here Comes Birthday Wishes - Pinkfresh Studios
Mini MISTI

Thursday, 13 April 2023

Hummingbird Shaped Card


Hummingbirds remind me of my Mom. So do lambs and pansies, but I have managed not to purchase any of the lovely pansy stamps & dies that have been released the past year or so. But when I saw this 5 x 7" shaped hummingbird die from Spellbinders? I might have actually gasped before I grabbed it. In fact, the designer has several dies in this line including a smaller hummer with lily's and that ended up in my cart too. What can I say - sometimes I'm weak. 😂

I wanted to play with it right away to make a birthday card for a friend, so I grabbed some of my Mirri cardstock (Hunkydory) and this is what I came up with. This card is also the 4th edition to my monthly series Shaped Cards

I just love how it looks with the mirrored and metallic card stocks! 


Inside I added an oval to stamp the sentiment on, since the die also embosses the details and it's too bumpy to stamp directly onto.

NOTE:  I cut the large outline shape three times. Once from the green/blue mirrored card stock and twice from white. The green/blue layer was adhered to one of the white ones then I proceeded to decorate it with the rest of the pieces in the set, fitting them like a jigsaw puzzle. The die embossed the lines so it's easy to see where they all fit. That second white hummer was used as the card back.


To make the hinge to attach the back of the card, I scored a line straight across as shown below, then added glue ABOVE the score line. Then I attached the back hummingbird shape to the front. When it was dry, I had a shaped card that will stand on it's own for display. Oh, and I also trimmed off some of the bottom feathers on the inside back (shown below) to help it stand.


Below is the card opened slightly and standing, and it just makes me HAPPY!!!  I am going to have to make a few more as I know several people who also love hummingbirds. This die will also fit on the front of a 5 x 7" card if I choose not to make it a shaped card. ❤️


Having been asked how many cards I make I thought it would be fun to keep track this year. Many of my posts include more than a single card or project and below is my tally. 

Card Tally for 2023
January - 53 cards
February - 56 cards
March - 55 Cards
April so far - 16 Cards

Additional Supplies:
Mirri Damask cardstock - Hunky Dory 
White cardstock

This blog uses affiliate links whenever possible. This means, if you make a purchase through one of my affiliate links that you pay the same amount but I may receive a small commission from your purchase. I only link products that I own, love and use for my card making and not every link below is an affiliate one! 😊


Thursday, 29 December 2022

Winter Pop Up Birthday Card


Hello my crafty friends. This Birthday card has it all ... stencilling, Glimmer Foiling, stickers, die cutting, stamping and of course it's also a pop up card. 😊 I made it for my Sister In Law who celebrates a December Birthday.


The lovely blue snowflake background was reverse glimmer foiled using the solid plate and the leftover foil from doing different panel. Since the sentiments were gold foiled, I added plenty of gold peel off stickers, die cut the panel with a stitched rectangle die and added it to the stencilled card front.


Inside, I used the new Bam Box die set by Karen Burniston. As soon as you open the card, the Box pops up the Happy Birthday. So fun! 


There is more stencilling inside, a stamped sentiment and a gold foiled word on the left side.


Additional Supplies:
5 x 6.5 card & envelope - Michaels
White cardstock
White pearl cardstock
White matte glossy cardstock

This blog uses affiliate links whenever possible. This means, if you make a purchase through one of my affiliate links that you pay the same amount but I may receive a small commission from your purchase. I only link products that I own, love and use for my card making and not every link below is an affiliate one! 😊

Saturday, 10 December 2022

Pair of Rockin' Rectangle Christmas Cards


Hello my crafty friends! I pulled out an older patterned paper pad for my card share today. In fact, I cut down several of the sheets and ended up with SIX similar card fronts. I made two each with different pop up's by Karen Burniston and these two use the Rockin' Rectangle. 

Next week I will share the card pair that uses the Little Labels Pop Up and if you'd like to see the ones already posted that use the Paper Frames Pop Up ... click HERE.  The card fronts of the first two and these two are very similar, if you are thinking that you've already seen these. 😂

I have a walkthrough of my cards on YouTube


I decorated the tree with peel off Glitter Dots so there is lots of shine but since they are flat stickers there is no extra bulk.


These two cards have the Rockin' Rectangle Pop Up inside. This is another one of my favourite dies by Karen Burniston and it goes together quickly.


The sentiment on the second card was done by 'reverse foiling' and I added gold gel pen highlights to the stocking.


This is the inside of the second one. The additional snowflakes dies are linked below.


See the height and dimension you get with this die set? 🥰


Additional Supplies:
Patterned paper - Holiday Wonder, Hobby Lobby (old, from my stash)
5 x 7" Cards & Envelopes
Sentiment stamp - Perfectly Plaid, Stampin' Up (retired)

This blog uses affiliate links whenever possible. This means, if you make a purchase through one of my affiliate links that you pay the same amount but I may receive a small commission from your purchase. I only link products that I own, love and use for my card making and not every link below is an affiliate one! 😊

Friday, 9 September 2022

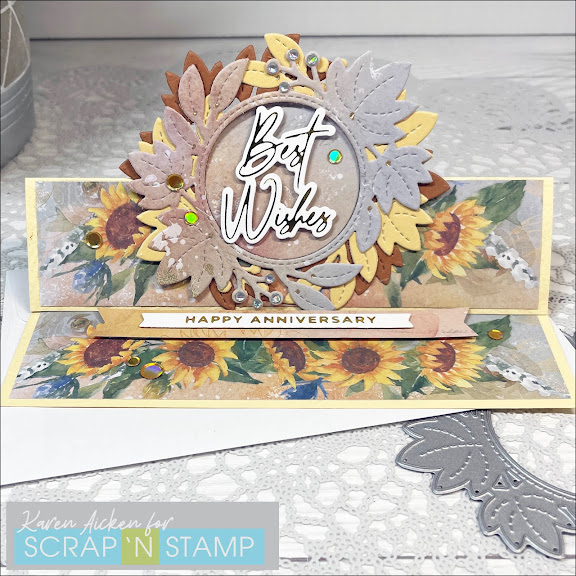
Anniversary Mini Slimline Easel Card


Hello my crafty friends and welcome to Scrap 'N Stamp Canada's September Inspiration Hop "The Colours of Fall". I created a Mini Slimline Easel card and used a die that is intended to be an add-on for the Magic Iris die set. I wanted to show you an alternative use for the Magic Iris Fall Leaf Add On die and have a quick walk through on YouTube:   


As much as I LOVE the beautiful floral patterns in the paper pad, the back side have subtle prints as well and that is what I used for the front 'wreath'. Most of the supplies I used are available at Scrap 'n Stamp


I don't actually make a lot of Easel Cards, because I don't want to send a card that requires 'instructions'. I use my hubby for those experiments, if I hand him a fun fold card and he doesn't know how to open it or stand it up then it's a fail for me. Apparently I've never given him an Easel Card before, because when I made one for our daughter & showed him he figured it out right away. Now I can go ahead and make more - yeah! This is my first Mini Slimline Easel card and I am very happy with it. It stands nicely for display, but has a nice small footprint as well. 


The finished size of this folded Mini Slimline card is 3.25 x 6.25" so I could take advantage of the full 6" width of the pretty patterned paper. 
NOTE:  Card base is:  6.5 x 6.25.  You will score down from the 6.5" side at 1-5/8" x 3-1/4".


The next stop on the hop is:  Meghan

This blog uses affiliate links whenever possible. This means, that at no cost to you, if you make a purchase through one of my affiliate links that I may receive a small commission from your purchase. I only link products that I own, love and use for my card making and not every link below is an affiliate one! 😊

Any supplies I'm unable to link are listed at the very bottom of my post.

Additional Supplies:
Textured buff cardstock - old, from my stash

Tuesday, 26 July 2022

Three Fold Flap Mini Slimline Christmas Cards - with NO LEFTOVER SCRAPS!


Hello my crafty friends! Back in May I had an idea for using three 6 x 6" patterned papers to create a trio of Mini Slimline Fold Flap cards with NO leftover pieces. I was really happy with how it worked, and it's one of my most popular video's. 😊  You can find the video HERE and the coordinating blog post is HERE.

EDITED - I forgot to post the short video clip, so adding it after this post has gone live:


When I was flipping through some holiday papers, I decided to use these pretty (retired) foiled papers and create a trio of Christmas cards for my stash. The papers are 12 x 12", but I simply cut three 6 x 6" pieces from different sheets in the package. I don't usually buy (or use) 6 x 6" papers because I prefer to make Slimline cards to A2 sized cards and the 6" length is just not long enough! That's why I didn't cut all three of the sheets down to 6 x 6", as I wanted the 12" length on the remaining pieces available to use later on.


I used lots of copper foiling on this card to match the copper foiled bits in the patterned paper. Both positive and negative glimmer foiling worked perfectly for the circle elements on the card front. I used any leftover foiled scraps to die cut small snowflakes from. Those smallest snowflakes are actually from Karen Burniston's Evergreen Pivot Panels.


One more look ...

For reference, your card base is 7 x 6.25". Score at 1.25 and 3.5". Patterned paper - first cut is 1" (for the fold flap) and the second is 3.25" (for the inside). The leftover piece fits on the left front as shown in the video.

This blog uses affiliate links whenever possible. This means, that at no cost to you, if you make a purchase through one of my affiliate links that I may receive a small commission from your purchase. I only link products that I own, love and use for my card making and not every link below is an affiliate one! 😊

Any supplies I'm unable to link are listed at the very bottom of my post.


Additional Supplies:
Patterned paper - Joyous Noel, Stampin' Up (retired)
White card stock - Accent Opaque Digital Super Smooth (Amazon .ca)
Matte glossy card stock - stash

Monday, 11 July 2022

60th Anniversary Card with Foiling


Hello my crafty friends. Today's card has foiling, foiling and more foiling! 😊  A friend's parents were celebrating their 60th Wedding Anniversary (!!!) and she requested a card shower. Of course I obliged and this is the card I came up with. 

I started the card with a pink cardstock layer that has the texture added from the Dashed Diamonds Cover Plate from Pigment Craft Co. I love how perfectly it fits on an A2 card, leaving just a little border all the way around. The Hexagon frame was gold foiled and die cut, then I got out some of my sentiment Hot Foil Plates as well as the solid hot foil plate. Once I had foiled the Congrats and Happy Anniversary I used the solid plate and the negative foil pieces to get another set of greetings. After die cutting I chose to use the negative ones on this card and put the others away for another day.

The beautiful Washi Tape has gold foil accents and I added some bling too. 😊  The #60 is from Karen Burniston's new Mini Alpha & Numbers - I didn't use the shadow dies on this card though.


Inside, I added the large Washi Tape wreath, a foiled dotted circle and a foiled Best Wishes that was also die cut. Everything was popped up with thin foam tape for some dimension and I was SO happy with how the card turned out. I hope the Anniversary couple will enjoy it too.


This blog uses affiliate links whenever possible. This means, that at no cost to you, if you make a purchase through one of my affiliate links that I may receive a small commission from your purchase. I only link products that I own, love and use for my card making and not every link below is an affiliate one! 😊

Any supplies I'm unable to link are listed at the very bottom of my post.


Additional Supplies:
Light pink card stock - Michaels
White card stock - Accent Opaque Digital Super Smooth (Amazon .ca)