Showing posts with label LDRS. Show all posts

Tuesday, 26 November 2024

Birthday Cards from Note Cards!


Last winter I cut down a box of printed note cards so I could use the card fronts to make Birthday Cards for my Mom's old nursing home. I cut them down because they were printed on a very lightweight cardstock and I do not like 'wussy' cards. I must have found the note cards on sale for a good price, but I cannot remember where. Ha. 

I pulled the card fronts from my 'In Progress' bin and got them all finished and ready to donate.


The card fronts had been cut down with stitched rectangle or square dies and I added them to folded white cards. The prints were dressed up with Stickles glitter glue for some shine and a stamped sentiment was added to some of them.

For the insides, I wrapped a white panel with washi tape from my stash and stamped a greeting before adding them inside the cards. I saved the card backs to use for matting and sentiment stamping etc, so there was very little waste.


This cute sloth panel was cut into a square as there must have been just too much pink background for my taste.


Here is another peek at the inside - each group of four got a different sentiment stamped inside.


Supplies used:
Note cards - unknown, possibly Paper Studio? I didn't end up keeping the supply list when I initially cut down the note cards.
Stickles glitter glue
Stitched Rectangle dies
Sentiment - MFT Stamps
Banner dies - MFT Stamps
Washi tapes - old, from my stash
Essential Birthday Sentiments - LDRS
Birthday Blowout - Poppy Stamps
Catherine Pooler inks

Friday, 2 August 2024

Butterfly Bunny Birthday Card Duo

Welcome to Fun Fold Friday here on my blog!  After I used this die to make Easter cards, I made a note to use it again for summer Birthday cards. This week I made these two and the second one is a pop up.

The die is quite large, so I made my cards into 5x7" but a 6x6" square card would work as well. The patterned paper is MANY years old and from my stash. I die cut the Butterfly Bunny from patterned paper and adhered them both to burgundy card stock. Then the images were fussy cut so I could pop them up with thin foam tape.

For this first card I added Stickles glitter glue around the butterfly wings, and added a pair of small die cut butterflies.

Below is the inside of the first card ... with a stamped sentiment and a light green vellum butterfly.

The second card is stepped up. I die cut butterflies from both patterned paper and white pearl vellum, adhering three of them over the butterflies on the main image. They were glued down along the butterfly bodies only, so there is some lift to the wings.

The first card base was white but I wanted to try it with a Kraft card base as well. In the end, I think I like the white one better. For the inside of this second card I used Karen Burniston's Lorna Label Pop Up.

The 'fluttering by' sentiment is actually part of a larger stamp that also says 'I miss you'. I knew I wouldn't use that one very often, so I trimmed away the 'miss you' portion and can add it to the 'fluttering by' sentiment again if I do need it. But I will get lots more use out of that stamp with it saying "fluttering by to say ..." 

I also added a couple more butterflies to the pop up area, and of course - Glitter Dot stickers for some shimmer.


The birthday sentiment was stamped on a scalloped white panel - both it and the crosshatch green panel are from the Short Crosshatch Rectangles die set - also by Karen Burniston


Supplies used:
Patterned paper - K & Company (very old, from my stash)
Bunny & Butterfly die - Creative Expressions
Butterfly dies - Scrapbook .com
Shimmer spray
Sakura glitter pen
Lorna Label Pop Up - Karen Burniston
Short Crosshatch Rectangles - Karen Burniston
Little Etched Butterflies - Paper Rose
White pearl vellum - stash
Fluttering By Sentiments - Waffle Flower 
Catherine Pooler coloured inks
Blending sponge - Tim Holtz
Glitter Dot stickers - Ecstasy Crafts
Stickles glitter glue
Happy Birthday - Birthday Blowout, Poppy Stamps
Essential Birthday Sentiments - LDRS
Kraft 5x7" card base & envelope
White 5x7" card base & envelope


Friday, 26 July 2024

Birthday Balloons Pop-Up Card w/ July's Sheetload of Cards


Welcome to Fun Fold Friday here on my blog! I finished off another one of those July Sheetload cards** and made it a pop-up. Same balloons as on a previous card, but a simpler layout with more white space. White space is slowly becoming my friend - who knew THAT would ever happen! 
**I made all eight of the July Sheetload of cards, doing the fronts only. I wanted to take my time and finish off the insides for cards that I know I will need coming up, rather than finish all eight at the same time. These ones will be for my stash and not donated to the nursing home.


I used the Katherine Label Pop Up, again in a horizontal position. I covered the pop-up platform with a stitched circle before adhering the balloons. I love balloons, so of course I had to purchase the balloon washi tape (Pinkfresh Studios) when it came out. I applied the entire roll of washi to white card stock so I could fussy cut the images as I needed them. There are coordinating stamps and dies as well, but I only purchased the tape.


I love all the dimension you get with the Katherine Label Pop Up - but it's quick and easy to assemble. 😊


Supplies used:
Patterned paper - Brianna, K & Company (old, from my stash)
Narrow gold foil tape - Amazon .ca
Gold foil paper - Recollections
Floral cluster die - Hand Penned, Stampin' Up
Stardust glitter pen - Sakura
Catherine Pooler coloured inks
Blending sponges - Tim Holtz
Stitched Scalloped circle nesting dies - Tutti Designs
5x7" card bases & envelopes - Ohuhu (Amazon .ca)
Vellum - Stampin' Up
Katherine Label Pop Up - Karen Burniston
Stitched circle dies - Divinity Designs
Happy Birthday - Bee Happy Cardmaking Kit, Paper Rose
Front Sentiment - Bitty Birthday Wishes, MFT Stamps
Inside sentiment - Essential Birthday Sentiments, LDRS

Thursday, 4 July 2024

July 2024 Sheetload of Cards - Camping Themed

Today I'm sharing my first card batch made with the July 2024 Sheetload of Cards. I can always tell when it's going to be one of my favourite Sheetloads, when I'm ready to start another right away. For this month, I spied a butterfly print 12x12" sheet and immediately cut it down to make 'half' a Sheetload, or 4 cards. I didn't even get started assembling those ones when my head thought how great this one would be for masculine cards. 

I pulled out this older paper package by Echo Park and cut the pieces. I am going to keep a couple in my stash and the others will be donated to my Mom's old nursing home. On the first four cards I used the reverse of the arrow print for the strips, since the paper is double sided. 

The tree is an old punch from my stash and I added some ink blending with a water brush then an alcohol marker.

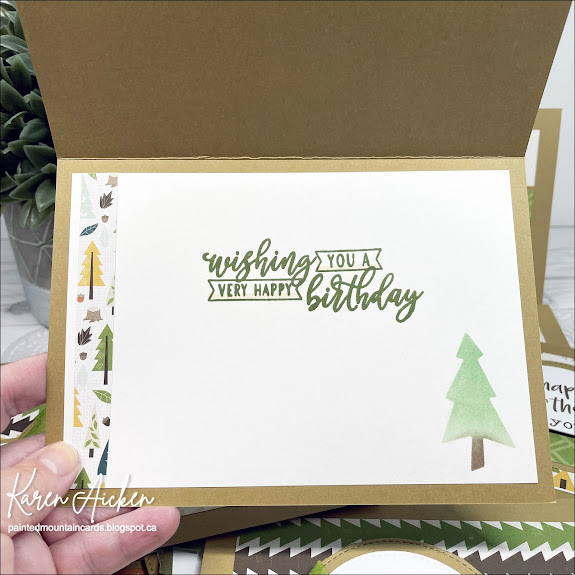
Below is a peek at the inside where I added a strip of patterned paper from a scrap in the package, and a stamped sentiment. I also punched a tree from a scrap of white cardstock and used it as a stencil with blending brushes & ink to add a tree inside.


When I was finished these, I went through some older paper pads and pulled out another two sheets which I have now started on. 😊  When I'm done with those eight cards, I'll finally assemble the four butterfly paper cards! I plan on using gold foil paper with those to dress them up ... and possibly a pop up inside one or two of them. 

I usually have a video walkthrough of my Sheetload cards, but since I don't have anything else to share for the next couple of days, I wanted to get the photographs taken and watermarked instead of waiting for a quiet time to take a video. I'll try to do one when I do the butterfly cards! 


Supplies used:
Patterned paper - Happy Camper, Echo Park
Happy Birthday words - Happy Birthday Many Ways, Catherine Pooler
Stitched circle dies - MFT Stamps
Tree punch - EK Success (old!)
Catherine Pooler coloured inks
Water Brush
Inside - Essential Birthday Sentiments, LDRS
Blending brushes
Alcohol markers

Thursday, 29 June 2023

Trio of Paper Pumpkin Alternate Cards


Even though I made all the cards from this kit back in March, I decided to spread out sharing them by doing one post a week. Since the colours and papers are very similar in the cards I didn't want all my blog posts to start looking the same! This week I'm sharing another Paper Pumpkin Alternate card using the March 2020 'No Matter The Weather' kit ... this time a trio of 'get well' type cards.


I wasn't overly keen on the gloomy printed panels - they are definitely not my style. But paired with bright and cheery rubber boots and rainbow printed paper? I liked them a LOT better. I also added die cut stitched clouds, sequins and a stamped sentiment strip.


Inside the cards I added stamped sentiments from my stash and another strip of that patterned paper.


I'll be back next week with another alternate project with this kit.

Having been asked how many cards I make I thought it would be fun to keep track this year. Many of my posts include more than a single card or project and below is my tally. 

Card Tally for 2023
January - 53 cards
February - 56 cards
March - 55 cards
April - 32 cards
May - 43 cards
June so far - 33 cards

Additional Supplies:
No Matter The Weather Paper Pumpkin kit, March 2020
White cardstock
Sequins - stash
Blue Skies Ahead - MFT Stamps

This blog uses affiliate links whenever possible. This means, if you make a purchase through one of my affiliate links that you pay the same amount but I may receive a small commission from your purchase. I only link products that I own, love and use for my card making and not every link below is an affiliate one! 😊

Tuesday, 21 February 2023

Mountain Flip It Card

This card is the February edition to my series 'Throwback Fun Fold Dies'.  I pulled out the 5 x 7" Square Flip-Its die set which was sold at the Stamps of Life a few years ago when I purchased it. I checked though and it is no longer available so I can't link it for you. NOTE - this die requires a die cutting machine with a larger than 6" opening.

We see the beautiful Rocky Mountains from where we live in southern Alberta so I have an affinity for mountain themed patterned paper. I picked up this particular package last Spring and realized that I needed to get it out and play with again.


I like that so many companies are now coming out with dies to cut out their sentiments, as that allows you to add foam tape for dimension as I did on the front.  For this card, I added the birthday words onto the back and that is where we will sign our name.


Late last year I was asked how many cards I make but I didn't have a clear number. Since many of my posts include more than a single card or project, I thought it would be fun to keep track this year. 

Card Tally for 2023
January - 53 cards
February so far - 46 cards

Additional Supplies:
Square Flip-Its Plus, Stephanie Barnard (Sizzix) - Discontinued
In The Pines - Stampin' Up
Blue cardstock
White cardstock
5 x 7" envelope

This blog uses affiliate links whenever possible. This means, if you make a purchase through one of my affiliate links that you pay the same amount but I may receive a small commission from your purchase. I only link products that I own, love and use for my card making and not every link below is an affiliate one! 😊


Friday, 30 September 2022

Greenhouse Easel Birthday Card


Hello my crafty friends and welcome to Fun Fold Friday here on my blog. I have a new appreciation for Easel Cards these days, so this one was decorated with a greenhouse and potted plants and was for our daughter's birthday.  The photo above shows how the card looks coming out of the envelope, and below how it stands for display.


I stamped a sentiment on the white panel, and that is also where we signed our names. The Happy Birthday sentiment was gold foiled and I adore the shine. It really catches the light in real life.


... one more look ...


Note - this is a 7 x 5" card, which fits in a standard A7 envelope for mailing. 

This blog uses affiliate links whenever possible. This means, that at no cost to you, if you make a purchase through one of my affiliate links that I may receive a small commission from your purchase. I only link products that I own, love and use for my card making and not every link below is an affiliate one! 😊

Any supplies I'm unable to link are listed at the very bottom of my post.


Additional Supplies:
Green card stocks - stash
Sequins - leftover from an old Paper Pumpkin Kit
White cardstock
Patterned paper - Eucalyptus, Hobby Lobby
Matte silver cardstock - stash
Garden Greenhouse - Stampin' Up (Retired)

Monday, 26 September 2022

Four 5 x 7" Nautical Birthday Cards


Hello my crafty friends and welcome to Masculine Card Monday here on my blog. I had this patterned paper pad out for a different set of cards, and decided to cut down the page of 4 x 6" Journal Cards and make 5 x 7" Birthday Cards to donate to my Mom's old nursing home. 

The patterned paper is one I picked up several years ago, stumbling on a screaming deal. It was the only reason I picked up the pad, as I sure didn't need any more 12 x 12" patterned paper pads. 😂. But for the price, I knew I would get good use out of the heavy, glossy papers for my donation cards so ... into my cart it went.


All of the insides were done the same, with the MISTI helping with keeping my stamping 'oops' free. 

 
... one more look ... 


This blog uses affiliate links whenever possible. This means, that at no cost to you, if you make a purchase through one of my affiliate links that I may receive a small commission from your purchase. I only link products that I own, love and use for my card making and not every link below is an affiliate one! 😊

Any supplies I'm unable to link are listed at the very bottom of my post.


Additional Supplies:
Kraft 5 x 7" cards and envelopes
Patterned paper - Hey Sailor, DCWV (retired)
Black fine point sharpie
Anchors - Sea Creature Sentiments, Your Next Stamp (retired)
Ivory cardstock - stash

Monday, 19 September 2022

Four Birthday Cards with Gold Whales


Hello and welcome to Masculine Card Monday here on my blog. Today I'm sharing a set of 4 cards I made to donate to my Mom's old nursing home. Once again I pulled out the June 2021 Sheetload of Cards for the sketch and cutting guide, and an OLD paper pad from my stash.


Some of the papers have gold foiled bits, and all of them have a gloss finish. Below is the inside ... all of them have the same stamped sentiment. The prints on the patterned paper show as black in the photos, but are navy blue in real life. 😊


This blog uses affiliate links whenever possible. This means, that at no cost to you, if you make a purchase through one of my affiliate links that I may receive a small commission from your purchase. I only link products that I own, love and use for my card making and not every link below is an affiliate one! 😊

Any supplies I'm unable to link are listed at the very bottom of my post.

Additional Supplies:
Patterned paper - Hey Sailor, DCWV (Retired)
June 2021 Sheetload of Cards
Oval punch - Stampin' Up 
Navy cardstock

Monday, 14 March 2022

Slimline Card With Pop Up Balloons


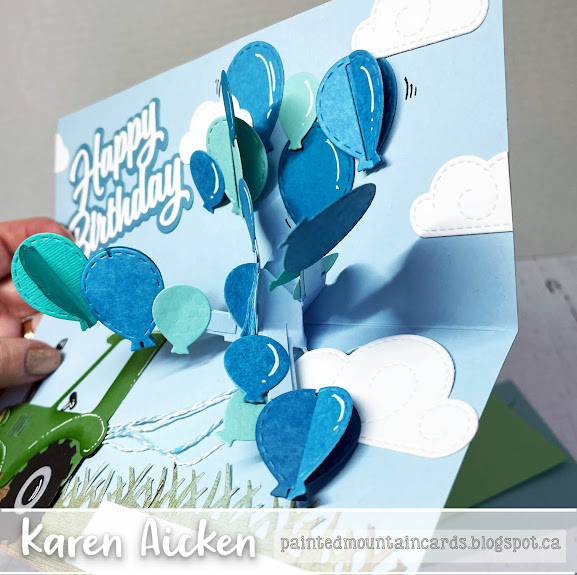
Hello my crafty friends and welcome to Masculine Card Monday here on my blog. Today I'm sharing the Pop Up Slimline card I made for our Son In Law! Once again I used the Forest Slimline die by Kat Scrappiness on the card front along with a humorous sentiment from Clearly Besotted. The balloons give a hint at what is inside ...


I used Karen Burniston's Heart Collage Pop Up with the Balloon Collage Add on for the mechanism. The twine was added to the balloons and to the ECD tractor. 


Our SIL has a tractor on their farm and I know he is going to get a kick out of his card. When he finally receives it, that is - it is SLOWLY making it's way through the mail system, and he didn't get it in time for his Birthday. Sigh.


This blog uses affiliate links whenever possible. This means, that at no cost to you, if you make a purchase through one of my affiliate links that I may receive a small commission from your purchase. I only link products that I own, love and use for my card making!

Any supplies I'm unable to link are listed at the very bottom of my post.


Additional Supplies:
Blue cardstock and scraps
Twine - stash
White card stock - Accent Opaque Digital Super Smooth (Amazon .ca)
Green card stock scraps 
Patterned paper scrap - Basic Grey (old, from my stash)

Monday, 13 September 2021

Dinosaur Slimline Shaker Card


Hello!  I had a lot of fun creating this card for our Gransons Birthday this month. I used the Downhill Vertical Scene from Hello Bluebird, cutting everything from white card stock. Then I inked, dipped and dragged the pieces with dye inks and placed them back inside the outline ... puzzle style. I also cut away one of the portions to create a shaker, which I know our Grandson will enjoy.


Here is a peek at the inside where I added a few layered sentiments. We will be hand delivering this card, so I didn't have to worry about bulk or how much it weighed for going through the mail.


One more look ...


This blog uses affiliate links whenever possible. This means, that at no cost to you, if you make a purchase through one of my affiliate links that I receive a small commission from your purchase. I only link products that I own, love and use for my card making!

Additional Supplies:
Fun foam
Various shaker filler - my stash
Green card stock
Grey and blue Copic markers
Tasteful Label Dies - Stampin' Up (retired)
Dino stamps - No Bones About It, Stampin' Up (retired)
Dinosaur die - Pre-historic Tim Holtz
Heavy weight white card stock

Thanks for stopping by