Showing posts with label That Paper. Show all posts

Friday, 22 September 2023

'That Paper' Magic Iris Card


It's Fun Fold Friday here on my blog and today I'm sharing the 9th edition to my monthly series "Magic Iris Cards".  I chose 'That Paper', which is from Hobby Lobby in the US. We don't have Hobby Lobby in Canada, but a lovely lady sent me some as a Random Act of Kindness and I think of her every time I use the paper. I just love it! 


When you pull down on the lever, the shutters open to reveal the stamped sentiment. I used the Scalloped Circle Add On, which is my favourite way to use the Magic Iris Die set. A hummingbird cut from gold mirrored cardstock and a gold matted, stamped sentiment and my card front was done.


Here is a peek at the inside ...


Having been asked how many cards I make I thought it would be fun to keep track this year. Many of my posts include more than a single card or project and below is my tally. 

Card Tally for 2023
January - 53 cards
February - 56 cards
March - 55 cards
April - 32 cards
May - 43 cards
June - 34 cards
July - 56 cards
August - 106 cards
September so far - 49 cards

I decided to cancel the subscription that provided linked thumbnails to what products I used on my cards. It was costing me out of pocket each month, so I’m back to listing what I used with a few affiliate links included.

Supplies:
Patterned paper - Eucalyptus (Hobby Lobby)
and a miscellaneous print from a 6x6" Stampin' Up Paper Share
Blending Brushes - Taylored Expressions
Catherine Pooler Inks
Sentiment - Magic Messages - Lawn Fawn
Gold gel pen
Narrow gold tape - Amazon
Gold mirror cardstock
Paper Layering Hummingbirds - Hero Arts
Sentiment inside - Not Older, Better, Penny Black
Let's Celebrate - Happy Birthday, Honey Bee
Glitter Dots - Ecstasy Crafts


Thursday, 16 March 2023

St. Patrick's Day Mini Slimline Card


I knew I wanted to try using 'THAT paper**' to create a St. Patricks Day card and I'm happy I did! Starting with a green card base, I die cut the patterned paper** with a die from Taylored Expressions then backed the windows with a strip of white cardstock. 

The Shamrock (Riley & Company) was cut from a scrap of a glossy green cardstock and I filled the openings with Nuvo Glaze topped with chunky glitter. The sentiments are also from Taylored Expressions.


Inside I added Karen Burniston's Happy St. Patrick's Day and added some shadowing to the lower part of the words with a marker. Before adhering it to a white panel, I added some blue ink with a blending brush. I like the way it lt looks behind a word die.


** THAT paper is from Hobby Lobby, and was used so frequently by a card designer called Bette Manning that the Facebook Group called Stamp Junkies just started referring to it as 'THAT paper'. We don't have Hobby Lobby in Canada, but a lovely lady sent me some as a Random Act of Kindness so I could join in and play as well. I absolutely love this paper and she sent me enough sheets that I don't even have to hoard it! (Thanks again Marilyn!!)

Having been asked how many cards I make I thought it would be fun to keep track this year. Many of my posts include more than a single card or project and below is my tally. 

Card Tally for 2023
January - 53 cards
February - 56 cards
March so far - 24 Cards

Additional Supplies:
White cardstock
Green glossy cardstock - recycled packaging 
Scrap of pale green cardstock
Alcohol markers
Green cardstocks
Eucalyptus paper - the Paper Studio
Chunky glitter - stash

This blog uses affiliate links whenever possible. This means, if you make a purchase through one of my affiliate links that you pay the same amount but I may receive a small commission from your purchase. I only link products that I own, love and use for my card making and not every link below is an affiliate one! 😊


Friday, 30 September 2022

Greenhouse Easel Birthday Card


Hello my crafty friends and welcome to Fun Fold Friday here on my blog. I have a new appreciation for Easel Cards these days, so this one was decorated with a greenhouse and potted plants and was for our daughter's birthday.  The photo above shows how the card looks coming out of the envelope, and below how it stands for display.


I stamped a sentiment on the white panel, and that is also where we signed our names. The Happy Birthday sentiment was gold foiled and I adore the shine. It really catches the light in real life.


... one more look ...


Note - this is a 7 x 5" card, which fits in a standard A7 envelope for mailing. 

This blog uses affiliate links whenever possible. This means, that at no cost to you, if you make a purchase through one of my affiliate links that I may receive a small commission from your purchase. I only link products that I own, love and use for my card making and not every link below is an affiliate one! 😊

Any supplies I'm unable to link are listed at the very bottom of my post.


Additional Supplies:
Green card stocks - stash
Sequins - leftover from an old Paper Pumpkin Kit
White cardstock
Patterned paper - Eucalyptus, Hobby Lobby
Matte silver cardstock - stash
Garden Greenhouse - Stampin' Up (Retired)

Friday, 19 August 2022

Greenhouse Platform Pop Up Card


Hello my crafty friends and welcome to Fun Fold Friday here on my blog. Today I'm sharing another Platform Pop Up card - this one I made for friends who are avid gardeners. They have been renovating a new-to-them house and, while still under construction, it's far enough along for them to have moved into their basement. I have all the details in a YouTube video:   


I used Lawn Fawn's Platform Pop Up, and a couple of retired stamp & die sets for this card.  I made the card awhile ago but couldn't post it until I had given it to them so that is why the plant supplies are retired ... they were not when I made the card. Ha.


One more look ...


This blog uses affiliate links whenever possible. This means, that at no cost to you, if you make a purchase through one of my affiliate links that I may receive a small commission from your purchase. I only link products that I own, love and use for my card making and not every link below is an affiliate one! 😊

Any supplies I'm unable to link are listed at the very bottom of my post.


Additional Supplies:
Butterfly sticker - Violette Stickers
White cardstock
Patterned paper - Eucalyptus, Hobby Lobby
Cardstock scraps
Garden Greenhouse bundle - Stampin' Up
Plentiful Plants bundle - Stampin' Up
Brass ladybug - Stampin' Up
Matte Silver Foil cardstock - stash


Friday, 11 March 2022

Hello Friend, Mini Slimline Card


Hello my crafty friends and welcome to and non Fold Friday here on my blog. Today I'm sharing the Mini Slimline card I sent to a friend for Happy Mail and all the details are in my YouTube video:  


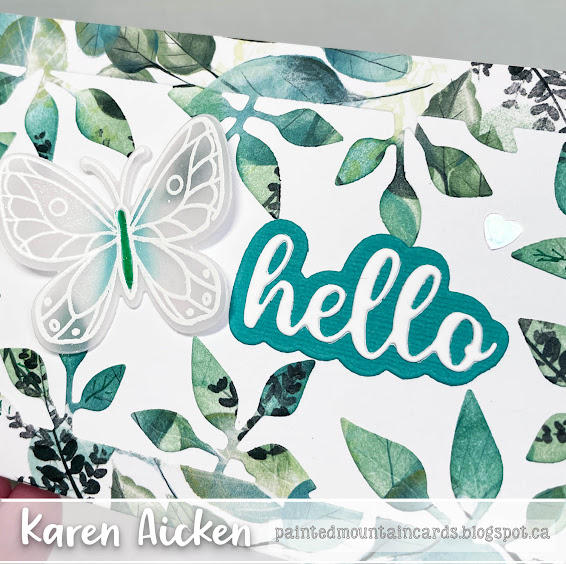
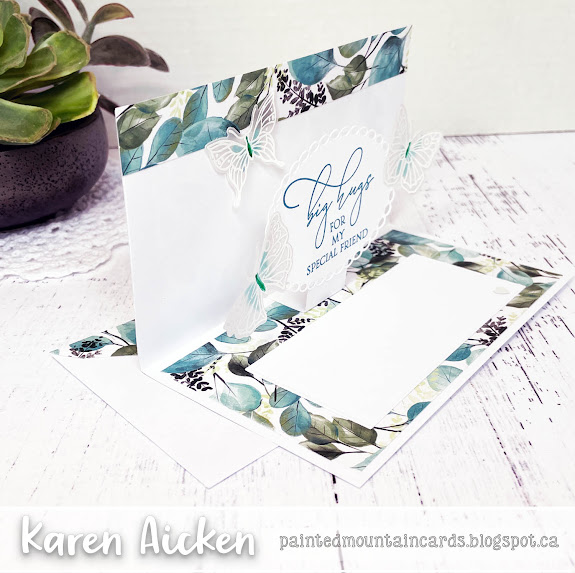
I used 'That Paper', which this particular friend sent to me as a Random Act of Kindness. It's available at Hobby Lobby and of course we don't have HL in Canada. I absolutely love this paper and make sure to USE it and not HOARD it as I would normally do with paper I love but can't replace when it's gone.  NOTE:  It's referred to as "That Paper', as a talented paper crafter Bette Manning uses it a lot and shares her beautiful creations on the Facebook group Stamp Junkies. She started a full on craze using 'That Paper', which is how I became aware of it in the first place. 


I die cut the Mini Slimline Foliage Frame (linked below) from 'That Paper', and adhered it to a white card base. The butterfly was stamped and heat embossed with white embossing powder onto vellum. I added colour in the centre area with water based markers spreading the colour with a water brush then Wink of Stella for lots of shimmer.

Inside I created a simple box pop up to add the stamped oval and more butterflies to. Not one to waste pretty paper, I added a leftover piece to the top edge.  Note:  HERE is a link to my tutorial on creating a simple box pop up - once you get the hang of it (it's so easy - I promise!) you can vary the measurements of the platform to work with the card size you are creating.


I wrote my note on the white panel which has a lovely embossed edge, and added more of the patterned paper to the envelope.


This blog uses affiliate links whenever possible. This means, that at no cost to you, if you make a purchase through one of my affiliate links that I may receive a small commission from your purchase. I only link products that I own, love and use for my card making!

Any supplies I'm unable to link are listed at the very bottom of my post.


Additional Supplies:
Teal fine point marker
Teal card stock scrap
White card stock - Accent Opaque Digital Super Smooth (Amazon .ca)
Patterned paper - Eucalyptus, Hobby Lobby

Sunday, 5 September 2021

Make a Wish Birthday Cards


Hello!  A sweet lady in the USA sent me some of 'That Paper', which is only available at Hobby Lobby. We don't have Hobby Lobby here in Canada, and this paper had been VERY popular at the time because of a talented carmaker called Bette Manning. She posts her cards in the Facebook group called Stamp Junkies and since she inspired so many people with her use of this paper, we all just started referring to it as 'That Paper'. 

'That Paper' has my favourite colours and leaves ... what's not to love! Since I had it out for a different project, I thought I would create some Birthday cards for my Mom's old nursing home.


Inside I used the leftover strips to create little fishtail banners, and stamped the sentiments in several different coordinating inks.


This blog uses affiliate links whenever possible. This means, that at no cost to you, if you make a purchase through one of my affiliate links that I receive a small commission from your purchase. I only link products that I own, love and use for my card making!

Additional Supplies:
Eucalyptus paper - Hobby Lobby
Teal card stock
Gold glitter dots - Elizabeth Craft Designs (out of stock)
Birthday Cheer - Papertrey Ink (retired)

Thanks for stopping by

Saturday, 4 September 2021

Teal Pumpkin Thanksgiving Card

Hello!  I'm sharing a Thanksgiving card today using some non-traditional colours. My friend Kelly created a teal pumpkin card last month, and when I was putting this patterned paper away from a different project I realized it would make a great Thanksgiving card with a teal pumpkin! I thank Kelly for her inspiration.

The Canadian Thanksgiving is just a month away, so I guess I had better get started making and sharing more cards in that theme so they can get in the mail in time!

It doesn't show up in the photos, but the stitched pumpkin base got a blast with shimmer spray and it's SO pretty in real life. The pumpkin dies are from Lawn Fawn and everything that is available is linked below for you.


The aqua card base and envelope are larger than A2 - the card measures 5 x 6.5". I had picked up a package of these at Michaels a few years ago. The sentiment stamp inside is retired, but it's a great one and I love it. So many companies make 'Happy Thanksgiving" or other one line greetings but so few make larger verses for the insides. 


Once again I used 'That Paper' which was a gift from a friend in the USA. It has my favourite colours in it and I love using it for my cards. 

This blog uses affiliate links whenever possible. This means, that at no cost to you, if you make a purchase through one of my affiliate links that I receive a small commission from your purchase. I only link products that I own, love and use for my card making!
Additional Supplies:
Patterned paper - Eucalyptus, Hobby Lobby
Aqua 5 x 6.5" card and envelope - Michaels
Various card stock scraps
Shimmer Spray
Stamp inside - Be Full, Neat & Tangled
Gold Glitter Dots - Elizabeth Craft Designs (out of stock)

Thanks for stopping by

Saturday, 28 August 2021

Hanging Plant Fold Flap Slimline

Hello! I haven't done a Fold Flap Slimline card in awhile, so that is what I did for today's card. I dug out my (retired) Hanging Plant die set and made several of them up to have on hand for future cards. I had been eyeing a similar set at Stampin' Up but decided that this one is close enough and I really don't need 'more of the same' in my craft room. Hahaha, I say that now - but if that set ends up on the clearance rack, I just might jump all over it. Anyhow, I chose two of the hanging plant embellishments I had created and added them to this card.

The pretty braided rectangle is a die set by Pink Fresh Studio (linked below) created for Mini Slimline cards. It was also the perfect size to decorate the front of my Slimline!


I added more of 'That Paper' inside ... it was a gift from a friend in the USA, and my favourite colours.  The sentiment circle is hidden when the card is closed and there is room on the white panel to sign my name when I go to send the card.


Glossy accents was added to the pot inside the card, so it looks more like a ceramic pot. 😊


... one more look ...


EDITED TO ADD:  To create the card, cut your card stock 7 x 8.5". With the 7" side across the top, score at 1.25 and 3.5". The first score creates the flap that you fold to the front of your card. You can leave it as is and decorate all the panels, but I generally adhere my flap to the front of my card at the top and bottom with thin foam tape.

This blog uses affiliate links whenever possible. This means, that at no cost to you, if you make a purchase through one of my affiliate links that I receive a small commission from your purchase. I only link products that I own, love and use for my card making!

Additional Supplies:
Scraps of card stock in various colours
Patterned Paper - Eucalyptus, Hobby Lobby
Copics
Green card stock
Subtle Embossing Folder - Stampin' Up
Washi Tape - stash
Sentiment - unknown (old, from my stash)
Sizzix Hanging planter die - retired?

Thanks for stopping by today

Thursday, 1 April 2021

April 2020 Paper Pumpkin - Second Card Group

Hello! Today I'm sharing my second group of Paper Pumpkin Alternate cards using the April 2020 kit called "My Wonderful Family". I had found an online listing for an unopened kit and really enjoyed using it! I have a walkthrough of my cards on YouTube as well: 


The kit came with four Offset Gatefold Card Bases and four Z Fold Card Bases. This first card uses one of the Z Fold Card Bases. While the green print on the right side was on the card base (it matches the envelope) I added some of 'That Paper' since the colours worked so well.

I used the negative piece from the punched out leaf sprig as a stencil for the envelope.


The birds, sprig and label all came included in the kit.


My second card is also a Z fold card, but decorated completely differently! I used several of the included stamp sets but the 'You Are On My Mind' and the bear are stamps from the December Paper Pumpkin kit.


Below is the card fully open.


Card #3 uses the last of the Z Fold Card Bases, and for this one I added a scalloped rectangle on the left fold with a layered succulent.


I had been running low on Sympathy Cards, so this one is for my stash.


My final Paper Pumpkin Alternate card used the last Offset Gatefold Card Base and the layout was inspired by a card I saw on Pinterest by Elizabeth Price. For this card I rotated it to be a top fold card and adhered the bottom Gatefold flap right to the inside back of the card. That way the leafy sprig could overhang it for a nice detail. 


I added touches of glitter to the centre of the pale flowers that were printed on the top Gatefold flap.


Below is a peek at the inside of the card.

The kit came with enough supplies to create eight cards with coordinating envelopes, and that is what I did. Because I did my own thing rather than follow the included directions I have quite a few extra bits leftover for other projects though! A few of the birds, butterflies tree trunks and leafy sprigs will all be making their way onto future cards.

If you would like to see my first April 2020 Paper Pumpkin Alternate video - you can click HERE.


Supplies:
April 2020 Paper Pumpkin Kit, My Wonderful Family (Stampin' Up)
Patterned paper - Eucalyptus, the Paper Studio
Seam Binding - Stampin' Up
Wink of Stella
1/8" Quick Strips - Stamp Market
1/4" Quick Strips - Stamp Market
Taylored Expressions Blending Brushes
Sentiment inside - Happiest of Birthday's, Stampin' Up
Celebrate - Birthday Greetings, Studio Katia
Crystal Clear Confetti - Studio Katia
Beary Comforting - December Paper Pumpkin, Stampin' Up
Chameleon markers
Sakura black glaze and white gel pen
Card stocks - stash
Stitched Mini Scallop Rectangles - MFT Stamps
Large Flower Stencil - Hero Arts
Pearlized Doily - Stampin' Up
Sakura gold gel pen
Patterned paper - Greenhouse Collection, Kaisercraft
Card stocks
Simple Strips Sympathy - Taylored Expressions
Simple Strips die - Taylored Expressions
Sympathy words - Hero Arts
Grey Copic markers
Celebrate - Birthday Bundle, May 2015 Paper Pumpkin
Happiest of Birthday's - Stampin' Up
Card sizes (all) - Standard A2, 4.25 x 5.5"

Thanks for stopping by

Friday, 19 March 2021

Cup of Spring Mini Slimline Trifold Card


Hello! Today I'm sharing a card for the Coffee Lover's Blog Hop, which I will link below. I made a Mini Slimline Trifold Card using goodies from Your Next Stamp, who is one of the amazing sponsors of this massive Blog Hop. I have a walkthrough of my card on YouTube:  


I chose the Cute Blooms for my card today - who wouldn't love a cup full of Spring blooms! After water colouring and die cutting with the coordinating die (see? It even cuts out the areas between the cup and the handles) I gave it a spritz with my shimmer spray. For even more sparkle I added some sequins.


You open the left flap and see the smaller right flap, which on this card just has a panel of patterned paper. Sometimes I add a sentiment or coordinating image to this panel.


Below is the card displayed fully open. The image from Cute Blooms was stamped in a light colour ink on the white panel, then I stamped Happy Spring over it with a dark ink. One single sequin adds the sparkle.


To create the card base for my Slimline Trifold, cut card stock 8-1/2 x 8-1/2". Score 3" from left edge and 2" from right and you can decide whether to use the 2" flap on the right or left side. I change it up often! NOTE:  There is a label on the right side of my blog called Trifolds if you want to see more of them in a variety of sizes. Decorate the panels as desired.

I hope you will check out the Coffee Lover's Blog Hop - there is always a ton of inspiration! Click HERE to be taken to the Coffee Lover's Blog Hop!

Supplies:
Cute Blooms - Your Next Stamp
Cute Blooms Die Set - Your Next Stamp
Black Olive Ink - Your Next Stamp
Water colour card stock
Various card stocks - stash
Karin Water Colour Markers
Water Brush
Mini MISTI - My Sweet Petunia
Eucalyptus patterned paper - Hobby Lobby (gift from an American friend)
Fine line markers
Scallop Stitched Nesting Circles - Tutti Designs
Circle Die - Hero Arts
Vellum Doily - Stampin' Up
Shimmer Spray
Glitter Brush Pen
Crystal Clear Confetti - Studio Katia
Card size - 3-1/2 x 6", fits in a #6 Envelope

Thanks for stopping by today