Showing posts with label Treat Holders. Show all posts

Friday, 9 December 2022

Get Well Slider Box With Pop Up Surprise


Hello my crafty friends and welcome to Fun Fold Friday here on my blog. Today's project is another Sneak Peek of Karen Burniston's upcoming new release; using the Slider Box and Bam Box. I also added the Get Well Charms and I talk about lots of ideas for this fun box in my YouTube video:  


As I said in the video, I made this pretty much as soon as the Design Team received their sample dies -- back in early October! I wanted to send something to my Mother In Law, who wasn't feeling well and my husband was flying to Ontario to visit her. I thought this would bring a smile to her face. (She is much better now!)


Not only is there the fun pop up surprise (thanks to the Bam Boxes) but chocolates too! I stacked two Bam Boxes but you could also use a strip of acetate that is adhered to the bottom of the box instead. I just HAD to try the Bam Box and have been using it a lot since It is SO versatile and I hope you have been enjoying all the sneak peeks that the Design Team has been sharing this week.


... one more look ...


Below you can see all the items that are in this new release, which will be shipping on Monday. We will also be celebrating with a Blog Hop on Monday.


One of the ideas I suggested in the video, was to create a sleeve for tissue packages - perfect for cutting into a gift package! I used the rest of the patterned paper from the box above, and a felt sticker that had been sitting on my stamping table. It was leftover from another project and I figured it was a great way to use it!


Slider Box - Karen Burniston (shipping December 12/22)
Bam Box - Karen Burnsiton (Shipping December 12/22)

Additional Supplies:
Patterned paper - Basic Grey, Fresh Cut Peony
#8 elastics/rubber bands
White cardstock
Black marker
Felt flower - leftover sticker from my stash

This blog uses affiliate links whenever possible. This means, if you make a purchase through one of my affiliate links that you pay the same amount but I may receive a small commission from your purchase. I only link products that I own, love and use for my card making and not every link below is an affiliate one! 😊

Friday, 7 October 2022

Scrap 'n Stamps 'SO SWEET' Inspiration Hop


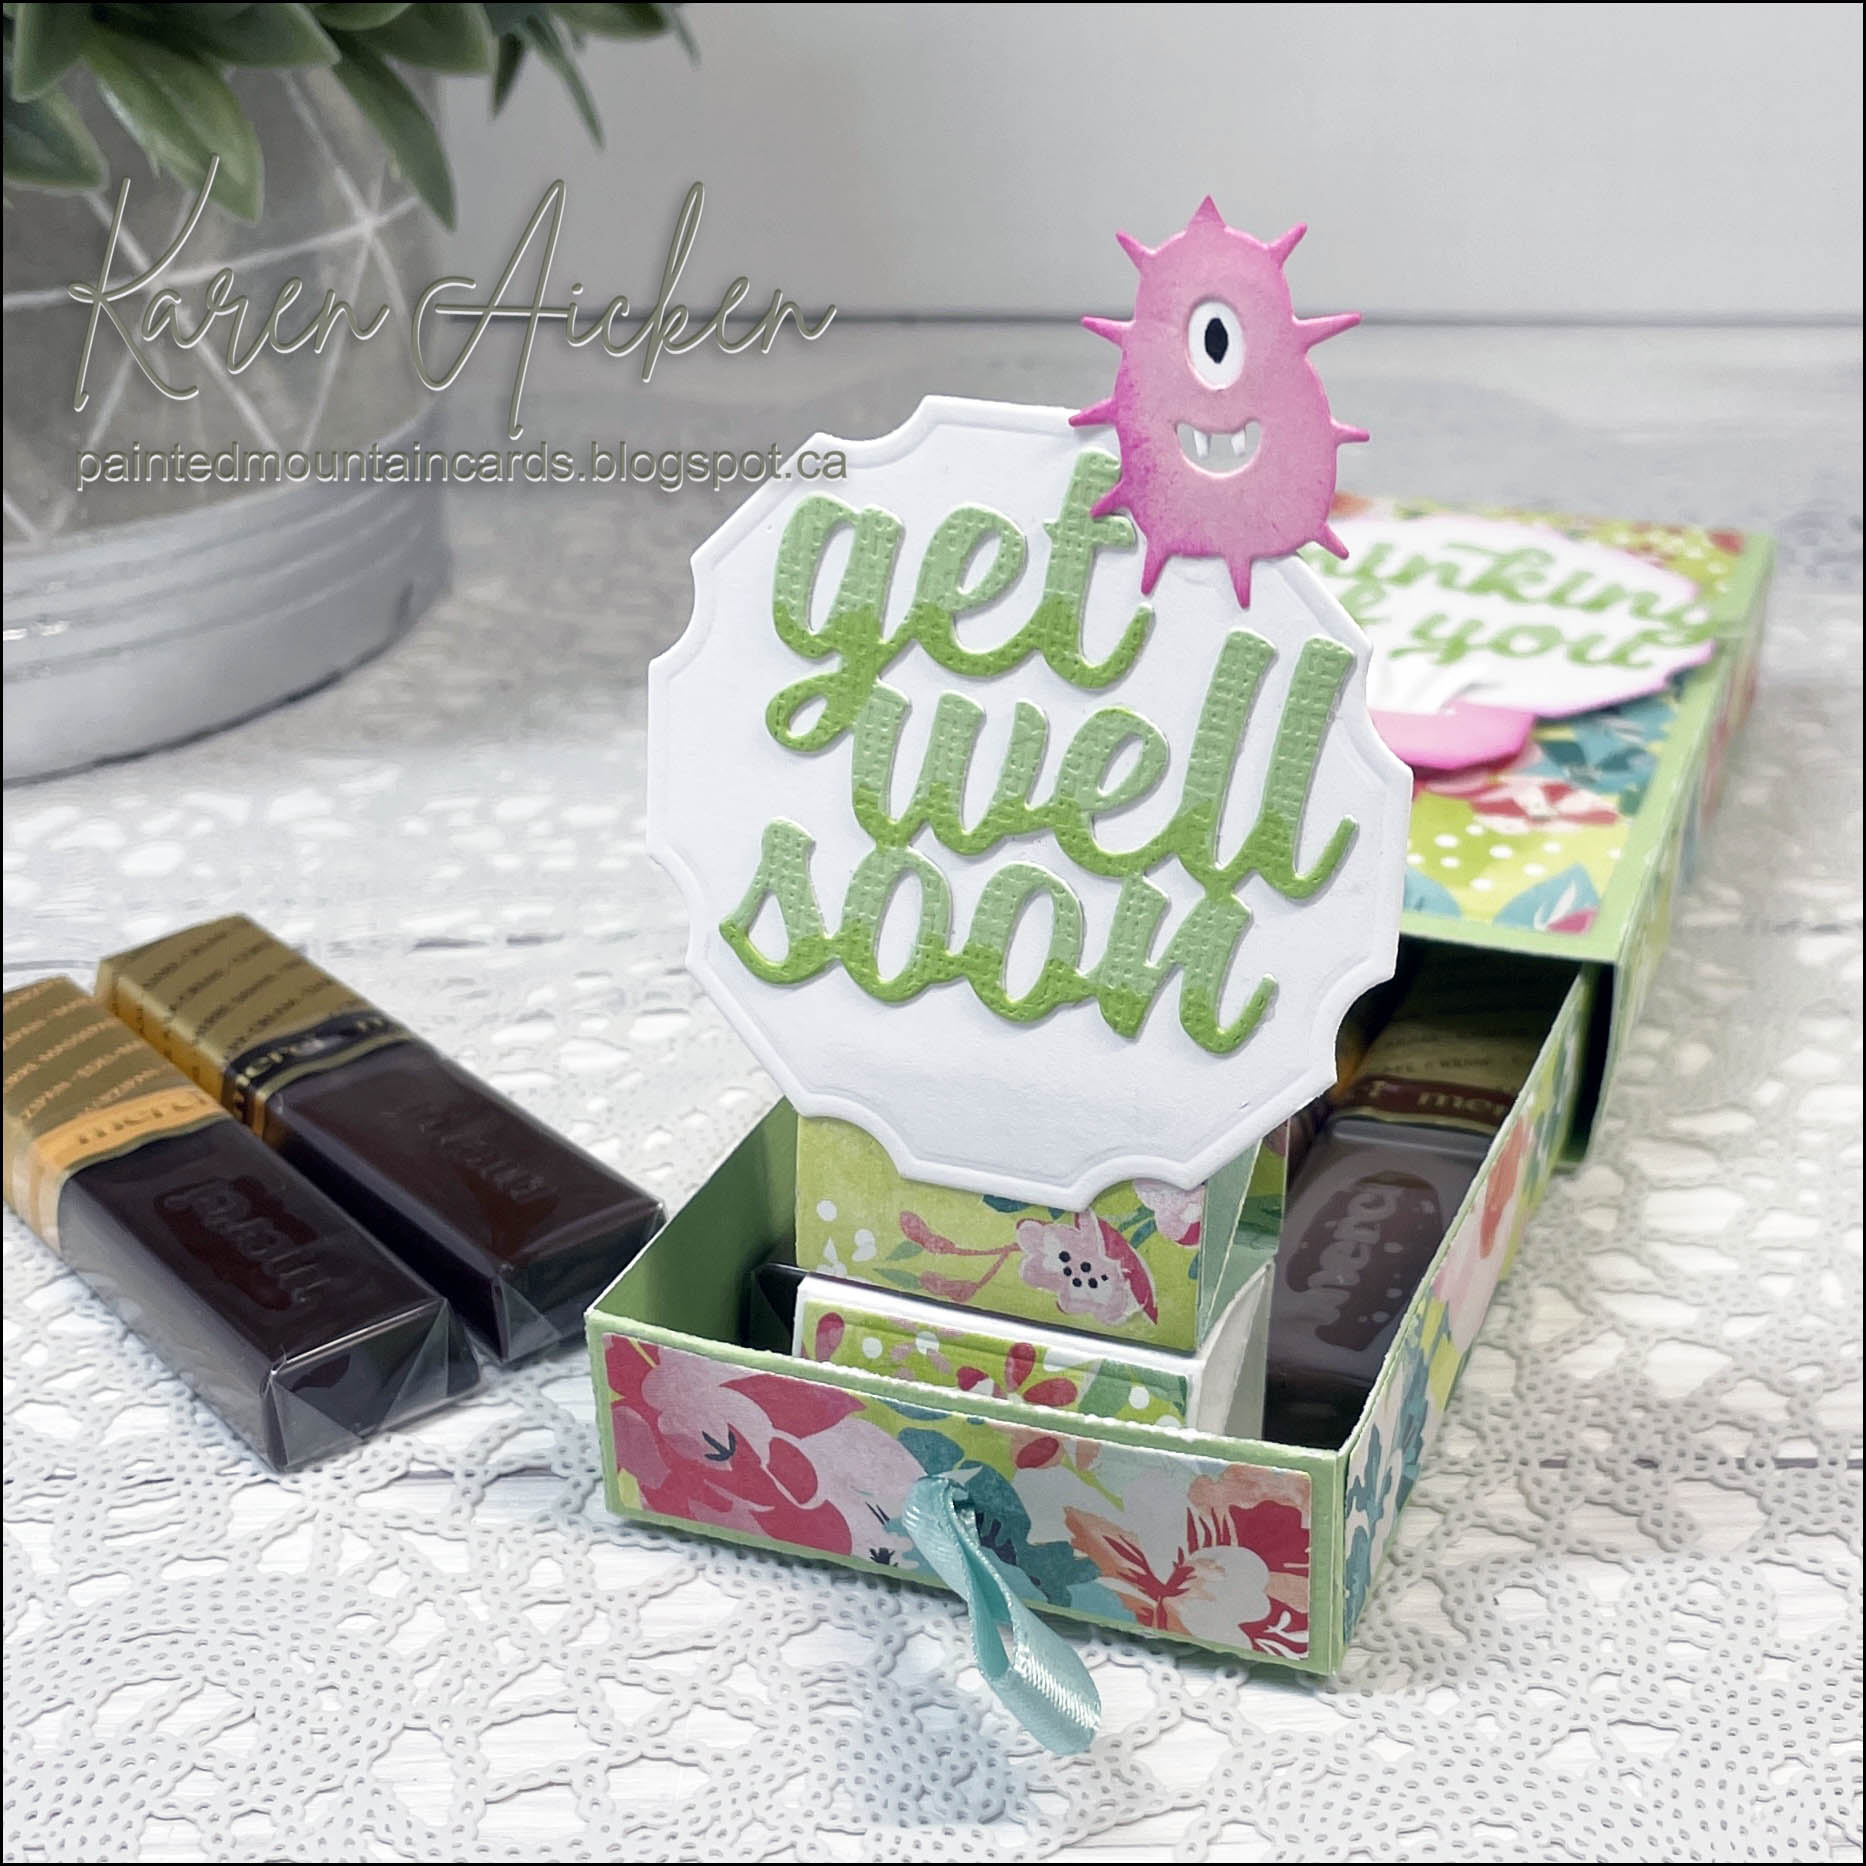
Hello my crafty friends and welcome to another Inspiration Hop put on by Scrap 'n Stamp Canada. I took the challenge literally and made treat holders and a Halloween shaped cake card. First up is the shaped card!


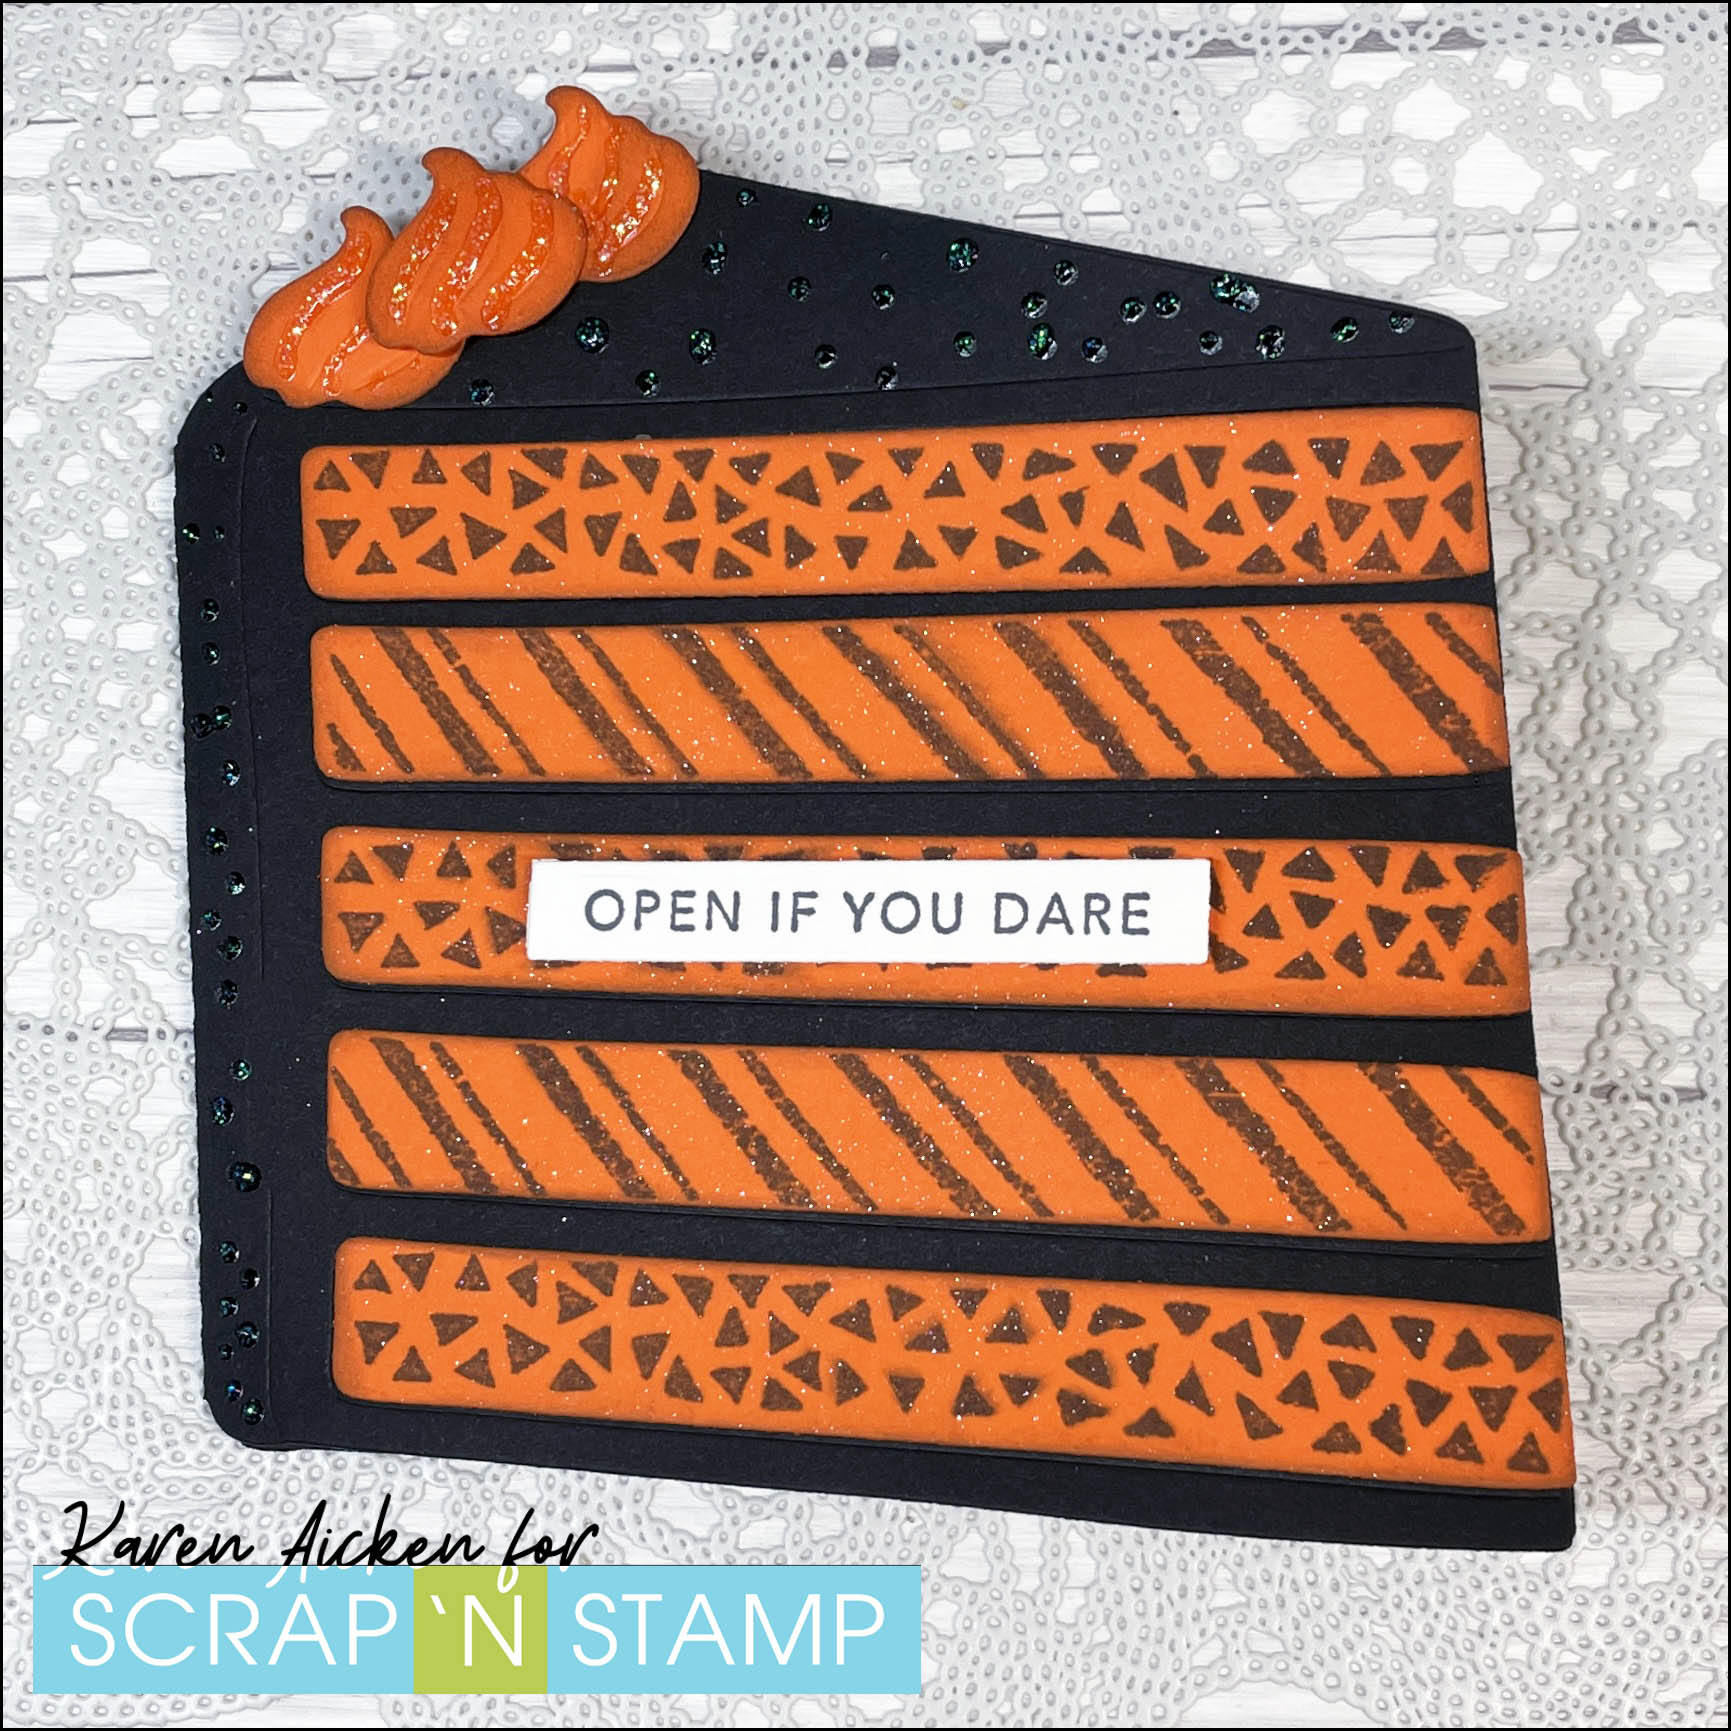
I have had this cake shaped card by Honey Bee designs for awhile and I thought it would be fun to turn into a Halloween themed one. I mean cake is sweet, right? And what would be sweeter than a Halloween cake shaped card? A Halloween cake shaped card with a pop up inside!


I added the Giant Happy Halloween from Lawn Fawn inside, with a few folds to create the pop up. Because the card base was black, I also added a signing block with white card stock.


Next up are the treat holders. Wanting a more 'rainbow' effect for the ghosts, I dipped and dragged white card stock through puddles of ink created with Catherine Pooler inks spritzed with water. When the panel was dry I die cut the ghosts. 

Black card stock scraps were adhered behind the open faces for impact, then I glued another ghost on the back to hide the black piece for the free standing treat topper. A narrow strip of acetate was sandwiched in between the two and that is what slips into the straw opening of the to-go plastic cup lid. All of the ghost edges were inked and they also got a blast of shimmer spray. 


I still remember the first time I made these 'sour cream' treat holders 25 years ago (or more!) and they are still a fun way to dress up a few treats. They can be whipped up quickly and are a great stashbushter for patterned papers.


Since these have been around for SO many years, I didn't do a tutorial. There are lots and lots of tutorials around, & I did a quick search on YouTube and HERE is one for you:   I didn't do the extra steps of using a crimper and fancy edges scissors on this one, but they do make them look extra nice. I figure my grandkids will just be ripping into them and those details would be los on them. 😂

Finally, I popped one of the ghosts onto an Action Wobble and then to a folded die cut oval. You can add these on top of any number of treat bags etc, but I chose an iridescent zip top baggie. I often give the grandkids little candy treats, but am mindful of their parents desire to limit sugar. So Just a few in one of these baggies with a cute topper makes us all happy! 

I added some bling, just because I've had these ones for YEARS and want to use them up.


The next stop on the hop is: Meghan
Edited - Meghan's blog is giving her grief, so if you can't see her cute cards using the link above, you can see them on Instagram

You can find many of the supplies I used at Scrap 'n Stamp

This blog uses affiliate links whenever possible. This means, that at no cost to you, if you make a purchase through one of my affiliate links that I may receive a small commission from your purchase. I only link products that I own, love and use for my card making and not every link below is an affiliate one! 😊

Any supplies I'm unable to link are listed at the very bottom of my post.  

Additional Supplies:
White cardstock
Acetate scrap
Shimmer Spray
Clear to go cups & lids - Amazon.ca
Candy
Seam binding - stash
Zipper candy bag - Amazon.ca 
Gems - old, from my stash
Plaid patterned paper - Perfectly Plaid, Stampin' Up (retired)
Orange cardstock

Thursday, 28 October 2021

Halloween Treat Holder


Hello!  The newest Fun Friday Challenge at Your Next Stamp is "Face your fears - be sure to let us know what you are facing. A color combo you avoid?  A new technique?  Perhaps a spider or other creature on your creation?" I was just getting over a broken blood vessel in my eye where I looked like a demon who could scare young children, so I decided to make a treat holder with some eyeball Halloween candy. 😊

I pulled out some retired patterned paper and the YNS Scallop Topped Treat Bag to hold a couple of the chocolate goodies. Then I added a stitched circle with a stamped sentiment from the Happy Hayrides Halloween stamp set and everything that is available is linked below for you.


Our challenges always come with 2 ways to win:

#1 – Would you like the chance to win a YNS stamp set? Leave a comment on the Your Next Stamp Blog by November 3, 2021 at midnight EST to be entered in the random drawing. Want more entries in the drawing? Leave comments on YNS’ IG and FB pages too!

#2 – Would you like the chance to win a YNS store e-gift card? Play along with the challenge! Link up your creation at the bottom of the post on the YNS BLOG by November 11th, 2021 at midnight EST to be entered in the random drawing to win a $15.00 YNS gift certificate. If your creation contains YNS products and you are the random winner then you receive an extra $5.00. 

This blog uses affiliate links whenever possible. This means, that at no cost to you, if you make a purchase through one of my affiliate links that I may receive a small commission from your purchase. I only link products that I own, love and use for my card making!


Supplies:
Patterned paper - Happy Haunting, Stampin' Up (retired)
The ivory card stock I used is no longer available, so I have linked a different one for you.


Tuesday, 9 February 2021

Ghirardelli Chocolate Treat Holder


Hello!  Today I'm sharing my Design Team project on the Crafty Meraki Blog using the Love Slimline Tag die set. I get so much use of this both this set and the Celebrate Slimline Tag die and I wanted to share another way to use them by making a treat holder. I have a tutorial on how I made this on YouTube HERE


These would be quick and easy to create for all kinds of themes and occasions!


This one was decorated using one of the darling pixie's from the Pixie Perfect Stamp set with hearts from the Owl Yours stamp set. Blending brushes were used to add the colour to the front of the tag, and I used plastic stamp packaging and dye inks to add the colour to the back side. I have a YouTube video showing how I did that on a different Crafty Meraki project (click HERE to view it). 


I chose 'colouring book' style colouring with very little shading so that makes it easy to create multiples. The HUGS is included with the Love Slimline Tag set, I simply snipped off the "&" that was attached. 


These instructions are in the video, but I will share them here as well.  Once you die cut your tag, lay it horizontally onto your scoring board and score 1-3/4 and 2" from the left edge. This creates the pocket for the Ghirardelli chocolate.

Cut a strip of card stock, 3-3/4" long and 1/2" wide. Score that at 1/2", 3/4", 3" and 3-1/4". Add adhesive on each outer end as shown in the video and attach to the tag where it will be hidden by the bottom pocket. Adhere this to the tag. 

Add adhesive to the front of that strip and fold the bottom tag edge onto it and now your chocolate will slide into the pocket from the top but won't slide out either side. This is much easier to explain visually and really doesn't take much time at all - again, a great thing if you are making multiples.

Supplies:
Love Slimline Tag Die - Crafty Meraki
Pixie Perfect - Crafty Meraki
Owl Yours (Slim Hearts) - Crafty Meraki
Various card stocks
Taylored Expressions Blending Brushes
Sakura white gel pen
Ohuhu Markers
Ghiradelli chocolate
Shimmer spray
Stickles
White pearl card stock
Clear resin hearts - Stampin' Up

Thanks for stopping by today!

Thursday, 4 February 2021

Valentine Treat Holders


Hello!  I had so much fun making these Treat Toppers for the Fun Friday Challenge #157 at Your Next Stamp. The Theme is 'Young At Heart' and I hope you will play along. More details about the challenge and a chance to win a prize further down my post.

I used Crayola markers to colour in one of the Paint Swooshes in a rainbow of colours, to tie in with the rainbow candy. It worked out even better than I'd hoped! After colouring on the stamp I gave it a light mist with water and stamped it onto the white stitched rectangle. Then I stamped the Happy Valentine's Day in black on top of the swoosh.


For the rainbow candy sleeve, I added a 1 x 6" strip of white card stock to the outside back of the bag. That helped keep the candy from sliding around too much. 


Our challenges always come with 2 ways to win:

#1 - Would you like the chance to win a YNS stamp set? Leave a comment on the Your Next Stamp BLOG by February 20 2021 at midnight EST to be entered in the random drawing. Want more entries in the drawing? Leave comments on the YNS Instagram and Facebook pages too!

#2 – Would you like the chance to win a YNS store e-gift card? Play along with the challenge! Link up your creation on the Your Next Stamp Blog challenge by February 18 2021 at midnight EST to be entered in the random drawing to win a $15.00 YNS gift certificate. If your creation contains YNS products and you are the random winner then you receive an extra $5!


Supplies:
Treat Topper - Your Next Stamp
Love & Hugs - Your Next Stamp
Black Olive Ink - Your Next Stamp
Paint Swooshes - Your Next Stamp
Card stocks - stash
Crayola markers
Spray mister
Wink of Stella
Cello Bags (2 x 10", trimmed), amazon.ca 
Candy

Thanks for stopping by today!

Thursday, 17 December 2020

Hot Chocolate Pouches

Hello crafty friends ...

I did something different this year for the grandkids! I have mentioned before that the Christmas Season starts for our family on December First. I usually give the Grandkids a holiday book and new PJ's on December First along with a hand made card. This year I gave them holiday MASKS instead of book, and made these cute Hot Chocolate Pockets instead of the cards. (Olivia and Ethan got a reindeer mask, Zachary, Ilai and Alma got Snowman Masks). 

I had been poking around  and found a video from Bourbon Creek Crafts, and she had made these hot chocolate pouches and once I saw that she used Business Envelopes for the pocket themselves I had to try it myself!! I have a walk through on YouTube for you as well.


I chose the patterned paper pad because it had papers that would work for both girls and boys, and had fun poking around my Christmas embellishment bin for random elements that would work to decorate the pouches.  


Each pouch contained a packet of hot chocolate, a candy cane for stirring, and a cello sleeve with 4 chocolate squares for a little somethin' somethin'. I make a lot of these chocolate sleeves over the holidays, and talk about them in my video.


It was fun to go stash diving to decorate these pouches/pockets and I got to use up a bunch of stickers etc as well as leftover labels and circles that were just sitting around.

Supplies:
Video from Bourbon Creek Crafts - HERE
#10 Business envelopes (sealed and cut in half, so you get two pouches from each envelope.
Patterned paper - Holiday Bash, Recollections.
3/4" circle punch - Stampin' Up
Chipboard Stickers - Santa Stops Here, Bella Blvd
Joy Banner - Cricut Cut (from stash, done many years ago)
Felt poinsettia sticker- stash
Labels and circles etc - from 'the stash'
Scraps of white pearl card stock
Sakura black glaze pen
Stickles
Hot chocolate packet
Candy cane
Mini Swiss Chocolates
2 x 10" Cello bag (trimmed down in length)
Snowflake embellishments - Stampin' Up
Washi Tape

Thanks for stopping by today

Sunday, 15 November 2020

Gingerbread Treat Bag Trio

Hello crafty friends ...

I love making both treat holders and gift card holders for the holidays. Today I'm sharing three adorable treat holders using some Your Next Stamp goodies! I added the YNS Scalloped Top Treat Bag to my collection during the YNS Birthday Sale last month so had to make it up right away. It is easy to put together and is just so darned cute! These ones have Hershey's Kisses inside.


The Sweet Holiday Cookies stamp set (with coordinating dies) is from the new release and they work perfectly on a treat holder! 


I decided to create a little Belly Band to hold the Scalloped Treat Boxes closed - they simply slide off so you can lift the scalloped top up and get the chocolate inside. For my Belly Band, I cut a strip of patterned paper 5-1/4" x 3.4". I put the centre at the back of the treat box and folded the ends to the front. When I had the tightness I wanted (not too tight or it won't come off easily, and not too loose or it won't stay on) I secured the ends at the front with a Glue Dot. 

I adhered the stamped, die cut and coloured gingerbread cuties to hide the seam of the belly band and the back is nice and clean looking.


Supplies:
Scallop Topped Treat Bag - Your Next Stamp
Sweet Holiday Cookies - Your Next Stamp
Sweet Holiday Cookies Die Set - Your Next Stamp
Patterned paper - Nostalgic Christmas, Recollections
Sakura gold gel, white gel and black glaze pens
Copic markers
Ohuhu Markers
Wink of Stella

Thanks for stopping by today

Thursday, 29 October 2020

Halloween Treat Holders


It's time for a new Challenge at Your Next Stamp - 
the Fun Friday Challenge #151 with the theme:  Candy Inspiration - take inspiration from your favourite candy/sweet and let us know what it is!

The Fun Friday Challenges come with two chances to win prizes!!
Comment on the YNS BlogInstagram or Facebook pages for a chance to win a free stamp set. Comment on all three to increase your chances, but comments must be left by November 4th 2020. The winner will be announced on November 6th on the YNS Blog.

More details about the prizes at the end of my post!

I went literal with the candy theme, and used some YNS products to make Halloween Treat Holders for two of our grandikids. The Way Cool Monsters are so fun to colour up, and I added some googly eyes for additional fun.


When I was writing up this post, I saw that the Treat Topper is out of stock. But you can sign up to be notified when it comes back in! (I get a lot of questions about where people can get this great die, every time I post a project using it.)


When I was poking around in my Halloween embellishment bin, I found these foil circle stickers that have been in there for YEARS. I used them to make three additional Treat Holders for the rest of the Grandkids.


The YNS Treat Topper Die is so quick and easy to use!


The Fun Friday Challenge #151 runs through November 12th 2020 at midnight EST. 
One random participant will win a $15 gift certificate to the Your Next Stamp store.  If YNS stamps or dies are the focal point then the winner receives an additional $5 gift certificate for a total of $20!!  The winner will be announced on the YNS Blog the Sunday after the challenge closes. Check it all out on the Your Next Stamp blog HERE.
 

Supplies:
Treat Topper Die Set - Your Next Stamp
Way Cool Monsters - Your Next Stamp
Way Cool Monsters die set - Your Next Stamp
Black Olive Ink - Your Next Stamp
Stitched Wavy Circle die set - Your Next Stamp
Vellum
Sakura white gel pen
Copic markers
Glossy Accents
Card stocks - stash
Patterned Paper - Halloween Night, Stampin' Up
Cross stitch circle dies - Tutti Designs
Foil stickers - Sandy Lion
Googly Eyes
Sequins - stash
Bakers twine
Cello bags, 4 x 4" - Amazon .ca

Thanks for stopping by today

Wednesday, 28 October 2020

Thanksgiving Treat Holders


Today I'm sharing the treat holders I gave to our daughters for their Thanksgiving tables this year. The Canadian Thanksgiving was earlier this month, but because of COVID we weren't able to get together and celebrate as a family. Well - lets be clear. We CHOSE not to get together BECAUSE of COVID. Apparently lots of Canadians thought that COVID shouldn't interfere with their Thanksgiving and went ahead with their traditions and family dinners and a big rise in the number of positive cases increased accordingly. As our Health Minister says ... COVID loves a party. Sigh.

We dropped off the treat holders with a porch visit, but (shiver) porch visits aren't going to be nearly as much fun now that the weather is turning colder!  


The Treat Holders were part of the September Paper Pumpkin Kit, and it was a kit that was JAM PACKED with embellishments. You could make either Thanksgiving Treat Holders or Halloween ones ... or both! 

I filled these ones with Hershey's Kisses, but didn't do too much embellishing because I know that the grandkids would just be ripping them open to get the candy. I wanted them to look nice on the table but also didn't want to put too much time and effort into them for that reason. Thus, I have a TON of elements leftover to use on future treat holders or cards etc etc.


All in all I made 9 of these Thanksgiving Treat Holders, then joined two together to make one larger diameter one for my husband & I to share (we had our own special dinner, just the two of us) but time got away from me and I didn't get that one finished. I guess I'll have it for next year!

Everything came included in the Paper Pumpkin kit but the punched Tailored Label which is also by Stampin' Up.

Thanks for stopping by today!


Wednesday, 1 July 2020

Canada Day Video Hop + Over $1000 in Giveaways!


Hello crafty friends ...


Happy Canada Day! I’m joining a group of Crafty Canadian YouTubers and we’re celebrating this special day by featuring Canadian craft products and shops. A total of 13 shops and 2 Canadian papercraft magazines have generously sponsored today’s event and we’re giving away over $1000 in prizes! 


***** The Video Hop will begin on Emily’s YouTube Channel *****


You can find my video for the hop HERE:


I hope you remembered to leave a comment ON MY YOUTUBE VIDEO for your chance to win one of the fabulous prizes. 


The more you comment ON THE VIDEO'S, the higher your chances of winning. (Please indicate if you are in Canada or elsewhere as a few prizes are restricted to Canadian addresses only.)

All of the giveaway details are on Emily’s blog, and if you get lost along the way, please head to Emily’s blog for the full list of participants:


Comments close at 11:59pm EST on July 17, 2020 and all winners will be announced on Monday, July 20, 2020.  We have 25 individual gift certificates ranging from $25 to $100, a one-year subscription to Creative Scrapbooker Magazine, and a grand prize package worth $150 from Scrapbook & Cards Today.


OK - onto my projects. Since I did such a detailed video, I'm not going to go into a lot of description here on my blog.  I do have a full supply list below with links to the sponsor's products used at the end of my post though!

Canada Day Treat Holders


These Treat Holders were made using the Your Next Stamp Treat Topper die, a digital stamp from Angie Blom Digital Designs and some clear 'drops' from Studio Katia. They are for our Grandkids and have Maple Cookies inside the cello bags.


For the backing piece, I cut white card stock to 3.5 x 6", wrapped the cello bag around the top and stapled it, Then the Treat Topper wad attached with double sided tape.


Crafty Wishes Treat Holder


This second Treat Topper is decorated with the FUN Craftastic set from Studio Katia. I also added some of their pearls and crystals for a little somethin' somethin'.


Canada Day Explosion Card


I had fun making this Explosion Card using digital images from Angie Blom Digital Designs, and the greeting is from the Happy Celebrations stamp set from Studio Katia.


Note, I cut down my text weight paper to 8 x 8" after it had been printed.


Maple Leaf Z-Fold Card


If you follow my blog you know I love Z-fold cards! This one uses this lovely heart filled Maple Leaf digital image from Angie Blom Digital Designs. I also added some confetti, the patterned paper and a stamped greeting using goodies from Studio Katia.


Slimline Oval Shaker Card


I also LOVE making Slimline cards, so really enjoyed combining the new Dotted Slimline Die Set One from Studio Katia with the Beautiful Butterflies stamps & dies from Your Next Stamp. The pretty confetti and bling is also from Studio Katia.


Here is a peek at the inside, where I used an additional stamp set from Your Next Stamp and a little more Studio Katia bling.


This was a huge undertaking, put together by the amazing Emily Leiphart. The sponsors were so generous & excited to be a part of this Canada Day Video Hop! I want to thank everyone who was involved and I hope you hop along for all the inspiration we have for you.


Additional Links:


Explosion Folding Technique


Your Next Stamp


Angie Blom Digital Designs


Studio Katia


Canada Day Treat Holder Supplies:

Treat Topper Die Set - Your Next Stamp
White cared stock
Red Sparkle card stock (partial sheet, from my stash)
Ink Jet Printer
Circle die - Hero Arts
Red Sharpie marker
Green comic marker
Gold Nuvo Glitter Pen
Digital stamp - Angie Blom Digital Designs
Clear Drops Mix 2 - Studio Katia
Cello bag


Crafty Wishes Treat Holder Supplies:

Treat Topper Die Set - Your Next Stamp
Craftastic Stamps and die - Studio Katia
Craftastic Die Set - Studio Katia
Black Olive Ink - Your Next Stamp
MISTI - My Sweet Petunia
Copic markers
White and Kraft card stocks
Blue polka dot patterned paper - scrap fro my stash
Black marker
Fun Faces stamps - Your Next Stamp
Bora Bora Pearls - Studio Katia
Pineapple Delight Crystals - Studio Katia


Canada Day Explosion Card Supplies:

Digital Stamps - Angie Blom Digital Designs
 - Sweetest Canadian Friend
 - Living My Best Life
 - Camping Adventures
Nuvo Glitter Pen
Stitched Rectangle Die - Your Next Stamp
Ink Jet Printer
Copic markers
Red & White card stocks
Stickles
Bakers Twine
Fun Foam
Holiday Cheer Confetti - Studio Katia
Happy Celebrations Stamp Set - Studio Katia
Clear embossing powder


Maple Leaf Z Fold Card Supplies:

5 x 6.5" Card and envelope set from Michaels
Digital Stamps - Angie Blom Digital Designs
 - Sweetest Canadian Friend
 - Living My Best Life
Ink Jet Printer
Bakers Twine
Black Olive Ink - Your Next Stamp
Mini MISTI - My Sweet Petunia
Crystal Clear Confetti - Studio Katia
Sentiment - Craftastic stamp set, Studio Katia
Embellishment Wand - Studio Katia
Patterned Paper - Studio Katia
Slimline Oval Shaker Supplies:

Dotted Slimline Die Set One - Studio Katia
Kraft card stock
Patterned paper - Susan Winget, K & Company (old, from my stash)
Pink Carnation Crystals - Studio Katia
Pineapple Delight Crystals - Studio Katia
Crystal Clear Confetti - Studio Katia
Beautiful Butterflies & dies - Your Next Stamp
Positive Affirmations - Your Next Stamp
Stitched Fishtail Banners - Your Next Stamp
Gold embossing powder
Silly Fun Birthday - Your Next Stamp


Thanks for stopping by today!