Showing posts with label Chameleon markers. Show all posts

Monday, 22 June 2020

Chameleon Record Card - You Rock


Hello crafty friends ...

Today for Masculine Card Monday here on my blog,  I'm sharing a card I made to show the versatility of the Chameleon Fineline markers. These things are sooo cool! For example, you take the lid off the yellow marker and add the orange marker lid for a few seconds. Then you add the red marker lid for a few seconds When you go to write, the colour flows from the red through orange before returning to the original colour. 

I had just received this fun record die set from MFT so that is pretty much what inspired my card. Note, I made this card in the Spring of 2019 but didn't get it posted so am sharing it now.


I used the markers to write 'you rock' on one stitched card stock strip, and then drew a plaid on a second one. The Fineline markers coordinate with the Chameleon Color Tone and Color Tops so I used those to colour the record label and banner.


Inside I added a stitched panel with marker colour outside the stitched line and a die cut word. The other words were done with the Chameleon Fineline markers!


Supplies:
Sketch - C4C 475, Crazy4Challenges.
The Bee Paper Company, marker paper
Stitched vertical stitched strip dies - MFT Stamps
Chameleon Color Tones markers
Chameleon Color Tops
Chameleon Fineliners
White, black card stocks
Black glossy card stock - Tonic Studios
Nuvo Crystal Drops
Record die - MFT Stamps
Silver for card stock - Stampin' Up
AWESOME and FANTASTIC dies - Verve (retired)
Fishtail banner die - MFT Stamps
Stitched rectangle dies - Elizabeth Craft Designs

Thanks for stopping by today

Thursday, 12 March 2020

Your Next Stamp March 2020 New Release Blog Hop

Hello crafty friends ...

Today the March Release is available in the Your Next Stamp online store and we are having a Blog Hop to celebrate!! I hope you have been enjoying the previews the Design Team has been sharing this week - I have really enjoyed the fun images and the variety of sentiments in the different sets.

Not only is there a Blog Hop filled with inspiration, AND a Discount Code (scroll down to see) - by commenting along the hop you have a chance to win a $25 YNS Gift Certificate! The more blogs you comment on, the greater your chances are to win. Check out all the Blog Hop links on the Your Next Stamp Blog.  Note, the Blog Hop ends at 12 midnight EST on March 15th, and the winner will be announced on the YNS Blog on March 17th 2020. The link to the Blog Hop is at the end of my post.


I chose the Birdie Easter Basket set to make an Easter card for our Grandson Zachary who loves GREEN. Once again I'm playing with the Stitched Rectangle Frames - I'm really liking these and they are perfect for shaker cards.


There are coordinating dies available for the Birdie Easter Basket and I love the inner sections that also cut out. Such a great detail with Your Next Stamp dies. The colouring was done with Chameleon Color Tone and Color top markers. There is no pink on this card, since it's for a boy and let me tell you, Zachary would notice any pink. Ha. The Retro Gumdrops were the perfect addition, don't you think?


Finally, here is a peek at the inside, with an image from the new Easter Love set and the sentiment is included in the Birdie Easter Basket set. What a great size for a sentiment!!

I stamped the chicks & egg with a Catherine Pooler ink pad, then used a water brush to pull in some of the colour from the outline on the chicks.


Here is the discount code for your shopping pleasure. Grin.


You can start the Blog Hop by clicking on the Inlinkz link below and remember to leave a comment here for your chance to win!

You are invited to the Inlinkz link party!
Click here to enter

Your Next Stamp Supplies:
Other Supplies:
MISTI - My Sweet Petunia
White card stock
Acetate
Patterned paper - Here & There, Studio Calico
Various sequins and filler from my stash
Chameleon Color Tones & Color Top markers
Sakura black glaze and white gel pens
Tiny stapler - Tim Holtz
Water Brush'

Card size - Standard A2, 4.25 x 5.5"


Thanks for stopping by today

Sunday, 9 February 2020

'Pick Me Up' Card Duo

Hello crafty friends ...

Today we are sharing projects with the upcoming February release at Your Next Stamp!! There is a chance to win a prize as well, so be sure to scroll all the way to the end of my post to see those details.

The 'Pick Me Up' stamp set is a small set with a great price point that packs a LOT of punch. I can see so many uses for this set and to start off I created both a Thank You card and a Birthday Card.


The video's on Blogger are quite small so if you would like to see them larger, click HERE for my YouTube channel.


First up is the 'Thanks For All The Smiles card. There is also a coordinating die available for the Pick Me Up set and just look at how it cuts the inside of the balloon strings! There is a THANKS die included in the die set, and the stamp set also comes with a Thanks stamp for even more versatility. 


To create my backgrounds, I die cut two card panels with the largest Stitched Rectangle die from white pearlized paper. Then I dipped and dragged the panels through puddles of Distress Oxide inks and when they was nice and dry I die cut the panels using the new CLOUD PANEL Die, which is also part of the February release.

Something I often do with background dies, is back them with a lightweight acetate which gives the card some great shine. With the pearlized card panel, the acetate backing, the white pearlized card stock, the clear embossing of the image and the shimmer pen on the balloons and cat bellies ... these cards are nice and shiny!

Have another look at the THANKS die, and how the 'A' and the 'N' are already shaped to fit perfectly on the balloons. I always appreciate the thought that goes into the YNS dies.


I kept all of the fallaway clouds to use on the card interior and future projects, so I added three inside the Thank You Card.  The oval window inside was cut using the new ROUNDED PANEL SHAPES and I stamped the greeting on a piece of light blue card stock and put it behind the opening. There are lots of shapes included in that die set and it's going to be great to create fun windows in and on your cards with a fun stitch line around the window.


Below is a closer look at the window, and the 'FOR ALL THE SMILES' is one of the greetings included in the PICK ME UP stamp set.


For the second card, I used the second pearlized & smooshed background cut with the new CLOUD PANEL Die. The PICK ME UP cat with balloons was clear embossed and coloured with the same brush markers as the first card. I intended to add the cat to the card with a Mini Action Wobble, but it turns out I don't have anymore. I will have to remedy that soon.


In the photo below, you can see the shine you get from the acetate. Sorry the photos aren't the best and I had wanted to show the stamp set in the photos as well. But my DT package was delayed getting to me and I was on a time crunch to get the cards made and photographed at all!


Inside I added stamps from the Whatnot Sentiments Set 12.


Now for the prize information!

Your Next Stamp is giving away each of the sets being previewed!! Today, 2 random comments will be selected from the Your Next Stamp Blog or Instagram and each person will win 1 of the 2 sets.  All comments must be left by February 12th at midnight and the winners will be announced on 2/13. These are the two sets being previewed today:

Pick Me Up
Ewe Can Do It

Supplies:
Pick Me Up Stamp Set - Your Next Stamp (February Release)
Pick Me Up Dies - Your Next Stamp (February Release)
Cloud Panel Die - Your Next Stamp (February Release)
Rounded Panel Shapes - Your Next Stamp (February Release)
Black Olive Ink - Your Next Stamp
Cool Tag One (banner) - Your Next Stamp
Whatnot Sentiments Set 12 (Birthday words and balloon) - Your Next Stamp
Stitched Rectangle Die Set - Your Next Stamp
Blue and white card stocks
White shimmer card stock
Acetate
Arteza Real Brush markers
Water brush
MISTI - My Sweet Petunia
Clear embossing powder
White embossing powder
Chameleon Color Tone and Color Top Markers
Spectrum Noir Glitter Pen

Card sizes - Standard A2 (4.25 x 5.5")


Thanks for stopping by today

Saturday, 1 February 2020

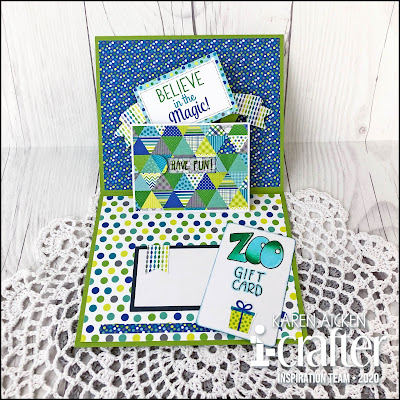
Wiper Pop Up ZOO Gift Card Holder (& Blog Hop!)

Hello crafty friends ...

Today is a New Release Blog Hop for i-crafter and showcasing Lynda Kanase's designs for February 2020.  The Blog Hop list of the Inspiration Team is at the end of my post. With apologies to my Canadian followers, as right now i-crafter is still a company that will only ship to the US. In fact, you can't even register on the site unless you live in the US and that includes me as an Inspiration Team member! The BIG NEWS though, is that Simon Says Stamp will soon be carrying the i-crafter line so that means more than reasonable shipping to Canada and many other places across the globe. Woot!!!

To be entered into our blog hop giveaway please comment on all blogs in the hop. The giveaway - FOR US RESIDENTS ONLY, UNFORTUNATELY, closes at 11:59 pm on February 14th, 202. The winner will be announced on the i-crafter blog on February 15th 2020.

Now onto my card, which I've actually had done for awhile - in fact it was for a Hanukkah Gift! We gave two of our Grandkids a Zoo Pass for Hanukkah and it came in the form of a Gift Card. I wanted to make a cute Gift Card Holder for it so pulled out the Pop Up Wiper Insert die knowing I couldn't share it here until the February Release & Blog Hop.

I chose bright, fun patterned papers from Doodlebug Designs instead of the typical Hanukkah colours, and popped it in a bright green envelope for them to open.


The video's on Blogger are quite small, so you can always seem them larger on my YouTube Channel HERE:


The Adventure Awaits was one of the cut aparts in the 6 x 6" paper pad, and I added the die cut banners that come with the Pop Up Wiper Insert.


There is a separate die you can use to cut the notches that hold a gift card and it would usually go in a vertical orientation. I chose to use it in the other direction  and I like how it hides part of the word that slides up when the card is opened.


When you remove the gift card, you can read the rest of the cut apart - 'Believe in the Magic", which I thought was perfect for zoo trips.


I added the 'have fun!' strip which you can see when the gift card is removed. You could add all kinds of messages in behind!


I hope you enjoyed my project, and that you will hop along to see what the rest of the Inspiration Team came up with using the new release!


Supplies:
222011 Pop Up Wiper Insert - Lynda Kanase, i-crafter
Green, white and navy card stocks
Patterned paper & cut aparts - Dragon Tails, Doodlebug Designs
Copic marker
Fun foam
Chameleon Markers and Color Tops
Rectangle dies - Hero Arts
Tropical Paradise Gumdrops - Your Next Stamp

Card size - 6 x 5", fits in a 5 x 7" envelope

Thanks for stopping by today

Thursday, 9 January 2020

Blue Chameleon Birthday Card

Hello crafty friends ...

Today I have a card for Fun Friday Challenge #130 at Your Next Stamp. The theme is   "Shades of Blue - keep the winter blues away and show how great the color blue is by including blue somewhere in your creation".


The Fun Friday challenges come with two chances win prizes!! Comment on the YNS Blog, Instagram or Facebook pages for a chance to win a free stamp set. Comment on all three to increase your chances, but comments must be left by January 14th. The winner will be announced on January 17th on the YNS Blog.
 See more details about the prizes at the end of my post today.


For my card, I chose this fun Chameleon from the 'One In A Chameleon' stamp set and made a Birthday Card for my stash.


The Chameleon was coloured in with Chameleon Color Tone and Color Top markers. I added the turquoise Color Top to the Blue marker for several seconds then just coloured. So fun to get this kind of graduation in colours with only one marker.

I also added a couple of blue Gumdrops.


Here is a peek at the inside, with the greeting stamped in two colours of blue ink.


The Fun Friday Challenge #130 runs through January 24th at midnight. One random participant will win a $15 gift certificate to the Your Next Stamp store.  If YNS stamps or dies are the focal point then the winner receives an additional $5 gift certificate for a total of $20.  The winner will be announced on the YNS Blog the Sunday after the challenge closes. Check it all out on the Your Next Stamp blog HERE.


Supplies:
Neenah card stock (for the stamping)
Sketch - Viva la Verve May 2018, Julie Tilman
Circle dies - Hero Arts
Patterned paper - All About A Boy, Echo Park
White and navy card stocks
MISTI - My Sweet Petunia
Chameleon Color Tone and Color Top markers
Chameleon Color pencils
Cloud Stencil - Echo Park
Makeup brushes
Sakura white gel and black glaze pens
Black marker
Copic markers
Fun foam
Card size - Standard A2 (4.25 x 5.5")

Thanks for stopping by today

Tuesday, 7 January 2020

'Make it Rain' Gift Card Holder

Hello crafty friends ...

Today I'm sharing the Gift Card Holder I made for my brother's birthday. I used those colourful card panels with matching envelopes I mentioned in a previous post and this fun 'Make it Rain' stamp set from Your Next Stamp. No matter how I tried to edit the photos the orange kept showing up as NEON - so I had to lower the saturation.


Back when I ordered the stamp, I also ordered the die and I'm so glad I did - look how it cuts out the middles!


To make the pocket that holds the gift card, I actually used a scrap of patterned paper from the package - it was already cut in this shape. I just lined up the YNS Stitched Rectangle die and ran it through my die cutting machine, which cut off a sliver from the bottom and left edges and gave me the nice stitched line. If I weren't using the scraps, I would have made it fit across the bottom edge but I was happy to find a good use for this leftover piece. It holds the gift card the same as it would if it were larger.


TIP - I prefer to adhere gift card pockets with wet glue rather than double sided adhesive, as sometimes the tapes don't hold quite as well and the gift card slides and gets stuck in the adhesive. Not a problem with glue as long as you give it a minute or two to dry.


One more look at the front of the Gift Card Holder ... and I have to say my brother got a big kick out of this happy, cash holding doggie.


Supplies:
Neenah card stock (for stamping)
White card stock
MISTI - My Sweet Petunia
Chameleon Color Tone and Color Top markers
Sakura white gel and sparkle pens
Carlton cards orange post card and envelope
Patterned paper - All About a Boy, Echo Park
Circle dies - Hero Arts

Card size - 4 x 5.25" (slightly smaller than a standard A2)


Thanks for stopping by today

Saturday, 19 October 2019

Karen Burniston joins Pear Blossom Press for a BLOG HOP!!

Hello my crafty friends

You are in for a treat today, as we are collaborating with the Pear Blossom Press team for an amazing Blog Hop. Pear Blossom Press makes cool Chibi light packages that make creating cards with a light up feature much easier. Then Amanda & hubby came out with EZ Lights which are meant to work with interactive, pop up cards! Yes you heard that right. Pop Up cards that also light up.  I know, right?


There are prizes and discounts too, which I have listed below all the photos.


I have to say these things are SLICK and I am both impressed and excited to use the EZ Lights again.  You are going to want to settle in, because I actually made TWO cards for the Blog Hop today. Amanda and I are on Lynda Kanase's Design Team together and I wanted to show her some extra support with a second card.


So for my extra long post today,  I'm sharing the first card with a YouTube video followed by details, notes and still shots. After that will be the second card, again with a YouTube video followed by the still shots and the Blog Hop links so you don't miss any of the cool projects on the hop. A full supply list of my cards will be at the end of the post.


This was my first time using the Chibioni lights and of course we are stepping up the process by creating pop-ups that also light up. So there were some 'trials and tribulations' but that had nothing to do with the EZ Lights. It was more with the planning on where to place the wires and how to attach everything. I'm not usually a planner when it comes to card making, and tend to create as I go.


I die cut the rocket and readied the card base along with the other pop up pieces then figured out where to put all the elements. I wanted the rocket flames to light up which meant the wires needed to come from below. I cut a slit in the (unassembled) pop up flames piece and threaded the lights through that from the back side. Below you can see the little slit I cut into the flame arm.


When I knew that was going to work, I was able to adhere the moon piece inside my card as per Karen B's Rocket Pop Up assembly video. I wanted it to be really secure, so I also used a small stapler. The staples show on both the front and back but both were going to be covered with card stock panels so that wasn't a concern. Then I adhered the wired flame pop up arm to the moon base.


When I finished assembling the lighted rocket pop up, I realized I hadn't done enough planning and I now had the wires and Battery/Switch piece sitting on the inside of the card. Hmmmmm ...  While I wanted the switch to be on the inside, I could't figure out how to disguise all of the wires with just stars & planets etc. I fixed that with a craft knife, cutting a upside down U shaped flap large enough to pop theBattery/Switch through to the back of the card. I secured the flap and the wires on the back with a  piece of double sided tape leaving the rest of the wires and the Battery/Switch hanging free from the back of the card. There is lots of length to work with on the wires, which is great. With the double sided tape on the back, the flap is secure and you can barely see it from the inside! Note at each point I tested the lights to be sure they still worked.


The next thing was how to get the Battery/Switch back to the inside of the card.  I really wanted the push button on the inside. So out came the kraft knife again. I figured out where I wanted the switch to be and how I wanted to disguise it then cut another flap. I popped the Battery/Switch back to the inside and secured the excess wires in a curve on the back of the card using a large piece double sided tape.  Then I used red line tape to adhere the Battery/Switch where I wanted it inside the card and added the double layer of foam tape around it. Note - the Battery/Switch is the same thickness as a double layer of foam tape, which is what you would typically use for a shaker card.


I pressed the spot where the PUSH ME button will be ... and the rocket tail lit up ... and I honestly did a little happy dance. SO flippin' cool!! I cut a slightly smaller panel for the back of the card and used wet glue just around the edges to secure it to the card back. You'd never know there are flaps cut and excess wire lengths curved up in between the layers, and the extra panel helps balance out the card weight with the decorated panel on the card front.


Below is the front of my card. To create the clouds, I used a hand made mask. When Karen B first came out with the Nature Edges, I cut one of the clouds from scrap paper and I'm still using it! I had to add one of the aliens and space ship from the Space Charms - they are just SO cute! I penned the sentiment with Chameleon Fine Liners - see how the colour changes as you write? 


Here are the detail shots, and my second card follows them.


Whew! - still with me? I hope so ... and I don't mind at all if you are just looking at the pictures and not doing any reading. I only added the notes and tips for those that might want to recreate this card.


For my second card, I had an idea to create a camping card and this is what I came up with. There are detail shots below the video, as well as the BLOG HOP LINKS!!!  You won't want to miss any of the fun inspiration on this blog hop.


I have had this patterned paper package for several years and I was happy with how well it matched my theme. The fish come with the Camping Charms, and I strung them on a loop of twine after brushing their bellies with Wink of Stella.


By adding a circle to the Katherine Label arm, you get a completely different look!


How cute is this Camping Riley? He is so fun, and I coloured him with my Chameleon Color Tone and Color Top markers.


I had added some yellow vellum behind the campfire, but it didn't really show up so I coloured it red with a Copic marker. When you press the PRESS ME stamp on the right hand side of the card, two stars and the campfire light up on the left hand side of the card. 😀


The tree trunk was quickly snipped from a scrap of brown paper. I stamped the PRESS ME on the tree before adhering it to the card base, over the Battery/Switch. The Battery/Switch just fits under the tree, which is the fall away portion of the tree from the Christmas Tree Pop Stand.


Finally, I added a signing block on the back of the card. I didn't want to change up the inside, or distract from the lights and action.


Thank you so much for hopping along with us on the Karen Burniston and Pear Blossom Press Collaboration Hop! Be sure to comment along the way to be entered to win one of two great prizes:
  • Snowman Twist Circle Die Set with a 5-pack of EZ-Lights, or 
  • Cake Pop-Up Die Set with a 5-pack of EZ-Lights! 

Now don’t worry if you aren’t drawn as one of the winners; we’ve got a special gift for everyone! Just enter the code POPANDLIGHT for 15% off your purchase at karenburniston.com or pearblossompress.com. One code works for both shops! (Coupon code valid until November 2, 2019.)


Karen Aicken (you are here!!)


Prizes & Official Contest Rules
Two prizes will be awarded to two separate winners, chosen at random, from comments left on participating blogs and videos. No purchase necessary. Comments must be posted by 11:59 pm PDT on October 26, 2019. Only one comment per blog or video will be counted, but you can comment on multiple blogs and videos in the hop for additional entries. (This is to prevent spam.) Contest open internationally to participants over 18 years of age. Void where prohibited by law. Any personal information collected will only be used for the purposes of contacting winners, your information will never be shared or sold. Comments left on YouTube videos must not violate community guidelines. This contest is not sponsored by YouTube. Winners will be announced on November 28, 2019 here and prizes must be claimed within thirty days of announcement, or new winners will be drawn. 


Supplies for Light Up Rocket Pop Up Card


EZ Light 5 Pack Set - Pear Blossom Press

Navy, white, yellow, green, teal and confetti card stocks
1105 Rocket Pop Up - Karen Burniston
1038 Tropical Scene (small stitched circle) - Karen Burniston
1047 Upsy Daisy Pop Up (small fishtail banner) - Karen Burniston
1053 Alpha - Karen Burniston
1104 Triple Flip (fishtail banner) - Karen Burniston
1054 Rectangles Crosshatch - Karen Burniston
1006 Nature Edges - Karen Burniston
1046 Circle Charm Pop Up (star) - Karen Burniston
1057 Circles Crosshatch - Karen Burniston
1109 Space Charms - Karen Burniston
Tiny Attacher - Tim Holtz
Sakura white gel pen
W1 Copic marker
Makeup brushes
Black pen
Sunscape stencil - Newtons Nook
Chameleon Fineliners
Push Here stamp set - Lawn Fawn
Dot stamp - Stamps by Judith
Card Size - A2 (4.25 x 5.5")


Supplies for Camping Riley Pop Up Card


EZ Light 5 Pack Set - Pear Blossom Press

Gone Camping scrapbook kit, card stock and patterned paper - We R Memory Keepers (old)
1054 Rectangles Crosshatch - Karen Burniston
1102 Word Set 10 Thinking of You - Karen Burniston
1064 - Christmas Tree Pop Stand (large tree) - Karen Burniston
1097 Farm Edges (back hill on the right) - Karen Burniston
1049 Camping Charms - Karen Burniston
1011 Katherine Label Pop Up - Karen Burniston
1057 Circles Crosshatch - Karen Burniston
Neenah card stock (for Riley)
Camping Riley - Riley & Company
Camping stamp - Funny Bones, Riley & Company
Catherine Pooler Inks
Chameleon Color Tone and Color Top markers
Sakura Black glaze, white gel and sparkle pens
Chameleon Coloured pencils
1/8" Hole punch
Small scraps of yellow vellum
Teal, brown, off white and white card stocks
Push Here stamp set - Lawn Fawn
Twine
Mini Brad

Card size - wide A2 (5.5 x 4.25")


Thanks for stopping by today