Showing posts with label Kat Scrappiness. Show all posts

Friday, 9 August 2024

Pop Up Wedding Card


Welcome to Fun Fold Friday on my blog! ItOur daughter-in-law's brother is getting married this month and I offered to make a wedding card. The bride loves pink, orange and yellow so those are the colours I went with - along with lots and lots of white.


I love a larger card for a wedding, so this one is 5x7". The patterned paper had the right colours, and since it's such a 'loosey goosey' print, I scribbled more pink, orange and yellow onto the flowers with alcohol markers. I knew I'd be covering the paper with vellum to soften the paper, but it would have been OK without. The Foliage Frame was die cut from white pearl cardstock and the Happily Ever After was cut from rainbow holographic cardstock. Actually I cut it three times - twice from white and once from the holographic. I adhered the three layers together so it would be nice and sturdy - like a chipboard element, and since the card is being hand delivered I didn't have to worry about bulk. Finally, I added a trio of mirrored heart confetti pieces and filled in the open heart on the sentiment with glitter glue.


Inside I used Karen Burniston's Twist Flower Pop Up. I sure get a lot of use out of that one having made over 15 cards with it already!  


The wedding charms are also by Karen Burniston. When you snip off the hanging hole, they become cute little elements you can add to your cards. I love the embossed feature on the brides dress.


Supplies used:
Patterned paper - Meandering Meadows 6x6", Stampin' Up
5x7" Foliage Frame - Kat Scrappiness
Rainbow Holographic cardstock - Recollections
Vellum - Stampin' Up
White pearl cardstock
Nuvo Glaze
Happily Ever After - Karen Burniston
Mirrored hearts - Kat Scrappiness
Catherine Pooler coloured inks
Sentiment - One in a Million, Stampin' Up
Nesting hearts dies - Hero Arts
Wedding Charms - Karen Burniston
Congrats (stamp and die) - Pinkfresh Studios
5x7" card base & envelope


Wednesday, 31 July 2024

Anniversary Z-Fold Card


I used the March 2024 Paper Pumpkin kit for this card but of course changed it up from the kit instructions. I'm always a fan of the envelopes that are included with the Paper Pumpkin kit and this one is printed inside and has a rounded flap.

I stamped the sentiment on a stitched circle die cut which was matted with a crosshatch circle die cut from vellum. I added three mirrored hearts above and below the sentiment.


Here is a look at the inside. The patterned card base was turned inside out, so it was white on the outside front & back and all the pattern was inside. The centre score line was already there, so I just scored a second line on the left side of the (opened) card in the centre of that panel. Then, simply fold as shown! I used a corner rounder to punch the top two corners which ties in with the rounded flap on the envelope.

The greeting was stamped on a same size stitched circle as on the front, and placed so it cannot be seen when the card is closed. While I could have stamped the greeting directly on the card base, I liked the look of the stitched circle better.


One more look ...


Supplies used:
March 2024 Paper Pumpkin kit "Memorable Meadows", Stampin' Up
Circles Crosshatch - Karen Burniston
Stitched circles - MFT Stamps
Vellum - Stampin' UP
Word stamps - The Inside Scoop Anniversary, Taylored Expressions
Mirrored hearts - Kat Scrapiness
Corner Rounder - Amazon .ca


Tuesday, 16 April 2024

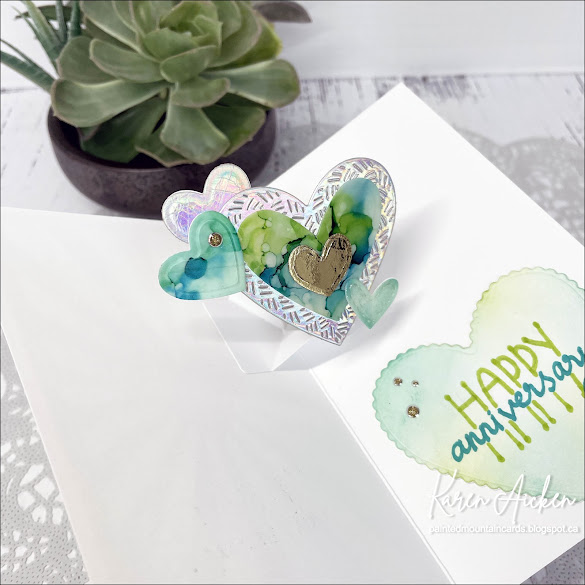
Mini Slimline Pop Up Anniversary Card

 
Today I'm sharing the shiny anniversary card I made for our eldest daughter & hubby. I started by die cutting the sunburst heart out of rainbow holographic card stock - I love that die and finding reasons to use it. 😂.  Last year I made a bunch of alcohol inked backgrounds on vellum and have managed to hoard every single one. Sheesh. So I pulled one out to put behind the die cut then mounted it to a Mini Slimline card base.


Wanting to keep the front nice and simple, I added a gold heart to the center of the sunburst and a gold Glitter Dot as well.


Inside I used the Twist Flower Pop Up die (Karen Burniston) to animate a crosshatch heart cut from the same rainbow holographic cardstock as I used on the front. I die cut more hearts, both from the alcohol inked scrap pieces, gold foil card stock and the rainbow holographic cardstock scraps.


The Happy Anniversary was done with Sharpie markers.


Supplies used:
Rainbow Holographic cardstock - Recollections
Mini Slim Heart Sunburst
Alcohol Inked vellum
Twist Flower Pop Up - Karen Burniston
Hearts Crosshatch - Karen Burniston
Gold foil card stock - Recollections
Wink of Stella
Sharpie markers

Thursday, 29 February 2024

Mini Slimline Thank You Card


This is the 13th card I'm sharing made with Paper Roses' cardmaking kit 'BEE HAPPY'. I think it was actually the first one I made, but I rarely share things in the same order I make them.  I just loved this print and didn't want to cover any of it up. I simply added two pieces of ephemera to the card front - both came in the kit. Then a bit of Stickles glitter glue for sparkle & shine.


Supplies used:
BEE HAPPY cardmaking kit - Paper Rose
Stickles glitter glue
Embossed edge Mini Slimline dies - Kat Scrappiness

Wednesday, 31 January 2024

Pop Up Mini Slim Valentine Card

I'm sharing a Mini Slimline Valentine card today - that I actually made for my hubby. 🥰. I kept the front fairly simple, cutting the sunburst from heart patterned paper then adding some foiled stickers to the centre heart. I figure since I'm giving this to him on Valentine's Day, I didn't also need to add a Happy Valentine's Day to the card front. I'll be saying it to him as I give him the card anyway. 


Inside I used ephemera from my stash, that I've had for so long I have no idea when or where I got it, or who makes it! But there is really only one person I could use this 'I'm Yours' piece for, and it's what actually inspired the whole card. I have it popped up on Karen Burniston's Twist Flower Pop Up, which I have really been enjoying since I got it a few months ago.


I really like all the dimension you get with this easy-to-assemble die set, and that it works in so many different card sizes. I'll write him a personal message on the white heart on the lower right.


Yep - I'm his, and he has to keep me. No refunds or returns, right? 😂


Supplies used:
Heart Sunburst Mini Slimline die - Kat Scrappiness
Patterned paper on front - Love Notes, Echo Park
Patterned paper inside - unknown (old, from my stash)
Mini Slim Scalloped rectangle - Divinity Designs
Ephemera. inside - old and unknown
Stickers - old, from my stash
Nested heart dies - Hero Arts
Washi Tape - Doodlebug 

Friday, 22 December 2023

Mini Slimline Christmas Duo


Welcome to Fun Fold Friday on my blog! Today I'm sharing my final Christmas cards for 2023 and these two Mini Slimline cards helped me use up the last of a 6x6" paper pad. 


The first card also uses the Winter Owl bundle (Stampin' Up) with a simple box pop up. The sentiment was trimmed from a sheet of borders in the pad - it was the last one!


 The Pop Up strip measures 1 x 3", scored at .5, 1.5 and 2". I have several video tutorials on creating this type of Pop-Up, here are a couple:  Slimline Pop Up Tutorial (but the technique and measurements work for A2 cards as well) or Quick and Easy Pop Up Tutorial (from 2 years ago but I use it all the time).


The second card has a piece of snowflake printed acetate over the ornament patterned paper - I don't do this nearly enough as I really like how it looks. The ornament decoration is a Peel Off sticker I've had in my stash for many years - originally it was from Elizabeth Craft Designs. As was the Seasons Greetings Peel Off sticker.

The navy cardstock strip goes over the patterned paper but under the acetate, and the Seasons Greeting is on top of the acetate. 


Inside I used my new favourite die by Karen Burniston ... the Twist Flower Pop Up. I love that it fits inside a Mini Slimline and Slimline card!


One more look ...


Having been asked how many cards I make I thought it would be fun to keep track this year. Many of my posts include more than a single card or project and below is my tally. 

Card Tally for 2023
January - 53 cards
February - 56 cards
March - 55 cards
April - 32 cards
May - 43 cards
June - 34 cards
July - 56 cards
August - 106 cards
September - 61 cards
October - 51 cards & 5 Tags
November - 46 cards
December so far - 22 cards (& 16 simple tags)

I decided to cancel the subscription that provided linked thumbnails to what products I used on my cards. It was costing me out of pocket each month, so I’m back to just listing what I used .

Supplies:
Patterned paper - A Winter's Night, Recollection (old)
Mini Slimline Embossed Edge Rectangle dies - Kat Scrappiness
Snowflake Luxury Foiled Acetate - Hunkydory
Snowflake Peel Off's - Ecstasy Crafts
Ornament Peel Off''s - Elizabeth Craft Designs
Copics to colour the snowflakes copper
Catherine Pooler Inks
Water Brush
Seasons Greetings Peel Off's - stash
Twist Flower Pop Up - Karen Burniston
Double Stitched Circles - Divinity Designs
Magic Holiday Messages - Lawn Fawn
Glitter Dots - Ecstasy Crafts
Large Snowflake Peel Off's - Elizabeth Craft Designs
Wink of Stella
Wonder & Cheer - Above it All, Stampin' Up
Winter Owls (stamps & dies) - Stampin' Up
Fishtail banners - MFT Stamps
Short Crosshatch Rectangles - Karen Burniston 

Saturday, 18 November 2023

Mini Slimline for Thanksgiving


For our Thanksgiving cards this year, I made an effort to use up some bits and pieces from my craft room. This leaf panel with the gold leaves was one I'd been hanging onto because it was just to pretty to toss but it was the wrong size for an A2 card. Back then people weren't making Mini Slimline cards, so I pulled out a couple of Mini Slimline dies and this is the card I came up with. This is also my last Thanksgiving card until next season!


I cut the gold leaf panel with a fancy edge die then matted it with a gold mottled foiled cardstock. The sentiment was stamped on a white fishtail banner and matted with brown, and I added a few gold glitter dots for even more sparkle. But it seemed to need something, so I cut stitched leaves from scraps of gold mirror cardstock and added a little twine bow. Done!


Inside I made a simple box pop up and decorated the white panel with Washi Tape (which is also on the envelope) and a single gold stitched leaf.  The sentiments used are ones that I have had for many years (from Reverse Confetti) & they came with the label dies. I pull out the set every year to use on my cards. 😊


I didn't to a tutorial for making a simple box pop up, because I already have several on YouTube. Here are links to a couple of you are curious:

Slimline Pop Up Tutorial (but the technique and measurements work for A2 cards as well)

Quick and Easy Pop Up Tutorial (from 2 years ago but I use it all the time)

Having been asked how many cards I make I thought it would be fun to keep track this year. Many of my posts include more than a single card or project and below is my tally. 

Card Tally for 2023
January - 53 cards
February - 56 cards
March - 55 cards
April - 32 cards
May - 43 cards
June - 34 cards
July - 56 cards
August - 106 cards
September - 61 cards
October - 51 cards & 5 Tags
November so far - 20 cards

I decided to cancel the subscription that provided linked thumbnails to what products I used on my cards. It was costing me out of pocket each month, so I’m back to listing what I used .

Supplies:
Gold leaf panel cut from an 8-1/2 x 11" sheet by Club Scrap, old
Glitter Ombre Mirri Card - Hunkydory
Gold Glitter Dots - Ecstasy Crafts
Mini Slimline Stitched Rope dies - Kat Scrappiness
Washi tape - Amazon
Give Thanks and dies - Reverse Confetti
Stitched Leaves - Lawn Fawn
Twine
Catherine Pooler Inks

Wednesday, 1 November 2023

Fox & Foliage Mini Slimline Card


While poking around in my 'in progress bin" I came across this birch tree background that I had printed off of my computer years ago. I didn't end up using it at the time, as there was a red vertical line through the tree stump which meant I needed to change the ink in my printer. I did that, printed off a fresh one for the project I needed it for and put this 'defective' one into the bin. Ha - why? Who knows.

When I pulled it out again I realized how easy it would be to disguise the line on the tree stump with a critter. I trimmed it to fit behind the die cut foliage frame then die cut the fox from Honey Bee's Heart Hugs. I just adore the critters in that die set and don't use it nearly enough.


Here is a peek at the inside ... 


Having been asked how many cards I make I thought it would be fun to keep track this year. Many of my posts include more than a single card or project and below is my tally. 

Card Tally for 2023
January - 53 cards
February - 56 cards
March - 55 cards
April - 32 cards
May - 43 cards
June - 34 cards
July - 56 cards
August - 106 cards
September - 61 cards
October so far -  cards
November so far - 1 Card

I decided to cancel the subscription that provided linked thumbnails to what products I used on my cards. It was costing me out of pocket each month, so I’m back to listing what I used with a few affiliate links included.

Supplies:
Clip Art printed piece, unknown, old from my stash
Mini Slimline Foliage Frame - Kat Scrappiness
Mini Slim Fancy Scallop dies - Kat Scrappiness
Patterned paper - K & Co (old, from my stash)
Chalks & Q Tip - Stampin' Up (old)
Catherine Pooler Inks
Small blending brushes - i crafter
Black marker
Wink of Stella
From the heart - Petal Palette, Stampin' Up
Thanksgiving Blessings - Taylored Expressions
Pops of Color

Monday, 23 October 2023

Mini Slimline Embossed Sympathy Card


Almost as soon as I got this embossing slimline folder - like 18 months ago - I embossed this gold pearl card stock. I oooooohed.  I ahhhhhhhed. And I put it in my 'in progress' bin to make into a finished card. Then promptly forgot about it, ha ha.

When I was flipping through the bin I pulled it out and decided to make a sympathy card with it. I cut the embossed panel down to fit on my Mini Slimline card base (3.5 x 6") then added some gold foiled bee stickers and a stamped sentiment on a label. The stamens got brushed with Wink of Stella and the card front was finished. Those gold bees show up so much better in real life ... in still shots they look brown rather than gold foiled and shiny.


Here is a peek at the inside ...


Having been asked how many cards I make I thought it would be fun to keep track this year. Many of my posts include more than a single card or project and below is my tally. 

Card Tally for 2023
January - 53 cards
February - 56 cards
March - 55 cards
April - 32 cards
May - 43 cards
June - 34 cards
July - 56 cards
August - 106 cards
September - 61 cards
October so far - 36 cards

I decided to cancel the subscription that provided linked thumbnails to what products I used on my cards. It was costing me out of pocket each month, so I’m back to listing what I used.

Supplies:
Gold Pearl cardstock - my stash
Simple Strips Sympathy stamp & die - Taylored Expressions
Gold foil bee stickers - stash
Slimline embossing folder - Lillies, Nellies Choice
Catherine Pooler Inks
Narrow gold tape - Amazon
Inside - Mini Slimline Embossed Edge, Kat Scrappiness
Sentiment - Inside Out Sympathy, Catherine Pooler

Monday, 18 September 2023

Masculine Faux Step Birthday Card


Welcome to Masculine Card Monday here on my blog! Today I'm sharing the birthday card made for our son, who enjoys fishing & camping. I actually made this card back in early summer but didn't want to share it until after his birthday.

After making hubby's Father's Day card I had a number of cut-aparts leftover. I pulled out these two to use on our son's card (and a third one ended up on his Gift Card Holder but no pics of that) then pulled out this older patterned paper package by Echo Park. The package has papers and stickers and I used both on the card.


This one is another Faux Step card and I quite like making this type of fun fold. They are very easy to customize for size - this one is a 7 x 5" card, but I have also done a Mini Slimline version and there are tons of tutorials online for an A2 sized card. I will list the measurements I used at the end of my post.


When I made the Father's Day card, I mentioned an accordion folded strip that really helped to keep the card from collapsing. I have a thing about sturdy cards, and having them stand for display. Having received Step Cards in the past I noticed after a short time on my sofa table they started to sink down. That is part of the reason I never made them or purchased a Step Card die set. That doesn't happen with these Faux Step cards, especially with the accordion piece added between the largest folds.

No tutorial, but here are a couple of photos showing placement.


Below are the measurements I used if you are wanting to try it. There are lots of Faux Step Card tutorials on YouTube as well.

NOTE: I added an accordion fold cardstock strip, between the centre and back pieces and right along the bottom edge in the centre. See photos for placement.

Card Base - 9 x 7 scored at 1.5, 3 and 6. Use the above photo as reference for the mountain and valley folds.

Folded Top Piece -  10 x 4" scored at 5". This can be adjusted depending on how tall you and/or wide you want it to be.

Accordion folded brace inside - 4 x 1", scored at 1, 2 and 3" 

White cardstock for personal message on back -  6.75 x 2.75"

Having been asked how many cards I make I thought it would be fun to keep track this year. Many of my posts include more than a single card or project and below is my tally. 

Card Tally for 2023
January - 53 cards
February - 56 cards
March - 55 cards
April - 32 cards
May - 43 cards
June - 34 cards
July - 56 cards
August - 106 cards
September so far - 25 cards

I decided to cancel the subscription that provided linked thumbnails to what products I used on my cards. It was costing me out of pocket each month, so I’m back to listing what I used with a few affiliate links included.

Supplies:
Cut Aparts, Outdoor Adventures - Carta Bella
Happy Camper - Echo Park (Patterned paper and stickers)
Washi Tape - Doodlebug
Anything But Basic Birthday Wishes - MFT Stamps
Catherine Pooler Inks
Stitched Sentiment Strip dies - Kat Scrappiness


Thursday, 20 July 2023

Mini Slimline Birthday Card - a Paper Pumpkin Alternate Card


Back in February, I worked on an older Paper Pumpkin kit and used it up. I didn't start sharing the cards until May though, and have been sharing one each week. This is the last card made with the kit! I ended up making a total of  16 cards because I pulled out a bunch of things from my craft room to use as well. You can always click on the Paper Pumpkin label on the right side of my blog if you wish to see the other Paper Pumpkin Alternate cards I've made.

Also earlier this year I created a Mini Slimline card with this sweet lattice die and the same rainbow coloured Slimline patterned paper and I liked it so much I wanted to make another. This one was the birthday card I sent to our niece for her early May birthday.


Inside, I added a zig-zag panel decorated with some coordinating Washi Tape and the remaining hearts from the kit. I've also been loving the Catherine Pooler stamps I got back in March - which is why you see me using them all the time. Especially for my nursing home donation cards!


Having been asked how many cards I make I thought it would be fun to keep track this year. Many of my posts include more than a single card or project and below is my tally. 

Card Tally for 2023
January - 53 cards
February - 56 cards
March - 55 cards
April - 32 cards
May - 43 cards
June - 34 cards
July so far - 32 cards

Additional Supplies:
March 2020 Paper Pumpkin 'No Matter the Weather', Stampin' Up
Patterned paper -  Slimline Rainbow Magic, Whimsy
White cardstock
Cloud mask, MFT Stamps
Alcohol markers

This blog uses affiliate links whenever possible. This means, if you make a purchase through one of my affiliate links that you pay the same amount but I may receive a small commission from your purchase. I only link products that I own, love and use for my card making and not every link below is an affiliate one! 😊

Tuesday, 23 May 2023

Tulip Birthday Card


I made this card for a friend who has a beautiful garden. She often posts photos of her flowers on Facebook and they are SO pretty! I thought she would enjoy a floral birthday card this year. The tulips are from Kat Scrappiness and I inked the edges of the tulip blooms then cut the stems/leaves from a green pearl cardstock. Of course, I had to add a couple of butterflies as well.


Inside, the stamped and matted sentiment is popped up on an accordion folded 'spring'.  I have been using those a lot the past couple of months 😊.


One more look ...


Here is a link to Sam Calcotts video where she shows her paper springs. 

Having been asked how many cards I make I thought it would be fun to keep track this year. Many of my posts include more than a single card or project and below is my tally. 

Card Tally for 2023
January - 53 cards
February - 56 cards
March - 55 Cards
April - 32 Cards
May so far - 37 Cards

Additional Supplies:
Patterned paper - Flowering Fields, Stampin' Up
5 x 7 Card Base & Envelope
White cardstock
Green pearl cardstock
Pink cardstock
Shimmer Spray
Gold Sequins - my stash

This blog uses affiliate links whenever possible. This means, if you make a purchase through one of my affiliate links that you pay the same amount but I may receive a small commission from your purchase. I only link products that I own, love and use for my card making and not every link below is an affiliate one! 😊


Tuesday, 16 May 2023

Curvy Gatefold Birthday Card


This Curvy Gatefold die set was one that I got for my Birthday, and I had to play with it right away. However, I'm just now sharing the card! I made it for our middle daughter's birthday so couldn't post it on social media until we had given it to her.  For this one, I added a pretty belly band that slides off to open and reveal the sentiment inside. 


The belly band was decorated with a flower and leafy sprigs and I cut some of the layers from pink mirrored card stock. 


I love a die set that comes with layering dies - especially for tricky curves like this one. I only used one layering die on the front, but used both of them inside. The bottom layer was cut from pink mirrored cardstock so there is lots of shimmer and shine.


Having been asked how many cards I make I thought it would be fun to keep track this year. Many of my posts include more than a single card or project and below is my tally. 

Card Tally for 2023
January - 53 cards
February - 56 cards
March - 55 Cards
April - 32 Cards
May so far - 28 Cards

Additional Supplies:
Curvy Gatefold Die Set - Creative Craft
White cardstock
Blue & green cardstock scraps
Shimmer spray
Patterned paper - Park Lane, Hobby Lobby

This blog uses affiliate links whenever possible. This means, if you make a purchase through one of my affiliate links that you pay the same amount but I may receive a small commission from your purchase. I only link products that I own, love and use for my card making and not every link below is an affiliate one! 😊