I like to make our grandkids their Teacher Appreciation Cards each year - here in Alberta the kids don’t start school until September and they go until almost the end of June. I made two of this one, as one family’s school is in a completely different county than the other.
The apples are stickers I bought last year from Amazon and there are a lot in the package so I use them freely - including on the envelopes! The Mini Slim background die is from Taylored Expressions and I still get a lot of use out of it.
This year I left the cards blank inside - other than the apple sticker - because the grandkids are old enough now to write a thank you message rather than just sign their names. I thought that would make the cards more personal for their teachers.
Supplies used:
Patterned paper - I Love School, Echo Park
Apple Stickers - Amazon .ca
Mini Slim Square Window Cutting Plate - Taylored Expressions
Welcome to Fun Fold Friday here on my blog! I’m very late sharing this Mother’s Day card I made for our eldest daughter, but better late than never. I used the Mini Slim Tri-Shutter die set from Divinity Designs for the card base and layers and their gorgeous patterned paper as well. I chose this paper because she loves peonies. She also loves Highland Cows!
The adorable Highland Cow on the front is actually a sticker that I attached to white card stock then fussy cut so I could pop it up with foam tape. I made a little box using a die by Karen Burniston to add the rest of the sticker package into as part of her gift, and she didn’t mind at all that I had chosen one of the package to use on her card.
The Happy Mother’s Day and Shadow dies are both by Karen Burniston and I cut the Happy Mother’s Day portion three times and stacked them for a chunky sentiment. Easy peasy since I was hand delivering this and didn’t need to worry about weight or thickness going through the mail.
Supplies used:
Patterned paper - Floral Favorites, Divinity Designs
Mini Slimline Tri Shutter die set - Divinity Designs
Scallop Circle dies - Divinity Designs
Blending Brushes
Crinkled seam binding - Stampin’ Up
Happy Mother’s Day & Shadow dies - Karen Burniston
Sadly, I didn't get this card in the mail in time - so I guess I'll be hanging onto it til next year. I had to have oral surgery this week and the pain meds have sent me for a loop. Ha - but I'm recovering well and starting to wean off the meds. I sure didn't get much done except rest and snooze - which I'm sure helped the healing process.
Anyhow I used one of Whimsy Stamps Slimline papers for my card as well as some really old stickers from my stash. They were adhered to white card stock & fussy cut so I could pop them up with foam tape. I also added some gold peel off stickers for some sparkle.
You can probably tell how much I love Karen Burniston's Twist Flower Pop Up die set, which is what I used here. A few more stickers as well as some washi tape inside. The sentiment iwas matted on rainbow holographic card stock. The tiny hears were also cut from that same card stock for a different project and the leftovers were sitting on my stamping desk. I added a few of them on the card.
Supplies used:
Patterned paper - Slimline St. Patricks Day, Whimsy Stamps
Stickers - old, from my stash
Shamrock stickers - American Crafts (old)
Self Adhesive gold dots - Dazzles
Stickles glitter glue
Rainbow holographic hearts - leftover from previous card, sitting on my stamping table
Twist Flower Pop Up - Karen Burniston
Washi tape - Doodlebug Designs
Scallop stitched circle dies - Tutti Designs
Mini Strips St Patricks Day, coordinating die and backing die - Taylored Expressions
I made so many Fall & Thanksgiving cards last year that I didn't need to make any this year. Then, I ran out of time and didn't get any mailed for our Canadian Thanksgiving in October, so now I have lots for next year too. Sheesh. At least I can mail cards to our American friends & family this month. I found this single 12x12" sheet of fall themed paper in my stash and decided to use it up. I made 4 different sized cards and have been sharing them throughout the week.
I've made a 5x7" fun fold, a standard A2, a Slimline and today's card is a Mini Slimline that used up the last of the paper! I added a circle sticker to matted circles, then went around the outer edge with a gold gel pen. The little mushroom was also a sticker, and it was added to white card stock then fussy cut so I could pop it up with a foam tape.
Inside I wrapped the white panel with both washi tape and narrow gold foil tape, then stamped the sentiment. In the top photo, you can see a sticker on the envelope flap. I kept half of it on the folded liner, so when I go to send the card I can peel away the rest of the liner and the sticker will adhere to the envelope.
When I was looking through my Halloween elements, I noticed that one package was almost gone - but these 3-D sparkly skull pieces were in it. I pulled all three out to make this card.
I cut the purple background using a die by Taylored Espressions then gave it a good spritz with shimmer spray. I added the 3-D skulls into the window openings and added a stamped sentiment. Then I pulled out an older package of resin stickers and added a crow above the sentiment.
Here is a peek at the inside where I wrapped holographic washi tape around the bottom edge and stamped the sentiment (in two parts). The resin sticker package also has the skull & crossbones in it so I added one inside.
Supplies used:
Mini Slim Square Window Cutting Plate - Taylored Expressions
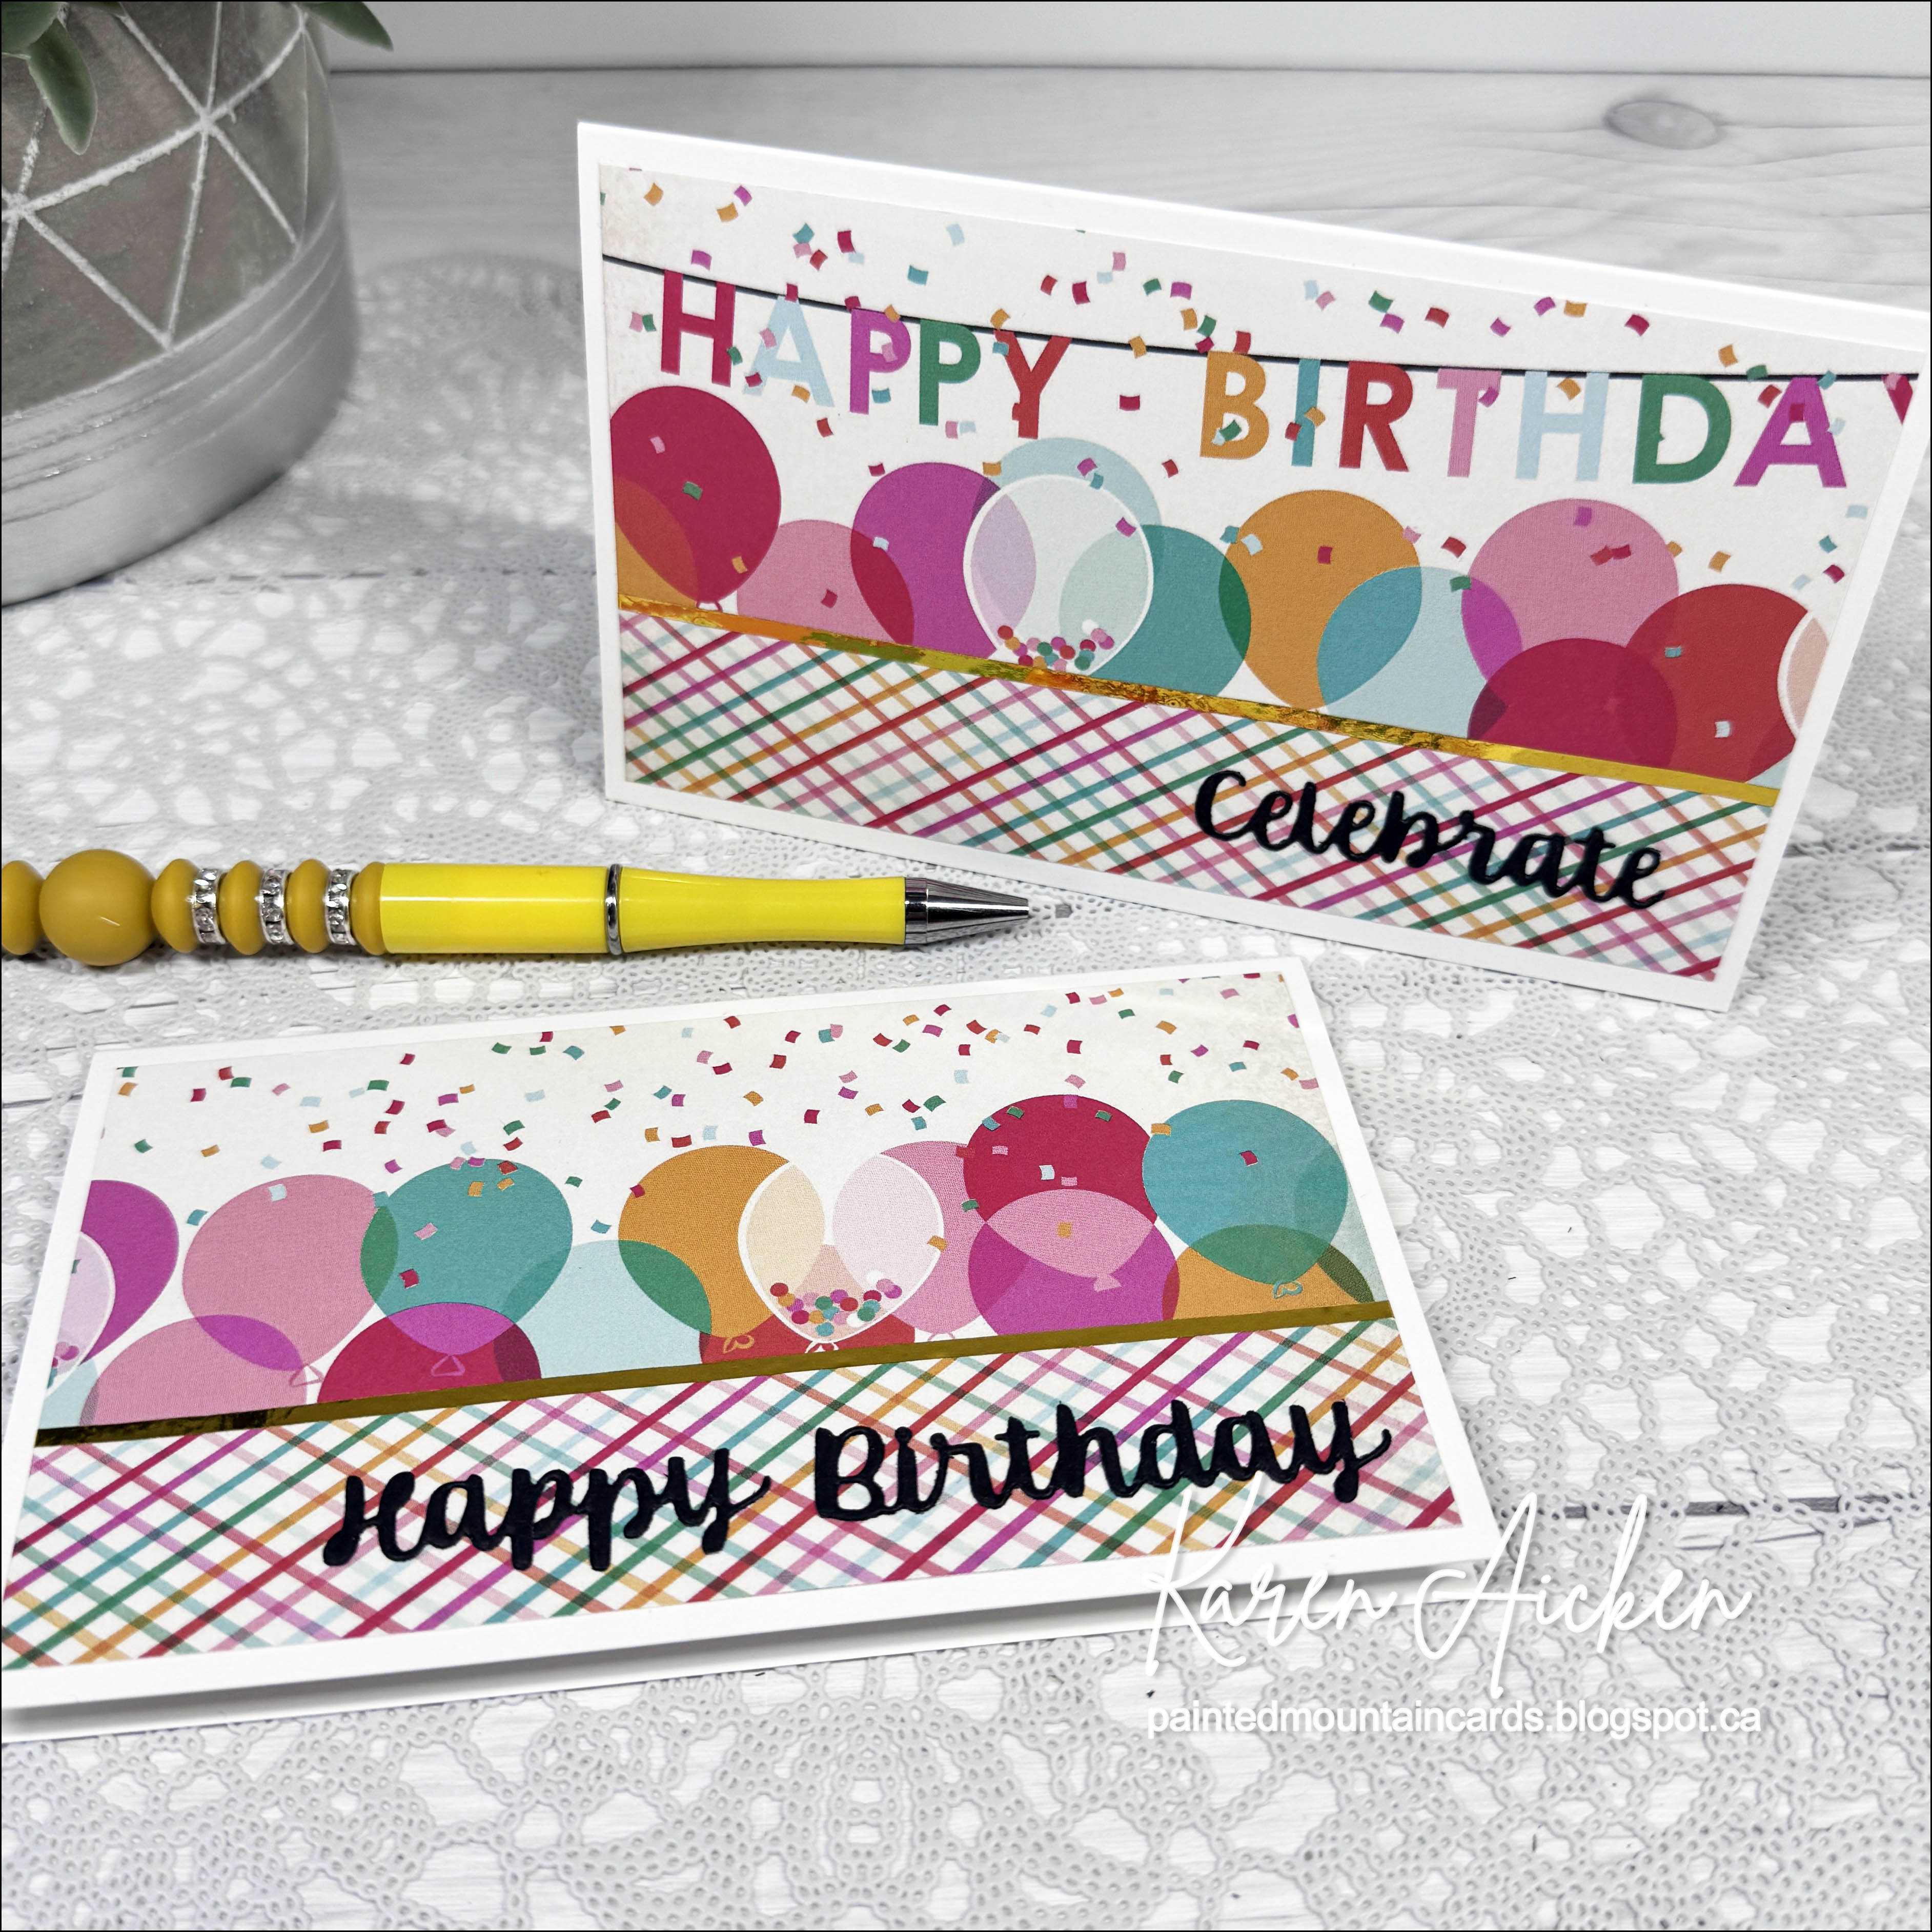
I love it when patterned paper takes second stage. This 12x12" sheet was in a package I was flipping through and I pulled it out for a better look. It was a sheet of border prints, the idea being that you would trim them apart for horizontal borders on scrapbook pages etc. I liked the way the plaid and the balloons went together (they were next to each other on the sheet) so I trimmed them away from the rest of the patterned paper cutting them in half so I had two 6" pieces. I trimmed each one to a 3/25" height and wrapped narrow gold tape over where the two patterns joined.
It was a happy accident that the Happy Birthday was printed to perfectly fit on the one 6" piece! I die cut both the words Happy Birthday and Celebrate using dies by Karen Burniston.
Here is a peek at the inside ... I wrapped the inside panels with washi tape and stamped the sentiment before adding them inside the cards. The remainder of the paper was put back into the package to use on cards another day.
Supplies used:
Patterned paper - Party Time, Echo Park
Narrow gold foil tape - Amazon .ca
Word Set 2 Birthday dies - Karen Burniston
Stamp inside - Lots of Birthday2Stamp - the Stamps of Life
Well this is exciting - not only is it time for a new Sheetload of Cards, this month it is based on one of my video's AND I am the Guest Designer! I have a walkthrough of my cards on YouTube as well:
The original video is still one of my most popular, which makes me happy. You can find it HERE if you are curious. It makes three Mini Slimlines with three sheets of 6x6 patterned papers and NO leftover pieces!
The September 2024 Sheetload yields twelve cards and uses three 12x12" sheets of patterned paper. Again, there are no leftover pieces. I did change up the images and greetings so I wouldn't have twelve identical cards, and while most of the birthday ones will be donated to my Mom's old nursing home - I think they are cute and will be keeping one or two for my stash.
Again, I'm holding onto summer because I am NOT ready for cooler weather. So I made my cards with a Bee theme. Some will be sent out for Happy Mail and the rest are birthday cards. (All the supplies are listed below.)
I had fun making these up and have some ideas for using this Sheetload again without the fold flap, instead using the left strip and the center strip combined on the card front. 🤷♀️
I hope you will check out the PLAYLIST and see what Alicia and the rest of the creative team made with this month's Sheetload. It is also linked in the description of my YouTube video.
Supplies used:
September 2024 Sheetload of Cards - Call Me Crafty Al
I plan on making at least one holiday card each month, & this is the one I made for July. Here in Southern Alberta we are in a heat wave ... and my craft room is the warmest room in the house. Obviously I'm not getting a lot done in there these days! We don't have AC so when it gets to be over 30ºC (86ºƒ) the house can get a little uncomfortable. I am happy to sit outside on our back deck, where there is enough shade and a bit of a breeze to cut the heat but I don't haul a bunch of crafting stuff out there to work on. Having RA and limited mobility - that is waaaaaay too many steps to bring it out and then back in to put away. I'd rather sit and listen to a podcast or audio book. It's also why I didn't do a full video for this card --- it's just too hot!
I wanted to make a fun fold card, so pulled out this Mini Slimline Tri-Shutter die set by Divinity Designs. The card base die can fit through a regular die cutting machine and you don't even need extended pads if you use removable tape. Just run it through on one end, turn the die/cardstock around and run it through the rest of the way. However, I do have a Big Shot Plus that I can use for larger dies like this. If I'm going to cut one using the big machine though, I usually cut a couple more and add the die cut bases in with the die set to use the next time.
I've had this silver foiled snowflake paper (12 x 12') for a couple of years but realized after I die cut the layers and added them to the white card base, that I covered up the sticker on the back so I have no idea who makes it!
After I finished the stamping and the card was 'finished', I had a look through my small snowflake dies to add a few extra as embellishments. But you know what? I decided that I liked it just the way it was. 😊 One more card for my holiday stash.
Note, the measurements for the matted rectangle inside the card are: 3 x 2.75", and 2.75 x 2.5"
Supplies used:
Mini Slimline Tri Shutter Die Set (with Layers) - Divinity Designs
Patterned paper - unknown
Rainbow Holographic cardstock - Recollections
Snowflake die - Elizabeth Craft Designs
Catherine Pooler coloured inks
Front sentiment - Snowflake Season, Penny Black
Inside Sentiment - Christmas Classics, Stampin' Up
Last week I shared a Mini Slimline card with leftover strips of patterned paper that came in Paper Roses' cardmaking kit "Bee Happy". Today I'm sharing another Mini Slimline and it's my final card with the kit!! There is only one small piece of black printed paper left and the sentiments but I'm calling it done and tossing all the tiny bits and pieces. I save all but the smallest pieces when working with a kit, because sometimes they are perfect to punch or die cut a little somethin' something' to add to a card from the kit. When I'm done with the kit though, I'm done with all the small pieces too. The sentiment strips I added to my clear envelope of stamped ones to use on future cards.
There are touches of gold on the card, with the narrow gold foil tape, the gold foil bee stickers and I rubbed the honey pot lid with gold Lunar paste. I was happy with how well that die cut worked on this card!
Below is a peek at the inside ...
Note: I did colour the foil bee stickers with a yellow alcohol marker to make them stand out a little more.
I didn't count how many cards I made with the kit, but it was well over a dozen and I really enjoyed using it.
Supplies used:
Bee Happy Cardmaking Kit - Paper Rose
Gold foil narrow tape - Amazon .ca
Honey Pot dies - Honey Bee Stamps
Gold Lunar Paste
Blending sponge
Catherine Pooler coloured inks
Hello die - MFT Stamps
Shimmer Spray
White gel pen
Alcohol markers
Gold bee stickers - Amazon .ca
Petite Scalop Mini Slimline die - Taylored Expressions
I was moving things around in my craft room and found the Bee Happy pouch with a few leftover pieces inside it. This is a cardmaking kit by Paper Rose that I worked on a lot several months ago. I decided to see what was in the pouch and ended up with enough pieces to make two Mini Slimline cards. This is the first one and I'll share the second one another day.
There were no more ephemera pieces left so I stamped and die cut a bee to add onto a die cut hexagon. The bee was coloured with alcohol markers with some glitter glue added as well. The outside sentiment is in the same stamp set as the bee (Studio Katia).
Here is a peek at the inside, with a very old stamp and a few scraps of the patterned paper. Since there is narrow gold tape on the front I added a strip inside as well.
While I have been having a lot of fun with the Pop Up Mechanism included in the Twist Flower Pop Up, I haven't really used the included flower dies before. So that is what I added inside today's card.
The front of the Mini Slimline card, as well as the banners inside are actually on a sheet designed to be cut apart. I was ready for some different floral paper, so picked up this paper package and the coordinating solids and look forward to playing with them some more.
The sentiment was stamped on a lightly inked, punched out hexagon and I added some gold glitter dots for shimmer & shine.
Supplies used:
Patterned paper (and coordinating solids)- The Paper Boutique
I plan on working on holiday cards at least once a month - so I'm just squeaking in with April's cards. Last month I shared a 5x7" card duo made with a lovely winter scene patterned paper. I saved the leftover pieces for these two Mini Slimline cards. You can see the other two cards HERE:
I do love shimmer and shine on a holiday card, so for these ones I added Rainbow Holographic card stock to the entire front of these these cards. Normally I would have cut away the centre of the card stock to use on a different project, but the patterned papers are quite thin and the edges of the cut away area below would show through. So I left it as a full size panel.
I just adore this large deer die, and cut it from white pearl card stock then lightly inked the edges with a blending brush and dye ink. I positioned the deer where they would be adhered with foam tape and stamped the sentiment, then I added the deer. Glitter dot stickers were added to each flank and some Pops of Color in a clear sparkle colour for even more shine.
I kept the insides clean and simple, with a stamped sentiment and holly leaf. Oh, and the sentiment on the front? The paper has a bit of a coating on it so I had to set the panels aside to dry for about 15 - 20 minutes after stamping the sentiment on the front panel before continuing with the cards.
Supplies used:
Patterned paper - Frosted Forests & Falling Flakes, Hunkydory
Today I'm sharing the shiny anniversary card I made for our eldest daughter & hubby. I started by die cutting the sunburst heart out of rainbow holographic card stock - I love that die and finding reasons to use it. 😂. Last year I made a bunch of alcohol inked backgrounds on vellum and have managed to hoard every single one. Sheesh. So I pulled one out to put behind the die cut then mounted it to a Mini Slimline card base.
Wanting to keep the front nice and simple, I added a gold heart to the center of the sunburst and a gold Glitter Dot as well.
Inside I used the Twist Flower Pop Up die (Karen Burniston) to animate a crosshatch heart cut from the same rainbow holographic cardstock as I used on the front. I die cut more hearts, both from the alcohol inked scrap pieces, gold foil card stock and the rainbow holographic cardstock scraps.
The Happy Anniversary was done with Sharpie markers.
I have a number of Slimline sized paper pads, so pulled them out and was flipping through them for some inspiration. This sunset print grabbed my attention so I pulled it out and decided to make a Mini Slimline Sympathy card for my stash.
The card base was made using navy card stock and that is also what I used to die cut the forest/trees from Stampin' Up's Grassy Grove bundle. Then I added a sympathy sentiment with thin foam tape.
Below is a peek at the inside, using a word stamp by Catherine Pooler and the trees from the Grassy Grove stamp set. I also added the trees to the envelope to tie everything together.
Supplies used:
Patterned paper - Glorious Sky Slimline Paper - Whimsy Stamps
Grassy Grove Bundle - Stampin' Up
Simple Strips Sympathy stamp and die - Taylored Expressions
Petite Scallop Mini Slim Stacklets - Taylored Expressions
Sigh. Had to make our first pet sympathy card of 2024. 😢
This one started with a white panel that I stencilled the bones & paw prints, then used blending brushes to add some subtle colour. I stamped the little dog on a circle, lightly inked around him in blue and added it behind a reverse scalloped circle. Nuvo Glaze on the eyes gave them a little shine. The sentiment was stamped and added across the card - such a true sentiment.
Today I'm sharing a quick and easy Mini Slimline card for Easter. I had a quick peek through my Easter bin and I'm getting closer to using up the patterned paper and ephemera in there! I actually don't need many Easter cards this year since I made so many last year. Which mean I won't be able to make much of a dent in that bin in 2024, so no new Easter paper pads for me.
I cut the bunny print paper with a scalloped Mini Slimline die (Waffle Flower) and added it to a heavy weight card base. The ephemera was popped up with foam tape and I added some Wink of Stella and Glitter Dot stickers for a little sparkle.
Below is a peek at the inside, where I added two new die sets by Karen Burniston - the Easter Borders and the Happy Easter (with shadow!) Colour to both was added with a blending brush and dye inks.