Showing posts with label Get Well Card. Show all posts

Friday, 6 December 2024

'Having Surgery?' Pop Up Card


It's Fun Fold Friday here on my blog and today I'm sharing my first play with Karen Burniston's Photo Fan Pop Up. We had a friend who had surgery so this is the card I made for him. 


We were in Arizona at the time, & I had only brought a few craft supplies down with me so I was fairly limited in embellishments, sentiment stamps etc etc. However this fun (and years old) paper package seemed perfect and I was able to fussy cut feathers from one of the sheets to decorate the squares. I used markers to create the custom sentiments and he really liked his card.


Once again I wish I'd watched the assembly video before I got to work on it - but instead I followed the directions on the package. Karen B always has great tips in her videos - like adding a backing square to the two outer fan squares, and I wish I'd done that. 

I was not expecting to like this die as much as I do - it's so fun! 


Supplies used:
Photo Fan Pop Up - Karen Burniston
Rectangle Crosshatch - Karen Burniston
Patterned paper - Tribal, Scrapbook Customs

Thursday, 29 June 2023

Trio of Paper Pumpkin Alternate Cards


Even though I made all the cards from this kit back in March, I decided to spread out sharing them by doing one post a week. Since the colours and papers are very similar in the cards I didn't want all my blog posts to start looking the same! This week I'm sharing another Paper Pumpkin Alternate card using the March 2020 'No Matter The Weather' kit ... this time a trio of 'get well' type cards.


I wasn't overly keen on the gloomy printed panels - they are definitely not my style. But paired with bright and cheery rubber boots and rainbow printed paper? I liked them a LOT better. I also added die cut stitched clouds, sequins and a stamped sentiment strip.


Inside the cards I added stamped sentiments from my stash and another strip of that patterned paper.


I'll be back next week with another alternate project with this kit.

Having been asked how many cards I make I thought it would be fun to keep track this year. Many of my posts include more than a single card or project and below is my tally. 

Card Tally for 2023
January - 53 cards
February - 56 cards
March - 55 cards
April - 32 cards
May - 43 cards
June so far - 33 cards

Additional Supplies:
No Matter The Weather Paper Pumpkin kit, March 2020
White cardstock
Sequins - stash
Blue Skies Ahead - MFT Stamps

This blog uses affiliate links whenever possible. This means, if you make a purchase through one of my affiliate links that you pay the same amount but I may receive a small commission from your purchase. I only link products that I own, love and use for my card making and not every link below is an affiliate one! 😊

Thursday, 25 May 2023

Paper Pumpkin Alternate #2 'Under The Weather' Card


Today I'm sharing the second alternate card made using an older Paper Pumpkin Kit "No Matter The Weather". I spent some time back in the early Spring making cards with the kit and managed to get it all finished off!  Of course, I did my own thing and hardly followed the kit instructions/inspiration at all.

This was one of the few times I actually cut down one of the envelopes to use the liner as a patterned paper. It matched the elements perfectly and I didn't have another green that would. Considering the envelopes were note card rather than A2 size, I didn't mind cutting one down as much as I would if it were an A2 size. The kit came with tiny clear enamel raindrops and I added three of them to this card as you can (barely) see in the photo below.


Here is a look at the inside, with a sentiment block matted in sunny yellow paper, and stamped & fussy cut rubber boots. The boots are attached with one of Sam Calcotts paper springs so they have a little movement.

I'll be back next week with another alternate project with this kit!

Here is a link to Sam Calcotts video where she shows her paper springs.


Having been asked how many cards I make I thought it would be fun to keep track this year. Many of my posts include more than a single card or project and below is my tally. 

Card Tally for 2023
January - 53 cards
February - 56 cards
March - 55 Cards
April so far - 39 Cards

Additional Supplies:
No Matter the Weather Paper Pumpkin Kit - March 2020
Blue Skies Ahead - MFT Stamps
White cardstock
Alcohol markers

This blog uses affiliate links whenever possible. This means, if you make a purchase through one of my affiliate links that you pay the same amount but I may receive a small commission from your purchase. I only link products that I own, love and use for my card making and not every link below is an affiliate one! 😊

Tuesday, 21 March 2023

Teacup Shaped Card


Today I'm sharing the third card in my monthly series "Shaped Card". I enjoy making shaped cards but I find I am so busy using the other goodies in my craft room and making pop ups ... that I forget to make shaped cards. This series should allow me to make at least twelve shaped cards by the end of 2023. 😊

I started with this cute teacup die from Trinity Stamps and some older patterned paper from my stash. At first I made the card from white card stock but it didn't feel sturdy enough for me. I cut the shapes again using patterned paper and added them over the white card base. You can see in the photo below I trimmed away the fold on the patterned paper pieces so there would be no extra folds in the crease.


NOTE:  I trimmed a tiny bit from the bottom edge of the inside, which helps the card to stand nicely for display.

This card fits perfectly into a standard A2 envelope for mailing. 😊


Having been asked how many cards I make I thought it would be fun to keep track this year. Many of my posts include more than a single card or project and below is my tally. 

Card Tally for 2023
January - 53 cards
February - 56 cards
March so far - 34 Cards

Additional Supplies:
Pink cardstock
Kraft cardstock
White cardstock
Patterned paper - Blank Canvas, 1st Edition
Floral sticker - K & Company

This blog uses affiliate links whenever possible. This means, if you make a purchase through one of my affiliate links that you pay the same amount but I may receive a small commission from your purchase. I only link products that I own, love and use for my card making and not every link below is an affiliate one! 😊

Friday, 9 December 2022

Get Well Slider Box With Pop Up Surprise


Hello my crafty friends and welcome to Fun Fold Friday here on my blog. Today's project is another Sneak Peek of Karen Burniston's upcoming new release; using the Slider Box and Bam Box. I also added the Get Well Charms and I talk about lots of ideas for this fun box in my YouTube video:  


As I said in the video, I made this pretty much as soon as the Design Team received their sample dies -- back in early October! I wanted to send something to my Mother In Law, who wasn't feeling well and my husband was flying to Ontario to visit her. I thought this would bring a smile to her face. (She is much better now!)


Not only is there the fun pop up surprise (thanks to the Bam Boxes) but chocolates too! I stacked two Bam Boxes but you could also use a strip of acetate that is adhered to the bottom of the box instead. I just HAD to try the Bam Box and have been using it a lot since It is SO versatile and I hope you have been enjoying all the sneak peeks that the Design Team has been sharing this week.


... one more look ...


Below you can see all the items that are in this new release, which will be shipping on Monday. We will also be celebrating with a Blog Hop on Monday.


One of the ideas I suggested in the video, was to create a sleeve for tissue packages - perfect for cutting into a gift package! I used the rest of the patterned paper from the box above, and a felt sticker that had been sitting on my stamping table. It was leftover from another project and I figured it was a great way to use it!


Slider Box - Karen Burniston (shipping December 12/22)
Bam Box - Karen Burnsiton (Shipping December 12/22)

Additional Supplies:
Patterned paper - Basic Grey, Fresh Cut Peony
#8 elastics/rubber bands
White cardstock
Black marker
Felt flower - leftover sticker from my stash

This blog uses affiliate links whenever possible. This means, if you make a purchase through one of my affiliate links that you pay the same amount but I may receive a small commission from your purchase. I only link products that I own, love and use for my card making and not every link below is an affiliate one! 😊

Tuesday, 14 June 2022

All Occasion Cards From A Card Kit


Hello my crafty friends.  Today I'm sharing some all occasion cards and I have all the details on YouTube:    


I started out with this pretty card kit from Stampin' Up, called Gorgeous Posies. I loved the colours and of course that the envelopes were also coloured to match. The kit came with the supplies for sixteen cards, so instead of overwhelming my friend with that many cards, I created two identical sets of 8 cards. That gave me two gifts for two special friends!


Since you can see most of the cards in the first photo and I went over each one in my video, I'll share a couple of pictures of the card interiors.


This blog uses affiliate links whenever possible. This means, that at no cost to you, if you make a purchase through one of my affiliate links that I may receive a small commission from your purchase. I only link products that I own, love and use for my card making!

Any supplies I'm unable to link are listed at the very bottom of my post.


Additional Supplies:
Gorgeous Posies Card Kit - Stampin' Up (retired)
Sympathy stamps - Hero Arts (retired)
Doilies - Stampin' Up (retired)
Kindness & Compassion - Stampin' Up 
Forever Fern dies - Stampin' Up
Happy Birthday Peel Off's - Elizabeth Craft Designs
Happy Thoughts - Stampin' Up

Tuesday, 22 February 2022

Speedy Recovery Slimline Card


Hello my crafty friends! Today's card is one I made for a friend who had just had surgery. She wasn't up for visitors so I sent her some Happy Mail instead. This Slimline card uses items from Pinkfresh Studio - their 'In The Meadow' Washi Tape and coordinating die. I applied the Washi Tape to white card stock, held the die in place with several pieces of removable tape and ran it through my machine. All the pieces cut with a single pass! 

The sentiment is one I wanted to use and I didn't really want to cut the stamp into two pieces so it would fit on the front. My finished card size is 3.5 x 8.5", but the business envelope is just over 4" wide so even though the sentiment hung over the card on each side, it easily fit in the envelope. And I liked the way it looked!


While they don't show up in the photos, I added a few of the mirrored hearts from Kat Scrappiness and the butterfly has some sparkle too.

Inside I added some patterned paper from my stash, a rounded white rectangle and a few more florals from the Washi Tape. That gave me plenty of room for our personal message but still a pop of colour when you open the card.


After I finished this card, I ended up cutting several more sets to have on hand. They are SO pretty and I had everything out anyhow. Many years ago I had a binder with 2.5 x 3.5" pockets - the ones for collecting sports cards and I used it to store smaller stamp sets and stickers.  I thought this would be a good way to store all the Washi Tape bits and pieces, so also bought a few 4 x 6" and also a few 5 x 7" pockets to put in the binder for the larger items. One evening I sat and added a whole other pile of leftover embellishments to the binder and hopefully this will keep everything in one spot and be easy to flip through to see the different embellishments. 😊

I think the hardest part, will be remembering to LOOK at it. Previously, if I had an extra flower or butterfly I would add them to a little box on my stamping table. The box was getting full and I had to go through the whole thing every time to see if there was something I could use up. Seeing them spread out in clear pockets just makes me happy.

This blog uses affiliate links whenever possible. This means, that at no cost to you, if you make a purchase through one of my affiliate links that I may receive a small commission from your purchase. I only link products that I own, love and use for my card making!

Any supplies I'm unable to link are listed at the very bottom of my post.


Additional Supplies:
White card stock - Accent Opaque Digital Super Smooth (Amazon .ca)

Sunday, 13 February 2022

Slimline Bandaid Card


Hello my crafty friends! This Slimline card is one I made for a friend, sort of a private joke. 😂. I was excited when Whimsy Stamps released this Big Boo Boo Slimline die as I knew I would get a lot of use out of it. Apparently I wasn't alone, as it sold out right away.

After die cutting the bandaid from the same light peach card stock as the card base, I inked it up with a wide blending brush & Catherine Pooler dye ink then spritzed it with water. Dropping a cloth on top helps pick up the excess water and still leaves you with the same splotched look you get with Distress Oxide inks.

I added the word OUCH with Karen Burniston's alpha die and added white gel pen highlights. Then the whole piece was attached to a light peach Slimline card base. Finally, I added two more die cut bandaids because I just couldn't resist.

On the inside, I added alpha stickers to a Slimline die by Rubbernecker, and two of the Fun Faces from Your Next Stamp.  I have a number of alphabet sheets that have come included in sticker books and paper packs that I rarely use, so I'm hoping to change that and use some of them up.


This blog uses affiliate links whenever possible. This means, that at no cost to you, if you make a purchase through one of my affiliate links that I may receive a small commission from your purchase. I only link products that I own, love and use for my card making!

Any supplies I'm unable to link are listed at the very bottom of my post.


Additional Supplies:
Light peach care stock - stash
White card stock - Accent Opaque Digital Super Smooth (Amazon .ca)

Thursday, 6 September 2018

Get Well Soon Pop-Up Card

Good morning friends

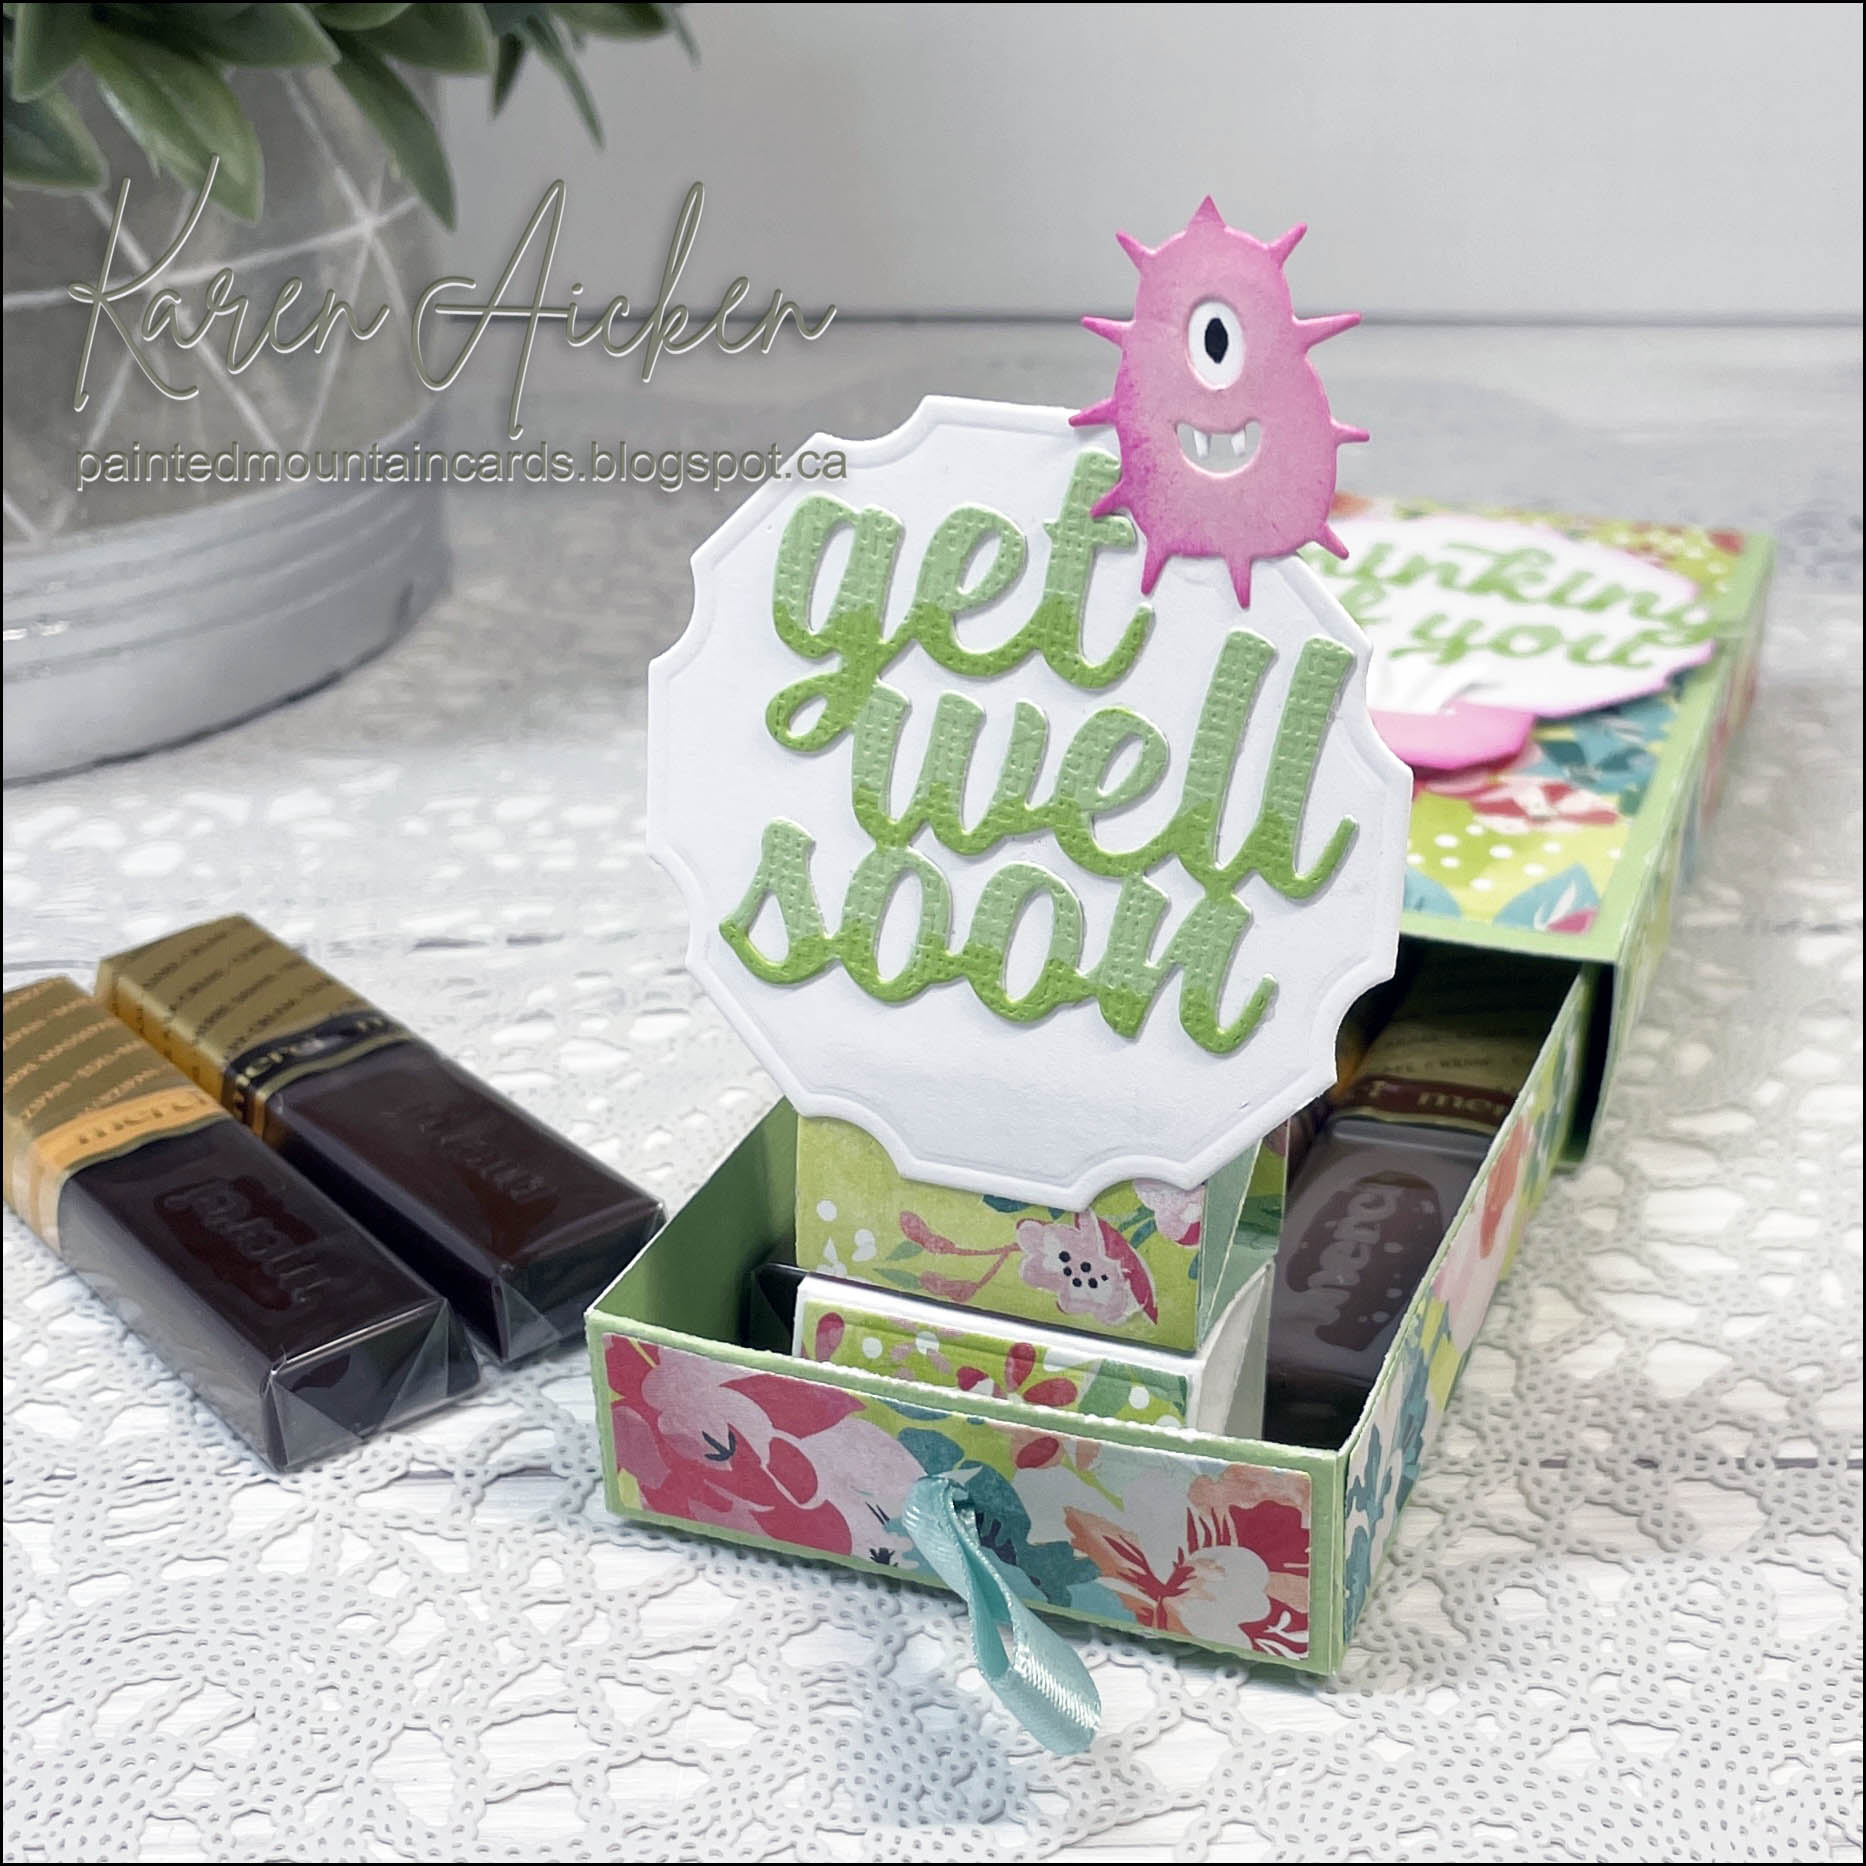
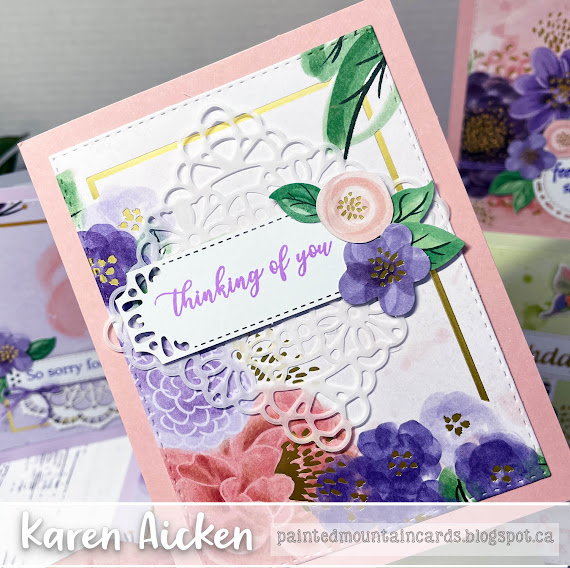
I have a fun card to share today, using more of Karen Burniston's new release. On the front, I paired the new Get Well Soon with the large crab from the Ocean Animals Set. I loved this pretty patterned paper that was leftover from a different project, so used the rest of the sheet for this card.


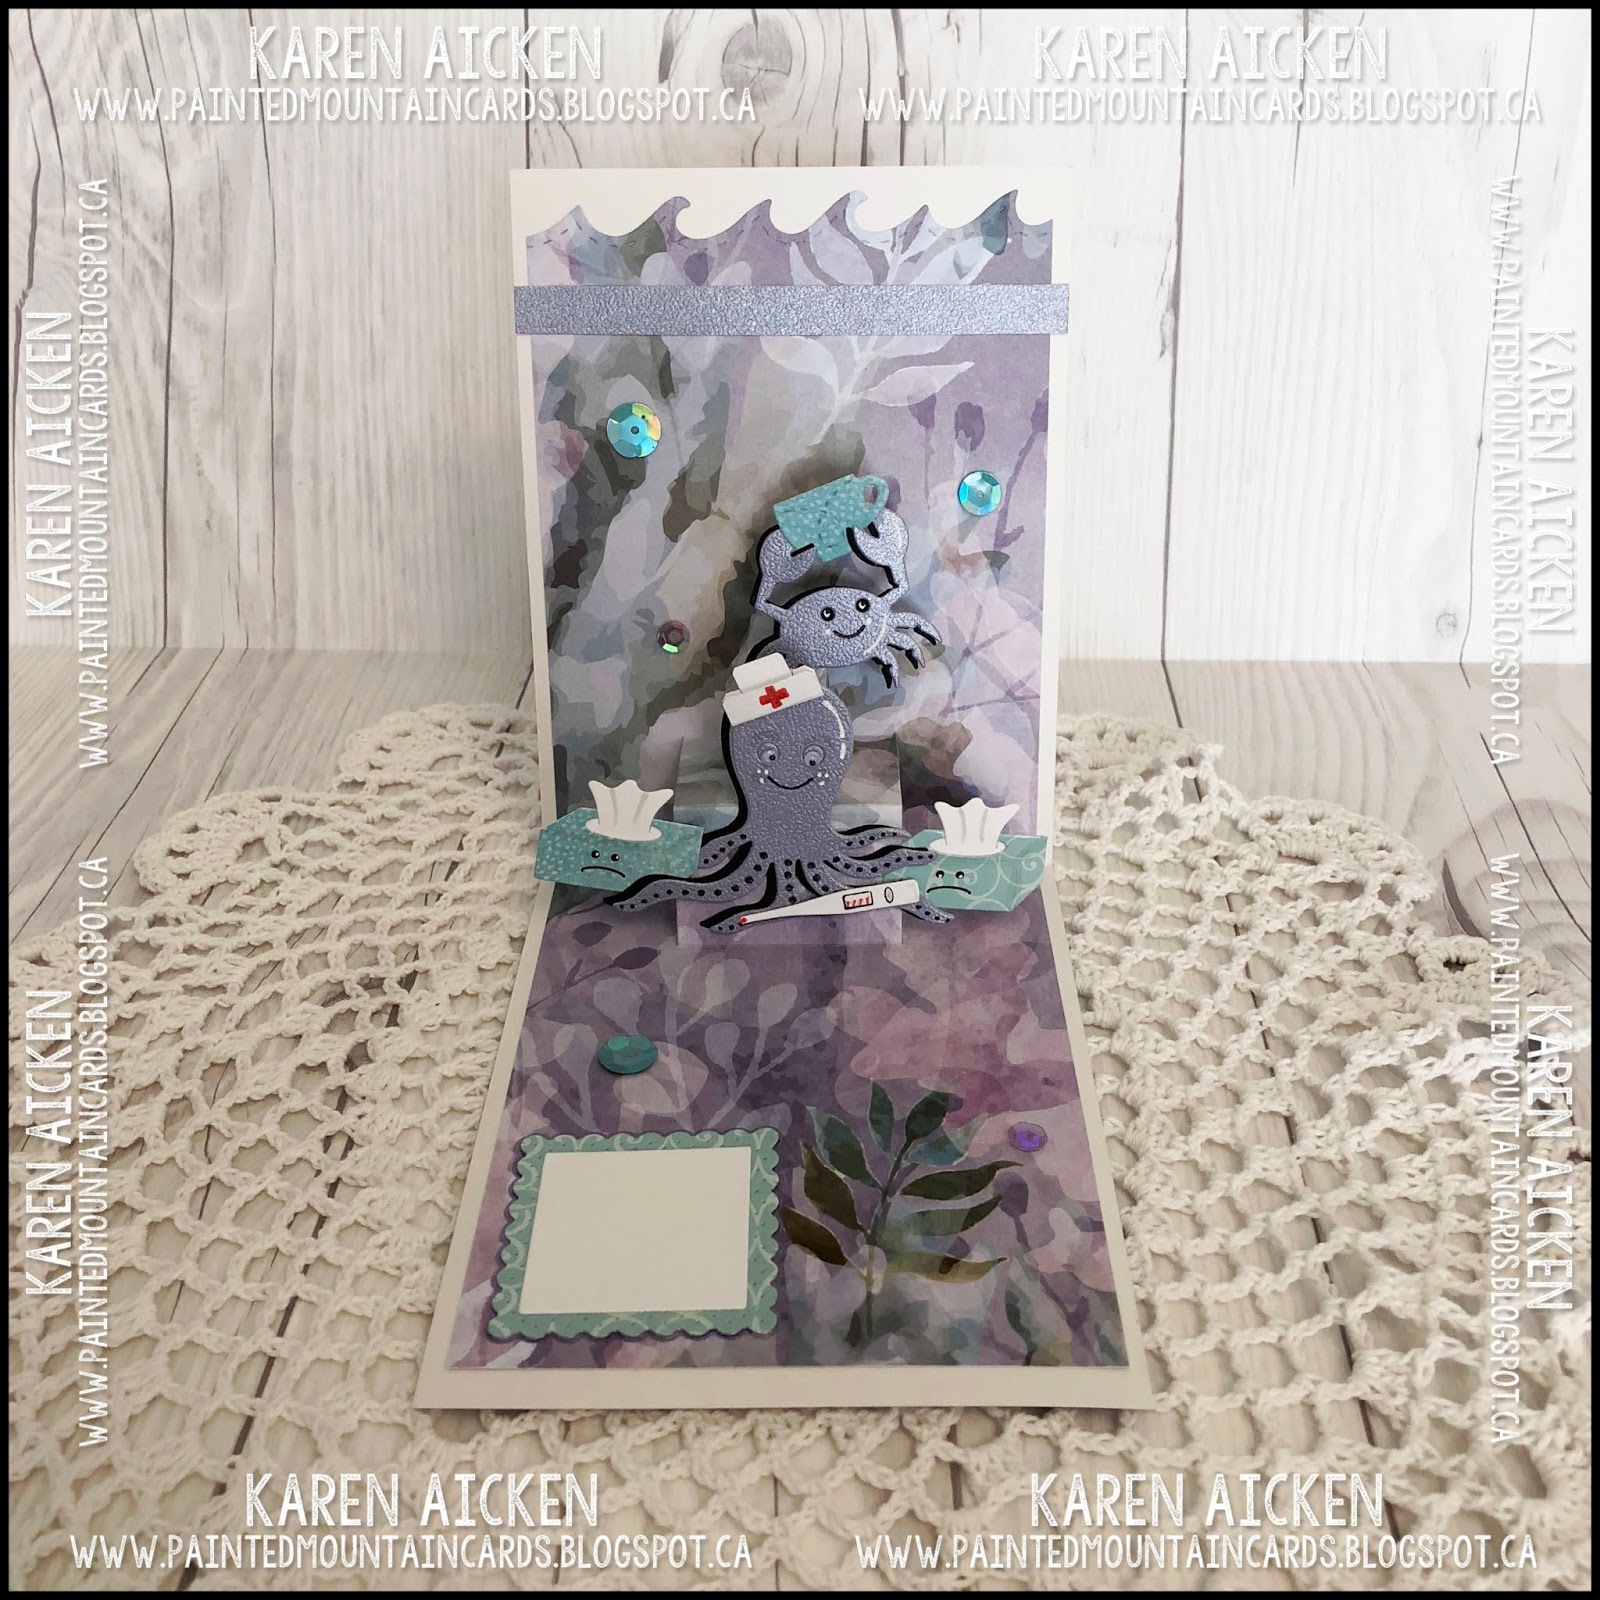
Inside I used the Pop-Up platform that comes with the new Explosion Card die set and turned the Octopus from the Ocean Animals into a nurse. :-) My Mom was a nurse, and wore these nurses hat - so I really wanted to make one. With a little trimming and folding and a red marker, the Kleenex box became a nurses cap.


Both the large crab on the card front, and the octopus have wiggly eyes. Since they didn't really stand out enough against the patterned paper I was determined to use, I cut the sea creatures again from black card stock and adhered those behind the pearlized purple ones with a bit of an offset.

The crab was sitting too low on the upper pop-up bump, so I glued a 1/2" x 1" strip of the patterned paper to the bump and then the crab to the top of the little strip. Gave me all the height I wanted!


The new Get Well Charms are SO fun - here I've used the thermometer and Kleenex Boxes. The smaller crab is holding a cup, which could be soup or hot tea depending on what you find the most soothing.

I didn't want to hide that pretty green & teal seaweed on the paper, so decided on a square signing block instead of my usual rectangle. The sweet scalloped square is from the Spinner Square Pop-Up.


Finally, here is a group shot for those that like to pin them.


Supplies:
1068 Ocean Animals - Karen Burniston
Purple pearl card stock
Black, white card stock and various scraps
Black sharpie marker
Wiggly eyes
1072 Get Well Charms - Karen Burniston
Packaging
Copic marker
Red Staedtler marker
Sakura Stardust glitter pen
1069 Explosion Pop-Up - Karen Burniston
Patterned paper - Kaisercraft
1041 Coffee Charms - Karen Burniston
1038 Tropical Scene - Karen Burniston
Sakura white gel pen
1055 Oval Crosshatch - Karen Burniston
1042 Spinner Square Pop-Up (scalloped square) - Karen Burniston
Sakura gold metallic gel pen

Thanks for stopping by today

Friday, 14 July 2017

Get Well Floral Pull Card

Good morning friends

It's Flip-It Friday here on my blog and I have a Pull Card to share today using Karen Burniston's Spiral Circle Pull Card. I used the rest of this beautiful floral patterned paper as the card base, and some fun stamps & dies I purchased earlier this Spring. You can see the other card I made from this pretty sheet of paper HERE.


The notches hold the card in the closed position until you pull the sides to open it.


These pill bottles are SO cute!


Another card I mailed to my Mom while I was away. She went through a lot, and I wanted her to know she was being thought of.

Supplies:
Patterned paper - Kaisercraft
Spiral Circle Pull Card, Pop it Ups - Karen Burniston (Elizabeth Craft Designs)
Clock & Gears (lg circle) , Pop it Ups - Karen Burniston (Elizabeth Craft Designs)
Feel Better Stamps & dies - MFT Stamps
White card stock
Copic markers
Stitched Circle dies - MFT Stamps
Wink of Stella
Stitched Fishtail Banners - Elizabeth Craft Designs

Thanks for stopping by today

Tuesday, 2 May 2017

Floral Get Well Pop-Up Card

Good morning friends

While I was away, my Mom had cataract surgery. Which requires drops several times a day that she was counting on me for. Since I was unable to help, she was able to make other arrangements but I wanted to send her a card to let her know I was thinking about her.


Isn't that paper pretty? It was actually in a 'free with purchase' package. Score!


Here is the card opening ...


... and the card opened. I used Karen Burniston's Twist Circle Pop-Up along with some stamped images.


This is another card where I was able to add one of those sweet little banners!


Supplies:
Twist Circle Pop-Up , Pop it Ups - Karen Burniston (Elizabeth Craft Designs)
Patterned paper - Kaisercraft
Stitched Circle dies - MFT Stamps
Stitched Fishtail Banner dies - Elizabeth Craft Designs
Wink of Stella
Feel Better stamps and dies - MFT Stamps
Stitched Heart die - Elizabeth Craft Designs
Heart Banner - Taylored Expressions

Thanks for stopping by today