Showing posts with label New Years Card. Show all posts

Monday, 1 January 2024

Happy New Year!


Happy New Year to all my crafty friends! 

I decided to start 2024 off on my blog with a New Years Card. I love how sparkly it is - perfect for ringing in a new year.  I started with a glossy printed cardstock panel by Hunkydory, then I embossed it with a fireworks embossing folder. After matting this panel with rainbow holographic cardstock I added it to the front of a white card base. 

Adding the Celebrate (a die by Karen Burniston) cut from the same holographic cardstock my card front was finished.


I had ordered a few new goodies back in early November, and this Happy New Year stamp set by Pink & Main is one of them. I really liked the large size of the sentiments, and I didn't have much in the way of New Year stamps. 


I wish you all the very best for 2024.

Card Supplies:
Patterned card stock - Mirri Card, Time to Celebrate - Hunkydory
Rainbow Holographic cardstock - Recollections
Embossing Folder - Firework Trio - Altenew
Celebrate die - Karen Burnikston
Happy New Year - Pink & Main
Catherine Pooler coloured inks
5 x 7" Card blank and envelope

Tuesday, 12 December 2023

New Years Magic Iris Card


Today I'm sharing the 12th and final edition to my monthly series "Magic Iris Cards" and this one is a card for the New Year. I used some cloud themed patterned cardstock for the decorative panel,, the scalloped piece and the iris 'arms', and also gold heat embossed the bursts onto the front panel.


When you slide down the lever on the right side, the arms open to reveal the gold heat embossed sentiment. So fun! I have really enjoyed using this die set over the past year and even though I won't be continuing the monthly series I will continue to use this set.  The numbers and CELEBRATE dies are by Karen Burniston and I added gold sequins for additional sparkle.


I didn't really have a stamp that would work inside, so I ended up just handwriting the greeting. I also added gold Peel Off border stickers to the inside panel for a little more shine.


Having been asked how many cards I make I thought it would be fun to keep track this year. Many of my posts include more than a single card or project and below is my tally. 

Card Tally for 2023
January - 53 cards
February - 56 cards
March - 55 cards
April - 32 cards
May - 43 cards
June - 34 cards
July - 56 cards
August - 106 cards
September - 61 cards
October - 51 cards & 5 Tags
November - 46 cards
December so far - 12 cards (& 16 simple tags)

I decided to cancel the subscription that provided linked thumbnails to what products I used on my cards. It was costing me out of pocket each month, so I’m back to listing what I used with a few affiliate links included.

Supplies
Magic Iris & Scallop Add On - Lawn Fawn 
Patterned paper - Dreamy Nights, Hunky Dory
5 x 7" Card blank and envelope
Gold mirror cardstock
Gold embossing powder
Circle Bursts - Your Next Stamp
Gold Fusion Sequins - Studio Katia
White paint Pen
Mini Alphabet & Numbers - Karen Burniston
Gold Gel Pen
Gold Peel Off's - stash
Black marker
Glitter Dots - Ecstasy Crafts

Thursday, 7 September 2023

Second Rosh Hashanah Card


I didn't need another Rosh Hashana card as I made one for our daughter and family already. But after MONTHS of not purchasing any new paper crafting supplies I placed a couple of orders. One of my new goodies is the 'Little Book of Bees' - a thick pad of ~4x6" printed panels with different bee scenes. I think there are four of each design - it's the same as the 'Little Book of Muddy Paws' that I use all the time to make dog themed cards. I thought this panel would make a cute Rosh Hashanah (Jewish New Year) card and this is what I came up with. I've decided to give this one to our daughter and hang onto the previous one for next year. 😊

I trimmed the bee panel slightly then matted it with brown cardstock so the panel measured 4 x 6". Then I cut a 5 x 7" piece of transparency and scored approx 1/2" from each edge. I mitred the corners then added strong double sided adhesive to each of the transparency edges. Those edges were wrapped around to the back side of the bee panel and three sides adhered down securely.  I added some sequins to the front, turned it over and stuck down that remaining side. Ta Da ... an infinity shaker (also called edge to edge shaker). 


Using a hexagon stencil and distress oxide inks, I added some colour to the top left and bottom right corners of a Kraft card base before adhering down the shaker. I have these gold foiled bee stickers so added them to the envelope and also onto the front of the shaker. They almost disappear but catch the light when you turn the card. 


Below is a peek at the inside, using an older stamp set from Papertrey Ink.


Having been asked how many cards I make I thought it would be fun to keep track this year. Many of my posts include more than a single card or project and below is my tally. 

Card Tally for 2023
January - 53 cards
February - 56 cards
March - 55 cards
April - 32 cards
May - 43 cards
June - 34 cards
July - 56 cards
August - 106 cards
September so far - 8 cards

I decided to cancel the subscription that provided linked thumbnails to what products I used on my cards. It was costing me out of pocket each month, so I’m back to listing what I used with a few affiliate links included.

Supplies:
Little Book of Bees - Hunkydory 
(purchased online at R&R Scrapbooking in Edmonton Alberta)
Transparency 
Sequins - stash
5 x 7" card blank and envelope
Gold foiled bee stickers - stash
Stencil - Clear Scraps
Blending Brushes - Taylored Expressions
Spiced Marmalade Distress Oxide Ink
Mazel Tov - Papertrey Ink
5 x 7" Lacy Layers - Waffle Flower


Tuesday, 5 September 2023

Rosh Hashanah Card


I don't know what it is about embossing folders, but I love them. I love the look of them yet - even though I purchase a few - I rarely use them. I vow to use them more, then that fizzles out and I can go months and months without even thinking about using an embossing folder. Sheesh. This one I purchased last year since it was so different. It is for a 5x7" card and cuts that centre section away as well as embosses the panel. 

While I have used it in the past on a panel that was attached to my card front, this time I wanted to use the embossing folder right on the card front itself. NOTE:  I do have a Big Shot Plus I can use when I need to cut something larger than 6". Otherwise I would have cut a 5.5 x 7" white panel and scored it down the left side at 1/2". That way it would fit through my regular machine, and afterwards I would use that 1/2" as a hinge to attach it to the back of a 5 x 7" panel.


I stamped on a scalloped panel and added that inside the card so it shows through the window opening. I had made this to send to our middle daughter and family to celebrate the Jewish New Year but I actually made a second card that I'll be sharing later in the week and I'll be holding onto this one until next year.  ðŸ˜Š


Having been asked how many cards I make I thought it would be fun to keep track this year. Many of my posts include more than a single card or project and below is my tally. 

Card Tally for 2023
January - 53 cards
February - 56 cards
March - 55 cards
April - 32 cards
May - 43 cards
June - 34 cards
July - 56 cards
August - 106 cards
September so far - 6 cards

I decided to cancel the subscription that provided linked thumbnails to what products I used on my cards. It was costing me out of pocket each month, so I’m back to listing what I used with a few affiliate links included.

Supplies:
Bees in Nature Embossing Folder - Nature's Garden Collection (Crafters Companion)
5 x 7" White card base and envelope
5 x 7" Lacy Layers dies - Waffle Flower
Slice of Happiness - Stampin' Up
Wink of Stella
Momento Ink
Blending Brushes - Taylored Expressions
Coloured pencils - Prismacolor

Friday, 20 January 2023

Year of the Rabbit


Today I'm sharing the card I made to send to a friend to celebrate the Lunar New Year.  I pulled out some very old Chiyogami paper and this BigZ die from Tim Holtz. Since the rabbit die is a steel ruled die, it could handle the weight of the Chiyogami paper attached to white card stock with double sided tape. Once cut, I added white lines with a paint pen then gave the rabbit a blast with shimmer spray.

There was a scrap of black paper in the package, so I added it with a pair of magnets to hold the card closed. The second magnet is under the slightly popped up oval.


When you open that black flap, the Happy New Year pops up ... because I added it to Karen Burniston's new Bam Box. 


The Happy New Year was cut from gold mirrored cardstock, and I added decorative panels to the Bam Box with red mirror cardstock. A few more gems, another die cut rabbit as a signing blog and my card was finished.


A couple of times recently, I was asked how many cards I make but I didn't have a clear number. Since a lot of my posts include more than a single card or project, I thought it would be fun to keep track this year. 
2023 Tally: 38 Cards

Additional Supplies:
Chiyogami paper - my stash
Easter Elements Big Z Die - Tim H
White cardstock
Red cardstock
Happy New Year - the Stamps of Life
Small magnets - K&J Magnetics
Shimmer Spray
5 x 7" card and envelope

This blog uses affiliate links whenever possible. This means, if you make a purchase through one of my affiliate links that you pay the same amount but I may receive a small commission from your purchase. I only link products that I own, love and use for my card making and not every link below is an affiliate one! 😊

Friday, 6 January 2023

Platform Pop Up for the New Year


I have decided to change things up on my blog this year, and run several different monthly series. Today is my first share in my "Platform Pop Up" Series. I have more information on my plans later in the post. Since it's Friday, this card also works for Fun Fold Friday here on my blog!


The more I play with this die set, the more I enjoy it. I especially like how easily it goes together, and that you can really keep the bulk down while still having a dynamic pop up that fits in an envelope for mailing.

This patterned paper was from Stampin' Up and has a cool finish on it. It's not actually sparkly, but when it catches the light it does have a shine. The Happy New Year is one I have had for several years, originally it was from the Stamps of Life.


... one more look ...


Why choose to do several different monthly series? I spent some time over the holidays thinking about my blog, what I create and what I like and don't like about how I've been doing things. I'm mostly happy about everything, but I don't like having great supplies that don't get enough use! Our supplies - dies especially - are an investment, and I have certain criteria for most of my die purchases. 

First, I want dies that are versatile & timeless. I want to be able to use them for multiple occasions and for many years. I don't really care about trends, in fact I'm usually behind on purchases that others got as soon as they were released. I've never been one to follow companies, anxiously awaiting their newest release and I don't think I've ever hit the "BUY ALL" button with a new release as lots of crafters do. 

Whatever supplies I have purchased fit that criteria. The problem is, that I'm not getting to actually USE them as much as I thought I would when I purchased them. Health, Family and Design Team work will always come first, but when I really thought about it - there should also be enough time to use the dies that I loved enough to buy. All those fun, interactive dies that I have notebooks of ideas for! It doesn't matter that many have been retired or discontinued - I spent good money on them so I could use them over the years and now I am going to do just that.

I plan on running a series for the Platform Pop Up, the Magic Iris (both by Lawn Fawn), Shaped Cards, 12 Months of Christmas, Throwback Fun Fold Dies, New Fun Folds etc. I know that travel and life might throw a wrench into a post here or there, but hopefully at the end of 2023 I will have shared 12 different cards in each of those Series. I will be getting good use out of my dies, be able to share ideas (which I love to do), and still have time to do my Design Team work. 

While I won't have set days for when I will be publishing a new post for any of the Series, I will create labels on the right side of my blog to make it easy for searching. I am really excited about this, and I am already feeling more creative and inspired.

 I'll be back again next month with another platform pop up creation!

I am including a running tally on how many cards I make this year, not counting the ones I don't share here on my blog.  I donate 25 Birthday Cards each month to my Mom's old nursing home and don't often take photos or post the majority of those. A couple of times recently, I was asked how many cards I make but I didn't have a clear number. Since a lot of my posts include more than a single card or project, I thought it would be fun to keep track this year. 

2023 Tally: 18 cards

Additional Supplies:
Patterned paper - Metallic & Shimmer, 6" - Stampin' Up
White cardstock
Stitched Stars - the Stamps of Life
Happy New Year - the Stamps of Life

This blog uses affiliate links whenever possible. This means, if you make a purchase through one of my affiliate links that you pay the same amount but I may receive a small commission from your purchase. I only link products that I own, love and use for my card making and not every link below is an affiliate one! 😊

Friday, 30 December 2022

Pop Up Panel Gatefold Card for the New Year


Hello my crafty friends and welcome to Fun Fold Friday here on my blog.  I had stumbled on this type of card on Pinterest and wanted to check it out. Of course, it's by the talented Sam Calcott of Mixed Up Craft and I will link her tutorial at the end of my post. I like that it is a 5 x 7" size, it's a Gatefold (which is more interesting than a plain card front), and has this surprise pop up inside. Above is how the card would look as it came out of the envelope with a belly band holding it closed.


Below you can see I have slid off the belly band and you get a peek at what's inside. If you follow me, you know I rarely post things in the same order I make them. When I saw Sam's video I immediately made a Valentine card. I was happy with it and eager to make another one - thus the New Years card I'm sharing today.  I'll be sharing the Valentine's Card next month in the first of a series of New Fun Fold cards I'll be doing.


This is the card fully open! Now I didn't add all the layers that she did, not because I didn't like them but this card is heavy enough and I am always mindful of additional mailing costs. I was also going to do a video on what I changed and my thought process, but I am feeling burnt out from videos. They take a surprising amount of time and effort! I did cut my 5 x 7" card base to 5 x 6.25" as I was working with 6" patterned papers and that made it easier. 


The champagne bottle is adhered to the 'bendy' band with one of Sam's cardstock springs. I saw these back in November, and was intrigued enough to try one on a card that hasn't been shared yet. And I was hooked! You could also use a paper spring or Action Wobble for a similar effect, but I am loving being able to use up some of these scrap card stock strips I have hanging around.


Everything I used is from my stash - something I'll be doing a lot of in the coming year. I have lots of fabulous items in my craft room that I don't feel I have used enough - like this champagne bottle die - so I will be concentrating on doing that in 2023.


You can find Sam's beautiful cards and her tutorial HERE.

Additional Supplies
5 x 7" card and envelope
6 x 6" Patterned paper - Metallic Shimmer, Stampin' Up
Message in a Bottle Shaker die - Creative Expressions. I can't find this one to link for you, so I will link the Hero Arts set (which I also have)
Happy New Year - the Stamps of Life

This blog uses affiliate links whenever possible. This means, if you make a purchase through one of my affiliate links that you pay the same amount but I may receive a small commission from your purchase. I only link products that I own, love and use for my card making and not every link below is an affiliate one! 😊

Friday, 31 December 2021

New Years Mini Slimline Card Trio


Hello! - since it's the last day of the year, I am sharing three cards I made to celebrate the New Year. Let's hope that 2022 is better to our world than 2021 was ... I had such high hopes last year this time. That being said, I'm very thankful that our family had a good year, with our health and lots of happy times & memories.

All three cards I'm sharing today are Mini Slimline cards are 3.5 x 6.25" and I used the Celebration Mouse Edger die by Creative Expressions. The layout is fairly basic but it was fun and I do love the shine from the mirror card stock. For the first two I cut the edger from white and adhered it on top of the blue mirror panel which was the same size as the card front.

The words were penned with a blue marker and popped up with thin foam tape. Since I can't link the mirror card stock I used on these cards, I linked other ones that I have in my craft room.


Here is a peek at the inside - both of them are the same, with a scalloped Mini Slimline die by Divinity Designs. The Cheers! and wine glasses are dies by Karen Burniston and everything that is available is linked below for you.


For the third card, I did the opposite - cutting the Celebration Mouse Edger from red mirror card stock and mounting it to the front of a white Mini Slimline card base. The fallaway stars from all three images were scattered onto the cards and adhered with glue.


Inside I combined dies by Karen Burniston to create the sentiment.

This blog uses affiliate links whenever possible. This means, that at no cost to you, if you make a purchase through one of my affiliate links that I may receive a small commission from your purchase. I only link products that I own, love and use for my card making!

Any supplies I'm unable to link are listed at the very bottom of my post.

Additional Supplies:
Celebration Mouse Edger - Creative Expressions
White card stock

Wednesday, 10 February 2021

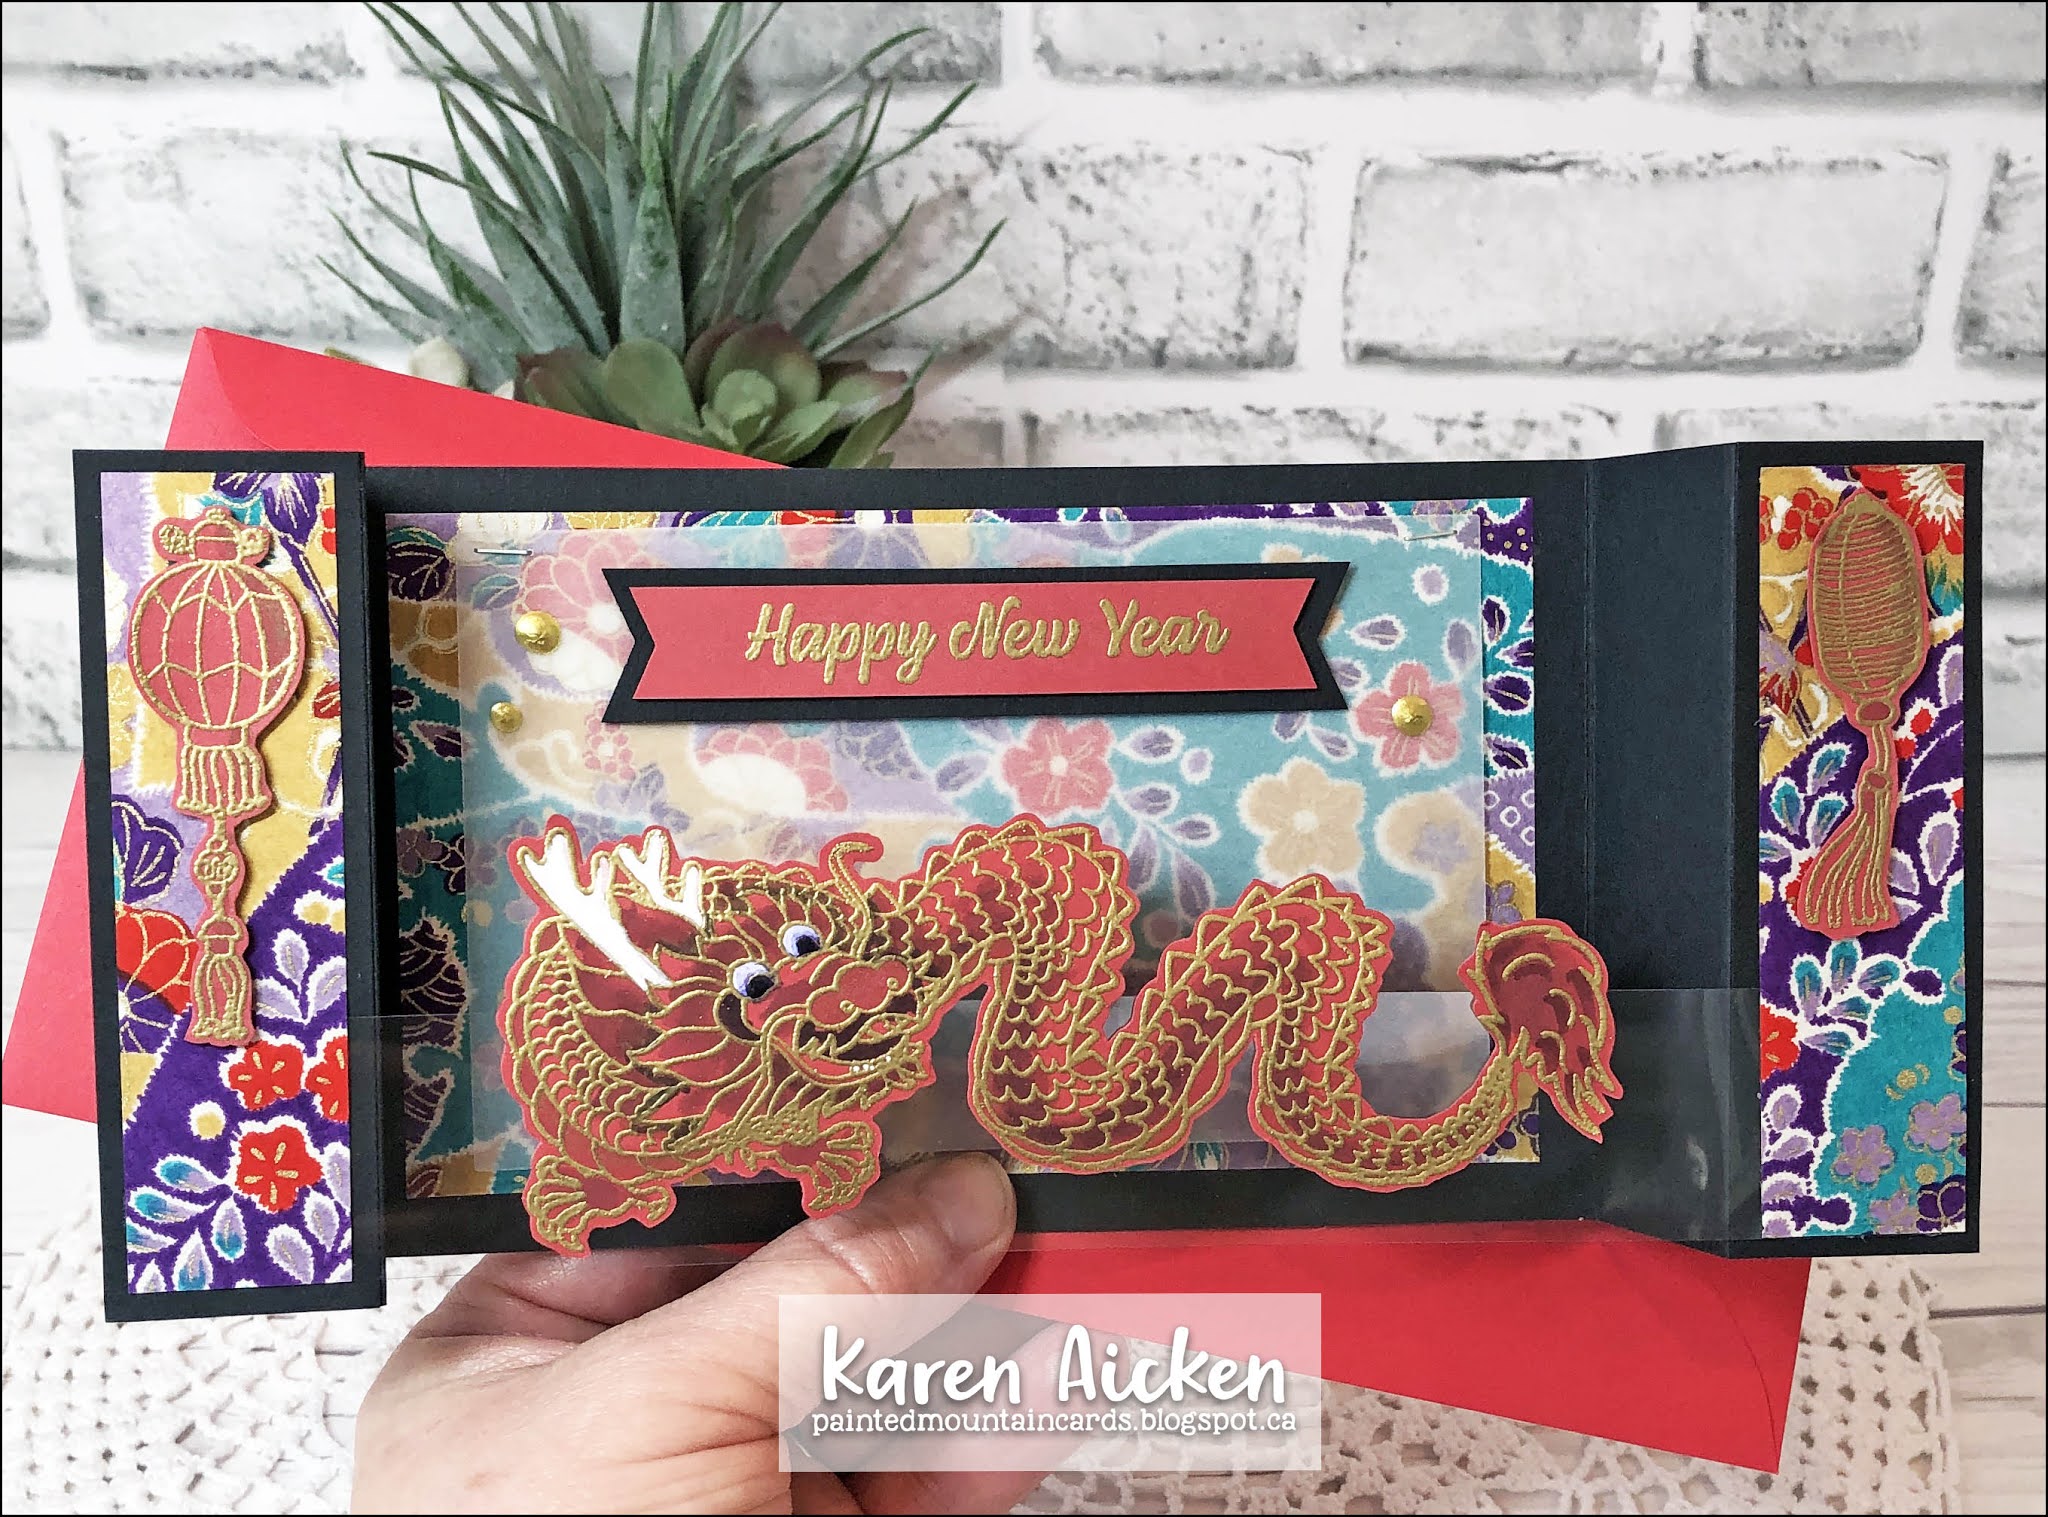
Dragon Slimline Bridge Card

Hello! Today I'm sharing the card I sent to a friend to celebrate the Lunar New Year and I used the 'Year of the Ox' stamp set by Crafty Meraki. I also made a Slimline Bridge Card! I made one of these for Halloween and really enjoyed it - it is based on the measurements in one of Jennifer McGuire videos. I have a walk through of my card on YouTube here:  

The dragon was gold heat embossed on red card stock, and I added a little colour with alcohol markers and a white paint pen.

The back is where I added my personal message.


Here are the measurements I used for my Slimline Bridge Card:

Card base is cut 11 x 4".

Score 1-1/4" and 2-1/2" from each side.

The acetate bridge piece is about 1" high and 8-1/2" wide. 

Supplies:
Origami Paper - stash
Card stocks - stash
Mini MISTI - My Sweet Petunia
Year of the Ox - Crafty Meraki
Banners Pick A Punch - Stampin' Up
Copic markers
White paint pen
Copic markers
Water Brush
Black Sharpie
Vellum
Tiny Attacher - Tim Holtz
Gold embossing powder
Wink of Stella
Gold Nuvo Drops
Card size - folds down to 4 x 9" and fits in a #10 Business Envelope for mailing

Thanks for stopping by today!

Monday, 4 January 2021

Crafty Meraki ... Meraki Hugs Release


Hello!  Today is the day the Design Team can start to share our projects made with the January release at Crafty Meraki ... and the release is called Meraki Hugs. It's such a fun release and I have to say I have really been enjoying the stamps and dies. I have TWO Slimline cards to share with you today, and the first one is a card for the Chinese New Year.


Check out that cool Slimline die, with the three semi circles called 'View From My Window'. This die was designed by Candice Fisher, who is also on the Crafty Meraki Design Team and there are piercing marks on either side of the cutline of those semi circles. I love features like that! I saved the red fallaway pieces to use on another project another day. 

First I cut the View From My Window die from red card stock, and then cut a slightly smaller red panel to add to the back. I used a single layer of foam tape to create a shaker window behind the centre opening after clear embossing the symbol where it would show above the gold sequins. Then I adhered the backing piece to the View From My Window panel. The finished shaker piece was 3.5 x 8.5" and would have fit perfectly on a standard Slimline sized card but I decided to make my card base just a little larger so I would have that white border showing all the way around.


The stamps I used are from the new 'Year of the Ox' stamp set and let me tell you this is one large stamp set. Be sure to check out what the rest of the DT has come up with using this set - I am amazed by the talented ladies on this team!!!  I gold heat embossed the lanterns & cat image then fussy cut them out. The Happy New Year was gold embossed on a white card stock strip with fishtailed ends.


If you follow me you know I like to decorate the inside of my cards, so I did that using more images from the Year of the Ox stamp set. While it's hard to see in the photos ... I stamped the lanterns in red dye ink then did some highlights with a Wink of Stella pen. That bled the ink a little in those areas, which I liked, as well as added some lovely shimmer.


One more pic of the finished card before we move on to my bright and cheerful second card. I had found these gold pearl business envelopes in my stash this summer when I was reorganizing my craft room and I love how well one worked with this card!


When I opened my Design Team package, I actually squealed when I saw this Love Slimline Tag die set. This is another one designed by Candice Fisher and you will be seeing me use it a LOT. Never mind I had decided I wanted to make more TAGS in the New Year, this one is sized to work on a Slimline card!!  Be still my heart.


Check out the rainbow colours too (something else you will be seeing a lot of from me in the coming months). One afternoon in December I went into my craft room and started cutting 1/2" wide strips from scraps in the scrap bin. I have lots left over for other projects too!


The LOVE cuts as a single piece, which makes it very versatile. I wasn't sure how I wanted to use it though, so first I die cut the LOVE from the rainbow striped tag. I die cut a second tag from black card stock and backed the rainbow striped one with the black one. The LOVE shaped window was OK but not the look I was going for. I added foam tape to the back of the rainbow LOVE that was cut away from the tag and popped that up into the LOVE shaped opening ... Elipse Technique style. I liked that much better and stopped for the evening. 

The next morning I looked at the tag and still felt like it needed something. I cut the LOVE again from black card stock and splattered it with diluted distress oxide ink. I added that on top of the popped up one and then I was happy. There are additional word dies that come with the Love Slimline Tag so I cut the '& Hugs' from more of the white ink spattered card stock (which I did for the white card background panel too) and adhered that in the centre. The whole thing was added to a black card base with a strip of spattered black card stock and pretty rainbow sequins for some sparkle and shine.


Finally, here is a peek at the inside. The stamped sentiment and hearts come from another set being released today - Valentine. (OMGoodness, such an adorable stamp set!)


I added a pair of strips cut from my rainbow coloured card stock strip piece but matted them with black card stock to really help them pop. Using a blending brush and a light touch, I also added some yellow and orange ink to the very centre of the white panel to brighten up the sentiment.

I hope you enjoyed my first cards with this fantastic new release. While I'm not due for another Crafty Meraki Design Team project until next Monday, I will have an additional one for you later in the week because I was having so much fun with the items we are releasing this week! Next Monday we will be sharing the next part of the Meraki Hugs release.


"Crafty Meraki is a tribe of women who are all creators but more importantly, love helping others in any way we can! 

Meraki (may-rah-kee) a verb, or adverb, a Modern Greek word, derived from the Turkish “Merak” (Labor of love, to do something with pleasure), is applied to tasks, usually, creative or artistic tasks, but can be applied to any task at all. Meraki means to do something with passion, with absolute devotion, with undivided attention.

Crafty Meraki was born out of a vision to help creators do what they love doing the most- to create!"


Supplies:

Chinese New Year Slimline Card
View from my Window Slimline Die - Crafty Meraki
Year of the Ox - Crafty Meraki
Card stock - stash
Clear embossing powder
Gold embossing powder
Acetate
Wink of Stella
Gold foil card stock
Gold Fever Confetti - Studio Katia
Card size - 3-3/4 x 8-3/4", fits in a #10 Business Envelope

Love & Hugs Slimline Card
Love Slimline Tag Die - Crafty Meraki
Valentine - Crafty Meraki
Various card stock strips
Distress Oxide Inks for spatters on black card stock
Water Brush
Black Sparkle Ribbon - Stampin' Up
Wink of Stella
Crystal Rainbow Fusion confetti - Studio Katia
Copic Markers
Card size - 3.5 x 8.5", fits in a #9 or #10 Business Envelope


Thanks for stopping by today

Friday, 28 August 2020

Happy New Year Pop 'n Swap


Hello crafty friends ... 

It's Fun Fold Friday here on my blog and I have a fun Pop Up to share today using the new Pop 'n Swap die by Karen Burniston. I also have a YouTube video with all the details!


The patterned paper has copper foiled bits, and I added copper foil card stock behind the Sip Sip HOORAY die as well as on the wine glasses and wine bottle charms.


I punched a window in the front with a circle punch so you can see the 2020 when the card is closed.


As you open the card, the 2020 disappears behind the Happy New Year rectangle and the 2021 appears!


I used the Happy Celebrations stamp set from Studio Katia and copper heat embossed the Happy New Year. 


Into my stash with this one for a few more months. 

Supplies:
Card stocks
Patterned paper - Brightly Gleaming, Stampin' Up
1133 Pop 'n Swap - Karen Burniston
Happy Celebrations (Happy New Year) - Studio Katia
Copper embossing powder
1057 Circles Crosshatch - Karen Burniston
Scotch tape
1-3/8" circle punch - Stampin' Up
Rose Gold Confetti - Studio Katia
1054 Rectangles Crosshatch - Karen Burniston
Sip Sip Hooray die - MFT Stamps 
1073 Wine Charms - Karen Burniston

Card size - 4 x 8.5", fits in a #10 Business Envelope


Thanks for stopping by today