Showing posts with label Violette Stickers. Show all posts

Friday, 19 August 2022

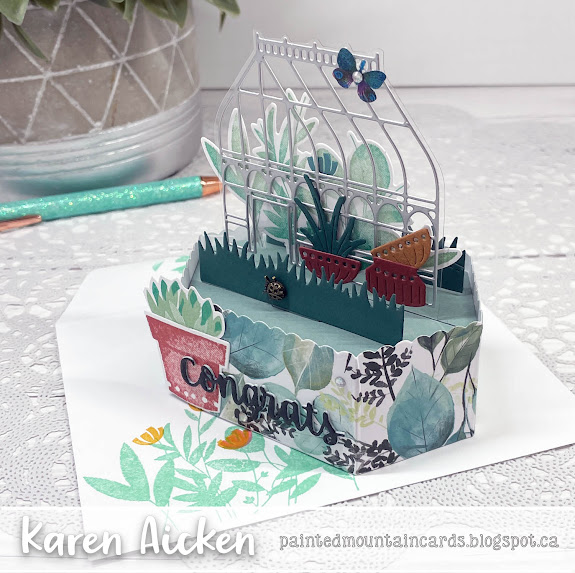
Greenhouse Platform Pop Up Card


Hello my crafty friends and welcome to Fun Fold Friday here on my blog. Today I'm sharing another Platform Pop Up card - this one I made for friends who are avid gardeners. They have been renovating a new-to-them house and, while still under construction, it's far enough along for them to have moved into their basement. I have all the details in a YouTube video:   


I used Lawn Fawn's Platform Pop Up, and a couple of retired stamp & die sets for this card.  I made the card awhile ago but couldn't post it until I had given it to them so that is why the plant supplies are retired ... they were not when I made the card. Ha.


One more look ...


This blog uses affiliate links whenever possible. This means, that at no cost to you, if you make a purchase through one of my affiliate links that I may receive a small commission from your purchase. I only link products that I own, love and use for my card making and not every link below is an affiliate one! 😊

Any supplies I'm unable to link are listed at the very bottom of my post.


Additional Supplies:
Butterfly sticker - Violette Stickers
White cardstock
Patterned paper - Eucalyptus, Hobby Lobby
Cardstock scraps
Garden Greenhouse bundle - Stampin' Up
Plentiful Plants bundle - Stampin' Up
Brass ladybug - Stampin' Up
Matte Silver Foil cardstock - stash


Wednesday, 28 April 2021

Mother's Day Waterfall Mini Slimline Card


Hello!  One of the die sets in Karen Burniston's new release is this Waterfall Card set and it even has different edges you can cut on the sides of the flap. I used the bracket edge for my card today and have a walkthrough on YouTube:  


As with my other new release cards, I created a Mini Slimline card! Pulling out some pretty stickers from my stash, I kept everything nice and flat to show that these cards really can be mailable.


As you pull the tab, the panels flip over to reveal the next sentiment and image.


While you could stamp a sentiment or write a message to be revealed on the decorator panel of the tab, I added another sicker as I have room for signing on the back of the card.


The flowers and sprig are from the Flowers and Bee die set.


The stickers got some glitter on them as well using Stickles.


When I do a card like this, I usually make it a post card style to keep the back nice and flat. In keeping with that, I used the shadow die for the new Happy Mother's Day to inlay into the back panel.


Here is a link to Karen Burniston's assembly video for the Waterfall Card:


This list contains affiliate links. If you use these links to buy something I may earn a small commission at NO extra cost to you. Thank you for your support!


Supplies:
Card stocks and scrap of patterned paper - stash
Stickers - Violette Stickers
Gold foil card stock scrap
Ribbon
"Hugs & Smiles" - Verve
Stickles
Wink of Stella
Card size - 6 x 3.5", fits in a #8 Envelope

Thanks for stopping by

Monday, 11 May 2020

Slimline Birthday Balloons Card Duo

Hello crafty friends ...

I was sorting through some patterned paper, and came across this 12 x 12" sheet of sparkly plaid. That is all it took to inspire this Slimline card duo for Masculine Card Monday, here on my blog!


The fun balloon die is from Your Next Stamp - and after I die cut them from coloured card stock I inked the edges with the i-crafter Blending Brushes. The greeting is also from YNS, and I added a bakers twine bow to each of the balloons.


Finally, here is a peek at the inside. I stamped a pair of greetings and added a rainbow star sticker for good measure.


These cards will be donated to my Mom's old nursing home.

Supplies:
Big Birthday Balloon Die Set - Your Next Stamp
Cool Tag Banner Sentiments - Your Next Stamp
Yellow, orange, blue, white and kraft card stocks
Plaid patterned paper - stash
Blending Brushes - i-crafter
Bakers Twine
Chalk Writer - Craft Decor
Inside stamps - Birthday Blowout, Poppy Stamps
Rainbow Star Stickers - Violette Stickers

Card size - 3.5 x 8.5", fits in a #10 Business Envelope

Thanks for stopping by today

Sunday, 28 October 2018

Witchy Pop-Up Card

Good morning friends

Since it's getting closer to Halloween, I thought I'd make another Halloween card. This time I used the Victorian themed stickers that I received from Violette Stickers. I also pulled out one of my background panels done months ago using Colorburst and Magical Shakers since the colours were perfect for the theme.


Inside I used Karen Burniston's Cupcake Pop-Up to animate the decorated crosshatch circle and fishtail banner. I also wanted a decorative edge on my card, so used the stitched scalloped border die from the Tropical Scenes. That one gets quite a work out in my craft room!


Below is a side view so you can see the pop-up a little better ...


The addition of a couple of black sequins break up the flatness of the black, and I added the die cut BOO to a stitched fishtail banner.


The ghosts were die cut from vellum and trapped under the Happy Halloween oval.  That way you don't see any adhesive showing through the vellum, and they are 'light and floaty' looking. I went over the bat with a black glaze pen for some additional shine.


Supplies:
1008 Cupcake Pop-Up - Karen Burniston
Stickers - Violette Stickers
White and black card stocks
Colorburst - Ken Oliver
Magical Shakers - Lindy's Stamp Gang
1038 Tropical Scene (stitched scalloped border) - Karen Burniston
1057 Circles Crosshatch - Karen Burniston
Fun foam
Stitched fishtail banners - MFT Stamps
1013 Halloween Elements - Karen Burniston
1058 Halloween Charms - Karen Burniston
Vellum
Sakura white gel pen
Sakura Black glaze pen
Sequins

Card size - 4-1/4 x 5"

Thanks for stopping by today

Wednesday, 24 October 2018

Owl Wheel Card

Good morning friends

There are a lot of 'Wheel Cards' floating around the internet, especially since Lawn Fawn came out with a whole collection of dies & stamps & add-ons for their Wheel Card die set. I think they are so cute - but resisted purchasing any of them because I already had a Wheel Card die. I've had it for several years - it's a BigZ XL die by Lori Whitlock for Sizzix but for some reason I have only used it a couple of times.

I decided to pull it out again and make a card - and quite enjoyed using it!  For today's card, I added some die cut words from Karen Burniston's word sets and used cute owl stickers from Violette Stickers.


When you turn the wheel (the white scalloped circle that sticks out both sides of the card) three other owls come into view ...


The patterned paper is another 'oldie' and every time I get it out I remember how much I enjoy using it. I cut a stitched frame to decorate the opening, and added some black Nuvo drops for some punch.


I like to make these 'Post Card' style rather than a folding card, and of course I had to decorate the back as well. I keep all the layers and embellishments on the back side flat - no foam tape!


There are things I like better about this die set as opposed to the Lawn Fawn one - but things I like better about the LF one too, so at this point I'm going to be satisfied with the die I already own. This card went to a friend, who we haven't seen in too many months.

I have a few more ideas with this die as well - just no time to get them done yet. Soon I hope!

Supplies:
Wheel Card Bigz XL die - Lori Whitlock, Sizzix
Patterned paper - the Paper Studio
White, black card stocks
Stickers - Violette Stickers
Mini Brad
Stitched circle frame - MFT Stamps
1052 Word Set 6 Summer - Karen Burniston
1002 Word Set 1 (Friend) - Karen Burniston
Stitched fishtail banner die - Elizabeth Craft Designs
Dashing rectangle dies - Elizabeth Crafat Designs
Scallop circle punch - Stampin' Up
Word stamp - Stampin' Up
Crystal Nuvo Drops

Thanks for stopping by today

Saturday, 11 August 2018

C4C447 Bug Shaker Card

Good morning friends


It's Saturday and that means a new challenge at the Crazy4Challenges Blog. Since it's a new month we also have a new Hostess and Guest Designer! Our August hostess is Anja de Regt, and our guest designer is Connie VanLoosen.

Anja's challenge this week is:  "I love summer! With summer time the bugs come too, the annoying ones and the beautiful ones. I love dragon flies and butterflies. For this challenge put a bug on your card/project."

I rarely go shopping for something just so I can complete a challenge card, instead preferring to search through my stash and use items I already own. I had been flipping through some patterned paper and discovered that the back side of a sheet of cloud paper had these BUGS on it. Since the other set of Grandparents for 3 of our grands used to do bug research for the University, I immediately put this sheet of paper in the package I keep for 'boy themed cards'. It was perfect for this challenge, so I pulled it out and got to work.


I knew I wanted to make a shaker card, so used a 3/4" and a 1" circle punch to punch some of the bugs out of the patterned paper and inked all the edges. Cutting a Gift Card window into a green panel, I added a shaker pouch, the punched bug circles, some black micro beads and green sequins. Then I backed it with a white panel and added the die cut black frame. Viola - a bug shaker, perfect for one of our Grandson's.


I also had this sheet of clear bug stickers in my stash, so added a few of them to the card edges inside and out. I simply cut off the back end of the bug stickers even with the edges of the panels. I'm not a bug person, so no - I did not keep the back end of the bug stickers to use on a different project. Bug Butts do not appeal to me at all, ha ha.


Check out the C4C blog to see how the Crazies have been inspired by the challenge. We'd  love to see your take on it, so be sure to stop by the Crazy 4 Challenges blog and link up your creations. If you are uploading to an online gallery, please use the keyword C4C447.


Supplies:

Patterned paper - Bella Boulevard
1" and 3/4" circle punches - Stampin' Up
Gift Card Frame & Window, plus Pouch - MFT Stamps
Green, black and white card stocks
Sequins & black micro beads
Happy Birthday stamp - MFT Stamps
Essential Fishtail Sentiment Banner dies - MFT Stamps
Distress Oxide inks
Bug stickers - Violette Stickers
Words inside - Stampin' Up


Thanks for stopping by today

Monday, 30 July 2018

Eat Cake Riley Pop-Up Card

Good morning friends

My card share today uses some 'free with purchase' patterned paper that has lovely rose gold foil accents.


I cut the Happy Birthday twice, once from the grey side of the patterned paper, and once from an area that had lots of the rose gold foiling. Then I off set them before adhering them to the card front and I like the shadow this gives it.


Inside I used the Cupcake Pop-Up by Karen Burniston, and disguised the cupcake portion with a die cut oval.


Once again I pulled out these sweet little cake stickers, adding two to white card stock & fussy cutting them to use with foam tape as embellishments. I die cut a word bubble and stamped it with a Lynda Kanase stamp & added another cake sticker to that.


Sophie the Moose is wearing an apron (and pearls!!) and showing off the pretty cakes she obviously has been baking. Dress Up Riley is so fun! I love that the words & borders from Lynda Kanase's Picture This Collection work so well on the lower step of the Cake Pop-Up. After die cutting the 'hooray', I backed it with a strip of the same grey patterned paper for more contrast.


On the panel where we will sign our names, I added a couple more of LK's stamps, and decorated the stamped cake with a few flowers from the sticker sheet.


Finally, here is a side view so you can see the Pop-Up a little better.


Supplies:
Dress Up Riley stamps & dies - Riley & Company
Sopies Accessories (stamps & dies) - Riley & Company
Sakura metallic gel pens
White card stock
Copic markers
Photo Frame, Celebrate - Lynda Kanase
Word bubble - Stampin' Up
Cake stickers - Violette Stickers
Spectrum Noir Glitter Pen
Stickles
Stitched oval dies - MFT Stamps
1030 Happy Birthday - Karen Burniston

Thanks for stopping by today

Thursday, 26 July 2018

Tropical Twist Panel Pop-Up Card and Gift Card Holder

Good morning friends

This sheet of tropical stickers from Violette Stickers was calling my name and I wanted to try them with Karen Burniston's Twist Panel Pop-Up die set. Since they matched so well, I also pulled out Lynda Kanase's new TROPICOOL VIBES patterned paper.  The card front features one of the Cut Aparts from the paper pad, the Hello from Word Set 6 Summer and a little glitter. I'm loving the colours and subtle texture in this paper pad.


Look at all the tropical fun going on when you open the card!


No wonder the Twist Panel Pop-Up is such a popular die set!


I wanted to make a thank you card for a friend of my Mom's who really went above and beyond these past few months, so this card is for her. I also wanted to include a Gift Card, so used Dawn Griffith's Gift Card Tutorial yet again to make a coordinating Gift Card Holder. Link to the tutorial is at the end of my post


My friend and team mate Kelly sent me this gift card to use in my projects, since I loved the one that she used on a project last year. Haha, only a crafter would be as excited as I was about getting an 'empty' gift card to use as a photo prop.


You can find Dawn's Youtube video HERE for the Gift Card Holder:

Supplies:
White, blue and navy card stocks
Stickers - Violette Sticker Club
Stickles
TROPICOOL VIBES 6 x 12" paper pad - Lynda Kanase (Sizzix)
Black fine tip marker
Crayola markers

Card size - 5-1/2 x 5"

Thanks for stopping by today

Monday, 9 July 2018

Birthday Cake Charm Accordion Card

Good morning friends

I made a card using these same cake stickers and patterned paper last month, which you can see HERE. Since I wanted to use up that pretty rose gold foiled paper, I went ahead and made a second birthday card. This one uses Karen Burniston's Charm Accordion. Every time I make a card with this die I fall in love with it all over again.

The patterned paper was a 'free with purchase' and double sided so I was able to use the reverse side of one to get that perfect grey for my decorator elements!


I love how these sweet cake stickers worked for my card, and the stamps from Lynda Kanase's Celebrate Photo Frame die & stamp set were the perfect size for the smallest scalloped rectangle die.


The heart charm was die cut from a scrap of the foiled paper so it has lots of shine. It was tied onto the frame with Bakers Twine instead of hanging it with a jump ring. I also added glitter to the flowers on the cakes.


Both the pretty scalloped square and the photo corner dies are from Karen B's Spinner Square Pop-Up.


Finally, here is the back view.


This one went into my stash.

Supplies:
Patterned paper - My Minds Eye 
Cake stickers - Violette Stickers
Photo frame, Celebrate - Lynda Kanase
Bakers Twine
Stickles
Mini Scallop Stitched rectangle dies - MFT Stamps

Thanks for stopping by today

Thursday, 28 June 2018

Cake Sticker Gatefold Birthday Card

Good morning friends

I have always loved stickers, so when I discovered the Violette Sticker Club this Spring, I signed up! How fun to get a nice selection of stickers in the mail each month. 

I loved the cake stickers when I saw them online, but was initially surprised at how small they are. I'm terrible at judging sizes online and see things as big as I want them to be in my head. But they are cute and so fun for planner and calendar decorating too. They would look classy on your calendar and there are so many on a sheet I'm able to USE them and not hoard them. I used several here and made a Birthday Card using my ScorPal to easily make a Gatefold card.


The patterned paper was a 'free with purchase' - and it has lovely copper foiled bits on one side. There were a couple of different patterns that came in the freebie - I think they might have been in one of the Simon Says Stamp Card Kits at some point.

A little glitter on the cakes and they were ready for the card.


Here is a peek at the inside, with more of that pretty foiled paper and a few more cake stickers for good measure.


The 'eat cake' stamp and the little banner and Happy Birthday are both by Lynda Kanase.


I'm a planner girl - and have used a planner to keep my life organized for over 30 years. Back in the day, all you could get was a Daytimer at an office supply store! I don't generally do a lot of decorating in my planner, but it was fun to add some of these cute cakes on the dates our family has birthday's.

Supplies:
Patterned paper - MME 
ScorPal
Stitched Mini Scallop Rectangles - MFT Stamps
Dashing Rectangle dies - Elizabeth Craft Designs
Cake stickers - Violette Stickers
Make a Wish - MFT Stamps
Photo Frame, Celebrate - Lynda Kanase (Sizzix)
Stickles

Thanks for stopping by today