Showing posts with label Crafty Meraki. Show all posts

Friday, 31 May 2024

Apple Thank You Card Duo


Last fall I was flipping through an older paper pad and when I saw this 12x12" sheet with the apples - I decided to pull it out and make a couple of teacher appreciation cards for my stash. These ones are a full 6" square - not a size I usually make because of the additional mailing costs for a square card. Since these ones will be hand delivered to our grandkids teachers though, I decided to go ahead with that card size!


I tried to do a pop up inside this first card, and added a window in the front. I can't remember what I did to mess it up (haha) but in the end I made that (sad) little shaker to try & salvage the card. The little Bookworm is from Karen Burniston and he is just too cute. I also added some rainbow holographic cardstock to brighten up the cards since the patterned & cranberry cardstock are very dark.  Below you can see the inside of the first card.


The second card has a large die cut apple, with a stamped sentiment. For some fun, I added the apple on with an Action Wobble spring so it bobs and wobbles. I think that was probably the last time I used an Action Wobble until recently when I've pulled them out again. I seem to go in phases with those things!


Below is the inside of the second card. These two cards were the first ones I pulled out of my card bin to give our daughters for the grandkids teachers, supplemented with the ones I've made recently.


Supplies used:
Apple patterned paper - K & Co (old, I've been hoarding it)
Double Stitched Circle dies - Divinity Designs
Rainbow Holographic cardstock - Recollections
Thanks die - Crafty Meraki
Stardust Glitter Pen
Transparency
Various filler - my stash
Bookworm - Karen Burniston
Black Pen
Sakura white gel pen
Grey Topic marker
Educators Rule stamps - Altenew
Catherine Pooler Inks
Glitter Dots - Ecstasy Crafts
Peel off Border - Ecstasy Crafts
Wink of Stella
Action Wobble
Apple of My Eye stamps & dies - Trinity Stamps
Teacher sentiments - Penny Black
Twine

Tuesday, 24 October 2023

Halloween Tags for Kids


I like to give the Grandkids goodie bags for Halloween. Usually I use white gift bags, but this year I used heavy brown lunch bags instead. I had fun choosing the candy and party favour type gifts to add into the bags and then wanted bright and cheerful tags to add to the front of the bags.

I have had these 3d sticker embellishments in my stash for years. There was no packaging - I had them in a sandwich baggie - so I don't know where I got them or who makes them. But I have managed to use up most of them this year!

The tags were cut using the Celebrate Slimline Tag by Crafty Meraki and decorated with scraps of patterned paper and the stickers. I added some dots with my favourite dot stamp and wrote their names with a black pen.  I could have used pretty ribbon instead of the bakers twine at the top of the tags - but really, the kids are just going to tear into the bags so ... 😂


Having been asked how many cards I make I thought it would be fun to keep track this year. Many of my posts include more than a single card or project and below is my tally. 

Card Tally for 2023
January - 53 cards
February - 56 cards
March - 55 cards
April - 32 cards
May - 43 cards
June - 34 cards
July - 56 cards
August - 106 cards
September - 61 cards
October so far - 36 cards & 5 Tags

I decided to cancel the subscription that provided linked thumbnails to what products I used on my cards. It was costing me out of pocket each month, so I’m back to listing what I used.

Supplies:
Ephemra - unknown, several years old
Scraps of Doodlebug patterned paper 
Dot peg stamp - Stamps by Judith
Twine

Friday, 23 June 2023

Canada Day Magic Iris Card


Today I'm sharing the 6th edition to my monthly series "Magic Iris Cards". For this one, I created a card to celebrate Canada Day (July 1st). The patterned paper is from Catherine Pooler and it was perfect for this card! When you slide down the lever, the shutters open up to reveal a stamped sentiment.


Inside, I added a stitched red panel and the Slimline Celebrate die. I added a tiny stamped red maple leaf on the die cut, which makes me happy.


Having been asked how many cards I make I thought it would be fun to keep track this year. Many of my posts include more than a single card or project and below is my tally. 

Card Tally for 2023
January - 53 cards
February - 56 cards
March - 55 cards
April - 32 cards
May - 43 cards
June so far - 25 cards
Additional Supplies:
White cardstock
Red cardstock
1" circle punch, Stampin' Up
Stong & Free - Wild Whisper Designs
0 Canada - Photo Play 

This blog uses affiliate links whenever possible. This means, if you make a purchase through one of my affiliate links that you pay the same amount but I may receive a small commission from your purchase. I only link products that I own, love and use for my card making and not every link below is an affiliate one! 😊


Tuesday, 16 August 2022

Congrats Slimline Card Duo


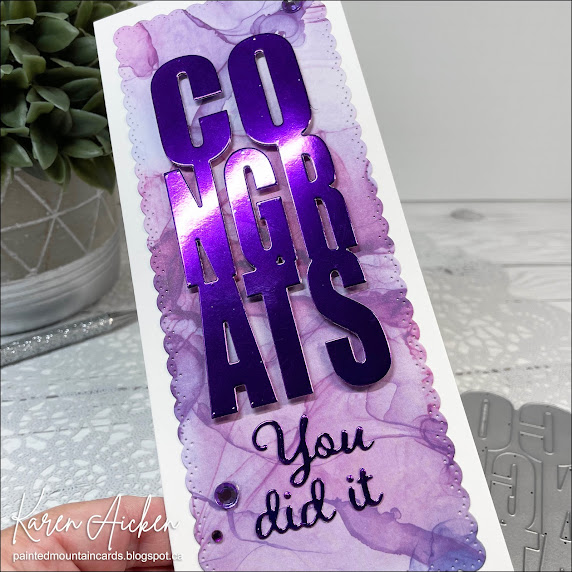
Hello my crafty friends.  A family member asked if I happened to have two CONGRATS cards on hand, that might be blank inside. She wanted room for their co-workers all to sign the cards. That made me realize that I didn't have any blank-inside cards (or notecards) in my stash! I quickly made these ones up for her and made a mental note to make a few that I could just keep for when they are needed. 

Both cards are Slimline cards and both use the Congrats Slimline Tag dies from Crafty Mereki.   While she wanted the inside blank, I added narrow stitched strips (Trinity Stamps) on either side to dress it up a little.


The Congrats was popped up with foam tape, as was the tag itself. Since they were going to be hand delivered I didn't need to worry about bulk & extra postage.


This is the second card. I wanted it similar but not the same since they would be given at the same time. The CONGRATS on this one was die cut from a purple mirror cardstock.


The 'you did it' is included with the Congrats Slimline tag and was cut from the same purple mirror cardstock.


Once again I added a little pop of colour inside, using a Slimline border die from Scrapbook.com.  I linked supplies below for you!


This blog uses affiliate links whenever possible. This means, that at no cost to you, if you make a purchase through one of my affiliate links that I may receive a small commission from your purchase. I only link products that I own, love and use for my card making and not every link below is an affiliate one! 😊

Any supplies I'm unable to link are listed at the very bottom of my post.

Additional Supplies:
Patterned paper - Over the Rainbow & Guilded Ink, both from Michaels
White cardstock
Black sparkle ribbon - Stampin' Up (stash)
Black pearls - old (stash)

Friday, 5 August 2022

Pop Up Baby Card


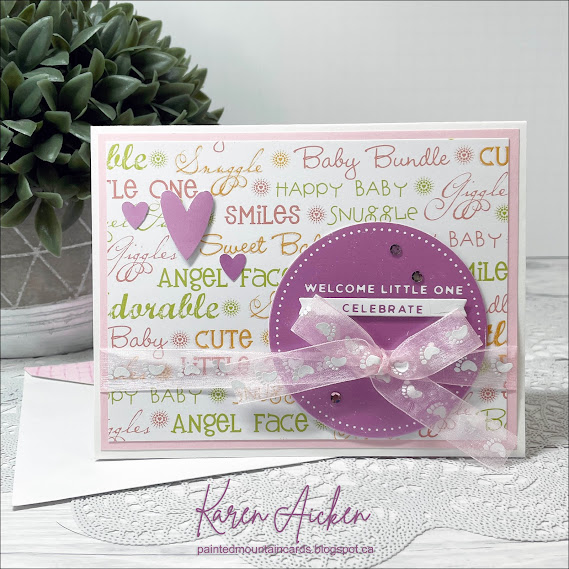
Hello my crafty friends! Today I'm sharing the baby card I made for our niece & her hubby, who had a baby girl recently 🥰.   The patterned paper is one I've had in my stash for YEARS as well as that sweet ribbon. The paper has some sparkle to it and I used a pink pearl glimmer foil for the other elements.


Since it's Fun Fold Friday on my blog, this card has a little surprise inside ... it's an explosion card! I have been making this type of explosion card for over 30 years (gasp). I would go into our kids classroom with a suitcase full of stamps & ink pads and teach these to the kids.  This card started with a 9" square of patterned paper. I think I will have to do a YouTube tutorial on this fun fold for those who haven't seen them before. Adding it to the list!

Since I also did some reverse foiling, there were areas of pink pearl foiling left on the cardstock after die cutting the circle and Congrats inside. So I pulled out an old heart punch and punched out the hearts from the leftover area. No waste and they coordinate perfectly!


I spelled out the baby's name using an alpha die set and rainbow holographic cardstock. Everything that is available is linked below. 😊 


This blog uses affiliate links whenever possible. This means, that at no cost to you, if you make a purchase through one of my affiliate links that I may receive a small commission from your purchase. I only link products that I own, love and use for my card making and not every link below is an affiliate one! 😊

Any supplies I'm unable to link are listed at the very bottom of my post.


Additional Supplies:
Card (6.5 x 5")  and envelope - Michaels
Patterned paper - Nana's Nursery Baby Girl, DCWV (old, from my stash)
Pink patterned paper inside - Provocraft? (old, from my stash)
Pink cardstock - stash
White card stock - Accent Opaque Digital Super Smooth (Amazon .ca)
Sequins - leftover from an older Paper Pumpkin kit
Hearts - retired punch from Stampin' Up
Rainbow Holographic cardstock - Hunkydory

Thursday, 23 December 2021

Dog Slimline Christmas Card


Hello!  Today's Slimline card is the one I made for our veterinarian & staff. Our dogs have vaccines that come due in December, so I always bring the vet clinic an edible gift and a hand made card.  

The dog dies are by Marianne Designs, I've had them for a couple of years and I love how you can make different dog 'breeds' with the one die set. For this card I didn't use the body or tail dies, but instead have them peeking out of the Crafty Meraki background die.


I added die cut snowflakes, the Merry Christmas & shadow and snippets of the Holly Pattern Plate - all dies by Karen Burniston and linked below. The patterned paper is long retired but it's one of my favourite 12 x 12" holiday pads. After I finished this card, I decided to go ahead and use this paper for another Sheetload of Cards and will be sharing those tomorrow. 😊


Inside I added the Giant Thanks So Much (Lawn Fawn) as Dr. KD and her staff took SUCH good care of our furry kids this past year. 

This blog uses affiliate links whenever possible. This means, that at no cost to you, if you make a purchase through one of my affiliate links that I may receive a small commission from your purchase. I only link products that I own, love and use for my card making!

Any supplies I'm unable to link are listed at the very bottom of my post.

Additional Supplies:
Oatmeal flecked card stock - stash
Patterned paper - Say Freeze, Recollections
Grey cardstock scraps
Elines Dog dies - Maryanne Designs
Grey Ink
Shimmer Spray
Adhesive Backed Snowflakes - Stampin' Up (retired)
Grey Copic
Holly Sticker - Joleens
Red Twine

Wednesday, 24 November 2021

Slimline Card with Deer Trio


Hello!  Today I'm sharing the card I made using those older, Cricut cut deer I used on a Mini Slimline card HERE. As I said in that post, there were four card fronts sitting in my Christmas Bin that had been there for YEARS. Since my style (and supplies) have evolved over time, I decided to repurpose those deer for this years holiday cards. They came off of the card fronts easily, since the foam tape was so old it didn't have much sticky left. 

The patterned paper is also old - the date on it is 2003! I die cut it using the View From My Window Slimline die from Crafty Meraki, backed the window openings with vellum then added the patterned paper fallaway pieces back in but behind the vellum for a softer look. I also outlined just inside the window edge with a gold gel pen.

 
Here is a peek at the inside ...


This blog uses affiliate links whenever possible. This means, that at no cost to you, if you make a purchase through one of my affiliate links that I may receive a small commission from your purchase. I only link products that I own, love and use for my card making!

Any supplies I'm unable to link are listed at the very bottom of my post

Additional Supplies:
Patterned paper - Magenta (from 2003!)
Oatmeal card stock
Shimmer Spray
Reindeer - Circuit cut MANY years ago)
Stitched Scallop Nesting Slimline die - Kat Scrappiness

Sunday, 17 October 2021

Favourite Creeper Slimline Halloween Card

Hello!  I pulled out the 'View From My Window' Slimline die from Crafty Meraki and cut it from this plaid patterned paper from Doodlebug Designs. Since the paper is double sided, I was going to flip the fallaway pieces around and inlay them back into the openings for a coordinating print. It turns out I didn't pay attention to the back side of the patterned paper, which is directional and those pieces were upside down. So I cut it again from white and used just the white portions for my card saving the base for another time. 

After inking the edges of the white pieces, they were popped up in the openings with thin foam tape. Then I just had fun decorating them with printed embellishments from Doodlebug!


Here is a peek at the inside, where I also added Karen Burniston's new Happy Halloween. I love that it comes with a shadow die! The plaid seemed pretty overpowering though, so I cut the shadow from vellum and adhered that over the plaid shadow before attaching the Happy Halloween script part. Much better. I also added some Peel Off Border Stickers.


That cute little frog has resin eyes ... I'm unable to find those ones to link for you but Doodlebug does have some different ones that I will link instead. The Boos & Brews papers, stickers and ephemera also seems to be unavailable but I will link a different Doodlebug paper set. I love Doodlebug so also have this set, ha ha. 

This blog uses affiliate links whenever possible. This means, that at no cost to you, if you make a purchase through one of my affiliate links that I may receive a small commission from your purchase. I only link products that I own, love and use for my card making!

Since many of the Doodlebug Designs products I used have been retired, I am going to link some new Doodlebug products for you.

Supplies:
Purple card stock - stash
Peel Off Border - Elizabeth Craft Designs
Odds & Ends, Boos & Brews - Doodlebug Designs

Thanks for stopping by

Tuesday, 13 July 2021

Canada Day Slimline Card Duo


Hello!  I know Canada Day is over, but I still have some cards to share. These two are Slimline cards and I used the Quilted Leaf die by Divinity Designs. This is exactly what I had in mind when I bought the die but of course if I chose different colours it would work beautifully for a fall card as well. 

I added it over the Slimline Clouds die from Whimsy Stamps, which I think is going to get lots of use.


I sprayed my paper pieced Maple Leaf with shimmer spray 😊.


Inside I used words from the Celebrate Slim tag by Crafty Meraki!


My second card started off with another die by Crafty Meraki ... the 3 Room Studio die. I disguised the off centre opening with one of Karen Burniston's Crosshatch Squares then added another paper pieced Maple Leaf.


Yes, even more shimmer spray - I do love shimmer & shine!


Inside I cut the large Celebrate from the white panel making sure to save the fallaway pieces from the letters "e, b and a".  Then I added them back in when I adhered the white stitched panel to my card. I saved the actual die cut Celebrate for another card another day.


For your convenience I have linked many of the products I enjoy using below. Some may be affiliate links which means if you use these links to purchase I may earn a small commission but there is NO extra cost to you.


Additional Supplies:
Red and black card stock - stash
Shimmer spray
Small maple leaf - Seasonal Layers, Stampin' Up (retired)

Thanks for stopping by

Thursday, 17 June 2021

Stencilled Floral Slimline Duo


Hello!  Today I'm sharing two Slimline cards I made to send out for Happy Mail. I took the photo above so you could see the difference in the Slimline sizes. The card on the left is my most used Slimline card size, 3.5 x 8.5".  The card on the right is the larger 4 x 9" size. Both fit in a #10 Business Envelope. 

I used some new items in my craft room ... a Slimline layering stencil set by Pinkfresh Studio (linked below) that also has a coordinating stamp. I didn't use the stamp for these two mostly because I was too impatient and couldn't wait to try out the stencils. What a quick and easy way to add a large statement floral image to your cards!


The butterfly was cut from pink foil card stock, and the Hello is from Crafty Meraki (also linked below). The floral panel got a spritz with my shimmer spray as well.


Here is a peek at the inside, where I added a punched butterfly and sentiments from Gina K.


The second card uses a different colour combo and has a pink foil matting layer. Note, I actually cut out the butterflies, Hey You and Hello from the centre area of that pink foil since the openings are hidden by the white stencilled panel. I hate to 'waste' specialty papers!


I have had the Hey You for awhile, but this is my first chance to use it. I am looking forward to playing with some more of my own products again, now that a lot of my Design Team work has settled down.


I decorated the inside similar to a Slimline Poppy card made last month. The pretty lacy element is from a long retired Stampin' Up set. It's such a lovely touch and I have to remember to use it more. Hmmmmm ... maybe I should just die cut a bunch of them from different colours and keep them on hand?

The bold Happy Birthday stamp is from Divinity Designs.


This idea would be pretty on the front of a CAS (Clean And Simple) card too!


For your convenience I have linked many of the products used below. Some may be affiliate links which means if you use these links to purchase I may earn a small commission at NO extra cost to you.


Additional Supplies:
Shimmer spray
Pink foil card stock - Stampin' Up
Butterfly die - Watercolour Wings, Stampin' Up (retired)
Lacy Strip - Petal Palette, Stampin' Up (retired)
Pink & green card stocks - stash
Butterfly punch - Martha Stewart
Card sizes - 3.5 x 8.5", and 4 x 9" - both fit in a #10 Business Envelope

Thanks for stopping by