Showing posts with label Pivot Cards. Show all posts

Tuesday, 2 May 2023

Slimline Anniversary Card


Welcome to Karen Burniston's May Designer Challenge, and this is the challenge she gave the Design Team :  "Theme: "BEJEWELED" - Incorporate shiny sparkly things into your card of any theme. This can be glitter, foil, mirrors, jewelry, gems, rhinestones, etc." While I didn't add any jewels, I did use several different mirrored card stocks and this card is VERY shiny! 🥰


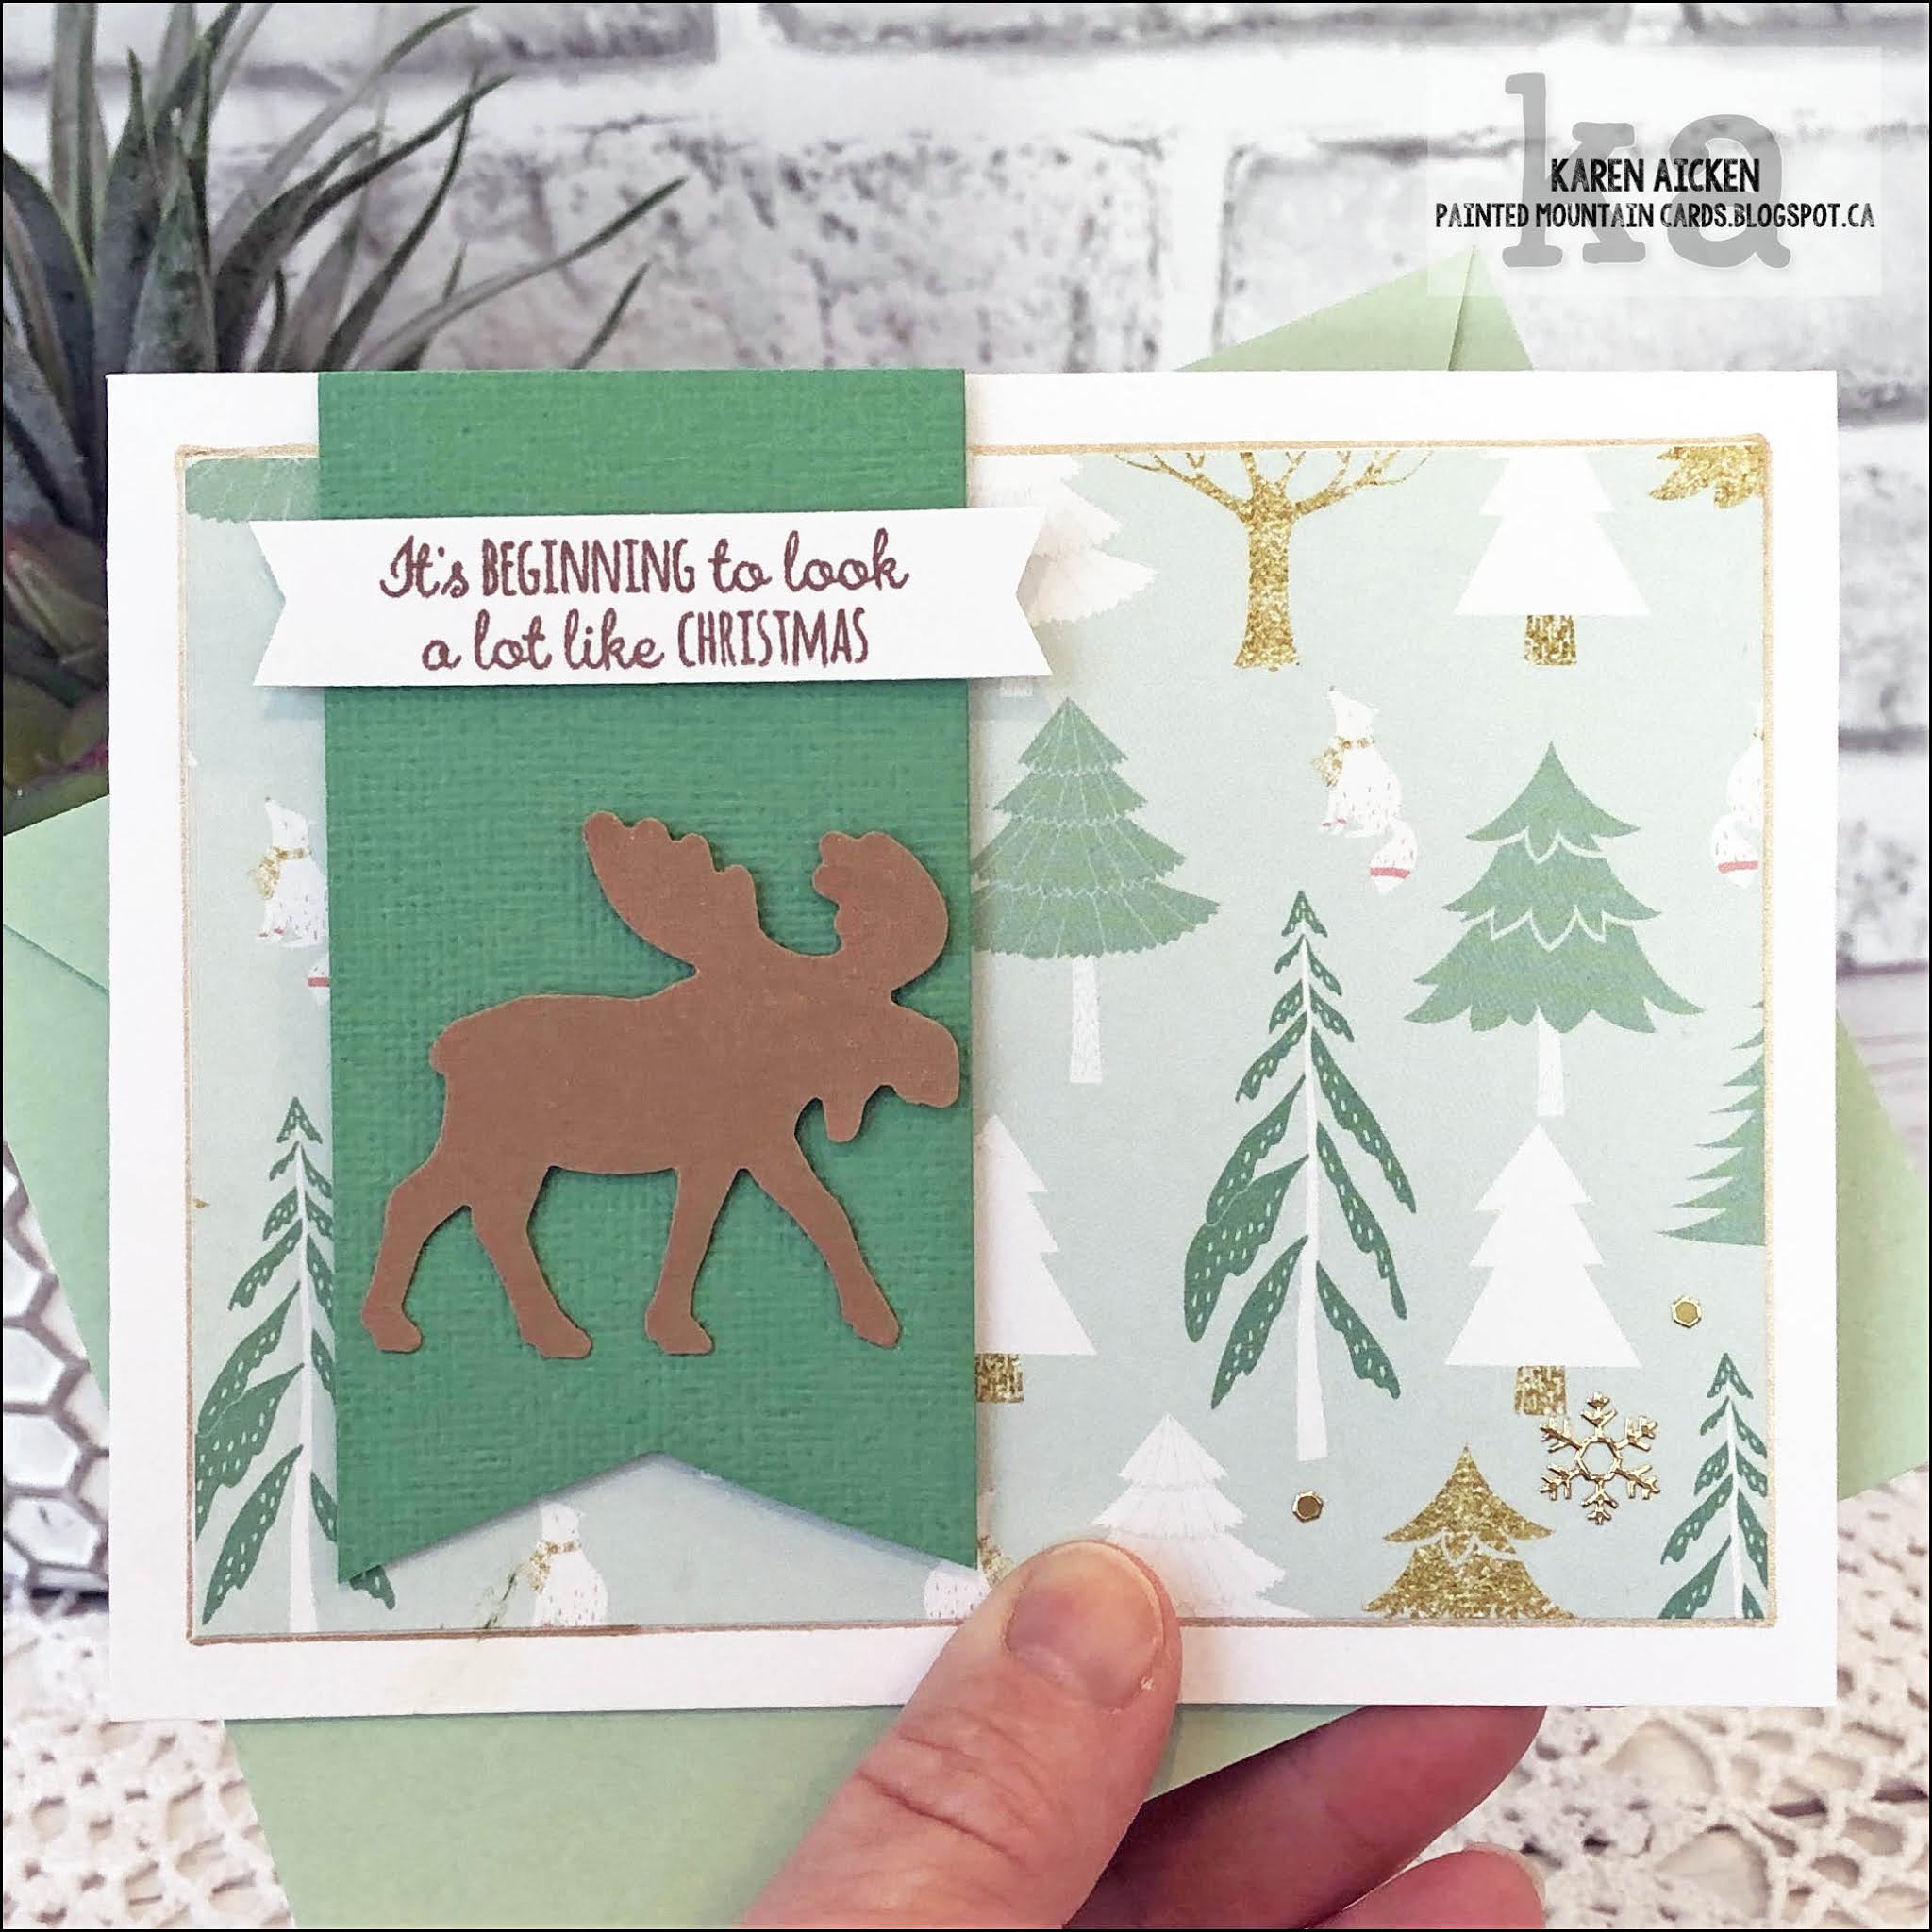
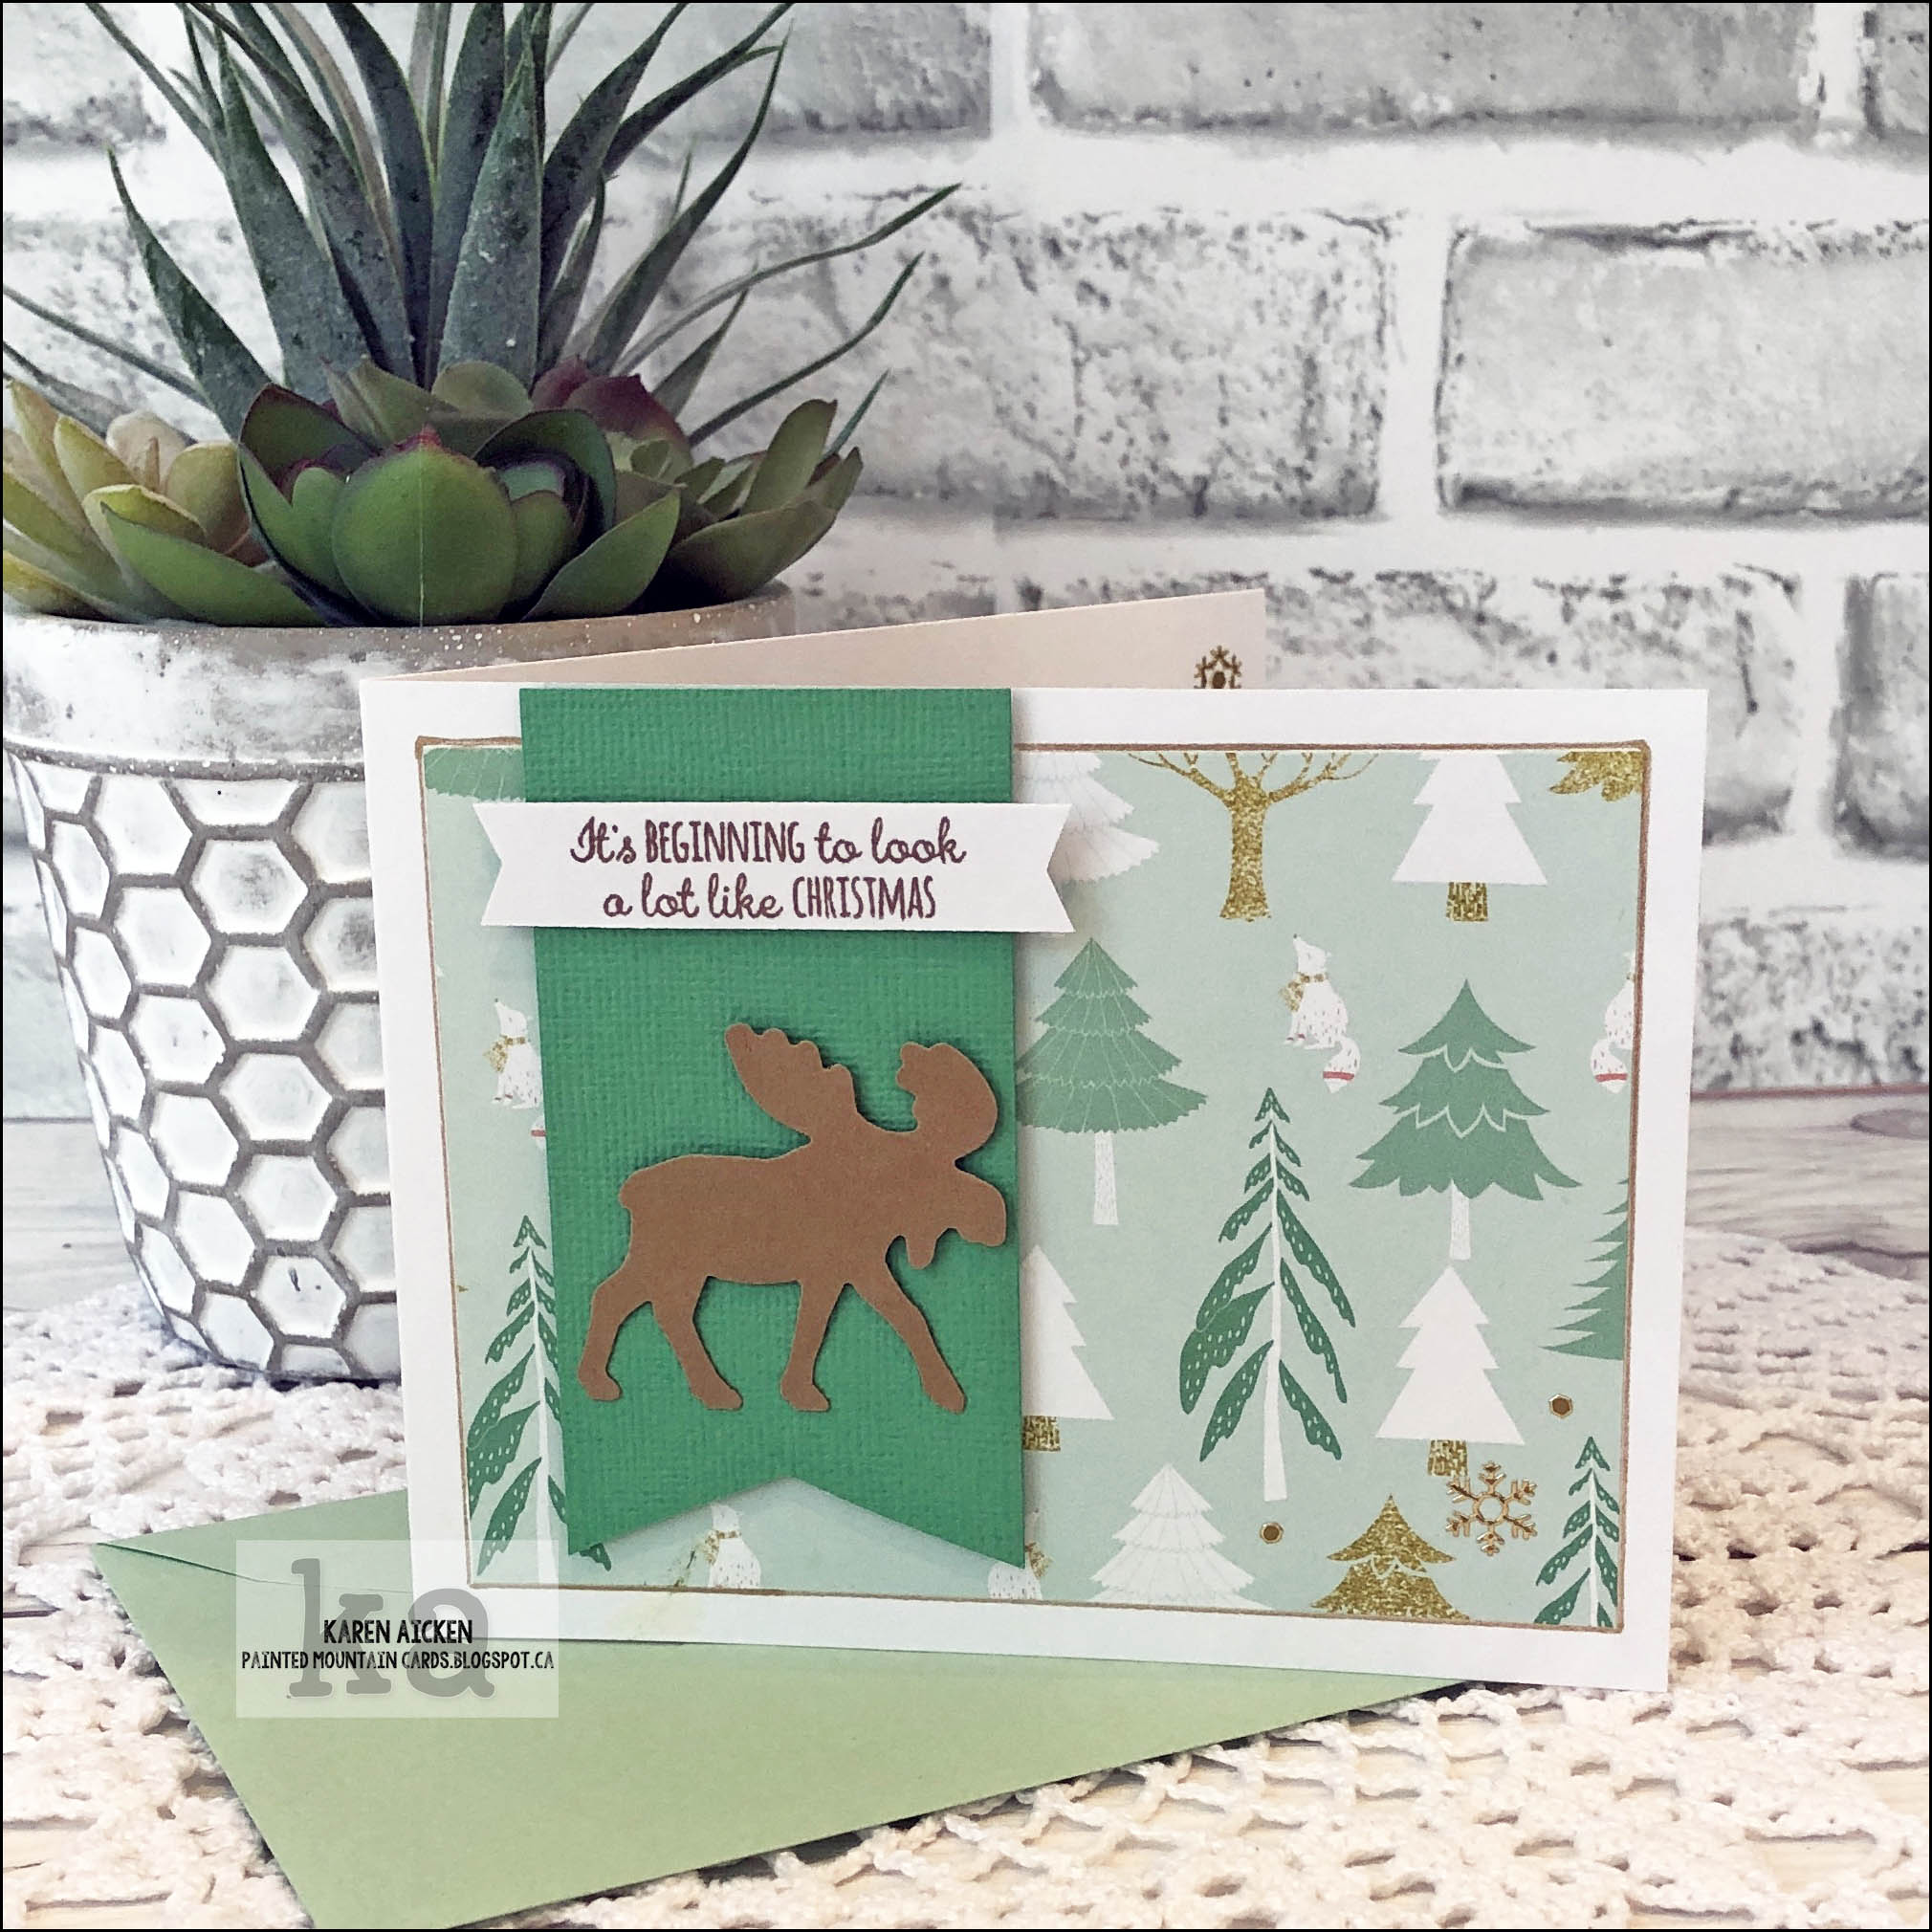
I wanted to make an Anniversary card, and since I haven't used any of the Pivot Panel die sets in awhile I pulled out the Heart Pivot Panel and created an off-set Slimline card. I did this type of card back in January 2021, and have a YouTube video as well - you can find that HERE.


Below you can see all the dimension you get with the die set. I didn't use foam tape on any of the layering hearts, so this card folds flat and will mail for a single stamp.


I keep all but the tiniest pieces of these specialty foiled/mirrored cardstock, and those scraps were perfect to die cut all the hearts from! The 'love' is from the Pop 'n Swap die set and it was cut from black glossy card stock.


Even the champagne layer on the glasses, was cut from mirrored card stock! Snipping off the hanging holes from any of Karen Burniston's Charm die sets, allows you to create cute little embellishments. 


One more look ...


The rest of the Design Team is linked on the right side of my blog and I hope you will check out what they came up with for the challenge. Karen Burniston will have her post tomorrow (Wednesday) on her BLOG.

Having been asked how many cards I make I thought it would be fun to keep track this year. Many of my posts include more than a single card or project and below is my tally. 

Card Tally for 2023
January - 53 cards
February - 56 cards
March - 55 Cards
April - 32 Cards
May so far - 2 Cards

Additional Supplies:
White cardstock
8-1/2 x 3-1/2, 6 x 3-1/2 scored at .5
Rainbow Holographic cardstock - Recollections
Scraps of red & different pink mirrored cardstock
Inside Scoop Anniversary stamps - Taylored Expressions

This blog uses affiliate links whenever possible. This means, if you make a purchase through one of my affiliate links that you pay the same amount but I may receive a small commission from your purchase. I only link products that I own, love and use for my card making and not every link below is an affiliate one! 😊


Wednesday, 18 January 2023

'Wet Your Plants' Birthday Card


Earlier this week I shared a post with plant themed cards. While I had the pad out, I pulled this sheet out to make a card and used Karen Burniston's Label Charm Pop Up and Garden Charms. To make the most of the large pattern on the 12 x 12" sheet, my card is an A7 size (5 x 7").  With the Label Charm Pop Up, the design on the front label pivots to the inside when the card is opened.


Lawn Fawns Giant Happy Birthday was die cut from a brown patterned sheet in the same package as well as a dark green cardstock. Then I offset them slightly for a shadow look and adhered it to the front of the card. Two squares of the same brown print were sliced on the diagonal and adhered to each corner on the card front.


I love how the watering can dangles inside the opening. I used a jump ring to attach the charm, but you could also use twine or thread.


I have been asked how many cards I make but I didn't have a clear number. Since many of my posts include more than a single card or project, I thought it would be fun to keep track this year. 
2023 Tally:  36 Cards


Additional Supplies:
Patterned paper - Farmhouse, Craftsmart (Michaels?)
White cardstock
Water colour markers
Brass Jumpring
Alcohol Markers
Green cardstock

This blog uses affiliate links whenever possible. This means, if you make a purchase through one of my affiliate links that you pay the same amount but I may receive a small commission from your purchase. I only link products that I own, love and use for my card making and not every link below is an affiliate one! 😊


Monday, 5 September 2022

Karen Burniston August Release Blog Hop


Hello my crafty friends!

Welcome to our Karen Burniston Products - KB Riley LLC September Release Blog Hop. The Design Team have come together with Karen today for a fun blog hop to celebrate the release of 13 new dies. Sneak peeks of the new release started last week, and the dies are available to order NOW!
This release includes:
  • 1 new charm die set
  • 1 new word set
  • 1 new Halloween die set
  • 2 new Halloween Pattern Plates
  • 2 new pop-up die sets
  • 2 new pop-up extra sets to coordinate with one of the new die sets
  • 1 new "Ball" Add-ons set
  • 3 new "Ball" Double-Ups Sets

I used three of the new dies along with some earlier releases for this shimmery Halloween Card. Here is what the card looks like when it comes out of the envelope:

Since it's more fun to see these cards in action, I have a walkthrough on YouTube:  
  

The shimmer & shine is from the Rainbow Holographic card stock. I just adore the new Skeleton and Bat, so had to use them for my card today. The card base uses the new Label Charm Pop Up and the bat on the front pivots to the inside as the card is opened.


Below is what the card looks like opened. The patterned paper is from Doodlebug and I've had it a couple of years. I did link some other Doodlebug papers (that I also have) but I'm not able to link this one. I love it - the purple stars are felted! 


Cutting the Spider Slim Pattern Plate from the same holographic card stock, I snipped the sides off to give me the border on each side of the card. Then I cut different webs and spiders away from the leftover piece to add them as elements on the inside and front of the card.


I always like to show the top view of this type of card, since when I give them to people they invariably turn it so they can see it from the top. 😊


GIVEAWAY:
To celebrate the release Karen Burniston and each of the Karen Burniston - KB Riley LLC Design Team members will be giving away a $25 Gift Certificate to some lucky person who comments on our blog posts, so make sure you join the hop and comment on everyone's blog post. Winners will be randomly chosen from ALL of the blog hop comments received on our blog posts by Monday, 12th September 2022. Lots of chances to win some goodies, so just leave a comment on this post or any other blog hop posts to enter! Don't forget to leave some way for us to contact you, in case you are a lucky winner!

Your next stop on the hop is:


Remember if you get lost along the way, you can always find the full Blog Hop list HERE

Label Charm Pop Up - shipping now!

Skeleton & Bat - shipping now!

Spider Slim Pattern Plate - Shipping now!

This blog uses affiliate links whenever possible. This means, that at no cost to you, if you make a purchase through one of my affiliate links that I may receive a small commission from your purchase. I only link products that I own, love and use for my card making and not every link below is an affiliate one! 😊

Any supplies I'm unable to link are listed at the very bottom of my post.


Additional Supplies:
Rainbow holographic cardstock - HunkyDory
Various cardstock scraps
Purple cardstocks - Michaels
Purple alcohol marker

Monday, 29 August 2022

Sunflowers & Butterflies - Karen Burniston's New Release First Sneak Peek


Hello my crafty friends. Today is the day ... the Design Team can start to share sneak peaks of Karen Burniston's upcoming release. I have long been a fan of her Circle Charm Pop Up so I was pretty happy to see this new Label Charm Pop Up in the new release and of course it was the first sneak peek I wanted to share.


My card is larger than A2, it's 5 x 6.5" and fits in a 5 x 7" envelope for mailing. And it folds down nice and flat too. The sentiments are also part of the new release, with the Just and coordinating shadow does as well as supporting sentiments. Here is a look at the whole release:


Here is the inside of my card ...


Once again I'm playing with that lovely sunflower patterned paper - it's a 6 x 6" pad that I have been getting a LOT of use out of. The butterflies were stamped onto vellum and white heat embossed then die cut - it's a die from Pinkfresh Studio although there are some sweet butterflies on Karen Burniston's website that would also work beautifully. I just happened to have these ones sitting on my stamping table.


The shadow and words 'saying hi' were die cut from a gold pearlized card stock for a little shimmer and shine. I added Wink of Stella and gold Stickles for even more shine. I can't link the cardstock but I did find others that would work just as well.


Here is the top view ...


One more look ...


The Design Team will be sharing Sneak Peeks all week! The release goes live on Monday September 5th and there will be a blog hop with lots of inspiration and prizes too. 

Word Set 15 Just Because - shipping September 5th

This blog uses affiliate links whenever possible. This means, that at no cost to you, if you make a purchase through one of my affiliate links that I may receive a small commission from your purchase. I only link products that I own, love and use for my card making and not every link below is an affiliate one! 😊

Any supplies I'm unable to link are listed at the very bottom of my post.


Additional Supplies:
White cardstock

Wednesday, 25 May 2022

Mini Slimline Pop Up Card Duo


Hello my crafty friends!  This pair of Mini Slimline cards are based on the April 2022 Sheetload of cards. I finished them in early April but couldn't share them because I used some of Karen Burniston's new release. We could't share our projects until May 9th so I hung onto the photos until now. 

First of all, I LOVED the April Sheetload, as it was for Mini Slimline cards. But when I discovered that the Pivot Panels fit inside this fold? I was SO excited. Below you can see the inside of both cards.


I used papers, cut aparts and stickers from Echo Park's 'Summer' line and this Sheetload uses 6 x 6" papers. The card front (which is shorter than the card back) has one of the prints and the inside has a coordinating print. You can see both as the card comes out of the envelope. Now that April 2022 Sheetload was hugely popular and I knew I'd make it often. But if I can make a Mini Slimline, a Fun Fold AND a Pop Up? That's just a winning combination in my books. 😊


The Flower Pivot Panel is what I used inside, as well as the Border Blends: Trims. The dragonflies are from the new Flutter Charms.


Love the dragonflies ... they have both a solid and a detail layer. 


The second card uses the same dies as above, but also the Happy Birthday and Happy Birthday Shadow.


Here is a closer look at the inside of the second card ...


Find out how to download the April 2022 SheetLoad of Cards HERE

Karen Burniston has assembly videos for all of her pop up dies including this one. If you have the die, then you have probably already checked out her video tutorial so I don't attempt do 'reinvent the wheel' by doing another assembly one. I prefer to show you different ways you can use those same dies since people love to see a variety of looks! Here is the link to the Karen Burniston website, which includes the assembly videos: Once you know how to assemble your die, the rest is card size, paper and colour choice as well as embellishments! You can change the look of your card every time you use the dies. 😊

This blog uses affiliate links whenever possible. This means, that at no cost to you, if you make a purchase through one of my affiliate links that I may receive a small commission from your purchase. I only link products that I own, love and use for my card making!

Any supplies I'm unable to link are listed at the very bottom of my post.


Additional Supplies:
April 2022 Sheetload of Cards
Hello cardstock scraps
Charcoal Stardream cardstock scraps
Shimmer Spray
White card stock - Accent Opaque Digital Super Smooth (Amazon .ca)

Tuesday, 6 July 2021

Circle Tag Book with Ice Cream Cones


Hello!  It's time for Karen Burniston's July Designer Challenge, and she challenged her Design Team to create a card using either the Tag Book or the Circle Tag Book. 

Every year I send Ice Cream cards to my kids in honour of my Mom. When she was a little girl there was a parade in their small town each July and afterwards her dad (my Grandpa) would take her for an ice cream soda. She made sure to take my brother and I for ice cream on this day each July and I did the same with my kids and now my grandkids. When my Mom lived away from us for a few years, I started sending her Ice Cream themed cards since we couldn't be together for an ice cream sundae and now I make sure to send my kids and my brother an ice cream card in July.

That is why I made an ice cream card for the challenge!  I have all the details on YouTube:  


As I said in the video, I chose to add the Evergreen Pivot Panels inside instead of the insert from the Circle Tag Book. I added it upside down then snipped off the hanging holes from the ice cream charms in the Sweet Treats set.


The ice cream scoops were die cut from glittery card stock in the patterned paper package and there are glittery bits in the patterned paper too.


Finally, here is the top view of the card.


I needed one more Ice Cream card so worked ahead and you will be seeing another one for the August Designer Challenge, only this time I used Karen Burniston's Parcel Pop Up combined with the Ice Cream Sundae Pop Up. 😊

I was also going to share  the Circle Tag Book assembly video for you, but since I really only used the outside, I'm just sharing the Evergreen Pivot Panels one only.  
Remember Karen Burniston has assembly videos for her pop up dies!  Once you know how to assemble your die, the rest is card size, paper and colour choice as well as embellishments! You can change the look of your card every time you use the dies. :-)  I always enjoy showing you different looks and ways you can use your dies once you know how to assemble them.


For your convenience I have linked many of the products used below. Some may be affiliate links which means if you use these links to purchase I may earn a small commission at NO extra cost to you.

Additional Supplies:
Patterned paper - Over the Rainbow, Recollections
Kraft card stock
Rainbow packing tape (Amazon.ca)
Ribbon
Silver cording
Enamel dots - Stampin' Up

Thanks for stopping by

Tuesday, 5 January 2021

Rainbow Hearts Slimline Pop Up Card


Hello and welcome to Karen Burniston's first Designer Challenge of 2021! 

This month KB challenged the design team to create a project with the theme 'Thinking of You' and here is my Pop Up Slimline card. I have a walk through video on YouTube HERE:


I came up with this idea late one evening when I was looking at the Heart Pivot Panels and trying to decide how I could use them in a Slimline Card. It wasn't until a few days after I finished my card that I realized I must have been influenced by Karen Burniston's November Designer Challenge Project (linked in the supply list). I used lots of happy rainbow colours - you will be seeing a lot of those from me in the next little while. I'm just craving them!


I am really excited about this idea, as I really enjoy all of the Pivot Panel die sets but really prefer Slimline cards these days. Now I can combine the two and create Slimline cards that are also Pop Ups!.Yeah!!!


Since the Thinking of You cuts as a single piece, it is easy to adhere multiple layers together as I did here using more brightly coloured card stocks.
 

Holy moly, glitter and shimmer is hard to photograph. Hopefully you could see all the shine in the video! The 12 x 12" patterned paper pad included a sheet with a large glittered sunburst but the pattern is too large to work on even a 6 x 6" square card. So I snipped small portions of each of the coloured sections and used those to cut my glittered hearts from.


Here is a birds eye view of what the card looks like:

Be sure to check out what the rest of the Design Team came up with for the challenge, their blogs are linked on the right. Karen Burniston will have her project tomorrow (Wednesday) on her blog.

To create this Slimline card, I cut two pieces of black card stock for the base. One measured 8-1/2 x 3-1/2" and the second one was 6 x 3-1/2". This smaller piece is the card front. I scored 1/2" from the left edge of the card front, which gave me a flap to wrap around and adhere to the back edge of the card for a folding card that will fit the Heart Pivot Panels. It's probably easier to see in the video than to try to explain it here. 

The Heart Pivot Panel was also cut from black card stock and assembled as per Karen Burniston's Assembly Video

The patterned paper was cut 12" x 3-1/4". I trimmed a 5-1/4" panel for the front, and a 5" piece for the inside right. The remaining piece fit perfectly on the left inside edge!


Supplies:
1088 Heart Pivot Panels - Karen Burniston
1102 Word Set 10 - Thinking of You - Karen Burniston
1151 Crosshatch Long Rectangles - Karen Burniston
1134 Flip Frame Pop Up (stitched rectangle inside card) - Karen Burniston
Karen Burniston's November Designer Challenge Project
Rainbow glitter card stock - Stampin' Up
Various card stocks
Patterned paper - Over the Rainbow, Recollections
Wink of Stella
Dot stamps - Stamps by Judity
Black Sharpie
Card size - 8.5 x 3.5", fits in a #9 or #10 Business Envelope

Thanks for stopping by today

Monday, 7 December 2020

Moose Pivot Panel Christmas Card


Hello crafty friends ...

It's Masculine Card Monday here on my blog, and I have another holiday card today using the Merry Moose stamp set and coordinating punch. On Friday I shared a 5 x 7" Shutter Card using this set and said there was just enough patterned paper leftover to create one more card - and this is that card! You can see the shutter card HERE.  

I have a walk through of my card on YouTube as well: 

Between the two cards I was able to use up that entire 12 x 12" sheet of double sided patterned paper. Woo hoo - I love to use things up! The moose on the card front was punched from Kraft card stock and spritzed with a gold shimmer spray.


Inside I used the Evergreen Pivot Panels, a die set by Karen Burniston. Using a gold gel pen I added details to each tree and also to the stars above the trees. 


Whenever I give someone a card made with one of the Pivot Panels, they turn it over to view it from the top. So ... here is a top view for you!


I'll be back tomorrow with another holiday project.

Supplies:
1062 Evergreen Pivot Panels - Karen Burniston
Patterned paper - Websters pages
Sakura gold gel pen
Shimmer spray
Merry Moose stamps and punch - Stampin' Up
Banners Pick A Punch - Stampin' Up
Circle dies - Hero Arts
Snowflake Peel-Off's - Elizabeth Craft Designs
Gold Nuvo Shimmer Pen
Card stocks - stash
Card size - wide A2 (5.5 x 4.25")

Thanks for stopping by today