Showing posts with label Slimline Card. Show all posts

Thursday, 11 September 2025

Piano Teacher Slimline Thank You Card


Whoa - it’s been ages since I’ve posted! I took a lot of time off this summer, spending it with family and friends instead of in my craft room. Of course, we didn’t have great weather this summer so it would have been a perfect excuse to craft, but … … …

I did manage to make a few cards here and there - and even got photos of them, but haven’t yet shared them so I will have some new content soon. Meanwhile,  this is the card I made for our youngest granddaughter’s (amazing) piano teacher at the end of June and she said he loved it.  I used dies & stamps by Karen Burniston including the Music Charms for the Grand Piano. It got sprayed with shimmer spray and I popped up the lid with a black foam dot.


Inside is the Piano Keys Pop Up - how fun, right? Two of them fit perfectly inside a Slimline card and I left room for her to write him a note.


Side view so you can see that the black keys are raised above the white ones. 


Supplies used:
Patterned paper - Guilded Ink, Recollections
Piano Keys Pop Up - Karen Burniston
Music Charms - Karen Burniston
Crosshatch Long Rectangles - Karen Burniston
Thanks - Biggest Wish, Stampin’ Up
Wink of Stella
Just A - Music Sentiments, Karen Burniston
Gold foil card stock
Glitter Dots flat adhesive stickers 

Thursday, 13 March 2025

Slimline St. Patricks Day Card


added stickers to white card stock for stability


Supplies used:
Patterned paper - Slimline St. Patrick's Day - Whimsy Stamps
Ephemera - Lots o' Luck Odds & Ends, Doodlebug
Shamrock stickers - American Crafts - old, from my stash
Glitter Dots
Inside - Shamrocks4us - the Stamps of Life
Shamrock die - Cut Ups, Riley & Co
Stickers - old, stash

Monday, 27 January 2025

Slimline 'New Dog' Card


It's Masculine Card Monday here on my blog, and today I'm sharing the card I made for friends who welcomed a new dog into their family.

It was fun to pull out this bone shaped slimline die set (Whimsy Stamps) for their card. Slimline cards are hard to photograph in a normal square shape for social media, so in the photo below I inserted a pic of the inside, where we wrote our personal message.


Supplies used:
Slimline Dog Bone set - Whimsy Stamps
Patterned paper - Gilded Ink, Recollections
Words/Dog stamps - Dog Happiness, Frantic Stamper
Hearts - Hero Arts
Pops of Color - Scrapbook.com

Saturday, 9 November 2024

Harvest Slimline Card


I made so many Fall & Thanksgiving cards last year that I didn't need to make any this year. Then, I ran out of time and didn't get any mailed for our Canadian Thanksgiving in October, so now I have lots for next year too. Sheesh. At least I can mail cards to our American friends & family this month. I found this single 12x12" sheet of fall themed paper in my stash and decided to use it up. I made 4 different sized cards and will be sharing them throughout the week. 

So far I have shared a 5x7" fun fold, and a standard A2 sized card. Today Is a Slimline card! I have these Kraft #10 business envelopes and they are perfect for fall cards. I used stickers to decorate both the envelope and the inside of the card, which is shown a bit further down the post.

I love the Happy Fall die from Pink & Main and have used it many times over the years during the fall season. For this card I lightly sponged a deeper orange in the centre of the die cut then added Wink of Stella for a little sparkle & Shine. The pumpkin started off as a shaker, but I decided I didn't want to add extra postage so instead created the shaker with thin foam tape. That gave me less bulk, and some of the filler is thin and does move around but not enough that I would call it a shaker.  Still, I liked the look. 


Below is a peek at the inside, where I added washi tape to the bottom of an off white confetti panel then a big focal sticker. 


Supplies used:
Patterned paper - Fall Harvest, Echo Park
Narrow gold tape - Amazon .ca
Stitched Pumpkin Frame - Lawn Fawn
Outside In Stitched Pumpkin - Lawn Fawn
Shimmering Fallen Leaves - Kat Scrappiness
Happy Fall - Pink & Main
Gold Lunar Paste
Shimmer Spray
Wash Tape - old, my stash
Stickers - old, from my stash
Glitter Dots stickers - Ecstasy Crafts

Wednesday, 23 October 2024

Halloween Slimline Duo


I love making Halloween cards - and when I went through my bin to get this years ready to mail, I didn't have enough! Which surprised me as I usually have lots leftover at the end of October each year. I pulled out this Slimline paper pad,  found two panels that would work for Halloween and these are the cards I came up with.

I have had these 3-d elements in my stash for YEARS. I probably hoarded them for the first couple of years but I'm over that and have been making an effort to USE my supplies and not trying to make them last for the rest of my life. Ha.


Aren't these ones cute? The frogs came with the googly eyes - so fun. I added a stamped sentiment with thin foam tape to finish off the card front.


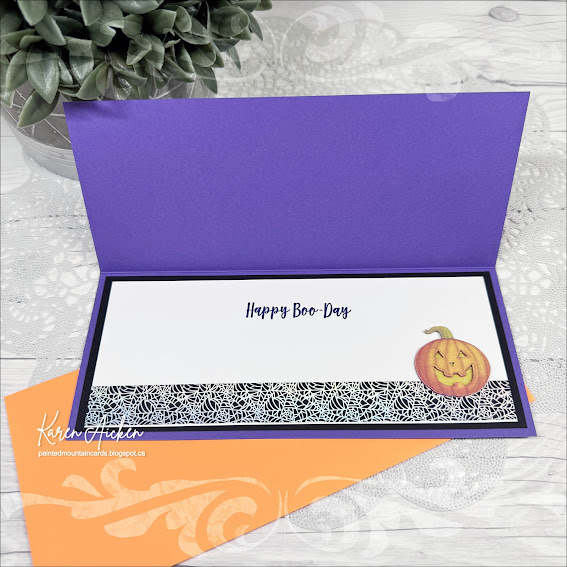
I stamped the sentiment on a white panel that had holographic washi tape wrapped around the bottom edge (another item from my stash) and added another pumpkin element. The panel was matted with black and added inside the card.


I chose a different package of elements for the second card, and added the die cut BOO instead of a stamped sentiment.


It's hard to see in the photo, but the purple BOO layer was sprayed with Shimmer Spray.


The inside was done the same as the first card ...


Supplies used:
Patterned paper panel - Slimline Paper Pack 'Enchanted Forest", Whimsy Stamps
3-d Elements - old, from my stash
BOO die - Photoplay
Shimmer Spray
Inside greetings - Papertrey Ink
Catherine Pooler coloured inks
Sponge dauber - Ranger
Washi tape - old, from my stash
Happy Boo day - Sassy Pants Spooktacular, MFT Stamps


Wednesday, 9 October 2024

Slimline Christmas Pop Up Card


I completely forgot to share a Christmas card in September! We ended up doing a camping trip down the Oregon coast, we've been busy since we got back and I'm having trouble finding time to get in my craft room. But this is the holiday card I made in September ... just a little late, ha ha.


I went with a Slimline card and the patterned paper is VERY sparkly. I've had the paper pad for a few years and there is also a coordinating ephemera pack that I used for the words on the front and the elements inside. The scene was at the bottom of a 12x12" sheet in the paper pad, and I thought it worked well for a Slimline.


The pop-up arms come from Karen Burniston's Mini Pops Pop Up and the signing block was die cut with her Rectangles & Labels set. 


The Canadian Thanksgiving is this coming weekend, and I didn't get a single card in the mail for it. Hoping I can dig out the extra Halloween cards I made last year and get those in the mail or I'll miss the boat on that occasion too! 

Supplies used:
Patterned paper  & Ephemera- Sugar Plum, My Minds Eye
Mini Pop Pop Up - Karen Burniston
Rectangle and Labels Crosshatch - Karen Burniston
Sentiment - Christmas Classics - Stampin' Up
Sakura stardust pen
Catherine Pooler coloured inks
Stickles glitter glue

Wednesday, 14 August 2024

Slimline 'Thinking of You' Card


After making the Pop-Up Birthday Card last week, I wanted to use up the leftover paper pieces and not just store them away. This is the card I came up with, one I can send to a friend for Happy Mail.

The diagonal strip is matted with rainbow holographic cardstock for some shine, and the flowers were added to a scalloped vellum circle.


I always like this sentiment, since I do so much texting these days.


Supplies used:
Patterned paper - Miss Caroline, My Minds Eye
Rainbow Holographic Cardstock - Recollections
'Hey You' die - Pinkfresh Studios
Vellum - Stampin' Up
Scallop Circles - Divinity Desixgns
Beautiful Blossoms Paper Die Duo Set 1 - Divinity Designs
Self Adhesive gem stickers - Dazzles
Wink of Stella
Slim Lacy Layers - Waffle Flowers
Inside Sentiment - Just Because, Gina K

Wednesday, 17 July 2024

'Sweet Friend' Slimline Diamond Z-Fold Card


I have a couple of friends dealing with health issues, so I've been making cards to send for Happy Mail. This is one of them ... a Slimline Diamond Z-Fold Card. I made a number of this type of card back in 2022 in a 5x7" size. I loved making them, so I also came up with the measurements and a tutorial for making this Slimline size. You can find that tutorial HERE, and the measurements are at the end of my post.


I usually have a Wish List for Stampin' Up items but rarely order everything on that list. Sometimes I wait and wait and by the time I decide I'd really like/use a set, it's either discontinued or out of stock or .....     So I keep an eye on a Facebook group for Canadian's selling retired SU products. This Honey Bee Bundle is one of those sets - it had been retired for a while before it popped up on that group and I claimed it right away. I've had it for over a year now, and it's one of those sets I get a lot of use out of. 


The stamped & die cut bees were coloured with alcohol markers and I added Wink of Stella glimmer paint to their wings. On the inner diamond, there is the honeycomb die cut as well as a small sentiment (from a different set). I will sign on the blank white diamond when I go to send the card.


While I prefer a Slimline card to measure 3.5 x 8.5", this one is a full 4 x 8.5" to give me room to make the diamonds this size. It fits perfectly in a #10 business envelope for mailing, and this one will mail for a single stamp!


Measurements for Diamond Z-Fold Slimline Card by Karen Aicken 

Card base - 8 x 8.5". With the 8" side at the top, score at 2" and 4". The 4" scoreline is the center, so fold your card in half along that scoreline. Then fold the front right flap back to the outside along the 2" scoreline.

Patterned paper - TWO 1.75 x 8.25" pieces and ONE 3.75 x 8.25" piece. I don't always use the two smaller ones, often just adding one to the front and leaving the inside one undecorated. It's entirely up to you.

Diamonds - TWO 2.75" squares and ONE 2-1/2" square

Patterned paper (BE MINDFUL OF THE PATTERNED PAPER IF IT HAS A DIRECTIONAL PATTERN) TWO 2.5" squares and ONE 2.25" square.

Signing block - 2.25" cardstock square with a 2" square of white or light cardstock of your choice.

Pop Up strip - 4 x 3". With the 4" side at the top, score at 1, 2 & 3"
Assemble as shown in the video.


Supplies used:
Patterned paper - Bee Happy, Echo Parl
Honey Bee Bundle - Stampin' Up
Catherine Pooler coloured inks
Alcohol markers
Tasteful Label dies - Stampin' Up
1-1/2" square die - Hero Arts
Inside sentiment - Hand Delivered, Stampin' Up
Nesting circles - Hero Arts
Blending sponges
Wink of Stella


Friday, 28 June 2024

Holiday Slimline Wiper Card Duo


Welcome to Fun Fold Friday here on my blog!  I have two more holiday cards to add to my bin for Christmas 2024 - these ones are Slimline sized Wiper Cards and I have a walkthrough of these on YouTube


I used Slimline sized patterned paper along with a Wiper Card die set made for a 5x7" card - I love getting more uses out of my dies.  I also used the 'Above It All' stamp/die bundle that I got from Stampin' Up last year. Since we live in the foothills of the Rocky Mountains, I knew I could use this die set year round. You can take the gondola up to the top of Tunnel Mountain in Banff in the Spring & Summer for some spectacular views. Also in summer you can also take a gondola up Sunshine Mountain to hike around on top of the ski hill to see all the beautiful wildflowers.

In the photo above, you can see the card fronts and the piece that comes out when you pull on the sides. In the photo below you can see the back sides of both cards when they are closed. Yes, even though the papers are exactly the same the position of the prints are slightly different - I explain that in my video. Hint - I have a REALLY hard time making Wiper Cards - they just don't make sense in my brain. Ha.


Finally, the lower photo shows the back of the card in the open position.


Note - I lined up the die onto the right side of the papers and held it in place with removable tape before die cutting (I showed this in the video). Also, I trimmed about 1/4" from the top of the wiper piece and rounded the corners so it fit inside the card a little better. Since the card size is smaller than the 5x7" that the die was designed for I needed to make that adjustment. That part was easy peasy! 


Supplies used: 
Patterned paper - Slimline paper pack, Frozen - Whimsy Stamps
5x7" Rectangle Wiper Card die set - Sam Calcott, Made To Surprise/Mixed Up Crafts
Corner rounder
Push here - Lawn Fawn
Labels Crosshatch - Karen Burniston
Catherine Pooler coloured inks
Above it All stamps & dies - Stampin' Up
Silver Snowflake peel off stickers


Wednesday, 8 May 2024

'On my Mind' Slimline Card


Well this is the last card I'll make with this patterned paper. Several of the patterns in the package are just too big for cardmaking. I've used most of them, including the ones I liked the best and I'm calling it done. The decorative elements I used on this card were actually fussy cut from one of the sheets!

I love that little girl holding the large bouquet.  It's hard to see in the photos, but I added clear glitter glue to the flower centres for some sparkle.


Below is a peek at the inside. I added more patterned paper, and a stamped sentiment onto a white panel that was inked with blending brushes, then ... a few more fussy cut elements.


Supplies used:
Patterned paper - Circle of Love, Stamperia
Slim Lacy Layers - Waffle Flower
Outside words - Essential Sentiments, MFT Stamps
Inside words - Good Feelings, Stampin' Up
Blending Brushes
Pops of Color, Snowflake - Scrapbook .com
Catherine Pooler coloured inks

Monday, 29 April 2024

Dog Bone Shaped Sympathy Card


I decided to make a pet sympathy card to have on hand, so pulled out the Slimline Dog Bone die from Whimsy Stamps. I also made it into a shaped card! To do this I die cut the bone three times. Twice from white card stock and once from the rainbow slimline patterned paper. After doing the stamping on the rainbow piece and adding the die cut dog, I adhered it to one of the white bones. For the remaining white bone, I scored those top bumps about 1/4" down from the top. Adding adhesive ABOVE the score line I attached the two pieces together. Ta dah - a shaped top folding card!


Now if I'd been smart, I would have done the inside stamping before I adhered the back to the card front. Instead, I stamped on a fishtail banner and adhered it over a scrap of the rainbow paper inside.


One more look ...


Supplies used:
Patterned paper -  Rainbow Magic Slimline paper pad,  Whimsy Stamps
Slimline Dog Bone die set - Whimsy Stamps
Pawfect Sentiments - Waffle Flower
Get Grounded stamps - Ink Blot Shop
Critter Condolences - MFT Stamps
Wink of Stella

Wednesday, 3 April 2024

Slimline Thinking Of You Card


Today I'm sharing a Slimline card I made to send to a friend who recently had surgery. The cute dogs came from the bottom of a 12 x 12" sheet of patterned paper - it seemed perfectly sized for a Slimline card! The sentiment  (using dies by Karen Burniston) was die cut from white card stock and inked with blending brushes.


I added some Nuvo Glaze to the flower centres and dog noses for a little shimmer & shine.


Below is a peek at the inside where you can see the rest of the die cut sentiment.


Supplies used:
Patterned paper - Circle of Love,  Stamperia
Slim Lacy Layers - Waffle Flower
Word Set 10 - Thinking of You, Karen Burniston
Blending brushes
Catherine Pooler coloured inks
Butterfly punch - Stampin' Up
Pops of Color, Snowflake - Scrapbook .com
Essential Sentiments - MFT Stamps

Thursday, 7 March 2024

Slimline Cocktail Birthday Card


When I was flipping through this slimline paper pad, I saw the cocktail panel and decided to make it into a birthday card for a friend. I cut it down, then added it to another patterned panel from the package. The background piece was adhered to the slimline card base without trimming it down. 

I added some glitter dots above the cocktails, then die cut Karen Burniston's CHEERS! from rainbow holographic cardstock. I added a couple of fishtail banners using the same holographic cardstock and popped those up with foam tape.


Below is the inside of the card, with a closeup photo below that. 😊


I cut the scalloped circle from the same Rainbow Holographic cardstock as I used on the front, then used the stitched circle to die cut the stamped sentiment. The sentiment is a Funnybones stamp from Riley & Company.


Supplies used:
Patterned paper panel (Slimline sized) - Welcome to Paradise, Asuka Studio
Wink of Stella
Cheers die - Karen Burniston
Rainbow Holographic cardstock - Recollections
Glitter Dots
Double Stitched Circles - Divinity Designs
Scallop Circles - Divinity Designs
Margarita stamp inside - Funny Bones, Riley & Company

Wednesday, 28 February 2024

Christmas Card Duo in Blues


I want to work on my holiday cards throughout the year, hopefully making a couple each month. Here are the two cards I made in February - a Slimline and a 5x7" & card. I'm loving the winter scene patterned paper (Hunkydory) and managed to get both cards out of a single 8x8" sheet!

I haven't used vellum in awhile, so that is how I added the stamped sentiment. I like that you can still see the scene through the vellum. Of course I added the Winter Owl die cut, which I LOVE ... and it was cut from white pearl cardstock then lightly inked on the feathers with brown ink. I added a scrap of white cardstock behind the body to keep all those fallaway bits in the die cut, but did let the ones on the wings fall away.


Some silver snowflake stickers & Glitter Dots added the holiday sparkle I like and my card fronts were done.


Here is a peek at the inside of the cards:


Supplies used:
Patterned paper - Frosted Forests & Falling Flakes, Hunkydory (now retired)
Vellum
Words - Christmas Classics - Stampin' Up
Catherine Pooler coloured inks
Silver Snowflake Peel Offs - Stamp On It
Glitter Dots - Ecstasy Crafts
Winter Owls Bundle - Stampin' Up
White Pearl cardstock
Inside sentiment - Wonderful Christmas - Waffle Flower