Showing posts with label Wiper Card. Show all posts

Friday, 28 June 2024

Holiday Slimline Wiper Card Duo


Welcome to Fun Fold Friday here on my blog!  I have two more holiday cards to add to my bin for Christmas 2024 - these ones are Slimline sized Wiper Cards and I have a walkthrough of these on YouTube


I used Slimline sized patterned paper along with a Wiper Card die set made for a 5x7" card - I love getting more uses out of my dies.  I also used the 'Above It All' stamp/die bundle that I got from Stampin' Up last year. Since we live in the foothills of the Rocky Mountains, I knew I could use this die set year round. You can take the gondola up to the top of Tunnel Mountain in Banff in the Spring & Summer for some spectacular views. Also in summer you can also take a gondola up Sunshine Mountain to hike around on top of the ski hill to see all the beautiful wildflowers.

In the photo above, you can see the card fronts and the piece that comes out when you pull on the sides. In the photo below you can see the back sides of both cards when they are closed. Yes, even though the papers are exactly the same the position of the prints are slightly different - I explain that in my video. Hint - I have a REALLY hard time making Wiper Cards - they just don't make sense in my brain. Ha.


Finally, the lower photo shows the back of the card in the open position.


Note - I lined up the die onto the right side of the papers and held it in place with removable tape before die cutting (I showed this in the video). Also, I trimmed about 1/4" from the top of the wiper piece and rounded the corners so it fit inside the card a little better. Since the card size is smaller than the 5x7" that the die was designed for I needed to make that adjustment. That part was easy peasy! 


Supplies used: 
Patterned paper - Slimline paper pack, Frozen - Whimsy Stamps
5x7" Rectangle Wiper Card die set - Sam Calcott, Made To Surprise/Mixed Up Crafts
Corner rounder
Push here - Lawn Fawn
Labels Crosshatch - Karen Burniston
Catherine Pooler coloured inks
Above it All stamps & dies - Stampin' Up
Silver Snowflake peel off stickers


Tuesday, 1 August 2023

First Birthday Wiper Card


I have been getting good use out of the 5x7" Wiper die set that I got for my (February) Birthday. I hadn't done much purchasing in several months, so when Craft Stash had a great sale, I used my Birthday $$ from the family to get several interactive dies. 😊


This one was decorated with some sparkly patterned paper from my stash, and a bunch of Doodlebug elements. I added sparkle to most of the elements with Stickles. The die cut sentiment along the bottom edge came with the Wiper Die set. 


When you pull on the sides, the little kitty & balloons pop up and into view.


Below is the back of the card, where I added the verse and a few more embellishments.


Having been asked how many cards I make I thought it would be fun to keep track this year. Many of my posts include more than a single card or project and below is my tally. 

Card Tally for 2023
January - 53 cards
February - 56 cards
March - 55 cards
April - 32 cards
May - 43 cards
June - 34 cards
July - 56 cards
August so far - 1 card

I decided to cancel the subscription that provided linked thumbnails to what products I used on my cards. It was costing me too much out of pocket each month, so I’m back to listing what I used below.

Supplies:
5 x 7" Wiper card - Mixed Up Crafts, bought through Craft Stash
Patterned paper - Baby Girl Stack, DCWV (old, from my stash)
Odds & Ends "Hey Cupcake' - Doodlebug Designs
White gel pen
Stickles
Pull stamp - from an old Stampin' Up Paper Pumpkin kit
Gumdrops (enamel dots) - Celebration Gumdrops, Your Next Stamp
Sentiment - Lots of BD2Stamp, the Stamps of Life
Various cardstocks
Catherine Pooler Inks

Friday, 28 July 2023

5x7" Wiper Card for a Music Teacher


It's Fun Fold Friday here on my blog and today I'm sharing a Wiper Card. Our youngest granddaughter takes piano lessons, so I made her a card to give her teacher at the end of June. 


I pulled out some (retired) masculine print patterned paper and an old music note stamp. After stamping the music notes I fussy cut them out and added Nuvo Glaze for some shine.


When you pull the sides, a rectangle pops up with music notes popped up with foam tape. 


There was lots of room on the back of the card for her to write him a message and sign her name, since 6 years olds write big. 🥰

Having been asked how many cards I make I thought it would be fun to keep track this year. Many of my posts include more than a single card or project and below is my tally. 

Card Tally for 2023
January - 53 cards
February - 56 cards
March - 55 cards
April - 32 cards
May - 43 cards
June - 34 cards
July so far - 55 cards

You may have noticed the affiliate thumbnails are no longer showing on my blog posts. That is because it costs money every month to share those links, and the past few months I havent made nearly enough sales to cover the cost. I would rather spend that money on craft supplies, than continue to pay out of pocket for a feature that viewers arent using.  I cancelled my subscription and will go back to just listing what I used in case anyone is curious about what I used.

Supplies:
5 x 7 Rectangle Wiper - Made To Surprise, Sam Calcott of Mixed Up Crafts
Patterned paper - Urban Underground, Stampin' Up (retired)
Giant Thanks So Much - Lawn Fawn
Music note - All Night Media (wood mount!)
Music - Stampendous (retired)
Nuvo Glaze - Tonic
Black Dazzles Peel Off's
PULL stamp - Paper Pumpkin Many Happy Birthday's - Stampin' Up (retired)


Tuesday, 20 June 2023

Sealife Slimline Wiper Card


I just adore this Slimline paper pad, so pulled it out again and had the idea to use the 5 x 7" Wiper die set with it to create a Slimline sized Wiper card. It worked perfectly - and since I have a number of different Slimline paper pads, I will be doing this again! NOTE: Since the dies are larger than the paper I used removable tape to line up the die so it didn't shift when going through my die cutting machine.


It's hard to see in the photos, but I added a number of clear enamel dots for a litlte shine and they resemble water bubbles. The stamped and die cut sentiment was popped up with foam tape.


Below is the back side, with a humorous sentiment and some stamped images. I added the same images to the envelope as well. 


Using a small stitched circle die and a scrap of the patterned paper, I cut the circle in half and stamped PULL on either side. These were attached to each side where the recipient would pull to reveal the wiper that is hidden inside. I have watched non card makers when they receive a wiper card and they aren't sure how to get it open, so this solves that problem. Ha.

Having been asked how many cards I make I thought it would be fun to keep track this year. Many of my posts include more than a single card or project and below is my tally. 

Card Tally for 2023
January - 53 cards
February - 56 cards
March - 55 cards
April - 32 cards
May - 43 cards
June so far - 21 cards

Additional Supplies:
Pull stamp - Paper Pumpkin February '17 Many Happy Birthday's (Stampin' Up)
Gems/resin dots - No Matter the Weather Paper Pumpkin kit (Mar 2020), Stampin' Up
Seas the Day stamp - Stampin' Up
White cardstock
5x7" Wiper Card - Sam Calcott, Mixed Up Crafts

This blog uses affiliate links whenever possible. This means, if you make a purchase through one of my affiliate links that you pay the same amount but I may receive a small commission from your purchase. I only link products that I own, love and use for my card making and not every link below is an affiliate one! 😊

Sunday, 18 June 2023

Birthday Balloons Wiper Card


Today I'm sharing the 6th edition to my Monthly Series: New Fun Folds. I got this die set for my February Birthday, and while I played with it in early March I'm just now getting the card shared. I was saving it for this edition, as it IS a new (to me) fun fold die set. It is the "5 x 7" Wiper Card" die set by Sam Calcott at Mixed Up Crafts. We had been in Arizona over my birthday so I was able to get the set with my birthday $$ from Craft Stash US. 


When you pull on the sides, a decorated piece pops up over the top edge. I have been having a lot of fun with this scenic patterned paper, which was a 'free with purchase' from Stampin' Up. I added the Celebrate (Karen Burniston) and die cut balloons (Lawn Fawn). The balloons were die cut from rainbow holographic card stock and I added the highlights with a white paint pen.


Adding a white panel on the back gave me lots of room for a large stamped sentiment and a couple of balloons.


Having been asked how many cards I make I thought it would be fun to keep track this year. Many of my posts include more than a single card or project and below is my tally. 

Card Tally for 2023
January - 53 cards
February - 56 cards
March - 55 cards
April - 32 cards
May - 43 cards
June so far - 20 cards

Additional Supplies:
5 x 7" Rectangle Wiper Card Die Set - Mixed Up Crafts
Green cardstock
White cardstock
Pull stamp - SU Paper Pumpkin Feb '17 'Many Happy Birthday's
Patterned paper - Enjoy the Journey, Stampin' Up
Rainbow Holographic cardstock - Recollections

This blog uses affiliate links whenever possible. This means, if you make a purchase through one of my affiliate links that you pay the same amount but I may receive a small commission from your purchase. I only link products that I own, love and use for my card making and not every link below is an affiliate one! 😊


Wednesday, 12 April 2023

Slimline Wiper Birthday Card


Today I'm sharing the 4th card in my monthly series: Throwback Fun Folds using a Wiper die set by Lynda Kanase at iCrafter. When they first started out I was on their Design Team and I loved their Wiper dies - this one is the Hello Sunshine Wiper Insert. It is still available, which is great as a lot of my older fun fold dies are long retired. Back then I was also tickled that they can work in a Slimline card so that is what I did today. 


This birthday card was made for a grandson who loves Pop Up cards. He was disappointed that his St. Patrick's Day card didn't have a pop up inside, so I made sure his birthday card did. 😊 I added the Gus & Gertie stamps (Taylored Expressions) because I just love them and haven't used them nearly enough.

Below is a peek at the inside and the dog/balloons slide up from the left with the clouds sliding up from the right as the card is opened.


I added Karen Burniston's Celebrate to the front of the insert piece and stamped the sentiment off to the left. The balloons and dog noses are nice and shiny with a Nuvo Glaze coating.


Having been asked how many cards I make I thought it would be fun to keep track this year. Many of my posts include more than a single card or project and below is my tally. 

Card Tally for 2023
January - 53 cards
February - 56 cards
March - 55 Cards
April so far - 15 Cards

Additional Supplies:
Alcohol markers
White cardstock
Dark teal cardstock
Cloud patterned paper - Flea Market, Doodlebug Designs (from my stash)

This blog uses affiliate links whenever possible. This means, if you make a purchase through one of my affiliate links that you pay the same amount but I may receive a small commission from your purchase. I only link products that I own, love and use for my card making and not every link below is an affiliate one! 😊

Monday, 25 May 2020

Black and Gold Masculine Birthday Wiper Card


Hello crafty friends ...

It's Masculine Card Monday here on my blog and today I'm sharing a fun Wiper Card that was actually made in November as a show sample for i-crafter's launch at  Creativation in January.

The card front uses a couple of i-crafter dies - the Happy comes from the Zip Gift Tag (January release), and the cool 'splat' die is from the Comic Word die set which is also part of the May release.


I backed the 'happy' with gold foil card stock and outlined the 'splat' with a gold gel pen. It's subtle in the photos, but I also outlined the decorative panel on the front with a gold gel pen. I do this a lot but often forget to point it out. The metallic in the gel pen catches the light and it's a nice effect.


Remember you can always see my interactive cards in action HERE, on my YouTube Channel!


I offset the Wiper Insert on this card, moving it all the way to the left and only using one arm instead of two. You can see the card I made with both arms loaded with balloons on my blog post HERE if you are interested.


I used neutral colours with pops of gold, and the sentiment was a cut apart in the 6 x 6" paper pad I was using for the card. The balloons were cut from both gold foil and black glossy card stocks and I was SO happy with how they looked when they were all assembled and adhered into the card.

I really like this layered Happy Birthday Die, and can see getting lots of use out of it. It's a great size and has a unique font.


I was happy that it was going to be a booth sample, but even more pleased when Lynda shared it again in her May Release Preview Video. When I make a show sample, I make sure the cards are nice and sturdy and also use lots of adhesive. They are handled a LOT and you want them to hold up well. Obviously this one did, as shown in the video which you can see HERE if you are interested in seeing the entire May i-crafter release.

Supplies:
222054 Happy Birthday Wiper Insert - Lynda Kanase, iCrafter
222041 Comic Words - Lynda Kanase, iCrafter
222010 Zip Gift Tags (happy) - Lynda Kanase, iCrafter
Kraft, white and black card socks
Patterned paper - Spring Fling, Pebbles
Rectangle dies - Hero Arts
Black Mirror card stock - Tonic Studios
Gold foil card stock - Stampin' Up
Word - Cut apart from the patterned paper above
Sakura gold gel pen

Card size:  Standard A2, 4.25 x 5.5"

Thanks for stopping by today

Thursday, 14 May 2020

Balloon Bouquet Wiper Card


Hello crafty friends ...

Today I'm sharing another Wiper Card, this one uses the new Happy Birthday Wiper Insert by i-crafter. I made this card last November (!!) so Lynda would have it for the i-crafter launch at Creativation in January. I didn't want to show it on my blog until the die set was available and since it is in the May release I can finally share it!


I added a balloon bouquet to the card front, inking the edges of the balloons and adding white highlights with a gel pen.


Remember you can always see my interactive cards in action HERE, on my YouTube Channel


This card started as a 5 x 5" square card. I made the inside, with the patterned paper layers and the Happy Birthday Wiper Insert. Then I got to work on the balloons and got everything secured inside. At that point I realized the balloons stuck out of the sides when the card was closed - clearly a lack of planning on my part. Not one to just toss a card, I added wider panels to the front and back and was pleased with how it looked!


For the Happy Birthday element I cut the white shadow layer from both white card stock and white fun foam, then adhered the inked Happy Birthday to those layers for a nice thick embellishment.


I specifically chose the colours of this card because they are the i-crafter colours and I wanted it to look good as a booth sample. I was thrilled that Lynda also showed it in the May Release Preview Video this month - it obviously held up well.

Supplies:
222054 Happy Birthday Wiper Insert - Lynda Kanase, iCrafter
Aqua, white and green card stocks
Patterned paper inside - Picture Perfect, Queen & Company
Sakura white gel pen
Fun foam
Seam binding

Card size - 6 x 5", fits in a 5 x 7" envelope

Thanks for stopping by today

Wednesday, 13 May 2020

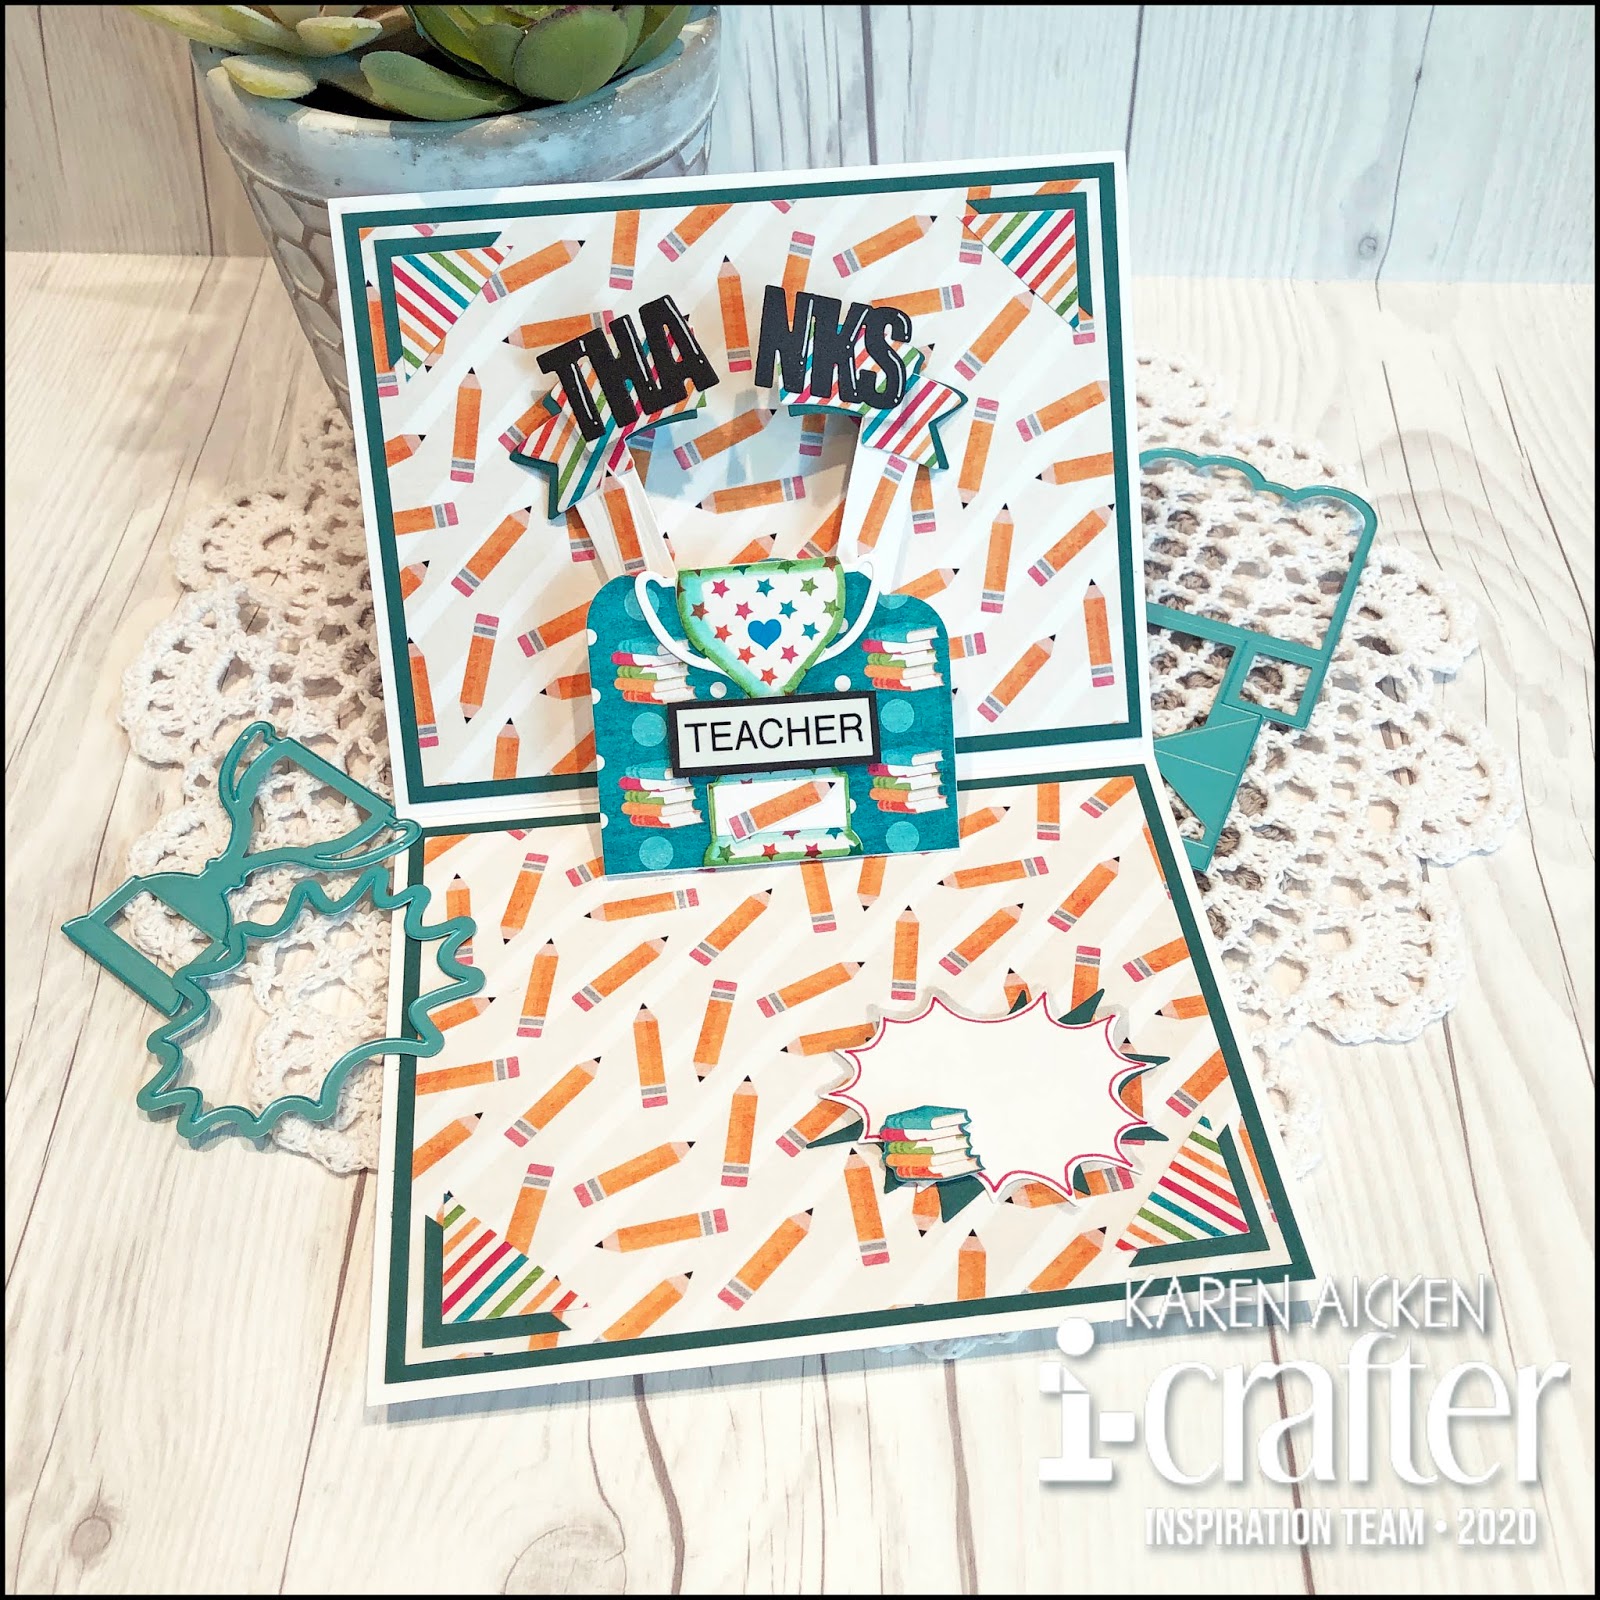
Pop Up Teacher Thank You Card


Hello crafty friends ...

Since our Grandkids teachers are still working and teaching (via Zoom) I thought I would make some Teacher Thank You Cards for them to give their teachers.

Remember you can always see my interactive cards in action, on my YouTube Channel HERE.


Last month's i-crafter release included the Carly Alphabet and it's such a cute font and size it's one I'll be reaching for time and time again.


This month i-crafter is releasing another Wiper Insert - this one is the Happy Birthday Wiper Insert. Since I've already made two Birthday Cards using it, I wanted to share how versatile it can be by combining the arms and THANKS from the previously released Pop Up Wiper Card. All the Wiper Inserts work well with each other (a question I'm often asked).


Another new item being released this month is the Comic Words and here I used one of the splats as a signing block.


Also new this month is the Best Dad die set ... and I used the Trophy from that set for my teacher element. The word TEACHER was done with a label maker.  I also added a tiny blue heart sticker to the centre of the trophy.


Tomorrow I have another i-crafter Wiper Card, and I'll be sharing another one next week!

Supplies:
222054 Happy Birthday Wiper Insert - i-crafter
222011 Pop Up Wiper Insert - i-crafter
222049 Best Dad die set - i-crafter
222041 Comic Words - i-crafter
222009 Alphabet Carly - i-crafter
White card and Envelope - Michaels
Patterned paper - School Days, Miss Kate’s Cutables
Teal, White and black card stocks
Copic markers
Brother Label Maker
Sakura White gel pen
Fine Point Marker
Water Brush
Seam Binding
Nuvo Drops

Card size - 6-1/2 x 5”

Thanks for stopping by today

Wednesday, 8 April 2020

Roses & Stars Mother's Day Wiper Card

Hello crafty friends ...

I'm on the i-crafter blog today sharing my Inspiration Team project. Here is the card front, where I kept things fairly simple by using a printed panel from the patterned paper pad with some popped up fussy cut elements.


Remember you can always see my interactive card videos HERE on YouTube.


The printed elements have some foiling to them and I also added Stickles for even more shimmer and shine.


I kept the front simple, because all the details are on the inside! Since I'm a huge fan of the i-crafter wiper die sets, I used the Pop Up Wiper Insert for this card. Fussy cut paper elements are on the wiper arms, and they move towards the centre when the card opens.


I die cut the Rose Heart two times - once from the patterned paper and once from white shimmer card stock. I inlay the white shimmer pieces into the patterned paper outline - it's a technique that is a little finicky but not difficult at all. Its' worth the effort for a special occasion like a Mother's Day card! It's hard to see all the shimmer in the photos, it's much prettier in real life.


Our eldest daughter loves roses, so this card was made especially for her for Mother's Day.


Supplies:
222039 Rose Heart - i-crafter
222011 Pop Up Wiper Insert - i-crafter
Patterned paper and cut aparts -  Moon Flower Magic, Craft Smart (Michaels)
White shimmer card stock
White card stock
Fun foam
Brother labeller
Stickles

Card size - 6 x 6", fits in a square envelope that I will be hand delivering to our daughter.

Thanks for stopping by today

Wednesday, 19 February 2020

Anniversary Wiper Pop Up Card

Hello crafty friends ...

Today I'm on the i-crafter Blog with my Inspiration Team project using i-crafter's February Release. Since I'm such a fan of the Wiper Inserts, that is what I went with again today, but also combined some additional January and February dies. 


The videos are quite small on Blogger, so if you'd like to see it larger, please check out my YouTube channel HERE.


I kept everything quite flat for ease of mailing, but it would look really nice with foam tape for dimension too. I die cut the heart from the Heart Hands Wiper Insert into the patterned paper, adhered all the pieces to some scraps of card stock then glued the heart back into the opening. You get just a hint of dimension from that extra card stock layer. The sweet greenery die is from the new Floral Garden die set.


Have you seen all the fun projects that the i-crafter Inspiration Team - and customers - are making with the Making Faces die set? So fun! Here I used them to resemble our middle daughter and hubby as this Anniversary card is for them.


I added another die cut heart and the love die, then adding some more of the greenery along the back of the card right at the fold. The banner under the signing block is from the new Pop Up Wiper Insert die set.


Supplies:
Green, pale pink, kraft, black and white card stocks
Patterned paper - K & Company
Rectangle dies - Hero Arts
Circle dies - Hero Arts
Acetate scraps
Black marker
Wink of Stella
Stickles
Nuvo Drops
Seam Binding
Sakura white gel pen

Thanks for stopping by today