Showing posts with label Pink & Main. Show all posts

Saturday, 9 November 2024

Harvest Slimline Card


I made so many Fall & Thanksgiving cards last year that I didn't need to make any this year. Then, I ran out of time and didn't get any mailed for our Canadian Thanksgiving in October, so now I have lots for next year too. Sheesh. At least I can mail cards to our American friends & family this month. I found this single 12x12" sheet of fall themed paper in my stash and decided to use it up. I made 4 different sized cards and will be sharing them throughout the week. 

So far I have shared a 5x7" fun fold, and a standard A2 sized card. Today Is a Slimline card! I have these Kraft #10 business envelopes and they are perfect for fall cards. I used stickers to decorate both the envelope and the inside of the card, which is shown a bit further down the post.

I love the Happy Fall die from Pink & Main and have used it many times over the years during the fall season. For this card I lightly sponged a deeper orange in the centre of the die cut then added Wink of Stella for a little sparkle & Shine. The pumpkin started off as a shaker, but I decided I didn't want to add extra postage so instead created the shaker with thin foam tape. That gave me less bulk, and some of the filler is thin and does move around but not enough that I would call it a shaker.  Still, I liked the look. 


Below is a peek at the inside, where I added washi tape to the bottom of an off white confetti panel then a big focal sticker. 


Supplies used:
Patterned paper - Fall Harvest, Echo Park
Narrow gold tape - Amazon .ca
Stitched Pumpkin Frame - Lawn Fawn
Outside In Stitched Pumpkin - Lawn Fawn
Shimmering Fallen Leaves - Kat Scrappiness
Happy Fall - Pink & Main
Gold Lunar Paste
Shimmer Spray
Wash Tape - old, my stash
Stickers - old, from my stash
Glitter Dots stickers - Ecstasy Crafts

Tuesday, 2 April 2024

Four Lattice Birthday Cards


These cards started with the lattice cutaway card bases from May 2016 Many Manly Occasions Paper Pumpkin kit. A few years ago I had found an 'unused' kit online for sale but then when it came, some of the card bases were missing and the person had just tossed everything into a bubble envelope so there was also some damage. I complained (which I hate to do) and they refunded my money, but then I was so disappointed that I put the kit away and hadn't made up any of the cards.

I pulled it out and had a look through the kit and made up these four cards. I decided to put aside the orange corrugated panel that is supposed to go behind the lattice and instead used some patterned paper which I liked better.


Then I went through my embellishment binder and pulled out some stickers and die cut washi tape that I thought matched the patterned paper. There is also a stamped/coloured/fussy cut dog with balloons on one of the cards. I chose whichever Happy Birthday seemed to fit in the area and added those to the front as well. Oh, and I added coordinating flat sparkly stickers to the card fronts for some birthday shine.
Inside are two stitched rectangles. One on the left to hide the back of the patterned paper and one to stamp the sentiment on. Since these cards are going to be donated to my Mom's old nursing home, I don't need to worry about the cards being too heavy to mail. I stamped the same sentiment inside all the cards. 


Supplies used:
Paper Pumpkin, Many Manly Occasions - May 2016 (Stampin' Up) retired
Patterned paper - Guilded Ink - Recollections
Stitched Rectangles Set 2 - Pink & Main
Washi tape florals - Pinkfresh Studios
Cloud punch - Stampin' Up
Stickers - old, from my stash
Dog with balloons - unknown, coloured etc many years ago.
Happy Birthday Many Ways - Catherine Pooler
Small Happy Birthday - LJD Birthday Greetings, MFT Stamps
Catherine Pooler coloured inks


Sunday, 10 March 2024

Rainbow Dog Birthday Card Duo


I'm back today with a pair of cards using those rainbow dog note cards I've been playing with lately.( I have a YouTube video sharing about those note cards HERE.)  For these two I cut the front from the back of the note cards then trimmed the fronts down to 3.75 x 5". 

Those panels were popped up on some confetti printed note cards I've had for YEARS! I added stamped sentiments matted with rainbow holographic cardstock and those were also popped up with foam tape. 

I added a little Nuvo Glaze to the dogs and then a stamped panel inside.  Apparently I didn't take a photo of the insides.


Initially I made these for my nursing home donations but I think I might end up keeping them for my stash. They just make me happy!


Supplies used:
Rainbow dog note cards - Amazon .com
Confetti print note cards - DCWV (old)
outside stamps - Anything But Basic Birthday Wishes - MFT Stamps
Rainbow Holographic Cardstock - Recollections
Catherine Pooler coloured inks
Dog Happiness - Frantic Stamper
Nuvo Glaze
Stitched rectangle dies - Pink & Main
Inside stamp - Special Sentiments, Penny Black

Monday, 29 January 2024

Seven Masculine Birthday Cards


Welcome to Masculine Card Monday here on my blog!

Back in September I pulled out this retired 6x6" paper pad as I knew there would be some strips to use up.  I decided to use those strips and create another August Sheetload of Cards, 😊 making masculine birthday cards for donating to my Mom's old nursing home.  Then I made the pop up Thanksgiving cards (see those HERE) and I was able to use up the remainder of the paper pad!

Once again, I didn't get these cards posted in September because of sharing various holiday cards, but I can finally share them.

I'm still loving the August 2023 Sheetload of cards. but these ones were made back when it was still fresh in my mind. Pretty much every paper pad I pulled out, I could see that sketch working for - especially since I have so many 2 x 6" paper strips leftover in most of my 6x6" paper pads!

Using up the remainder of this paper pad makes me SO happy. Note - one of the front panels is slightly smaller than the others because I was working with partial sheets - I used what I had and it worked out just fine.  

Once I had my patterned paper all cut and assembled, I went poking around in my dies to see what would work as masculine embellishments and I really like that long Happy Birthday stamp which I've had for years.


Here is a peek at the inside ... they were all done the same inside.


Supplies used:
                                             August 2023 Sheetload of Cards
Patterned paper - 6 x 6" Pumpkin Spice, Pink & Main
Bike stamp & die - Fun On Wheels - Stampin' Up
Dragonfly die - Lovely Layers Bugs - Honey Bee Stamps
Forest Trees - Echo Park
Music notes - Paper Rose
Happy Birthday - Perennial Birthday, Stampin' Up
Catherine Pooler coloured Inks

Monday, 1 January 2024

Happy New Year!


Happy New Year to all my crafty friends! 

I decided to start 2024 off on my blog with a New Years Card. I love how sparkly it is - perfect for ringing in a new year.  I started with a glossy printed cardstock panel by Hunkydory, then I embossed it with a fireworks embossing folder. After matting this panel with rainbow holographic cardstock I added it to the front of a white card base. 

Adding the Celebrate (a die by Karen Burniston) cut from the same holographic cardstock my card front was finished.


I had ordered a few new goodies back in early November, and this Happy New Year stamp set by Pink & Main is one of them. I really liked the large size of the sentiments, and I didn't have much in the way of New Year stamps. 


I wish you all the very best for 2024.

Card Supplies:
Patterned card stock - Mirri Card, Time to Celebrate - Hunkydory
Rainbow Holographic cardstock - Recollections
Embossing Folder - Firework Trio - Altenew
Celebrate die - Karen Burnikston
Happy New Year - Pink & Main
Catherine Pooler coloured inks
5 x 7" Card blank and envelope

Monday, 11 September 2023

Happy Fall Sunflower Card


I bought this sunflower background die last year, since it fits perfectly on the front of a 5 x 7" card.  I'm really glad I didn't just add it to my Wish List though, as it is already next to impossible to find. I sure wish companies didn't retire things so quickly although I know it's all about marketing. 

This one was cut from some subtle patterned paper and added right to the white card base. I added Nuvo Glaze into the centre of the blooms then sprinkled them with chunky glitter. I love the sparkle!


The Happy Fall was cut from gold mirror cardstock and the shadow from a rust scrap. Inside, I added some washi tape, a gold foiled bee sticker and a sentiment that I have been using for many Thanksgivings. After making this card I realized how long it's been since I had purchased any new Thanksgiving stamps and that was the catalyst for the orders I placed recently. 😊


Here are some detail shots ...


Having been asked how many cards I make I thought it would be fun to keep track this year. Many of my posts include more than a single card or project and below is my tally. 

Card Tally for 2023
January - 53 cards
February - 56 cards
March - 55 cards
April - 32 cards
May - 43 cards
June - 34 cards
July - 56 cards
August - 106 cards
September so far - 10 cards

I decided to cancel the subscription that provided linked thumbnails to what products I used on my cards. It was costing me out of pocket each month, so I’m back to listing what I used with a few affiliate links included.

Supplies:
Sunflower Splendour die - Crafters Companion
Patterned paper - Vivid Ink Drops, Craft Consortium
Blending Brushes - Taylored Expressions
Nuvo Glaze
Chunky Glitter - stash
A7 Double Stitched Frames - Honey Bee Stamps
Happy Fall die - Pink & Main
Gold foil cardstock - Stampin' Up
Gold Peel Off border sticker - unknown
Gold bee stickers - stash
Washi Tape
Inside stamp - Be Full, Neat & Tangled
5 x 7" card blank and envelope


Tuesday, 11 July 2023

Six Stashbuster Birthday Cards


I made it a goal to use up this older 6 x 6" paper pad and came up with these six cards to donate to my Mom's old nursing home. I have a walkthrough of my cards on YouTube:  


I also used up a bunch of older elements (some digital clip art, some from Doodlebug) these cards are truly stash busters. I used up all but three strips of the patterned paper, and will make three Mini Slimline with those and that paper pad will be finished. I sure do love to use things up!

Having been asked how many cards I make I thought it would be fun to keep track this year. Many of my posts include more than a single card or project and below is my tally. 

Card Tally for 2023
January - 53 cards
February - 56 cards
March - 55 cards
April - 32 cards
May - 43 cards
June - 34 cards
July so far - 14 cards

Additional Supplies:
Blue and Navy cardstocks - my stash
White cardstock
Patterned paper - Be Brave 6 x 6", by Pink and Main
Clip Art - unknown, printed long ago
Sentiments - Your Next Stamp, various sets
Doodlebug elements - Odds & Ends, Flea Market
Picture This background die - Stampin' Up

This blog uses affiliate links whenever possible. This means, if you make a purchase through one of my affiliate links that you pay the same amount but I may receive a small commission from your purchase. I only link products that I own, love and use for my card making and not every link below is an affiliate one! 😊

Monday, 10 July 2023

Three Mini Slimline Cards with my NO SCRAP Technique


It's Masculine Card Monday here on my blog! Our gate remote stopped working and we had to send a cheque to the HOA for a replacement. Since a cheque will fit perfectly in a #8 envelope and that is the same size for Mini Slimline Cards, I decided to make a card to add as well. I'm sure they get a lot of mundane mail and I hope my card makes them smile.

I pulled out this older patterned paper and decided to go ahead and use my technique using three different 6 x 6" papers on three fun fold Mini Slimline cards with NO SCRAPS. I first shared this in a YouTube video last May and it continually gets views, which makes me so happy!

You can find the video HERE and the coordinating blog post is HERE.


The card I sent to the HOA included the sentiment Thank You, but I left the other two blank to have on hand. Those two were needed already, so I will have to make some more as I don't have any on hand now!


Having been asked how many cards I make I thought it would be fun to keep track this year. Many of my posts include more than a single card or project and below is my tally. 

Card Tally for 2023
January - 53 cards
February - 56 cards
March - 55 cards
April - 32 cards
May - 43 cards
June - 34 cards
July so far - 8 cards

Additional Supplies: 
Patterned paper - Be Brave, Pink &. main (retired)
White cardstock
Navy cardstock
Succulents - the Stamps of Life
Sharpie marker

This blog uses affiliate links whenever possible. This means, if you make a purchase through one of my affiliate links that you pay the same amount but I may receive a small commission from your purchase. I only link products that I own, love and use for my card making and not every link below is an affiliate one! 😊


Thursday, 22 June 2023

Paper Pumpkin Alternate Pop Up Card


Even though I made all the cards from this kit back in March, I decided to spread out sharing them by doing one a week. Since the colours and papers are very similar in the cards I didn't want all my posts to start looking the same! This week I'm sharing another Paper Pumpkin Alternate card using the March 2020 'No Matter The Weather' kit ... this one is a larger than A2 card that features a pop up inside.


I added Nuvo Glaze onto the green rubber boots so they are raised and shiny. 😊


Inside I used Karen Burniston's Little Labels Pop Up, cut from another sheet of the rainbow patterned paper, and added a fussy cut boots/greenery image for the centre front image.


I just poked around in my stamps to find sayings that I thought went well with the card.


... one more look ...

I'll be back next week with another alternate project with this kit

Having been asked how many cards I make I thought it would be fun to keep track this year. Many of my posts include more than a single card or project and below is my tally. 

Card Tally for 2023
January - 53 cards
February - 56 cards
March - 55 cards
April - 32 cards
May - 43 cards
June so far - 24 cards

Additional Supplies:
No Matter The Weather Paper Pumpkin kit, March 2020
5 x 6.5" card blank and envelope - Michaels
Alcohol markers
Rainbow Holographic cardstock - Michaels

This blog uses affiliate links whenever possible. This means, if you make a purchase through one of my affiliate links that you pay the same amount but I may receive a small commission from your purchase. I only link products that I own, love and use for my card making and not every link below is an affiliate one! 😊

Thursday, 27 April 2023

Notes of Cheer, Butterfly Card Trio


Stampin' Up has had this butterfly themed card kit in their catalogue for a couple of years and I kept 'adding it to cart', then removing it. When I found out a friend was having eye surgery and could be laid up for several weeks though - I bought the kit. She works with butterflies at our zoo so it seemed appropriate. 😊

I have a walkthrough of the first three cards on YouTube:  


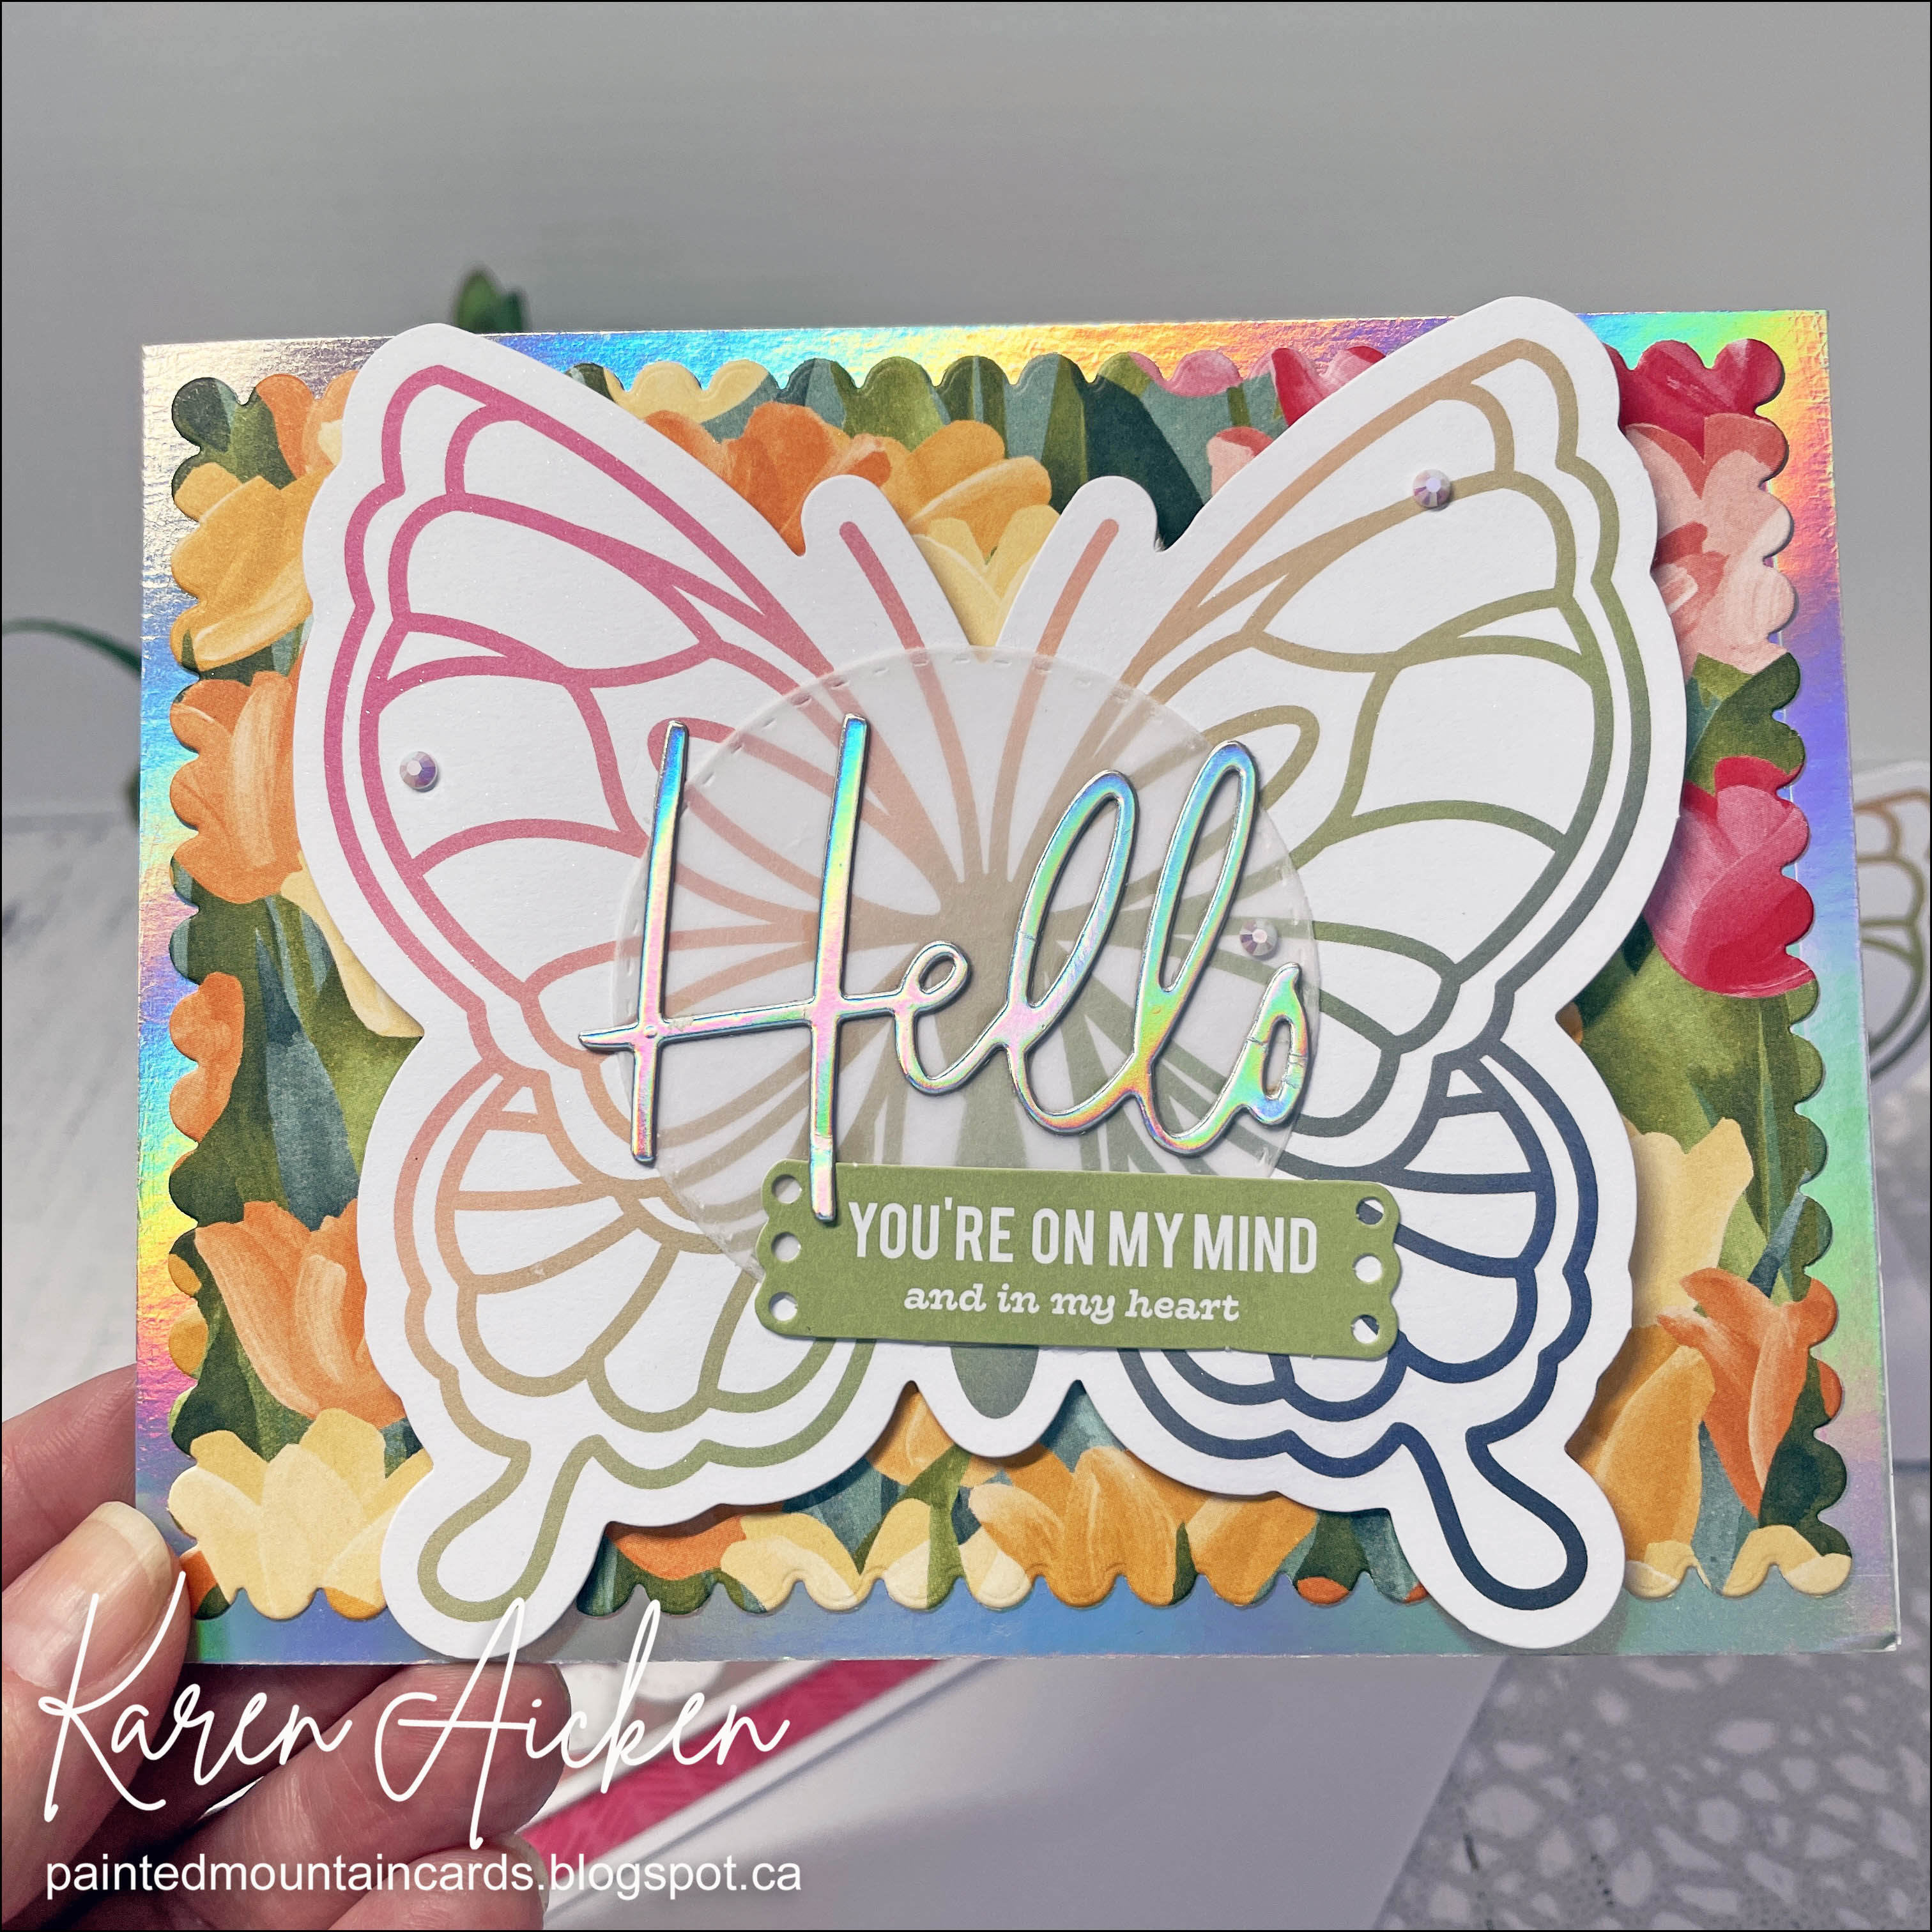
Of course the first card I made was a shaped card, and the first one I sent to my friend.


I spritzed the butterfly with shimmer spray, added a stitched vellum circle and a die cut HELLO cut from mirrored card stock.


The second card was an easel card. I cut the back off of this butterfly then adhered the back to the back of the shaped card to make it more stable.


Finally, a bright and happy card that I sent to my Mother In Law for Happy Mail. Since I added that busy patterned paper to the card base, it really didn't go with the envelopes from the kit. I pulled out a bright yellow envelope from my stash instead.


Having been asked how many cards I make I thought it would be fun to keep track this year. Many of my posts include more than a single card or project and below is my tally. 

Card Tally for 2023
January - 53 cards
February - 56 cards
March - 55 Cards
April so far - 31 Cards

Additional Supplies: 
Notes of Cheer card kit - Stampin' Up
Shimmer Spray
Rainbow Holographic cardstock - Recollections
Patterned paper - Flowering Fields, Stampin' Up

This blog uses affiliate links whenever possible. This means, if you make a purchase through one of my affiliate links that you pay the same amount but I may receive a small commission from your purchase. I only link products that I own, love and use for my card making and not every link below is an affiliate one! 😊

Thursday, 29 December 2022

Winter Pop Up Birthday Card


Hello my crafty friends. This Birthday card has it all ... stencilling, Glimmer Foiling, stickers, die cutting, stamping and of course it's also a pop up card. 😊 I made it for my Sister In Law who celebrates a December Birthday.


The lovely blue snowflake background was reverse glimmer foiled using the solid plate and the leftover foil from doing different panel. Since the sentiments were gold foiled, I added plenty of gold peel off stickers, die cut the panel with a stitched rectangle die and added it to the stencilled card front.


Inside, I used the new Bam Box die set by Karen Burniston. As soon as you open the card, the Box pops up the Happy Birthday. So fun! 


There is more stencilling inside, a stamped sentiment and a gold foiled word on the left side.


Additional Supplies:
5 x 6.5 card & envelope - Michaels
White cardstock
White pearl cardstock
White matte glossy cardstock

This blog uses affiliate links whenever possible. This means, if you make a purchase through one of my affiliate links that you pay the same amount but I may receive a small commission from your purchase. I only link products that I own, love and use for my card making and not every link below is an affiliate one! 😊

Friday, 11 November 2022

Happy Fall Slimline Easel Card


Hello my crafty friends and welcome to Fun Fold Friday here on my blog. Today I'm sharing another Easel Card, this time a Slimline sized one.

Die cutting the Slimline leaves background die from Pink & Main, I backed it with a transparency because I love the shine that gives. I added patterned paper behind the transparency before adhering the panel to the front of the easel.


To create the Slimline easel card base, I cut the pumpkin cardstock 8.5 x 7". With the longer side along the top I scored at 1.75 and 3.5". The center of the card is that 3.5" scoreline, and the remaining shorter score is where I attached the bottom portion of the leaf panel.

The Happy Fall with shadow (also from Pink & Main) is a relatively new die in my craft room, so I added it to the card front with thin foam tape and then added some Copper Pops of Color for extra sparkle. Tapping the card on my desktop flattened out those drops to resemble enamel dots.


Here is the inside and you can get a better look at the score lines. The sentiments are from Picket Fence Studio's and I fussy cut one to add to the bumper. The bumper is raised up with foam tape and that is what holds the Easel front from collapsing.


Below is what the card would look like coming out of the envelope.


This blog uses affiliate links whenever possible. This means, that at no cost to you, if you make a purchase through one of my affiliate links that I may receive a small commission from your purchase. I only link products that I own, love and use for my card making and not every link below is an affiliate one! 😊

Any supplies I'm unable to link are listed at the very bottom of my post.

Additional Supplies:
Transparency - office supply store
Patterned paper - Guilded Ink, Michaels (old - from my stash)
White cardstock
Oval Set 1 - Dees Distinctively