Showing posts with label Butterflies. Show all posts

Wednesday, 30 April 2025

Paper Pumpkin Sympathy Cards


I had been working with an older Paper Pumpkin kit (March ’24) and made these four sympathy cards for my stash. The card bases are printed front and back, so I usually cut each one into two panels to add to white card bases. Almost everything for the card fronts came in the kit, but I did add small die cut iridescent butterflies that were popped up with foam tape. It’s hard to see in the photo but the purple strip is actually vellum and the sentiment piece has a gold foiled line across the top.

I included four of the printed envelopes because they add so much to a special card like a these. After stamping the sentiment, I decided to also stamp a butterfly to tie in with the butterflies on the card fronts. 


Supplies used:
March 2024 Paper Pumpkin, Memorable Meadows - Stampin' Up
Inside Out Sympathy - Catherine Pooler
Little Etched Butterflies - Paper Rose
Rainbow Holographic card stock - Michaels
Butterfly stamp - old, Papercrafter Magazine


Friday, 2 August 2024

Butterfly Bunny Birthday Card Duo

Welcome to Fun Fold Friday here on my blog!  After I used this die to make Easter cards, I made a note to use it again for summer Birthday cards. This week I made these two and the second one is a pop up.

The die is quite large, so I made my cards into 5x7" but a 6x6" square card would work as well. The patterned paper is MANY years old and from my stash. I die cut the Butterfly Bunny from patterned paper and adhered them both to burgundy card stock. Then the images were fussy cut so I could pop them up with thin foam tape.

For this first card I added Stickles glitter glue around the butterfly wings, and added a pair of small die cut butterflies.

Below is the inside of the first card ... with a stamped sentiment and a light green vellum butterfly.

The second card is stepped up. I die cut butterflies from both patterned paper and white pearl vellum, adhering three of them over the butterflies on the main image. They were glued down along the butterfly bodies only, so there is some lift to the wings.

The first card base was white but I wanted to try it with a Kraft card base as well. In the end, I think I like the white one better. For the inside of this second card I used Karen Burniston's Lorna Label Pop Up.

The 'fluttering by' sentiment is actually part of a larger stamp that also says 'I miss you'. I knew I wouldn't use that one very often, so I trimmed away the 'miss you' portion and can add it to the 'fluttering by' sentiment again if I do need it. But I will get lots more use out of that stamp with it saying "fluttering by to say ..." 

I also added a couple more butterflies to the pop up area, and of course - Glitter Dot stickers for some shimmer.


The birthday sentiment was stamped on a scalloped white panel - both it and the crosshatch green panel are from the Short Crosshatch Rectangles die set - also by Karen Burniston


Supplies used:
Patterned paper - K & Company (very old, from my stash)
Bunny & Butterfly die - Creative Expressions
Butterfly dies - Scrapbook .com
Shimmer spray
Sakura glitter pen
Lorna Label Pop Up - Karen Burniston
Short Crosshatch Rectangles - Karen Burniston
Little Etched Butterflies - Paper Rose
White pearl vellum - stash
Fluttering By Sentiments - Waffle Flower 
Catherine Pooler coloured inks
Blending sponge - Tim Holtz
Glitter Dot stickers - Ecstasy Crafts
Stickles glitter glue
Happy Birthday - Birthday Blowout, Poppy Stamps
Essential Birthday Sentiments - LDRS
Kraft 5x7" card base & envelope
White 5x7" card base & envelope


Thursday, 11 July 2024

Sympathy Card w/ July's Sheetload of Cards


Today I'm sharing the first finished card from the July Sheetload of Cards that I shared yesterday. I will be finishing them off one by one, until I have eight completed cards for my stash. I thought the purple background to the gold floral cluster leaned itself well to a sympathy card and since I always like to have some of those on hand that is what I made.


I added a couple of butterflies punched from gold foil paper and matted the stamped sentiment on a gold foil paper scrap. Finally, a few glitter dots to finish it off. 


I don't usually do pop-ups inside a sympathy card but I do like to finish off the inside. So, using a different paper piece from the pad I cut a 4x6" piece. This mimics the 1/2" border all around the front panel. Another scalloped circle, this time from white cardstock and I stamped the sentiment with a plum ink. Then I added a pair of punched butterflies and my card was done.


I especially like the 5x7" size for sympathy cards.


Supplies used:
Patterned paper - Brianna, K & Company (old, from my stash)
Narrow gold foil tape - Amazon .ca
Gold foil paper - Recollections
Floral cluster die - Hand Penned Petals Bundle, Stampin' Up
Butterfly punch - Martha Stewart (old, from my stash)
Glitter Dot stickers - Ecstasy Crafts
Here for you - Waffle Flower
Inside Out Sympathy - Catherine Pooler
Stardust glitter pen - Sakura
Catherine Pooler coloured inks
Blending sponges - Tim Holtz
Stitched Scalloped circle nesting dies - Tutti Designs
5x7" card bases & envelopes - Ohuhu (Amazon .ca)
Vellum - Stampin' Up

Tuesday, 2 July 2024

Butterflies & Daisy's Birthday Card


My first card share for July is a 5x7" Birthday card. I checked out the July '24 Sheetload of cards last night and it's for 5x7" cards as well and I can't wait to get started on it. I gave lots of my hand made cards to family & friends in the fall, so now I can start to build up my stash again which is where this card is headed. 

The patterned paper pad is one I got back in February - which is the last time I bought anything new for my craft room - and I specifically chose the papers because of the daisy prints. I have those daisy punches from Stampin' Up and I thought the two would work well together. Ha - then I didn't use the punches on this card!

I was surprised to find several pages of printed panels in the package as well - such as the front panel on the card. I trimmed it down and matted it with yellow, and then fussy cut the two fishtail banners that were also on the sheet. Those got mounted inside the card and there is one more piece leftover for another card another day.

The 'love & best wishes' was already printed in the centre, so I added the 'on your special day' with foam tape. That is on a sheet leftover from Paper Roses' Bee Happy cardmaking kit and the colours worked well. The flower centres on the floral circle are raised, shiny with a little sparkle but of course that doesn't show up in the photos. I used Pops of Color for that. 


Supplies used:
Patterned paper & Coordinating solids - Dancing Daisies, the Paper Boutique
Little Etched Butterflies - Paper Rose
Gold foil card stock
Pops of Color - Scrapbook .com
Narrow gold foil tape - Amazon .ca
Inside - the Inside Scoop Birthday, Taylored Expressions
5x7" Card base & envelope


Wednesday, 1 May 2024

Pop-Up Mini Slim Birthday Card


While I have been having a lot of fun with the Pop Up Mechanism included in the Twist Flower Pop Up, I haven't really used the included flower dies before. So that is what I added inside today's card.


The front of the Mini Slimline card, as well as the banners inside are actually on a sheet designed to be cut apart. I was ready for some different floral paper, so picked up this paper package and the coordinating solids and look forward to playing with them some more. 


The sentiment was stamped on a lightly inked, punched out hexagon and I added some gold glitter dots for shimmer & shine.


Supplies used:
Patterned paper (and coordinating solids)- The Paper Boutique
Ephemera - Woodland Stories - Little Birdie
Hexagon Punch - Stampin' Up
Gold foil card stock
Little Etched Butterflies - Paper Rose
Happy Birthday Many Ways - Catherine Pooler
Glitter Dots
Inside Out Birthday - Catherine Pooler
Twist Flower Pop Up - Karen Burniston
Blending Brushes
Catherine Pooler coloured inks

Sunday, 21 April 2024

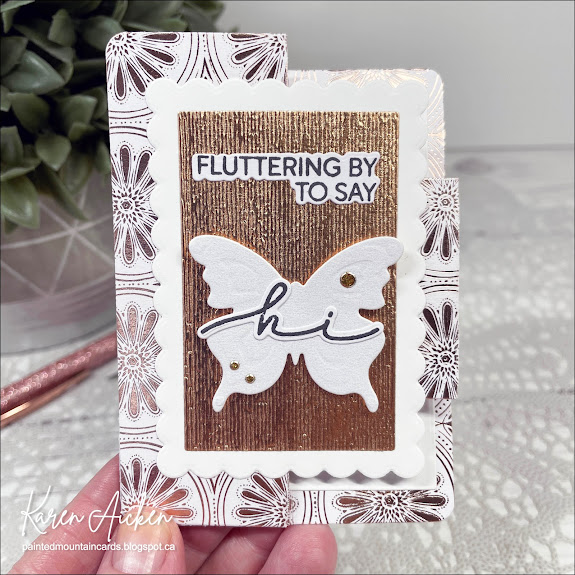
Small Butterfly Tri-Shutter Card


Welcome to Fun Fold Friday here on my blog!

Today's card is petite when it comes out of the envelope, but it opens up nice and big. Years ago I ordered a Tri-Shutter die set because I couldn't believe the price point! Then I couldn't believe the size of it when it came - no wonder it was priced so well. Totally MY fault for not paying more attention to the size that was clearly listed when I ordered.  The set was intended for pocket scrapbooking, so folded the card is 3x4". 

I actually wanted to see if I could use a printed note card for the card base and the die fit perfectly! This copper foiled one is from my stash and it's just SO pretty with that foiling. I did adjust the center fold a little so I could mount the larger matted rectangle & butterfly on it. The ATC dies from Waffle Flower are the perfect size for this card as well so that made me happy.

The larger butterfly die was included in the Sri Shutter die set and I added a smaller butterfly as well. The copper metallic card stock was in my stash and I coloured gold glitter dots with a rust alcohol marker so they would match a little better.


While I don't get a ton of use out of it, I do make sure to pull it out now and again to make a card. I shake my head every time, at how foolish I was. 


Supplies used:
Tri-Shutter die set - Sizzix (old)
Foiled note card - the Paper Studio
ATC Layer dies - Waffle Flower
Subtle Dynamic Embossing Folder - Stampin' Up
Copper foil cardstock - Recollections
Fluttering By Stamps & dies - Waffle Flower
White pearl cardstock scraps
Little Etched Butterflies - Paper Rose
Glitter Dot stickers
Alcohol markers

Wednesday, 17 April 2024

Butterfly Sympathy Card Duo


I love these patterned papers from Divinity Designs, so decided to use two of the prints to make a pair of 5x7" sympathy cards for my stash. 


I stamped the sentiment onto die cut labels then used a different die in the label set to cut gold vellum for the mat. It's subtle but so pretty in real life.  Since I like butterflies on a sympathy card, I die cut the butterfly trio (also Divinity Designs) from gold card stock and added the full butterfly to one card front. The pair of 'sideways' butterflies were added to the other and I used thin foam tape for all. 


The insides were done the same, using another label die from the set (Stampin' Up) and stamped flowers. The words/florals are from a very old stamp set which I believe is by Hero Arts.


I also added some Glitter Dot stickers for a little shine without making the card too sparkly. 


Supplies used:
Patterned paper - Beautiful Blooms Slimline Sized (6 x 9") - Divinity Designs
Butterfly Trio - Divinity Designs
Gold foil cardstock 
Glitter Dots
Gold Shimmer Vellum - Stampin' Up
Tasteful Label Dies - Stampin' Up
Sympathy Stamps - Hero Arts (old)
5 x 7" card and envelope

Monday, 15 April 2024

Mini Slimline Butterfly Pop Up Card


I have a fairly new 8x8" paper pad that includes a sheet with panels & tags to fussy cut. Since the panels fit perfectly on a Mini Slimline card, that is what I used for the front of this card. I have both the printed papers and the coordinating solids and used both as it's nice not to have to try to match up random cardstock colours. I added a stamped and die cut circle over the open circular area on the panel and some glittery ephemera for a pop of colour. I also added a small gold foil butterfly and gold glitter dots for additional shimmer & shine.


I haven't used the Butterfly Pop up die set in awhile, so pulled it out again. I wasn't sure if it would work in a 3.5" width - but it fits easily!


The butterfly base was die cut from gold foil card stock and I ended up cutting the wings and body from scraps of patterned paper that were sitting on my stamping table. The colours worked out well and I was able to use them up. Finally, a stamped sentiment from Catherine Pooler and some glitter dots and my card was finished. I know just who this is going to 😊


Supplies used:
Patterned paper (and coordinating solids)- The Paper Boutique
Ephemera - Woodland Stories, Little Birdie
Double Stitched Circle dies - Divinity Designs
Hexagon Punch - Stampin' Up
Pop Up Butterfly die set - Spellbinders
Gold foil card stock
Little Etched Butterflies - Paper Rose
Happy Birthday Many Ways - Catherine Pooler
Inside Out Birthday - Catherine Pooler
Glitter Dots

Friday, 12 April 2024

Mother's Day Easel Card


Welcome to Fun Fold Friday here on my blog!

I try really hard not to purchase any patterned paper, since I have a H*U*G*E stash of it. But every so often I see some that I just cannot pass up and this 6 x 8" pad by 49 & Market was one of them last year. Florals, a little grunge, beautiful colours ... yep - 'add to cart'. 😊.  I used it a lot for awhile, then put it away. Got it out again for this Mother's Day card for our eldest daughter - it's a 5 x 7" Easel Card.


Below you can see how the card front folds and rests on those two little butterfly bumpers to stand for display.


Below is a peek at the inside. Honestly, that printed border along the bottom of the page just makes me happy! 


Supplies used:
Nested Butterfly Shapes - Hero Arts
Patterned paper - Art Options Rouge, 49 Market
Rainbow Holographic cardstock -  Recollections
Stardream cardstock
Pink cardstock scrap
Happy Mother's Day - Karen Burniston
Water Brush
Bling - Queen & Co
Pops of Color, Snowflake - Scrapbook .com
Blue Skies Ahead - MFT stamps
Catherine Pooler coloured inks
 5 x 7" Card blank and envelope

Monday, 8 April 2024

Pop Up Easter Card


I thought I was finished sharing Easter Cards, but found these photos in the folder and I don't want to hold onto them until next year. So HERE I my final Easter Card of 2024!  ðŸ˜Š The front has patterned paper and a large ephemera piece the front. I kept it nice and simple because all the fun is on the inside!


I used the Lorna Label die set inside, which is an updated version of one that Karen Burniston had out years ago. I've talked about the differences between the versions in previous posts and I believe Karen addresses them in her assembly video. I am so happy that the Lorna Label Pop Up is back!


I added her Happy Easter & shadow and some butterflies from the Flutter Charms set. The bottom 'step' of the pop up is perfect for tying ribbon around! I also added (yet another) bunny border across the patterned paper seam - I love those bunnies.


A stamped sentiment on a scalloped signing block that was cut using KB's Short Crosshatch Rectangles.


Supplies used:
Lorna Label Pop Up - Karen Burniston
Happy Easter - Karen Burniston
Easter Borders - Karen Burniston
Flutter Charms - Karen Burniston
Short Rectangles Crosshatch - Karen Burniston
Patterned paper - Springtime, Authentique
Ephemera - Easter, Echo Park
Pink Bunny Patterned paper - unknown, probably Echo Park
Wink of Stella
Black Pen
Seam Binding
Pops of Color - Snowflake, Scrapbook .com
Rainbow Holographic cardstock - Recollections
Sentiment inside - Big Bold Easter - Taylored Expressions
Catherine Pooler coloured inks
Blending brushes - Taylored Expressions
Dot stamp - Stamps by Judith
5 x 6.5" Card base & envelope - Michaels

Monday, 25 March 2024

Springtime Pop Up Card


I still have Easter paper & cut-aparts in my stash - the same ones I've been using for several years. I won't buy new ones until I can use these up ... and I'm actually (finally!) making a dent in that basket. Today's card features a 4x4" cut-apart with patterned paper and a die cut butterfly on the front. In fact, this card ended up being quite a stash buster!


Inside I used the 'new' Lorna Label Pop Up die set by Karen Burniston. The Lorna Label was one of my favourite pop up dies waaaaaay back when it came out and, and I'm soooooo happy she brought it back. This time it's a 'glue in' instead of a 'cut in' which means you can add it into different sizes of cards without worrying about having the inner piece fitting through your die cutting machine. That also reduces the bulk of your finished card which is always a good thing. You can add the die cut piece anywhere you want along the fold, and it's just all the way around a great updated set. 

For my card today, I added it to a side folding card which is something I used to do with the old set too. I love to share different ways you can use your die sets, since they are an investment. 


The stamped sentiment was punched out and added to the left side of the card so I would have room to sign our names on the right.


The flower elements were already in my Easter bin - likely die cut for a different project one year and not used. So I added them to this card and then a couple more of those die cut butterflies. The butterflies were lightly inked with dye inks and a blending brush and I added some sparkle with Pops of Color (a thick glitter glue).


... One more look ...


Supplies used:
Patterned paper & cut aparts, Doodlebug
Patterned paper - Love Notes Petite Prints, Doodlebug
Black glaze pen - Sakura
Cloud punch - Stampin' Up
Scallop circle - Divinity Designs
Blending Brushes
Catherine Pooler coloured inks
Pops of color, Snowflake - Scrapbook .com
Sentiment - Egg-cement Easter Sentiments, CC Designs
Hexagon punch - Stampin' Up
Rainbow Holographic card stock - Recollections


Sunday, 24 March 2024

Butterfly Birthday Card


This is another quick and easy card that started with the patterned paper. I was putting away this (very old) package by Basic Grey and saw an almost A2 size panel with this black & cream print. That's all it took, ha ha.

I trimmed it to 4 x 5.25" and adhered it to the front of a white A2 card then went poking around in a baggie of Tim Holtz ephemera for an element that would work. The butterfly was perfect!  The Happy Birthday is ephemera from Paper Roses Bee Happy cardmaking kit and I fishtailed the left edge and added it to a matter white rectangle with foam tape.

Below is a look at the inside and this card was ready to put in my nursing home donation bag.


Supplies used:
Patterned paper - old, Basic Grey
Butterfly - Tim Holtz Alterations
Happy Birthday ephemera - Bee Happy Cardmaking Card Kit, Paper Rose
Sparkly gem stickers - Dazzles
Inside stamp - Special Sentiments, Penny Black

Monday, 11 March 2024

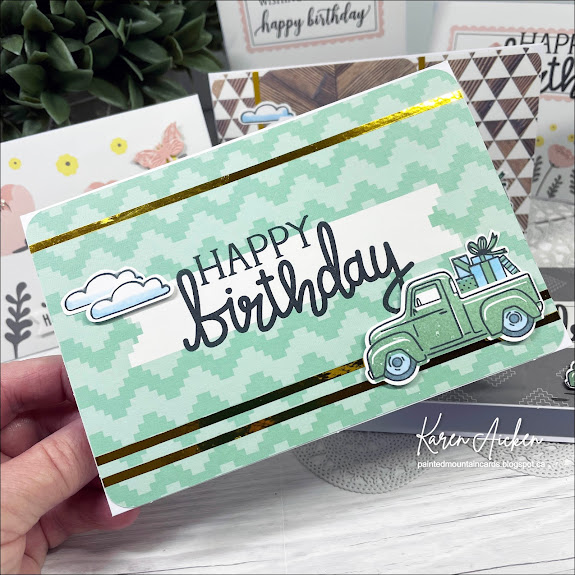
Six Birthday Cards for Donating


I pulled out a Project Life kit and decided to use several of the 4x6" journal cards to make some birthday cards for donating to the nursing home. Several years ago I picked up several Project Life kits for a great deal, knowing I would use them for cards like this ... but I keep forgetting about them! (Project Life kits contain both 4x6" and 3x4" journal cards for pocket scrapbooking.)


I made three floral cards and three more masculine ones with Stampin' Up's Truckin' Along stamp & punch. The cards are all 6x4" and some have narrow gold foil tape for a little shine. Other's have Stickles glitter glue on them.


PaperSupplies used:
4 x 6" Journal Cards - Project Life (unknown kit name)
Special sentiments - Penny Black
Little Something Sentiments - Catherine Pooler
Gold narrow foil tape - Amazon .ca
Stickles Glitter Glue
Little etched butterfly dies - Paper Rose
Truckin' Along Bundle (punch & stamps) - Stampin' Up
Alcohol markers
4 x 6" card bases
Lots of Birthday-2-Stamp - the Stamps of Life
Catherine Pooler coloured inks

Wednesday, 21 February 2024

Sympathy Card Trio


I pulled out this box of note cards and wanted to see what I could do with them. I HAD to have them when I saw them a few years ago, but I tend to forget that I have them. I have a matching sticker sheet so I got that out as well and decided to make three sympathy cards for my stash.

The first note card was cut in half along the score line, then the front was trimmed slightly smaller before adding it to a folded white A2 sized card base. After using a blending brush to add some colour to the centre I stamped the words with a dark grey ink. Then I added two small die cut butterflies which brings out the copper foiling on the floral image. I also added some glitter dots that were originally gold, but I coloured them with a brown alcohol marker so they look more coppery.


Inside I trimmed down the back note card panel then adhered it inside the card.  The sentiment was stamped on an inked scalloped circle and I added another copper butterfly with thin foam tape.


The second note card was cut in half along the score line and then the front was cut slightly smaller (4 x 5.25"). It was then attached to one of the other printed note cards in the package - the black with polka dots. I stamped the With Sympathy with grey ink on a scrap of white card stock then fussy cut it out and popped it up in the centre of the wreath with foam tape.

Adding one of the coordinating stickers to the lower left of the wreath and then a copper butterfly to the top right and some coloured Glitter Dots finished off the front.


Below is the inside of the second card. You can see I cut down the back of the notecard and added a stamped sentiment as I did on the card above. 


This third card was done the same as the above card only using a green ink for the With Sympathy.


The note card package also has a couple of black and white printed ones that I haven't used very much. So I cut one down for the inside of this final card to use as a mat behind the stamped panel.


Supplies used:
Foiled note cards - the Paper Studio
3D Stickers - the Paper Studio
Inside Out Sympathy - Catherine Pooler
Catherine Pooler coloured inks
Scallop Circle die - Divinity Designs
Glitter Dots
Alcohol markers
Copper metallic cardstock
Little Etched Butterflies - Paper Rose