Showing posts with label Flip-it Framelits. Show all posts

Tuesday, 6 February 2024

Birthday Flip-Its Card with Hidden Panel


Back in November I made my first Flip-Its card with a hidden panel (or extra flap). I had seen Stephanie Barnard from the Stamps of Life make one and since I love Flip-Its cards I had to make one right away. Well in preparation for that YouTube video (see it HERE) I had cut this one from white card stock. I finally got it finished and this is what I came up with.


I pulled out this older patterned paper from Taylored Expressions to finish the card using the layering dies that are included in the Circle Flip-Its. When you open the card you can see that there is another panel to lift ...


... and here is a look at the card fully open. There is so much extra room for a personal greeting when you use the dies this way!


Supplies used:
Circle Flip-Its - Sizzix, SOL
Double Stitched circles - Divinity Designs
Patterned paper - Hello Happiness, Taylored Expressions
Birthday Cheer - Papertrey Ink
Catherine Pooler coloured inks
Stardust pen - Sakura
Glitter Dots - Ecstasy Crafts


Tuesday, 7 November 2023

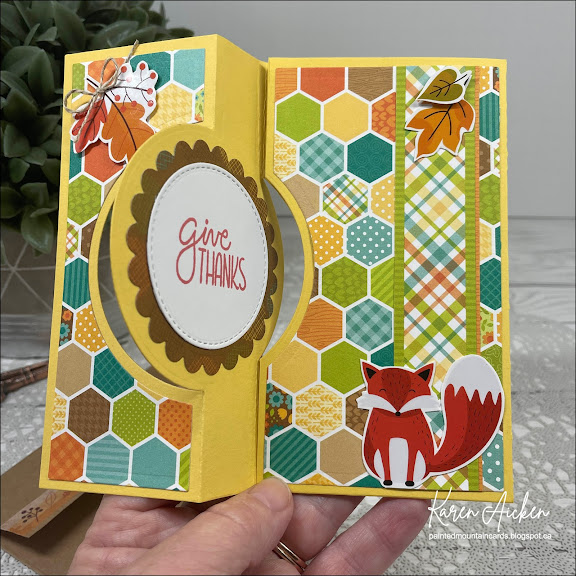
Circle Flip-Its Card (With an Extra Flap!)


It's safe to say I love Flip-its dies, and have for years. In fact I just checked the labels on the side of my blog and the Flip-its Label says 99 cards. This one makes 100 Flip-it cards! 😳😊  I was scrolling on YouTube and saw that Stephanie Barnard had a video showing how to add and extra flap to a Flip-its card and I immediately watched it. Then I had to go make one! I have all the details on how it's done in my YouTube video:  


The card opens like a regular Flip-its ...

... but then you open that centre section and it reveals an entire extra panel for you to decorate as desired! So fun. I pulled out some older patterned paper and stickers to finish off my card. NOTE the stickers were adhered to white cardstock then fussy cut. This gives them stability and allows me to pop them up with foam tape.


It took me awhile to find her video again, but I did and it's linked below for you. Also, she calls it a Hidden Panel which makes more sense but since I called it an extra flap in the video I am leaving it as is. 😉

Edited to add:  This card is my November edition to my monthly series "Throwback Fun Fold Dies" as well.

Having been asked how many cards I make I thought it would be fun to keep track this year. Many of my posts include more than a single card or project and below is my tally. 

Card Tally for 2023
January - 53 cards
February - 56 cards
March - 55 cards
April - 32 cards
May - 43 cards
June - 34 cards
July - 56 cards
August - 106 cards
September - 61 cards
October - 51 cards & 5 Tags
November so far - 9 cards

I decided to cancel the subscription that provided linked thumbnails to what products I used on my cards. It was costing me out of pocket each month, so I’m back to listing what I used.

Supplies:
Added Extra Flap as per SB's video, 
which you can find HERE
Patterned paper - Doodlebug Designs
Stickers - Stash
Circle Flip-Its - Sizzix, The Stamps of Life
Give Thanks Sentiments - Catherine Pooler
Catherine Pooler inks
Twine

Friday, 4 August 2023

Flip-Its Birthday Card with Butterflies


Blogger blocked me publishing this post because of a Community Guildline violation. WTH? It's a GREETING CARD with butterflies.  Anyhow, I went to check and see what they could possibly have an issue with and when I tried to edit an underlined phrase (I mean, what else could it be????) the entire post disappeared.  So I have requested a review and will wait and see what happens.  EDIT:  Blogger has 're-evaluated' my post and allowed it to publish, so I'm going to write it out again. But it's going to be really short, as I want to get on with my day instead of re-writing my nice long post. 

Welcome to Fun Fold Friday here on my blog and today's share is uses a Flip-It's die set - with a twist. This is the Diamond Flip-It's Plus and it has an extra panel that is hidden when the card is closed.


Below you can see the card fully open with all three panels.


I have been a fan of the Flip-It's die sets since they first came out MANY years ago. When Stephanie Barnard released this one last year, I had to add it to my collection.


Having been asked how many cards I make I thought it would be fun to keep track this year. Many of my posts include more than a single card or project and below is my tally. 

Card Tally for 2023
January - 53 cards
February - 56 cards
March - 55 cards
April - 32 cards
May - 43 cards
June - 34 cards
July - 56 cards
August so far - 12 cards

I decided to cancel the subscription that provided linked thumbnails to what products I used on my cards. It was costing me out of pocket each month, so I’m back to listing what I used.

Supplies (from memory)
Diamond Flip-It's Plus - the Stamps of Life
Butterflies - stamp, die and layering stencils - Pinkfresh Studios
Stamp inside - Penny Black
Glimmer Foil system and foil - Spellbinders
Perfect Sentiments Hot Foil Plate & die - Pinkfresh Studios
Rainbow foil - Spellbinders

Wednesday, 5 July 2023

Happy Summer Flip-Its Card


Today I'm sharing the final 'End of School Year' cards made for our Grandkids. This one is for Olivia, who will be going into Grade 7 in the fall. Isn't that amazing? She is still holding her own against Pulmonary Hypertension, and considering the Dr's didn't think she would make it to 4 years old ... we are constantly amazed, honoured and grateful for our beautiful granddaughter.


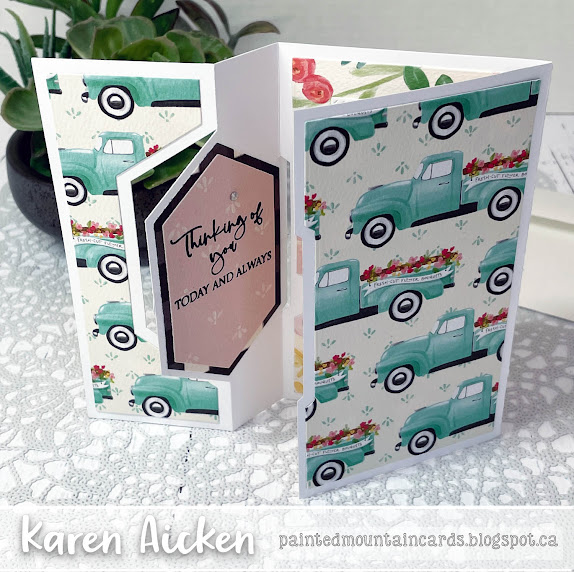
I used an older die for this card, as it is also the 7th edition to my Monthly Series "Throwback Fun Fold Dies". I have checked and this one is no longer available, but the Rectangle Flip-it's is and I will link it below for you. The only difference is the accessory dies that come with the two sets, and of course this one has the separate die to cut notches into the front rectangle to hold a gift card. This one is the Gift Card Flip-Its but I didn't use the notches.


I pulled out a really old 12 x 12" paper package, and used the stickers that were included as well. There is room for us to write our personal message on the reverse side of the front, center rectangle.


I also wanted to slip the grands a little cash to use on their summer adventures, but time was short  and I was already running late since they have been out of school almost a week already. So I pulled out this older die from Papertrey Ink. It die cuts this little folder that would hold a gift card, but it worked for cash too! I tucked each one into their card envelopes.


The notches cut with the die, which holds the gift card/cash from slipping out of the top, and the second one holds the flap closed. I have used this die LOTS over the years! NOTE:  I checked and it is no longer available.


When I was finished with the card and the cash envelopes, I decided I wanted to just FINISH up with the leftover papers & stickers as it's been hanging around in my craft room for too many years. I made eleven Birthday cards to donate to my Mom's old nursing home and I'll be sharing those later this month.

Having been asked how many cards I make I thought it would be fun to keep track this year. Many of my posts include more than a single card or project and below is my tally. 

Card Tally for 2023
January - 53 cards
February - 56 cards
March - 55 cards
April - 32 cards
May - 43 cards
June - 34 cards
July so far - 3 cards

Additional Supplies:
Gift Card Flip-Its - the Stamps of Life
Patterned paper & stickers - Paradise Beach, Echo Park
White card stock
Gift card/cash pocket die - Papertrey Ink (long retired)
Yellow cardstock - Bazzil

This blog uses affiliate links whenever possible. This means, if you make a purchase through one of my affiliate links that you pay the same amount but I may receive a small commission from your purchase. I only link products that I own, love and use for my card making and not every link below is an affiliate one! 😊

adddddddddddddddd

Tuesday, 21 February 2023

Mountain Flip It Card

This card is the February edition to my series 'Throwback Fun Fold Dies'.  I pulled out the 5 x 7" Square Flip-Its die set which was sold at the Stamps of Life a few years ago when I purchased it. I checked though and it is no longer available so I can't link it for you. NOTE - this die requires a die cutting machine with a larger than 6" opening.

We see the beautiful Rocky Mountains from where we live in southern Alberta so I have an affinity for mountain themed patterned paper. I picked up this particular package last Spring and realized that I needed to get it out and play with again.


I like that so many companies are now coming out with dies to cut out their sentiments, as that allows you to add foam tape for dimension as I did on the front.  For this card, I added the birthday words onto the back and that is where we will sign our name.


Late last year I was asked how many cards I make but I didn't have a clear number. Since many of my posts include more than a single card or project, I thought it would be fun to keep track this year. 

Card Tally for 2023
January - 53 cards
February so far - 46 cards

Additional Supplies:
Square Flip-Its Plus, Stephanie Barnard (Sizzix) - Discontinued
In The Pines - Stampin' Up
Blue cardstock
White cardstock
5 x 7" envelope

This blog uses affiliate links whenever possible. This means, if you make a purchase through one of my affiliate links that you pay the same amount but I may receive a small commission from your purchase. I only link products that I own, love and use for my card making and not every link below is an affiliate one! 😊


Friday, 8 July 2022

Ice Cream Cone Flip It's Card


Hello my crafty friends. It's Fun Fold Friday here on my blog and I'm back with another Ice Cream Card to send to my family! Every July I send them Ice Cream themed cards, and if you would like to know why, and more about the tradition, I put it below the photos. 


For this card I pulled out the Diamond Flip-Its Plus, a die set from the Stamps of Life. I've always loved Flip-Its, so when this one was released and it had the extra flap and the layering dies ... I added it to my collection!  The ECD Ice Cream die I've had for awhile. Even though it's retired, I still use it every year.

When you open the card, you see the 'enjoy' ...


... and when you open the right flap, the full sentiment is revealed. I stamped it onto one of Karen Burniston's new Short Crosshatch Rectangles - I adore that scalloped one. Some mirrored hearts for sparkle and this one is ready to be mailed. The sentiment is also retired, and I couldn't find it to link for you.

When my Mom was a little girl, there was always a July parade in their town. Afterwards her dad, my Grampa, would take her to the drugstore for an ice cream soda. She continued the tradition with my brother and I, on a special day in July she would take us for ice cream. And I did that with our kids too - bringing my Mom along. We always made sure she had ice cream on that day. 

Even though she has passed, we continue the tradition - raising an ice cream cone to her in a toast and our grandkids think it's a great tradition! I also send my family ice cream themed cards to celebrate. ❤️

This blog uses affiliate links whenever possible. This means, that at no cost to you, if you make a purchase through one of my affiliate links that I may receive a small commission from your purchase. I only link products that I own, love and use for my card making and not every link below is an affiliate one! 😊

Any supplies I'm unable to link are listed at the very bottom of my post.


Additional Supplies:
Burgundy alcohol marker
Burgundy cardstock
Ice Cream Cone die - Elizabeth Craft Designs
Sentiment inside - Kaisercraft, old set from my stash
Shimmer Spray

Friday, 10 June 2022

Canada Day Flip-Its Card with Additional Pop Up


Hello my crafty friends and welcome to Fun Fold Friday here on my blog. Today I'm sharing a Flip-Its card for Canada Day and I have all the details in my YouTube video:  


It was fun creating with the papers, stickers and ephemera from Photo Play. They had been on my Wish List since they first came out and I'm slowly adding them to my collection. 


Not only does this Flip-Its have the additional flap to open, I added a Pop Up inside using one of the journal cards/cut aparts from the package.


As I said in the video, I will do this again and have a tutorial for you but basically I folded the cut apart in half then added 1/4" score lines down each side. I am liking the added dimension you get - and the little surprise - when you open the right flap!

This blog uses affiliate links whenever possible. This means, that at no cost to you, if you make a purchase through one of my affiliate links that I may receive a small commission from your purchase. I only link products that I own, love and use for my card making!

Any supplies I'm unable to link are listed at the very bottom of my post.


Additional Supplies:
White card stock - Accent Opaque Digital Super Smooth (Amazon .ca)
Seam binding

Tuesday, 31 May 2022

Plant Themed Flip-Its Card


Hello my crafty friends!  A friend sent me a few 6 x 6" sheets of plant themed patterned paper and this sheet was my favourite. I finally broke down and USED it (instead of hoarding saving it) and this is the card I came up with. I have a walkthrough of my card and the dies used on YouTube HERE:   


The Diamond Flip-Its Plus creates an extra flap on the side which makes it even more fun. I added a fussy cut plant on the front (cut from patterned paper) and a stamped sentiment on the flip side. When you open the flap, there is lots of room to write a personal message when I go to send the card out for Happy Mail!


Below is the card fully open. I was happy to see how well Karen Burniston's new Short Rectangles Crosshatch fit inside!  I also got to pull out the plant stamps I got for my Birthday as they worked so well with the papers. 😊


This blog uses affiliate links whenever possible. This means, that at no cost to you, if you make a purchase through one of my affiliate links that I may receive a small commission from your purchase. I only link products that I own, love and use for my card making!

Any supplies I'm unable to link are listed at the very bottom of my post.


Additional Supplies:
Plentiful Plants suite (papers, stamp and dies) - Stampin' Up
Patterned paper inside - Artistry Blooms, Stampin' Up (retired)
Leafy patterned paper on the front - unknown (it was a gift)
White card stock - Accent Opaque Digital Super Smooth (Amazon .ca)
Bic metallic marker

Thursday, 12 May 2022

Diamond Flip-Its Hello Card


Hello my crafty friends. Today I'm sharing a Flip-It's card - with an additional flap - that I sent to my Mother In Law to let her know we were thinking of her. I have all the details on YouTube:   


This was my first play with this new Flip-It's die set from the Stamps of Life ... it's the Diamond Flip-It's Plus and it gives you an extra flap and the coordinating layering dies too! 


Above is how the card looks when it comes out of the envelope, and below you can see what it looks like when you open it as a regular Flip-Its!


... here is a look at that second flap ...


... and here it is fully open!  Note the crosshatch rectangle inside?  That is part of Karen Burniston's new release, which will be shipping on the 16th.


This blog uses affiliate links whenever possible. This means, that at no cost to you, if you make a purchase through one of my affiliate links that I may receive a small commission from your purchase. I only link products that I own, love and use for my card making!

Any supplies I'm unable to link are listed at the very bottom of my post.


Additional Supplies:
Patterned paper, Cut Aparts and Stickers - Flower Market, Carta Bella (retired)
White card stock - Accent Opaque Digital Super Smooth (Amazon .ca)

Tuesday, 29 June 2021

Two cards with "Rainbow Is My Favorite Color" Card Kit


Hello!  Today I'm sharing two cards made with the Simon Says Stamp kit called "Rainbow Is My Favourite Colour". I have a walkthrough of my video on YouTube as well: 


As I said in the video, this was a total impulse purchase but I am really having fun with it! The first card is a Mini Slimline and also a Trifold card. 


I also used a new cloud stencil/mask from A Colourful Life for my pretty clouds. I completely forgot to open the domed blending sponges and ink cubes that were in this kit, and instead used blending brushes and dye inks on this card. I did remember and open them up for the second one!


When you open the left panel, this first sentiment is revealed ...


... and when you open the right panel there is another sentiment.


My next card is a Flip-Its card using a very OLD Flip-It's die set by Stephanie Barnard. While it is no longer available, she does have a new one with lots of different accessory dies which I have linked below.


The clouds on the right are where I can sign my name, and it is hidden until you open the card.


Additional Supplies:
Shimmer Spray
Rainbow of Happiness - MFT Stamps
Teal card stock

Thanks for stopping by

Wednesday, 17 March 2021

Two Slimline and One Fun Fold Card


Hello!  Today I'm sharing three cards for my Divinity Designs Guest Designer Post on their BLOG. I love the bright colours in the Geometric Paper Pad, so paired it here with pops of both black and white. 

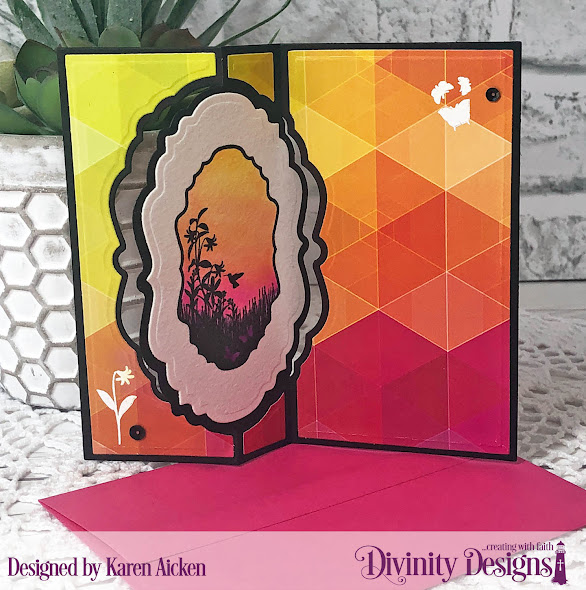
First up is a Birthday Card made with the Vintage Flip Fold With Layers and the Vintage Bird Label stamp set. I have a walkthrough of this card on YouTube:


The smaller Vintage Bird Label was clear heat embossed over black ink and water coloured with Karin Water Colour Markers. I scribbled the markers onto my glass mat, picking the colour up with a water brush and painting in the image.


Using the same stamp set, I white heat embossed a flower in the bottom left corner, the Happy Birthday to the centre label and butterflies in the top right corner. Now the patterned paper has a bit of a shine to it, so I had to stamp slowly and carefully so the images didn't smear. But it's completely doable!


The painting process was repeated inside, using a different one of the stamps in the Vintage Bird Label stamp and water colour markers. Finally, I added a couple of black sequins for some Birthday Sparkle.


My second card today also uses the Vintage Bird Labels - I love the silhouette look of these stamps, which of course is why I chose them. I die cut the Slimline Quatrefoil Background Die from white card stock and adhered that over a same sized piece of paper from the Geometric Paper Pad Slimline Size. One of the Double Stitched Vintage Labels was added to the top third, and on a smaller label I clear heat embossed the silhouette image that was stamped in black ink. The water colouring was done the same as the Flip Fold card above, using water colour markers scribbled onto a glass mat and picked up with a water brush. The painted image was popped up onto the white one with foam tape for dimension.

Using the Slimline Card Base die*** I cut my card base from black card stock and embossed the edges. Then the decorated Quatrefoil Background panel was adhered to the front making sure there was an even border all the way around. Finally - a few black sequins were added and my card front was done.

Here is a peek at the inside of the card. I used the Slimline Rectangle Dies to cut a slightly smaller black panel and embossed the edges. Then another rectangle die from the set was used to cut and emboss a smaller white panel. I added a couple of stamped images from the Vintage Bird Labels and there is lots of room to write my note on the white panel.


My third card is also a Slimline card! This was my first play with the Slimline Flower Petal Background and I think it's going to be lots of fun. I have several ideas already that I want to do with it. For my card today, I die cut it from black card stock and adhered it to a same sized panel of patterned paper from the Geometric Paper Pad Slimline Size.

The white card base was created with the Slimline Card Base** die and the edges were embossed. Then I added the Slimline Flower Petal background to the card front making sure there was an even white border all the way around.


The decorative element was created with a Double Stitched Circle and the You Warm My Heart stamp & die combo. The to-go cup was stamped onto the patterned paper and cut out with the included die. I added a little bit of shading with a grey alcohol marker and popped it up onto the circle with foam tape. The other images were stamped using the same set. Then, a few sequins added some sparkle.


Inside, I added matted embossed layers using the Slimline Layering Rectangle Dies. A smaller piece of leftover patterned paper was die cut with the same sized Slimline Layering Rectangle Die as the white panel (and embossed), then adhered to the bottom of the white panel. The smallest Slimline Layering Rectangle Die was cut from a strip of black card stock (and embossed) and added over the join. Then I stamped one more heart from the You Warm My Heart stamp set and added a single black sequin.


I'll be back next week with another Guest Designer Post using these fun products from Divinity Designs. Check out the Divinity Designs Blog for lots of inspiration from their Design Team!


** Requires a larger die cutting machine


Supplies:

Bird Flip Fold Card 
Vintage Label Flip Fold With Layers - Divinity Designs
Vintage Bird Labels - Divinity Designs
Geometric Paper Pad Slimline Sized - Divinity Designs
Mini MISTI - My Sweet Petunia
Card stocks
Karin Watercolour markers
Wink of Stella
White embossing powder
Clear embossing powder
White gel pen - Sakura
Black Sequins
Card size - Standard A2, 4.25 x 5.5"


Quatrefoil Slimline Thanks Card
Slimline Card Base**  - Divinity Designs
Slimline Quatrefoil Background Die - Divinity Designs
Slimline Rectangle dies - Divinity Designs
Geometric Paper Pad Slimline Size - Divinity Designs
Double Pierced Vintage Labels - Divinity Designs
Vintage Bird Labels - Divinity Designs
Card stocks
Karin Water Color Markers
Water Brush
Clear embossing powder
Water Colour paper
MISTI - My Sweet Petunia
Card size: ~4 x 9", fits in a standard #10 Business Envelope


Thanks for stopping by