Sunday, 21 February 2021

Deer Pop Up Slimline Card


Hello! Our Son-in-Law is a hunter, and I knew exactly what I wanted to do for his Birthday card this year. I started out pulling out a bunch of dies by Karen Burniston and this is what I came up with. I have a walk through of my card (and how I fixed an oops) on YouTube too: 

Using the Long Nature Edges combined with the deer/ground from the Outdoor Scene allowed me to create this Slimline scene. I also added two trees from the Tree Pop up die set. I really like this tree die - both the size and the shape of it.


Inside, I used both the Explosion Pop Up (for the centre panel) and the Mini Pops (the trees on either side). The Celebrate was added to a fish tail banner, and I die cut a deer silhouette from a Christmas stamp/die set for the stag on the trimmed circle.


Here is a side view so you can see the pop ups a little better.


I used Kraft card stock a LOT last year, but the past several months I've been craving bright rainbow colours. I have to say I enjoyed using Kraft again for this card.

Supplies:
Card stocks - stash
1005 Tree Pop Up - Karen Burniston
1146 Mini Pops - Karen Burniston
1063 Evergreen Pivot Panel - Karen Burniston
1152 Long Nature Edges - Karen Burniston
1069 Explosion Pop Up - Karen Burniston
1057 Circle Crosshatch die set - Karen Burniston
1151 Crosshatch Long Rectangles - Karen Burniston
1067 Celebrate - Karen Burniston
1045 Outdoor Scene - Karen Burniston
Copic markers
Taylored Expressions Blending Brushes
Sentiment on front - Birthday Greetings, Studio Katia
White paint pen
Wink of Stella
Plaid patterned paper - Karen Foster Design (old)
Stag head die - Hampton Arts
Stitched Strips - Trinity Stamps
Sentiment inside - Hampton Arts
Black marker
Enamel Shapes - Stampin' Up
Jute ribbon - Stampin' Up
Card size - 4 x 8.5", fits in a #10 Business Envelope

Thanks for stopping by today

Saturday, 20 February 2021

St Patricks Day Mini Slimline Cards


Hello!  I wanted to make St. Patrick's Day cards to send to our Grandkids for Happy Mail but I can't get to those stamps right now. Easter I can get to .. St. Pats not so much. I would have ordered a large Shamrock die or even a stamp set but honestly, I can't remember what I bought last year for St. Patrick's day so I decided to get creative instead. I started looking at a package of Doodlebug Designs papers and found perfect patterned papers AND cut aparts too!

I decided to make Mini Slimline cards, which are 3.5 x 6" and they fit in a #8 envelope.


I added some gold gel pen highlights, gold sequins and rounded the corners on this first one.


I liked the colourful shamrocks on this cut apart, so trimmed it down and rounded the corners, then popped it up with thin foam tape. The small heart stickers were sitting on my stamping table so I was able to use a few of them too.


The shamrocks also got brushed with Wink of Stella and the faces were outlined with a black glaze pen.


This cut apart was trimmed away from it's background, I added some gold gel pen highlights and a strip of gold foil card stock.


For this card, I trimmed 3/4" from front right edge of the card and added a 1" wide strip of patterned paper inside. Not having another shamrock, I drew one on a green card stock scrap with a gold gel pen and fussy cut it out. Then I added three different colours of sequins!


I used a stitched circle die to cut away this shamrock from it's background and popped it up with thin foam tape over the background papers. Then I gave it a good coating of Wink of Stella for shimmer and shine!


For the inside of some of the cards, I die cut a heart from a scrap of white card stock and used the negative piece as a stencil. Brushing ink into the stencil with a blending brush, I then wrote the sentiment with a green glaze pen.


I pulled out some rainbow Washi Tape from my stash and added it up the side of the envelopes, making sure to add glue under each end so it doesn't lift when it goes through the mail. I often receive envelopes with Washi Tape lifting so I'm sure to glue mine down on the ends.

Supplies:
Patterned Paper and Cut Aparts - Doodlebug Designs
Various card stocks - stash
Gold foil card stock - Stampin' Up
Gold gel Pen
Banners Pick A Punch - Stampin' Up
Corner Rounder
Heart stickers - Mrs. Grossmans
Wink of Stella
Black and Green Glaze Pens - Sakura
Sequins
Rainbow Washi Tape
Card sizes - 3-1/2 x 6", fits in a #8 envelope

Thanks for stopping by today

Thursday, 18 February 2021

Happy Happy Happy Shaker Tag


Hello!  Today I'm sharing a Shaker Tag for the Fun Friday Challenge #158 at Your Next Stamp with the theme "Sentiment Spotlight".  I have details at the end of my post on how you can enter to win a YNS prize!


I chose the HAPPY from the Bold Happy Birthday die set as my sentiment, and paired it with the sweet scalloped frame for my shaker card today. The scalloped tag is the largest one in the Bookmark/Tag die set.


I decorated the back just a little and there is room to write a note as well. 


While I expect I will use this as a tag to tie onto a gift, it does fit into a #8 envelope - the same size I use for Mini Slimline cards - and can be mailed as a note card instead.


Our challenges always come with 2 ways to win:

#1 - Would you like the chance to win a YNS stamp set? Leave a comment on the Your Next Stamp BLOG by February 24 2021 at midnight EST to be entered in the random drawing. Want more entries in the drawing? Leave comments on the YNS Instagram and Facebook pages too!

#2 – Would you like the chance to win a YNS store e-gift card? Play along with the challenge! Link up your creation on the Your Next Stamp Blog challenge by March 4 2021 at midnight EST to be entered in the random drawing to win a $15.00 YNS gift certificate. If your creation contains YNS products and you are the random winner then you receive an extra $5!

Supplies:
Bookmark/Tag die set - Your Next Stamp
Rectangle Scalloped Frames with Piercing Marks - Your Next Stamp
Bold Happy Birthday Word Die Set - Your Next Stamp
Seas The Day Gumdrops - Your Next Stamp
Patterned paper - Over the Rainbow
Shaker filler - Mommy Panda Supplies, Etsy (Canadian Seller!!)
other Shaker filler - stash
Wink of Stella
Stickles
Ribbon
Sharpie marker (for dots on acetate)

Thanks for stopping by today

Wednesday, 17 February 2021

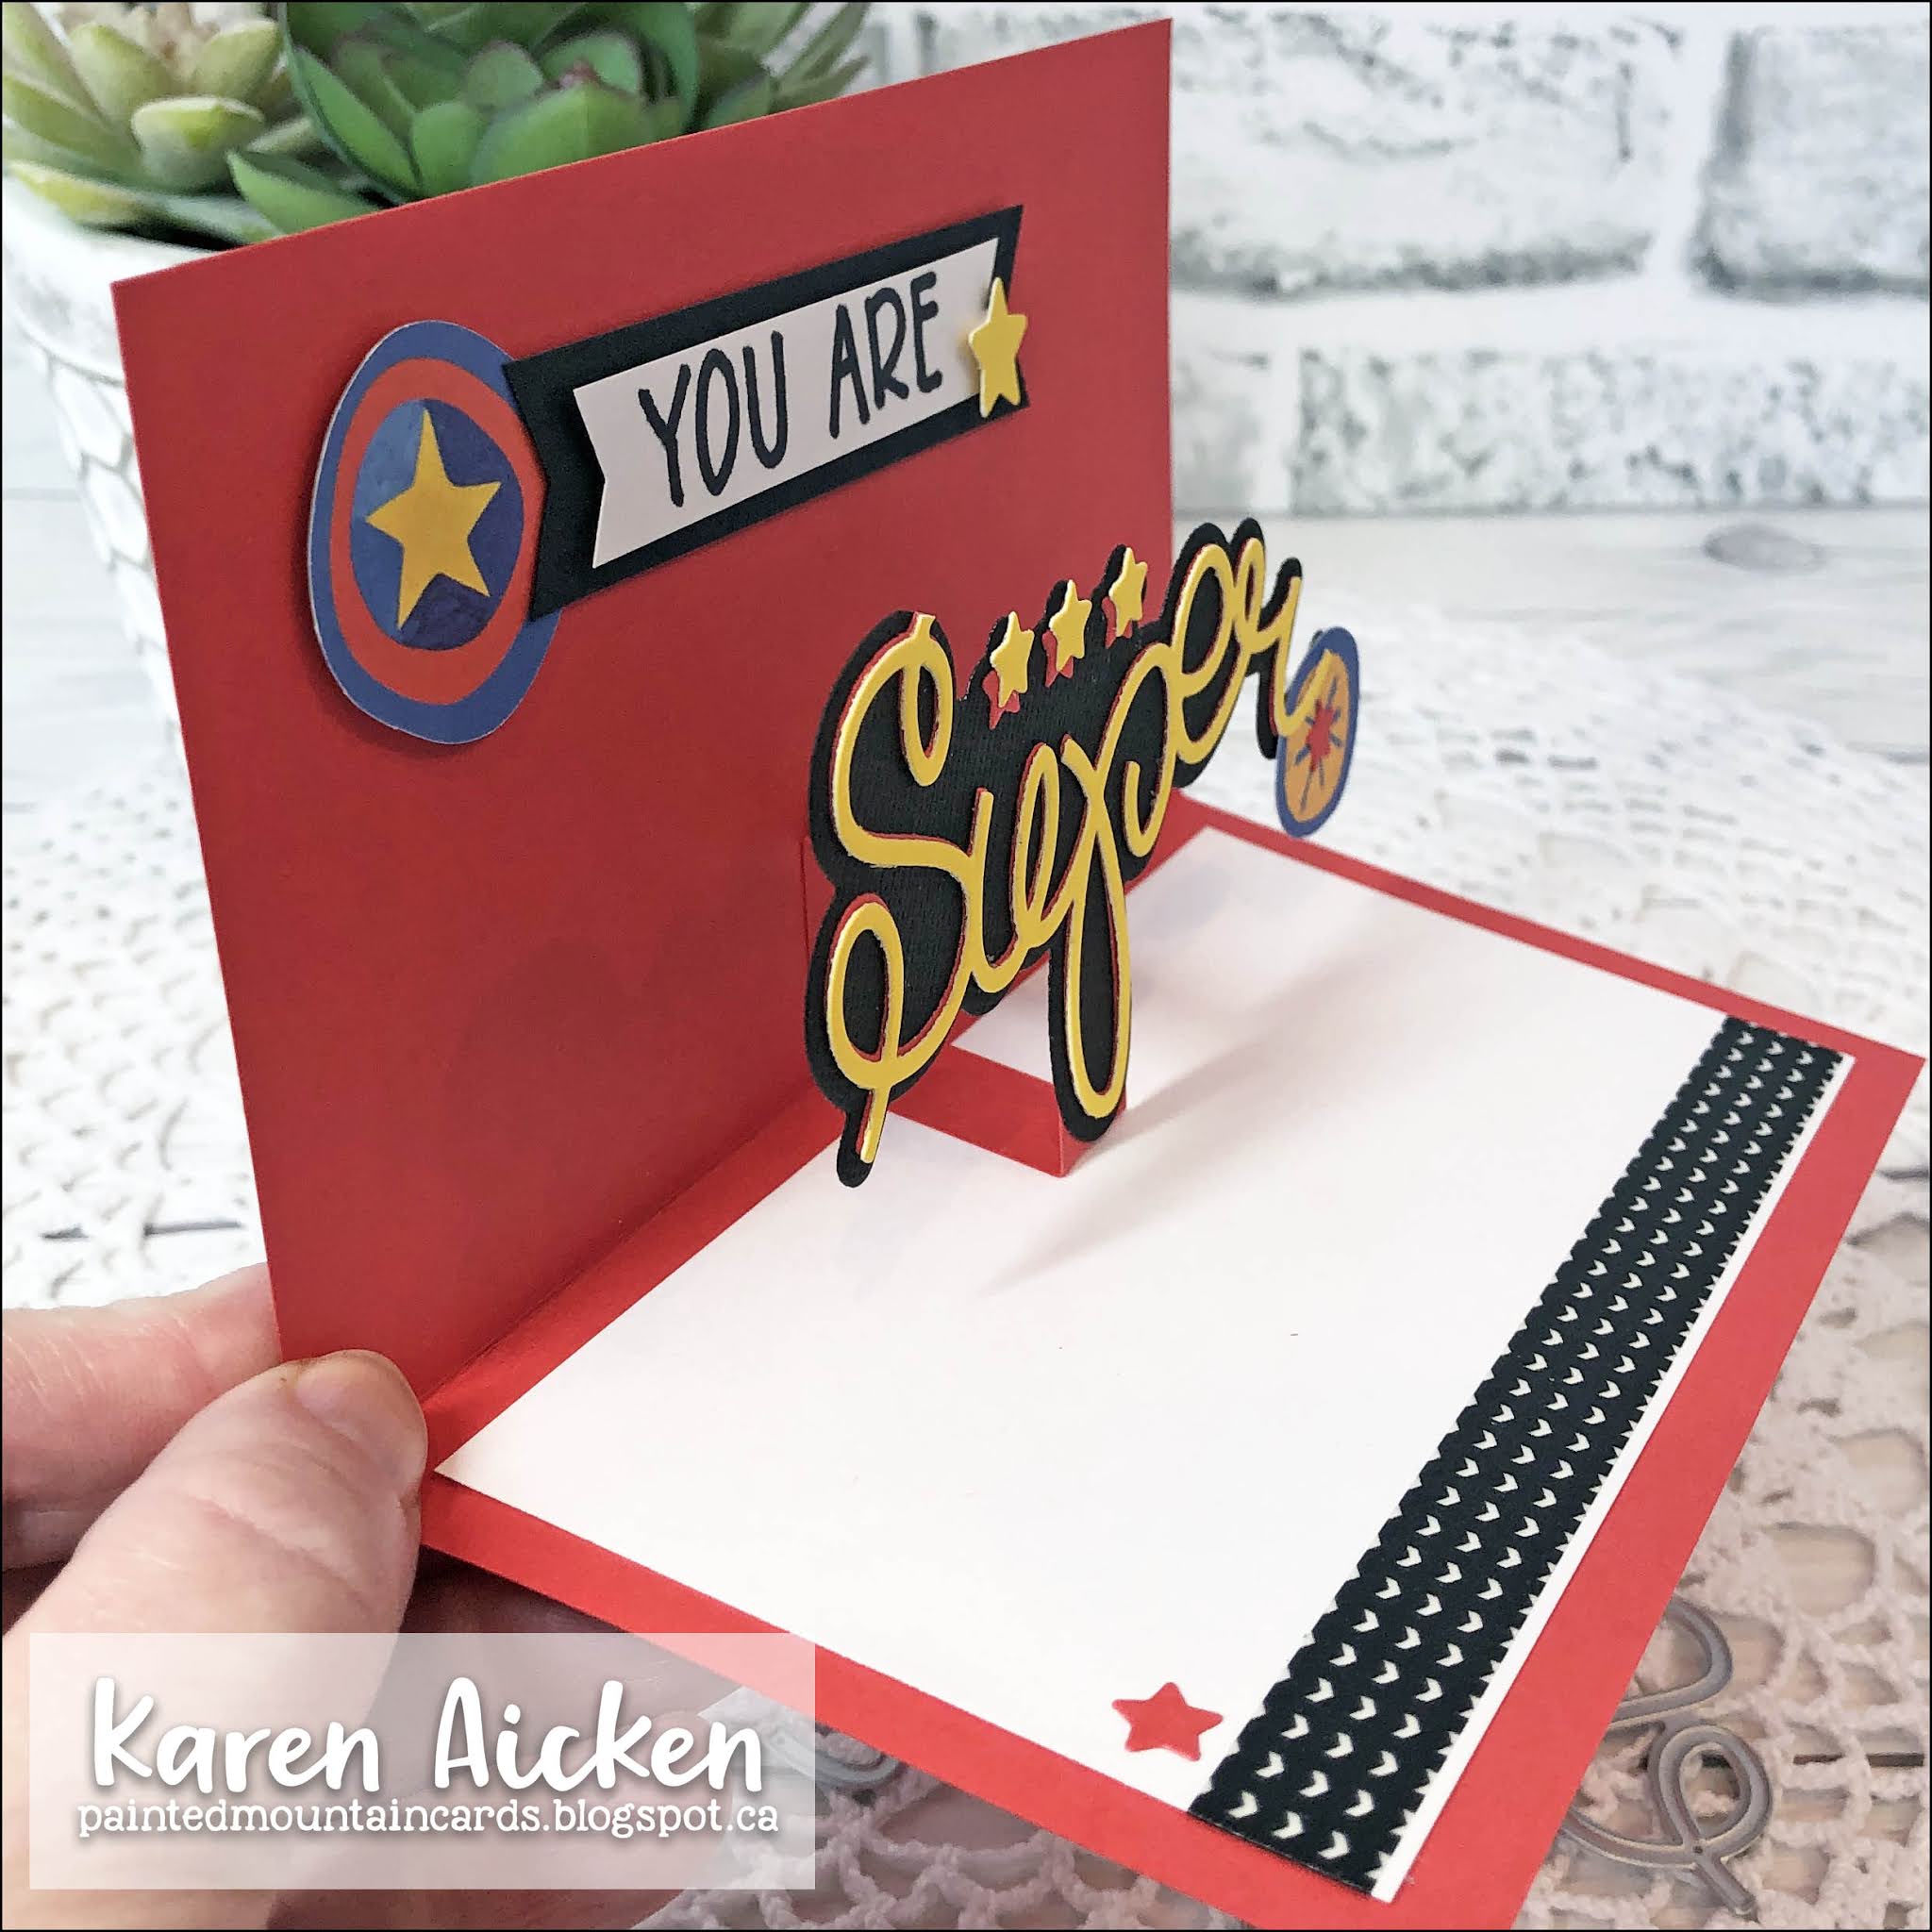
You Are Super Pop Up Mini Slimline Card

Hello!  Today's Pop Up card is a Mini Slimline card that is on it's way to one of our grandson's. I enjoy sending the grandkids Happy Mail and I know they enjoy it too. Here is a walkthrough of my card on YouTube


Inside, I made a simple Box Pop Up and the Super die from the Stamps of Life. 


The printed elements are by K & Company, and I've had them for a very long time so it was fun to get them out and USE several of them on this card. 


Finally, a side view so you can see the Pop Up a little better.


Supplies:
Card stocks - stash
Printed elements - K & Company (old, from my stash)
Washi Tape
Wink of Stella
Super stamp & die set - the Stamps of Life
Banners Pick a Punch - Stampin' Up
Black marker
Star punch - unknown
Carly Alpha - I-crafter
Card size - 6 x 3.5", fits in a #8 envelope

Thanks for stopping by today

Tuesday, 16 February 2021

Slimline Tag Pop Up Hugs Card


Hello!  I'm back today with my weekly Crafty Meraki Design Team project which you can also see on the Crafty Meraki Blog. I had fun coming up with a different way to use the Celebrate Slimline Tag to make a folding card that also has a Pop Up feature inside! I have a tutorial on YouTube for you as well: 


I used  blending brushes and a doily in my favourite colours to create the background, and added images from the Valentine and Pixie Perfect stamp sets. 


When you open the card, the pop up Floral Hugs is revealed along with a butterfly that bobs and wobbles as it is attached with a strip of acetate.


The Floral Hugs was stamped with Momento ink onto Bristol Smooth Card Stock and coloured with Zig Clean Colour markers and a water brush for the bright and vibrant colours.


Partial Diecutting was used to create the tag shaped card base, which I showed in the video. The card stock base was cut to 6 x 7" and scored down the centre at 3". Fold the card stock and align the Celebrate Slimline Tag so that the cutting edge is just above the fold line, which means it will not cut that edge but will cut all the others. Run it through your die cutting machine, cutting through both layers. This gives you the tag shaped card base!

Die cut two more Celebrate Slimline Tags and decorate as above, adding one to the front and one to the back of your folded card base. 

The Floral Hugs was stamped, fussy cut and coloured with water based markers and a water brush. When dry, I scored 1/2" from each edge and down the centre. Then I added two more score lines - one between the left 1/2" and the centre score lines, and one between the centre and the right 1/2" score line. 

Fold along the score lines, starting with a Valley Fold on the left and alternate between 
Valley and Mountain Folds as shown in the video. Adhere inside card using a strong adhesive on the outer edges. Note:  Only put adhesive from the outer edge to the 1/2" score lines!


"Crafty Meraki is a tribe of women who are all creators but more importantly, love helping others in any way we can! 

Meraki (may-rah-kee) a verb, or adverb, a Modern Greek word, derived from the Turkish “Merak” (Labor of love, to do something with pleasure), is applied to tasks, usually, creative or artistic tasks, but can be applied to any task at all. Meraki means to do something with passion, with absolute devotion, with undivided attention.

Crafty Meraki was born out of a vision to help creators do what they love doing the most- to create!"


Supplies:
Celebrate Slimline Tag - Crafty Meraki
Floral Hugs - Crafty Meraki
Pixie Perfect (butterfly) - Crafty Meraki
Valentine (clouds, words) - Crafty Meraki
Mini Misti - My Sweet Petunia
Bristol Smooth Card Stock (for the Floral Hugs)
Zig Clean Colour Markers
Waterbrush
Doily
Taylored Expressions Blending Brushes
Wink of Stella
Stickles
Acetate
Stitched circle - MFT Stamps
Copic markers
Fine point black marker
Ribbons
Sakura black glaze and white gel pens
Satin Rainbow Confetti - Studio Katia

Finished size ~2-3/4 x 6-1/2 and with the ribbon it will fit in a #9 business envelope or an A7 envelope for mailing

Thanks for stopping by today

Monday, 15 February 2021

A Big Deal Shaker Card

Hello!  Today's card is one I made in early December and I was playing with making my own pop up strips. I have a walk through of my card on YouTube too.


It was fun to take a break from holiday cards and pull out this patterned paper, which I had been itching to use. I pulled out the Dotted Patterns Set 4 from Studio Katia because it had this inner frame that I knew would work great for a shaker card.


Inside, I used a school of fish stencil from Picket Fence Studios ... there is just something about a swirling school of fish that appeals to me so I had to purchase that stencil.


You can see I added one of my Pop Up strips inside to add the fussy cut turtle to. I have been doing these simple box pop ups for awhile now, and keep meaning to make a tutorial for all of you. This month though, has kept me hopping with Design Team projects. (Hint ... there is a fun new release coming from Your Next Stamp!!!!)


I'm putting this one aside to send to one of our grandsons, to let them know I'm thinking of them.

Supplies:
Patterned paper - Whale of a Time, Stampin' Up
Frame die - Dotted Patterns Set 4 - Studio Katia
Whale Done stamps - Stampin' Up
Acetate
Various shaker filler
Sakura black glaze pen
Foam hearts - Trinity Stamps
Current of Fish Stencil - Picket Fence Studio
Tasteful Label dies
Bubbly Stencil - Taylored Expressions
Irrid Bubbles - Studio Katia
Card size: Standard A2, 4.25 x 5.5"

Thanks for stopping by today

Sunday, 14 February 2021

Cat Flip-Its Card

Hello!  I enjoy sending Happy Mail to friends and family, and that includes our grandkids. This card is on it's way to Alma, our youngest granddaughter! I wanted to make a Flip-Its card and when I went stash diving and saw these cat stickers, I knew exactly which Flip-It's die set to pull out. I have all the details for you on YouTube


I added the "Love Ya' up the right side of the card, and then brushed it with Wink of Stella for some shimmer.


Using an Alpha die set and white pearl card stock, I added her name inside.

Alma has a cute purse that she carries around with her, and when she gets Happy Mail from me, it goes right into her purse. ❤️


Supplies:
Triple Circle Flip-Its - the Stamps of Life
Cat 3D stickers - Recollections
Card stocks - stash
Patterned paper - Herbs & Honey, Basic Grey
Black glaze pen - Sakura
Wink of Stella
Big Scripty Word dies - Lawn Fawn
Paw Print die - Paw Prints,  MFT Stamps
White pearl card stock
Alpha dies - Paperytrey Ink
Seam binding - Stampin' Up
Card size - Standard A2, 4.25 x 5.5"

Thanks for stopping by today

Saturday, 13 February 2021

Butterfly Slimline Thank You Card


Hello! Today I am sharing a Slimline Thank You card that I have had on my mind for MONTHS. Basically, ever since Karen Burniston released the Garden Charms. I have a notebook that I keep track of card ideas in and this was one of the ones I wanted to try when I first saw those charms. 

I die cut the butterflies from white card stock, then dipped & dragged them through puddles of dye ink that had been spritzed with water. I wasn't going for complete coverage - I wanted the light, airy water colour look. When they were done, I added colour to the butterfly bodies with a grey alcohol marker and then added Stickles over that.

I added three more butterflies inside, and wrote my note of thanks around them. 


All the butterflies were adhered with thin foam tape and there are a few sequins for some additional sparkle & shine. The Thank You was die cut three times - twice from white card stock once from grey. I adhered the two white ones together so it would be nice and sturdy. To add the colour to the Thank You, I scribbled rows of Crayola markers onto my glass mat, spritzed it with water then dipped the Thank You in it. Then I adhered the water coloured one to the grey one slightly offset so the grey is a bit of a shadow.

I forgot to mention that the butterfly die cuts a charm, so they have a hanging hole that I easily snipped off with scissors. I also layered two pieces of white card stock and was able to cut the butterflies two at a time which saved time and effort. 

Supplies:
1130 Backyard Charms - Karen Burniston
1151 Crosshatch Long Rectangles - Karen Burniston
1066 Thank You - Karen Burniston
Card stocks - stash
Shimmer Spray
Stickles
Wink of Stella
Crayola markers
Copic marker
Sequins
Card size - 3.5 x 8.5", fits in a #9 or #10 Business Envelope

Thanks for stopping by today

Friday, 12 February 2021

Sending Hugs Tag (or Bookmark)


Hello! Today Your Next Stamp is one of the sponsors for the Cut It Up Challenge Blog! The theme for that challenge is All You Need is Love (Valentine or Love related) and the prize is a YNS $20.00 egift card. Check out all the details on the Your Next Stamp Blog.

I made a HUGS tag/bookmark using several YNS products, which are linked below. 


The Fun Faces stamp set has such cute little faces and I couldn't resist adding one to the bottom of my tag. I also added a pearlized white doily and a sparkling white GumDrop!

Thursday, 11 February 2021

April 2020 Paper Pumpkin - First Card Group

Hello!  I have been lucky enough to find a couple of on-line listings for un-used Paper Pumpkin kits, and one of them is called My Wonderful Family (April 2020 Paper Pumpkin Kit). Today I'm sharing the first four cards I made using the kit and all of them were mailed to family members.

I have a walkthrough of my cards on YouTube here:

The kit came with four printed panels with a lovely family verse printed on it. Those panels are what inspired these first four cards. The card bases were all 'fun folds', so this first card uses one of the Z-fold card card bases.

 
I love the pretty envelopes that come in the Paper Pumpkin kids, so I kept these cards all A2 so I could mail them in the envelopes.


The second card uses another one of the fun folds and I really liked the bright pops of yellow that were included. The small butterfly came in the kit, but the larger one is was punched from yellow card stock and stamped with the tree foliage in yellow.


Here is a peek at the inside of that card, with the pretty family sentiment.


I made this third card into a pocket card, and added some of 'that paper' because the colours matched so perfectly. The pretty green sprig came in the kit. The photo below shows the sentiment panel inside the pocket ...


... and here it is out of the pocket.


I used the negative part of the sprig piece to lightly stencil the back side of the pocket insert, and added another sentiment on a fish tail banner. That is also where I signed our names.


Finally - the fourth card! I adhered the green printed piece flat against the inside of the card for a different look, and added a die cut strip of yellow card stock above that. One of the bare tree die cuts from the kit  was adhered over the the stamped foliage, and I added a bird from the kit and a stamped fish tail banner.


Finally, here is a look at the inside, with the printed sentiment. This last one went to our son so it's a little less 'fussy'.


I have the next four cards done and will share those with that video later this month.

Supplies:
April 2020 Paper Pumpkin, My Wonderful Family
Card #1 (additional supplies to the Paper Pumpkin kit)
Stitched Mini Scallop Rectangles - MFT Stamps
Card stocks
Square Vellum Doily - Stampin' Up
Tasteful Label dies - Stampin' Up
Crayola markers
Wink of Stella
I-crafter blending brushes
Clear resin hearts - Stampin' Up

Card #2 (additional supplies to the Paper Pumpkin kit)
Tree trunk - Paper Smooches
Butterfly punch - Stampin' Up
Wink of Stella
Card stocks
Sequins

Card #3 (additional supplies to the Paper Pumpkin kit)
Patterned paper - Eucalyptus, Paper Studio
Card stocks
Butterfly punch - Martha Stewart
Wink of Stella
Scotch Tape

Card #4 (additional supplies to the Paper Pumpkin kit)
Cut off gatefold portion and adhered it right to card base
Halftone Lines Cover Die - Studio Katia (for yellow strip)
Water brush
Card stocks

Thanks for stopping by today