Thursday, 17 September 2020

Fun Friday Challenge #148 Fall Festival


Hello crafty friends

It's time for a new Challenge at Your Next Stamp - 
the Fun Friday Challenge #148 has a theme of 
Fall Festival - colors, fairs, whatever comes to mind!

The Fun Friday Challenges come with two chances to win prizes!!
Comment on the YNS BlogInstagram or Facebook pages for a chance to win a free stamp set. Comment on all three to increase your chances, but comments must be left by September 23rd 2020. The winner will be announced on September 25th on the YNS Blog.

More details about the prizes at the end of my post!

The 'Fall Festival' card I'm sharing today is a Slimline card I sent to our middle daughter and family who will be celebrating Rosh Hashanah this weekend. Rosh Hashanah is the Jewish New Year, so I chose images that are associated with Rosh Hashanah like honey and apples (have a sweet year).


On the Kraft panel, I die cut the Stitched Apple from the centre then backed the opening with acetate. You know I love the shine you get from acetate! Then I added a scrap of red card stock behind that and matted it with a white panel before adding it to the card front.

The Honeycomb Die set is going to be fun to play with! Here I added a few of the fallaway pieces back into the openings, and filled a few others with glossy accents and a light dusting of glitter. I also added gold Nuvo glitter pen inside a few others!


For the inside, I used the icicle border to represent dripping honey, and a black marker to add the traditional greeting "Shana Tovah". For the stencil, I die cut the honeycomb from a piece of release paper from some double sided adhesive and a blending brush.


The Fun Friday Challenge #148 runs through October 1st 2020 at midnight EST. One random participant will win a $15 gift certificate to the Your Next Stamp store.  If YNS stamps or dies are the focal point then the winner receives an additional $5 gift certificate for a total of $20!!  The winner will be announced on the YNS Blog the Sunday after the challenge closes. Check it all out on the Your Next Stamp blog HERE. 

Supplies:
Card stocks
Acetate
Word stamp - Mazel Tov, Papertrey Ink
Taylored Expressions blending brushes
White paint pen
Black marker
Stampin' Up Blend - Dark Daffodil Delight
Glossy accents
Silk Microfine Glitter, Solar Gold - Elizabeth Craft Designs
Gold Nuvo Glitter Pen

Card size - 3.5 x 8.5", fits in a #10 Business Envelope

Thanks for stopping by today

Your Next Stamp September Release & Instagram Hop!


Hello crafty friends ...

This is my second post this morning, because today is the day that the NEW RELEASE goes live at Your Next Stamp! I hope you have enjoyed the previews the Design Team has been sharing all week on the YNS Blog.


I'd like to let you know that we are celebrating this new release with an Instagram Hop!  The YNS September New Release Instagram Hop starts at 11 am EDT on 9/17/2020. Join us for your chance to win one of the three $20 gift certificates to the Your Next Stamp Store!!! The Instagram hop starts at YNS' Instagram page and continues on... find them on IG @yournextstamp


 Not only is there a chance to win a prize, there is a sale coupon too!


 I have another card to share today and once again I made a Slimline card.


The Happy Hayrides set is so cute - I really like the nice big size of the images! They were stamped with YNS Black Olive Ink and coloured with Copic markers, and I found this partial sheet of patterned paper in my stash that had the sun rays coming from the top left corner. Perfect to start my scene!


The brown paper has a scissor cut wavy line to represent the ground, and I just HAD to add the blue ribbon to this giant pumpkin.


Inside I added a border strip of patterned paper from the same package, and stamped 'Hello, Fall' from the Happy Hayrides stamp set.


If you are on Instagram, I hope you will join us for the hop, check out all the inspiration from the Design Team and follow/comment for a chance to win a YNS prize!


Supplies:

Black Olive Ink - Your Next Stamp
Happy Hayrides - Your Next Stamp (New Release)
Happy Hayrides Die Set - Your Next Stamp (New Release)
Glossy Accents
Copic Markers
Gold Nuvo Shimmer Pen
Patterned paper - Good Day Sunshine, My Minds Eye
and Doodlebug's Fall Friends
Card stocks - stash

Card size - 8.5 x 3.5", fits in a #10 Business Envelope


Thanks for stopping by today

Wednesday, 16 September 2020

Stamptember with Riley & Company!


Hello crafty friends...

This year Riley & Company is part of Stamptember, which is a month long event by Simon Says Stamp. They work with different manufacturers to come up with a stamp set (some sets have coordinating dies) that are Limited Edition. Once again this year, the stamp sets are selling out quickly! 


The Karen Burniston design team got to play with the fun Riley & Company set and I have a walkthrough of the stamps and my rainbow pop up card in a YouTube video:


I used Karen Burniston's Heart Pivot Panel along with a couple of cute images from the stamp set, which is called "True Friends". The patterned paper is a new one, and I actually cut into it for this card! 


As mentioned in the video, the one heart point was sticking out between Riley's legs so I snipped it off. That doesn't affect the pop up part at all and looks much better. Trust me. Ha.

I added the envelope from the Heart Charms to the stamped sentiment, and the fun animal trio (Simon, Riley & Burt) were coloured with coloured pencils blended with mineral spirits. I believe there is a coordinating die set available, but I fussy cut mine out.


Below is the view from the top of the card so you can see all the folds a little better.


If you like these stamps, be sure and head to Simon Says Stamp top pick up your 'True Friends' stamp set while it is available!


Supplies:
True Friends - Riley & Company/Simon Says Stamp
1088 Heart Pivot Panel - Karen Burniston
1113 Love Charms - Karen Burniston
1054 Rectangles Crosshatch - Karen Burniston
Various card stocks from my stash
Pencil Crayons -  Prismacolor
Gamsol & blending stump
1/8 and 1/2" Quick Strips -  the Stamp Market Sakura Black Glaze and White gel pens
Patterned paper - JJ Bolton, Waffle Flower
Vellum - Stash
Stick-it - Ken Oliver
Wink of Stella
Crystal Clear Confetti - Studio Katia
Card size - Standard Wide A2 (5.5 x 4.25")


Thanks for stopping by today

Circle Charm Pop Up Thanksgiving Card


Hello crafty friends ...

I haven't played with the Circle Charm Pop Up in awhile, so I pulled it out to make a Thanksgiving Card for my stash. This is a die set by Karen Burniston and one of my top three favourite KB die sets. I go over the details of my card in the YouTube video:


The centre portion of the Circle Charm Pop Up is actually a frame meant to dangle a charm from but I like to back the frame to give me a solid area to decorate. That is what I did here, adding a little cluster using dies from the Flowers and Bee die set which is also by Karen Burniston.


The sentiments are from the new Happy Hayrides at Your Next Stamp, and I used the Banners Pick A Punch to fishtail the ends of the card stock strips.


Finally, here is a top view where you can see the pivoting circles.


Supplies:
1046 Circle Charm Pop Up die set - Karen Burniston
1026 Flowers and Bee die set - Karen Burniston
Patterned paper - TC Fall, K & Company (stash)
Various card stocks - stash
Sakura gold gel pen
Gold foil card stock - Stampin' Up
1/8" Quick Strips die - the Stamp Market
Autumn sticker - Recollections (stash)
Banner Pick a Punch - Stampin' Up
So Grateful - Happy Hayrides, Your Next Stamp
Holographic circle stickers - Dazzles

Card size - 5 x 5", fits in a 5.5" square envelope or an A7 envelope (5 x 7").


Thanks for stopping by today

Tuesday, 15 September 2020

Flowers and Feather Slimline Card


Hello crafty friends ...

Today I'm sharing a Slimline Birthday Card that uses this lovely feather & flower digital stamp from Angie Blom Digital Designs. I thought it was just lovely and I was glad to finally print one off to colour and mount on a card. With digital stamps, you get to choose the size so I was able to size it to work with a Slimline, but you could size it for an A2 or other card/project if you prefer.

'They' keep changing our social media platforms, and Blogger is no different. I am going to try to add a quick video here so you can see all the sparkle and shine on my card, but I won't know until the post goes live if it actually worked or not! Fingers crossed.


I used the Slimline dies from Studio Katia for my layers, and of course added lots of sparkle as well.


The sentiments are from the Simple Strips Birthday by Taylored Expressions.


Here is a peek at the inside, where I added two die cut feathers and a pretty sentiment.


Supplies:

Feather dig stamp - Be Unique Feather, Angie Bloom Digital Designs
Copic markers
Sakura white gel pen
Dotted Slimline Dies Set 1 - Studio Katia
Various card stocks
Patterned paper - K & Company
Stickles
Feather/leaves - Paper Smooches
Tiny Attacher - Tim Holtz
Simple Strips Birthday - Taylored Expressions
Simple Strips die - Taylored Expressions
Crystal Clear Confetti - Studio Katia
It's Your Birthday - Studio Katia

Card size - 3.5 x 8.5", fits in a #10 Business Envelope


Thanks for stopping by today

Sunday, 13 September 2020

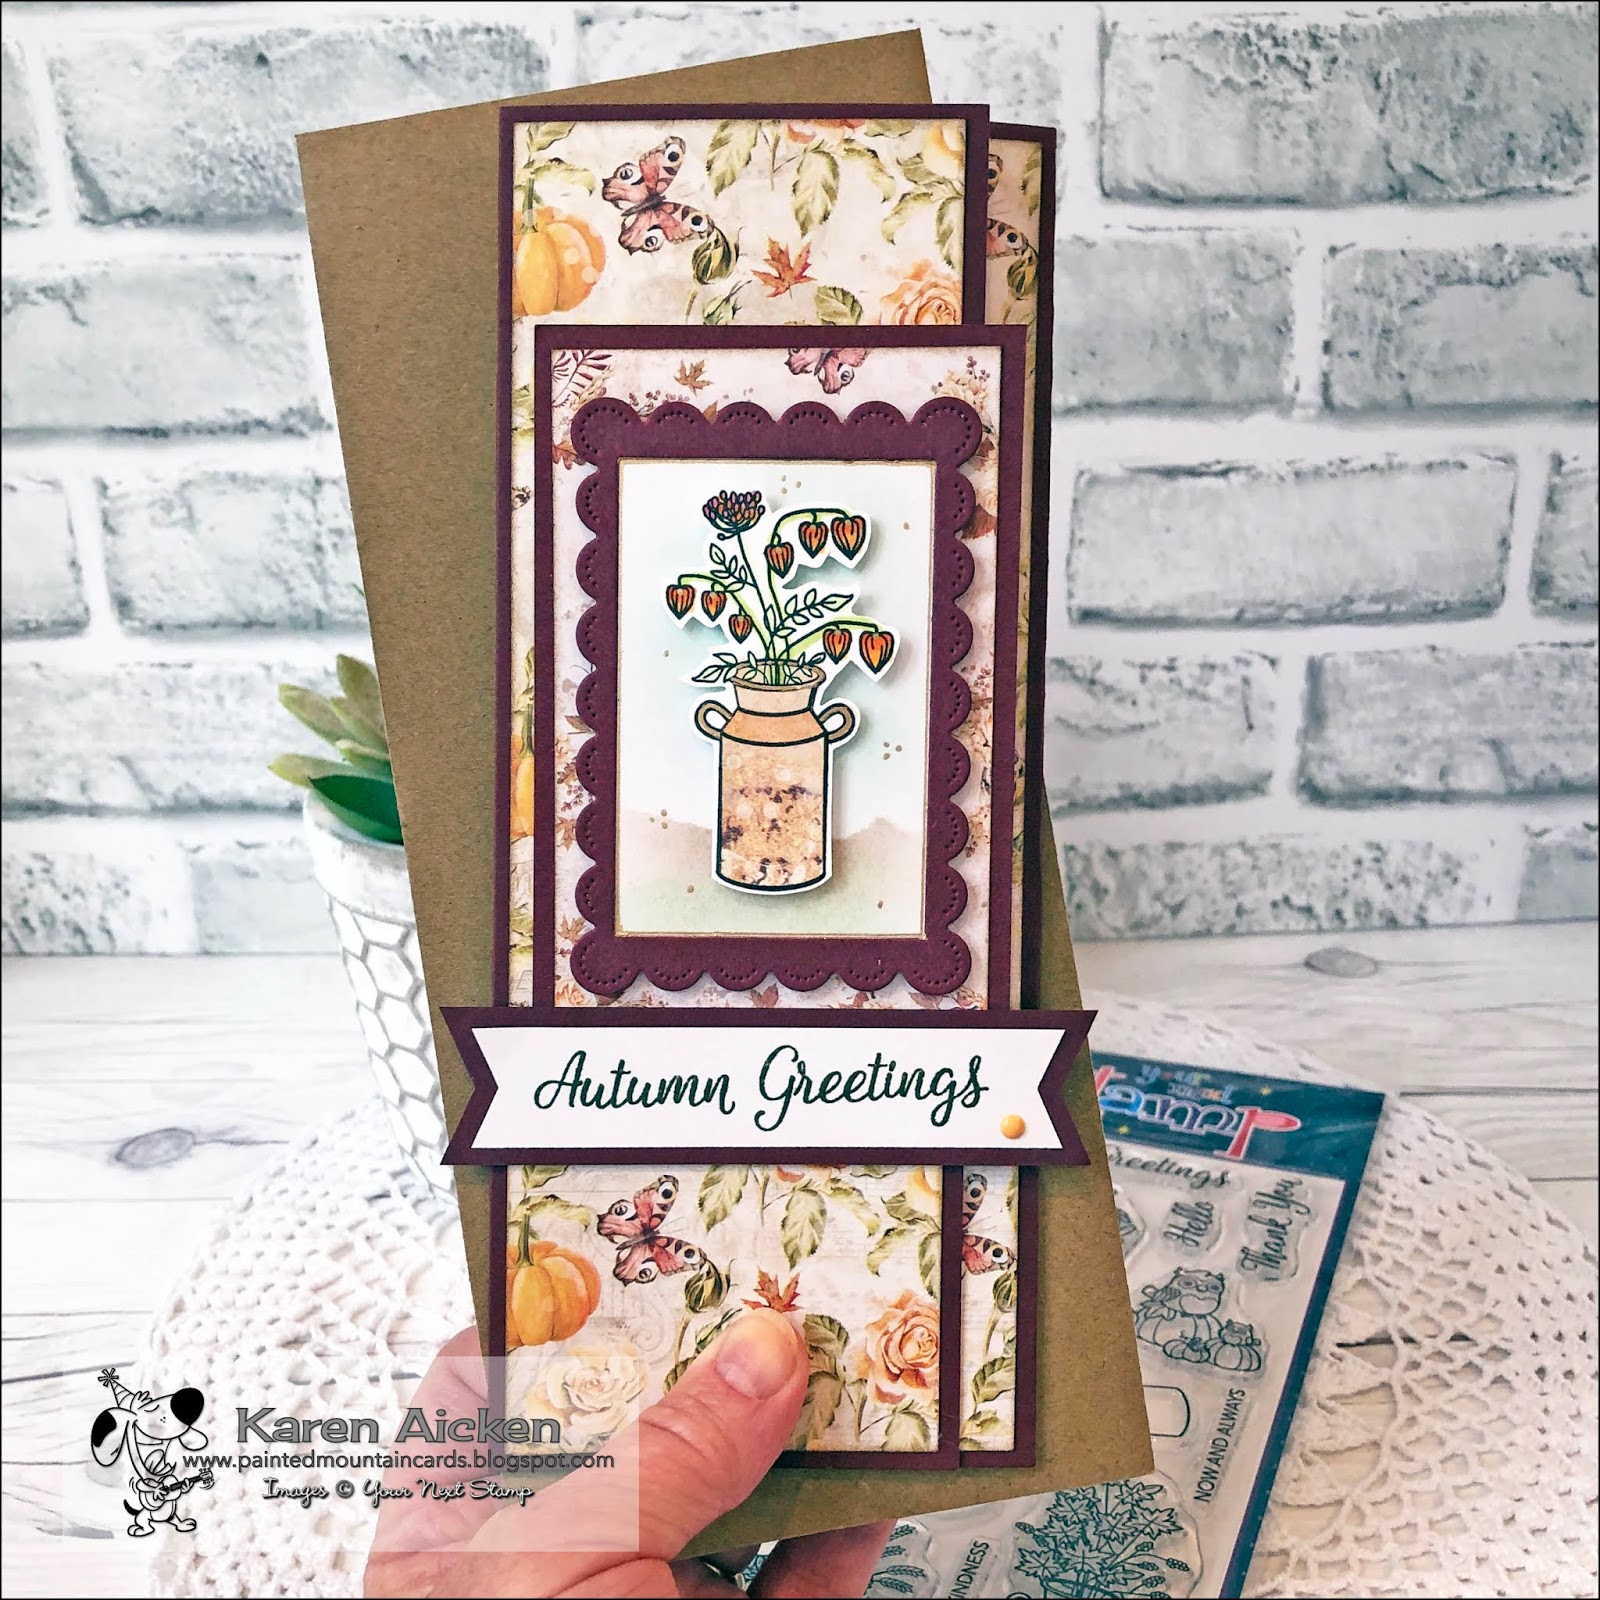
Autumn Milk Can Slimline Trifold


Hello crafty friends ...

Once more, COVID played havoc with manufacturing and shipping but the Your Next Stamp Design Team can finally start to share previews of the September Release!! I chose the lovely Autumn Milk Can stamp set to work with and made a Slimline Trifold card for Thanksgiving.


I have a YouTube video for you with all the details of my card today:


This Slimline Trifold is a layout I have done several times before, and I go over the measurements in the video as well as at the end of my post.

The milk can was paper pieced, using one of the marbled looking papers from the paper pad and I added lots of gold gel pen highlights for some shimmer.


Here is a peek at the inside - I used pieces of the largest frame in the set to create the cute scalloped borders!


Measurements - the card base is cut to 8.5 x 8.5". Score the left size at 3", and the right side at 2". Patterned paper panels are cut 1/4" smaller - or whatever size your choose. Example - the right panel is 2 x 8.5", so the patterned paper was cut to 1.75 x 8.25".  The decorative rectangle panel is 3 x 5".


Supplies:

Rectangle Scallop Frame with Piercing Marks - Your Next Stamp
Autumn Milk Cans - Your Next Stamp (NEW RELEASE)
Black Olive Ink - Your Next Stamp
Retro Gumdrops - Your Next Stamp
Card stocks - stash
Patterned paper - Amber Moon, Prima
1/2" Quick Strips die - Stamp Market
Sakura gold gel pen
Mini MISTI - My Sweet Petunia
Copic markers
Taylored Expressions Blending Brushes
Banner Pick a Punch - Stampin' Up
Gold Nuvo Glitter Pen

Card size - 3.5 x 8.5", fits in a #10 Business Envelope


Thanks for stopping by today

July Sheetload of Cards


Hello crafty friends ... 

If you follow my blog you know that I rarely post my cards in the same order I make them. I keep track of my blog posts in a small planner, and the last two months has been crazy with the number of changes because of shipping delays or Design Team requirements, last minute cards to share etc. In fact, I was getting so tired of scribbling out the posts to write in the new ones, or erasing them if I used pencil then having to re-write them again on a different date ... I have started writing them down on a small Post-It note for each day in the planner.

Just yesterday I had to swap two blog posts around because I was asked to take on a different DT date than I had been scheduled for. So ... these cards were supposed to be shared in July, but the post got moved a couple of times and here we are.

For my eight Birthday Cards today, I used the July Sheetload of Cards by Call Me Crafty Al's   for the sketch and cutting template. I will have her link at the end of my post above the Supply list.

This is a card layout I have done many times over the years but I loved having the measurements to utilize two 12 x 12" sheets of patterned paper to efficiently create eight cards.

This time I used the sketch more as a guide, which is the great thing about sketches! I actually used an older 6 x 6" paper pad instead of 12 x 12" papers and made two sets of four ... here are the first four cards:


I have a bunch of these chipboard elements in my stash - I believe they are supposed to be bookmarks for children but they make great embellishments for the Birthday Cards I donate to my Mom's old nursing home.


The insides were done the same ...


Here is the second  set of cards ...


I added Nuvo Glitter Drops to each of the eight cards, as well as on some of the embellishments for a little sparkle.


This July Sheetload was a lot of fun and I will be doing it again for sure. I got all eight of these cards made in one evening!

Call me Crafty Al's July Sheetload of Cards can be found HERE.  The template is free to subscribers of her YouTube channel and I think it's well worth subscribing. Her Sheetload series is SO much fun and such an effective way to use up your stash!!


Supplies:
Call Me Crafty Al - sketch and cutting template
Various card stocks
Patterned paper - Welcome To Paris, Prima
Chipboard embellishments - stash (unknown)
Tailored Tag (to punch banner tails)
Happy Birthday - Perennial Birthday (Stampin' Up)
Inside words - Birthday Blowout, Poppy Stamps
Stickles
Nuvo Drops

Card size - All, Standard A2 (4.25 x 5.5")

Thanks for stopping by today

Saturday, 12 September 2020

Grandparent's Day Slimline Card


Hello crafty friends ...

Today I'm sharing the card I sent to my Mother In Law for Grandparent's Day. 

I had this cheerful floral paper in my stash and I am NOT ready for fall yet so didn't want to go with earthy tones. The colours could easily be swapped out though, if you wanted to recreate this card. 

I die cut the Waves Slimline Die from yellow card stock and backed it with a transparency before adhering it over the floral paper. I have been doing this for a long time - I just love the shine you get, and that it is something unexpected. 


You may have noticed that there are no sequins or extra bling (what???) but with all the shine from the acetate, I thought adding more would just be too much. Yes, I actually said that I could have too much shine on a card. Ha!


Here is a peek at the inside, where I added a few of the fallaway pieces back onto the white panel for some colour and to tie in the card front.


I love that Karen Burniston adds heart dies to many of her sets, so I pulled out this small heart from the Katherine Label die set and cut it out of one of the stitched hexagons. Then I backed it with a small transparency piece and scrap of the pink card stock. I just love this little addition!


I send this lady a Grandparent's Day card every year, and have since 1985. Every Single Year. And every year, she say's something off handed like "I didn't know Grandparent's Day was a thing, but thanks for the card". I refuse to quit sending them to her, because I know she loves her grandkids and great grandkids and I want her to feel appreciated. So once again, this one was made with love and sent on it's way.

#suysjul2020 #showusyoursheetload

Supplies:
Various card stocks
Patterned paper - Easter Floral, Echo Park
Transparency sheet
Slimline Waves Die - Whimsy Stamps
Stitched Hexagons dies - Elizabeth Craft Designs
Copic Markers
Sakura Black Glaze and White Gel pens
Honey Bees - stamps and coordinating dies, Studio Katia
So Grateful - Happy Hayrides, Your Next Stamp
White Embossing Powder
Wink of Stella
Black Sharpie
1011 Katherine Label (small heart) - Karen Burniston

Card size - 3.5 x 8.5", fits in a #10 Business Envelope

Thanks for stopping by today

Friday, 11 September 2020

Crappy Times Flip It Card


Hello crafty friends ...

It's Fun Fold Friday here on my blog, and I have a Flip-It Card to share today! All the details are in my YouTube video below:


The Crappy Times set is from the August Release at Your Next Stamp and it's a great little set to send out some Happy Mail and make someone smile.


Below is a peek at the inside, with the second part of the sentiment on the left and room to sign our names on the right.


Supplies:
Card, Gift Card Flip It's - Stephanie Barnard, the Stamps of Life
Various card stocks - stash
Patterned paper - the Sorbet Stack, DCWV
Stitched Rectangle Die Set - Your Next Stamp
Crappy Times - Your Next Stamp
Crappy Times Die Set - Your Next Stamp
Black Olive Ink - Your Next Stamp
Stitched Fishtail Banner Die Set - Your Next Stamp
Glitter Dot - Elizabeth Craft Designs
Tombow Markers
Water Brush
Copic Marker
Stickles

Card size - standard A2 (4.25 x 5.5")


Thanks for stopping by today