Friday, 20 September 2019

Ocean Themed Photo Collage Pop Up

Hello my crafty friends

Today I'm sharing the birthday card I made for a friend. I'll start off with a YouTube video so you can see Karen Burniston's amazing Photo Collage Pop-Up in action. It creates such a dynamic pop up! Still shots and more details follow the YouTube video if you are interested, and there is a supply list at the end of my post.


I'm a huge fan of K & Company, and thankfully I have a big collection of their papers and embellishments. They are really hard to find anymore! Inside this stack of paper, there are two 12 x 12" sheets of faux postage and I figured they would be perfect to use with this type of die. They are detailed and glossy and SO pretty. Perfect for anyone who loves the ocean.

For the front of my card, I used an alphabet die to cut the word SHELL from kraft card stock, and then I cut the new Celebrate from kraft but cut away the CEL. I trimmed around the 'L' to give me the dash then inked the bottoms of the letters & word with blue distress oxide ink. Love how well it shows up on the kraft.


As usual, I kept the front fairly simple as all the fun is on the inside:


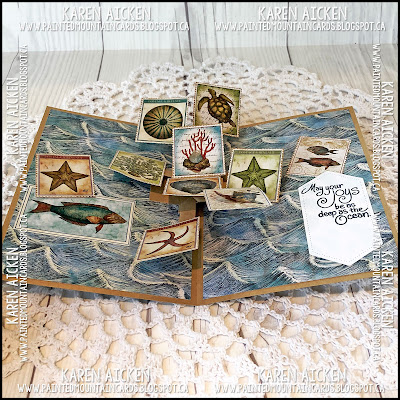
When you open the card there is just an explosion of lovely underwater images!


I rarely post my cards in the same order I make them. I was working on a card for our Daughter's birthday using the Photo Collage Pop Up and had to make sure that none of the elements stuck out of the card. The elements for this card are smaller than the Polaroid frame die that is included, so there were no issues at all. Because they are cut from patterned paper though, once everything was adhered I cut small squares of kraft card stock and adhered them to the backs of the elements to give them some stability.


I stamped the greeting on a stitched label and there was lots of room for me to sign the card.


Supplies:
Kraft, off white card stocks
Patterned paper - K & Company (a Tim Coffey design)
1098 Photo Collage Pop Up - Karen Burniston
Splash Stencil - Taylored Expressions
Stitched Nested Label dies - Stampin' Up
Alpha - Elizabeth Craft Designs
1067 Celebrate - Karen Burniston
May your joys stamp - Ocean Wisdom, Stampendous
Nuvo Drops

Card size - A2 (4.25 x 5.5")

Thanks for stopping by today

Thursday, 19 September 2019

Tropical Party Bird Cards

Hello my crafty friends

Back in March I purchased a 12 x 12" sheet of patterned paper with these fun tropical birds wearing party hats. I loved the colours, and I finally got the sheet cut down and onto cards that I will be donating to my Mom's old nursing home.


First I used a stitched rectangle die on each section of the paper that had a bird and would work for the cards, and adhered fun foam to the back of each panel.


I've had these banners in my stash for years and since I've recently done a little tidying in my craft room I found them and decided to use them on these cards. The colours on the printed panels look more washed out in my photos than the cards do in real life. I added a black glaze pen detail to each of the birds' eyes.


I stamped the inside with a couple of Stampin' Up images, which are listed below.


Supplies:
Patterned paper - Pink Paisley
Stitched rectangle dies - Your Next Stamp
Sakura black glaze pen
Teal, aqua and white card stocks
Fun foam
Fishtail Banners - my stash, old
Happy Birthday - Papertrey Ink
Words inside - Beautiful Friendship, Stampin' Up
Botanical Blooms, Stampin' Up

Thanks for stopping by today

Wednesday, 18 September 2019

'Lets Celebrate' Birthday Card

Hello my crafty friends

Today I'm sharing another card for the Fun Friday Challenge #122 at Your Next Stamp. YNS is celebrating a 10 Year Anniversary so the theme of the challenge is 'Celebration'. You can find all the details of the challenge HERE.


I pulled out an older patterned paper stack that had lots of scraps in it and used the YNS Mini Sunburst die to cut the pinwheel for the front.  I like that the patterned paper has sparkly bits on it! A stamped and die cut banner, a punched balloon with a string of bakers twine, and a little bling in the centre and my card front was finished.


I stamped a large greeting inside, but didn't take a photo. This card will be donated to my Mom's old nursing home.

Supplies:
Patterned paper - My Mind's Eye (old, from my stash)
Scrapworks Mini Sunburst Die Set - Your Next Stamp
White card stock
Bling - Queen & Company
Fun foam
Let's Celebrate and banner stamps/dies - The Stamps of Life
Copic marker
Brush Marker
Balloon Punch - Stampin' Up
Bakers Twine

Card Size - 5 x 5-1/2", which fits in a 5 x 7" envelope.

Thanks for stopping by today

Tuesday, 17 September 2019

Hello Trifold Card

Hello my crafty friends

When I was making the Thanksgiving cards for our Grandkids, there was this typewriter/hello journal card on the sheet and I decided it would make a cute card for a friend. Since I like making trifold cards, that is what I decided on and the card went from there.


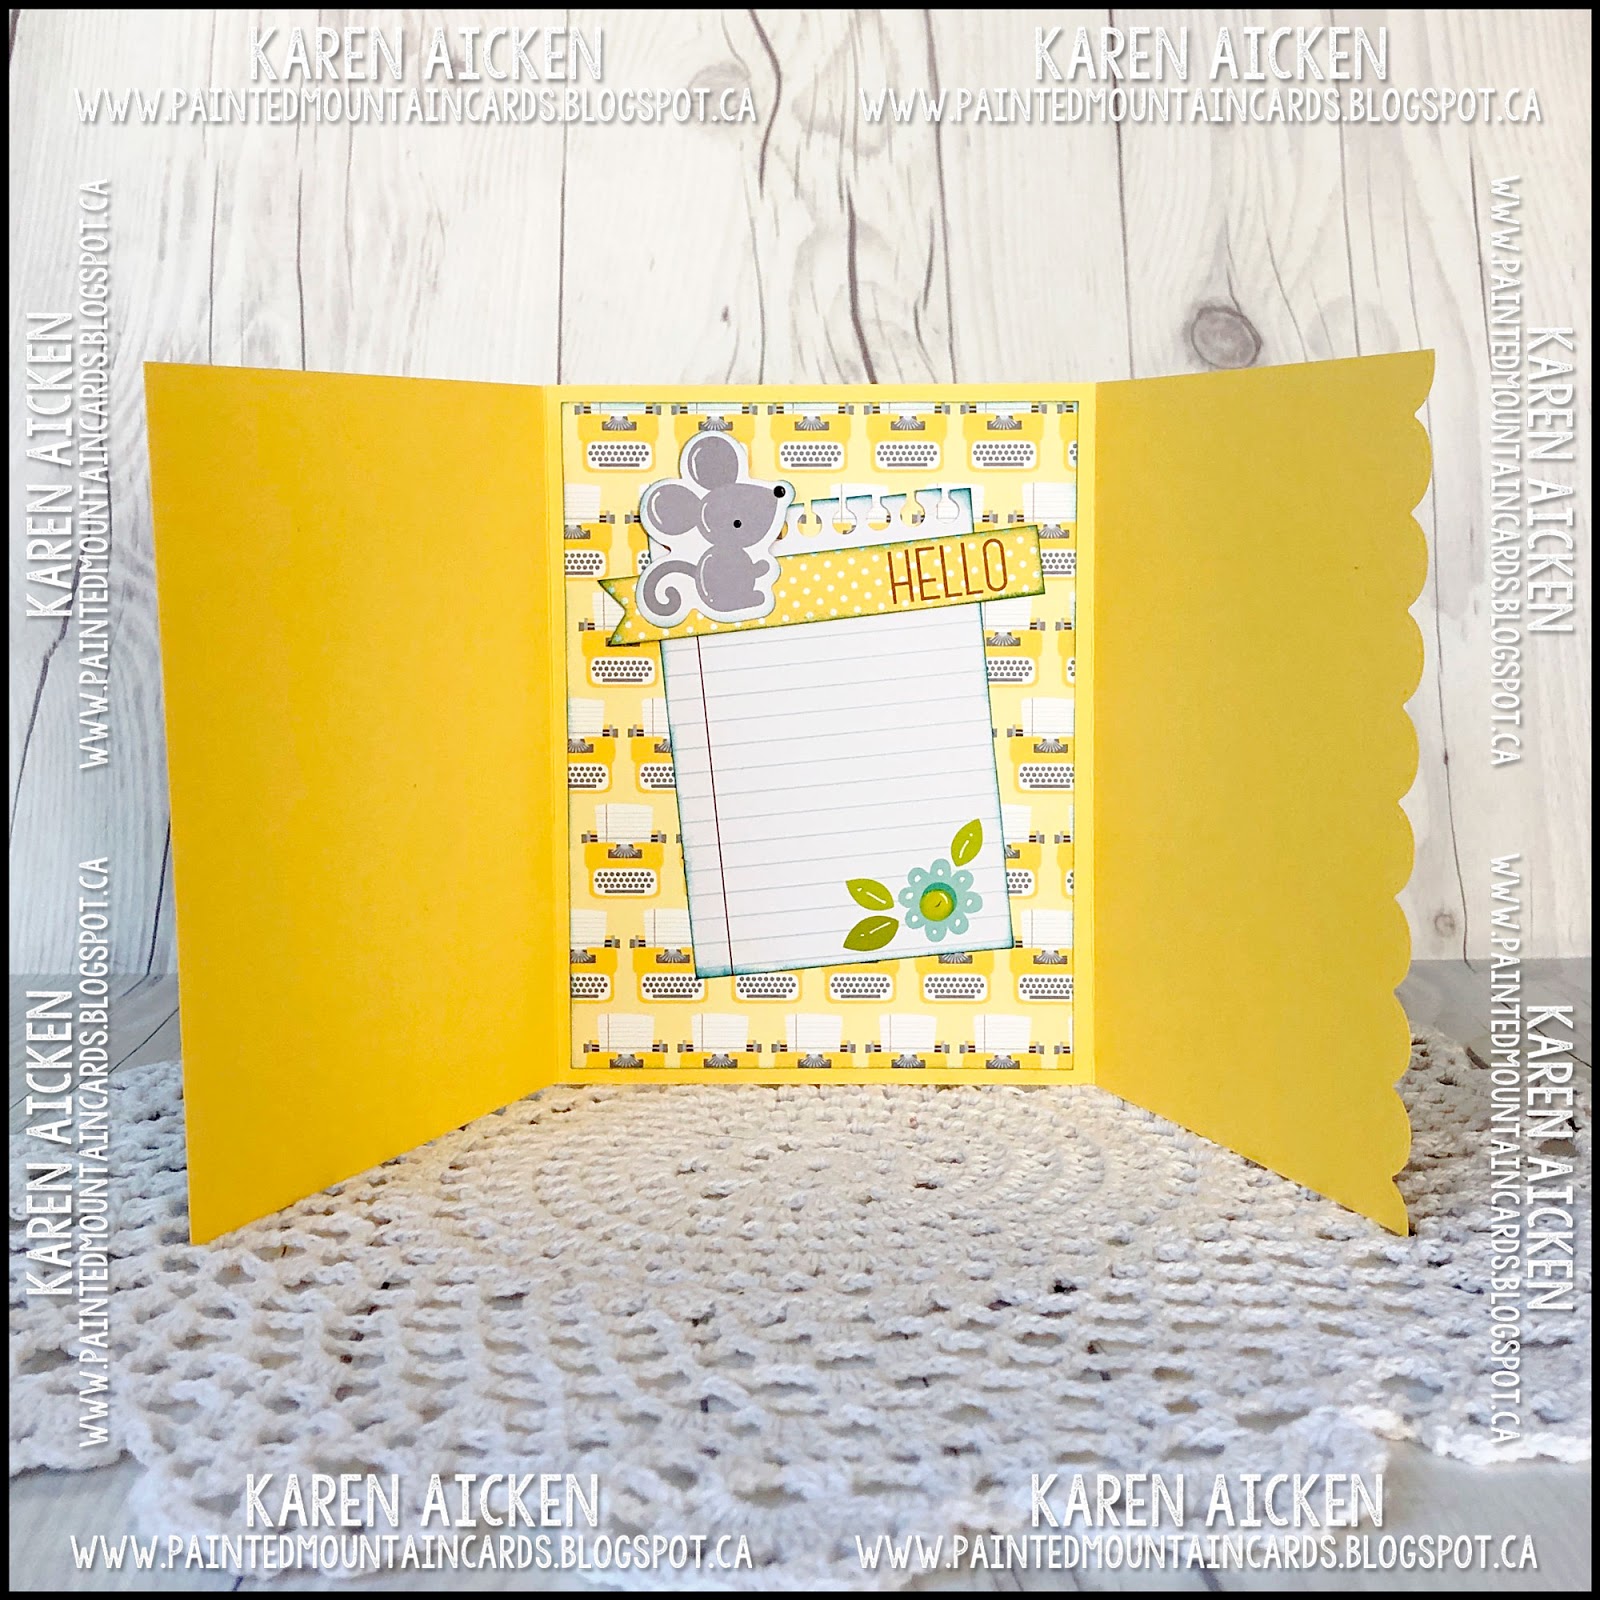
When you open the first panel you see a second panel and this one has a coordinating typewriter from the Doodlebug embellishment pack I had also pulled out for the Thanksgiving cards.


 I have a little typewriter die and stamp set in my stash, and I was happy to see that the words from the stamps fit so nicely on the papers in the typewriters! I also pulled out a script embossing folder and embossed the white panel.


When you open the second panel, a third decorated panel is revealed and this is where I wrote my message before popping the card in the mail.


This card is a standard A2 size, but is a little heavy because of all the layers. So I added a second stamp just to be safe.

Supplies:
Journal Card and Cut apart and embellishments - Flea Market, Doodlebug
W1 Copic Marker
Nuvo Drops
Sakura Stardust Pen, White gel pen and Black Glaze pen
Yellow and white card stocks
Scallop border - MFT Stamps
Script Texture embossing folder - Cuttlebug
Words - Marianne Designs Collectables (typewriter set)

Card size - A2 (4.25 x 5.5")

Thanks for stopping by today

Monday, 16 September 2019

Penguin Birthday Card Duo

Hello my crafty friends

It's Masculine Card Monday here on my blog and I have a pair of Birthday Cards to share today. The Stampin' Up Holiday Catalogue arrived and I couldn't wait to go through it. I always enjoy seeing what they have come up with but this year I was disappointed. Not because the products aren't great - I'm sure they are - but because of my present attitude of having ENOUGH and not needing more more MORE all the time.

As usual, I oooh and aaaah over the new items, and turn down the pages in the catalogue for the items I would like to purchase. When it was time to order though, I ended up unfolding most of those page corners and settled on two stamp sets. That's it! I actually thought about talking myself out of these Playful Penguins but in the end they were one of the two that I did order and I'm really happy with them.

I love that they are fairly realistic AND that they don't require much in the way of colouring. They are red rubber stamps and you can't beat rubber for crisp detailed images. These ones stamp beautifully. Of course they are supposed to be winter images but I chose them because they will work all year long. Here are the first cards I made with the Playful Penguin stamp set - masculine birthday cards I will be donating to my Mom's old nursing home.


The other stamp set that I purchased is called Snow Front. The Stampin' Up Water Front stamp set is hands down my very favourite set and this one will coordinate with it really well. So that was a no brainer ha ha. I used one of the stamps from the Snow Front set to help create ground for the front penguin. Who is also wearing a party hat!

I added some faint hills with a stencil/mask and then stamped greetings on both an 'ink smooshed' fishtail banner and right on the card panel. The 'you're so cool' comes with the Playful Penguins.


Here is a peek at the inside:


I have lots of ideas for this set, so you will be seeing it again soon!

Supplies:
Playful Penguins - Stampin' Up
Snowfront - Stampin' Up
White and black card stocks
Water brush
Party hat stamp - Lawn Fawn
Chameleon Color Tone and Color Top markers
Stitched rectangle - Your Next Stamp
Sakura black glaze and white gel pens
Makeup brushes
Waves & Hills Stencil/Mask - Simon Says Stamp
W1 Copic marker
Birthday look great - Anything But Basic Birthday Wishes, MFT Stamps
Fishtail banner - MFT Stamps
Distress Oxide Inks
Words inside - In and Out Birthday, Taylored Expressions (retired)

Card size - A2 (4.25 x 5.5")

Thanks for stopping by today

Sunday, 15 September 2019

Ten Chipboard Tag Birthday Cards

Hello my crafty friends

Today I'm sharing a set of ten birthday cards I made to donate to my Mom's nursing home.


I started with these pretty chipboard tags. I have had a box of them for awhile now so I pulled out ten that I thought would work well then went through my bin of embellishments & stickers. I had a lot of fun decorating these tags! Once all ten were decorated, I created some card bases with a matting layer and adhered the tags to the card fronts. Each one got a little bow added at the tag hole.

These first two got a 3-d sticker and I wrote Happy Birthday with a black sharpie marker.


I think these next two are my favourite - the succulents have gold trim and the tags also have some gold foil. I added some Happy Birthday Peel-Off stickers to carry on the gold.


These two cards each got a 3-d Birthday Cake sticker, and I added a gold Happy Birthday Peel-Off to the blue one.


Two more tags with the gold Happy Birthday Peel-Off's. The hummingbird has gold foil highlights and the butterfly is a 3-d sticker.


These final two got some handwriting and each of the tags also got some glitter glue for some birthday shimmer and shine.


This terrarium sticker is domed and actually a shaker. The glitter goes all the way through when you shake the card.


Since these cards will be hand delivered, I wasn't worried about bulk or weight. I stamped a greeting inside each one using the MISTI so there would not be any 'oopses'.


Supplies:
Chipboard printed tags - Recollections
Stickers & Embellishments - Stash
Bows - Stampin' Up
Stickles
Happy Birthday gold Peel-Off's - Elizabeth Craft Desgins
Patterned paper - We R Memory Keepers
Folded, printed card bases - Michaels
White card stock
Blueprints #29 (Stitched rectangle die)
MISTI - My Sweet Petunia
Inside stamps - Papertrey Ink

Thanks for stopping by today

Saturday, 14 September 2019

Fall Critter Oval Frames Pop Up

Hello my crafty friends

I have a fall themed card to share today. Not because I feel like welcoming the end of summer but these critter stickers have been sitting on the top of my printer for FAR TOO LONG and it was time to use them and toss the12 x 12"  backing sheet.

I haven't used the Oval Frames Pop Up in awhile so I watched Karen Burniston's assembly video again to refresh my memory. Teammate Sandy Diller had made a card that KB showed on the video and I decided to use Sandy's technique of having the ovals pop up at the top edge of the card.

I also included a short YouTube video showing what the card looks like in action, which is below the photos.

First, here is the front of my card:


I added black gel pen to the eyes and noses of the critters for some shine, and I added a little acorn sticker between his paws. I pulled out some other fall embellishments and added the leaves which have clear embossed veining.


Here is a look at the inside:


... a view from above ...


I was able to use all the remaining stickers other than one that said 'Autumn Memories' so that made me happy. I did adhere the stickers down with glue, since they're older I wasn't convinced that the adhesive would still hold permanently.


Below is the YouTube video!


Supplies:
Stickers - A Perfect Autumn, Echo Park
Mango, Kraft, green and white card stocks
1079 Oval Frames Pop Up - Karen Burniston
Patterned paper - Dreams of Autumn, Bo Bunny
Cloud mask - MFT Stamps
Makeup brushes
Sakura black glaze pen
Acorn sticker - Jolee's Boutique
Leaf embellishments - my stash
Stitched fishtail banner die - Elizabeth Craft Designs
1059 Autumn Elements - Karen Burniston
1060 Word Set 7 Autumn - Karen Burniston
Nuvo Drops

Card size - 5 x 5" (fits in a 5 x 7" envelope)

Thanks for stopping by today

Friday, 13 September 2019

SMILE Diagonal Trifold Card

Hello my crafty friends

Today for Fun Fold Friday here on my blog,  I'm sharing a quick and easy Diagonal Trifold card using a die set by Divinity Designs with Pink & Main SMILE dies.


I had been looking through this paper stack for something else, and saw a partial 12 x 12" sheet that would work really well for this style of card. It's a great way to showcase beautiful papers - this has a nice gloss to it. Above is what the card would look like coming out of the envelope and below is likely how it will be displayed.

I wanted to add another sentiment but didn't want to distract from the scene that spreads across the panels.  I simply white embossed 'you're the best' on a fishtail banner and added it with foam tape and then I was happy.


There is lots of room on the back to write a note when it is time to give the card.


This one is going into the stash and will likely be hand delivered because of the bulk from the bling.

Supplies:
Kraft and white card stocks
Patterned paper - DCWV
Z Fold Card Die with Layers - Divinity Designs
Paper Flowers - stash
Bling - Queen & Company
Smile - Pink and Main
You're the Best - Cool Tag Banner Sentiments, Your Next Stamp
White embossing powder
Fishtail banner die - MFT Stamps
White embossing powder

Card size - 4 x 5-1/2"

Thanks for stopping by today

Thursday, 12 September 2019

Two Spinning Bee Cards

Hello my crafty friends

I had so much fun making these cards! It's a technique I've been itching to try, and my friend Betty gave me a card using it with three little bees on the front. Since I had just used this paper pad (Pebbles) and it had the cute beehive and bee printed papers that were fresh on my mind, I also used bees on my cards. 


I used Bee Peel-Off's from Elizabeth Craft Designs, adhering the stickers to white card stock then fussy cutting the bees out. I water coloured the bee bodies, then assembled the cards.


I love how the bees spin and wiggle around on the card - it's very satisfying to sit and move the card back and forth watching the bees spin. Note, I did add a penny to the back of each of the mechanism's as I wasn't happy with how well they spun without the weight of the penny.


Here is a peek at the inside:


I also made a little YouTube Video so you can see the bees in action. So fun!


I was happy to be able to use up a few more items from my stash for these two cards, as well as pulling out some older stamps!

Supplies:
Bee Peel Off's - Elizabeth Craft Designs
White & black card stocks
Blueprints #12 - MFT Stamps
Patterned paper - Garden Party, Pebbles
Various dye inks
Water Brush
Wink of Stella
Circle dies - Hero Arts
Pennies
Clear embossing powder
Words, Bee4Me - Stephanie Barnard, the Stamps of Life
MISTI - My Sweet Petunia
Background4Bees - Stephanie Barnard, the Stamps of Life
Stitched Nested Label dies - Stampin' Up
Sequins

Card Sizes - A2 (4.25 x 5.5")

Thanks for stopping by today

Wednesday, 11 September 2019

Butterfly Panel Birthday Card

Hello my crafty friends

I know it is September, but I'm still hanging onto Summer. Between my Mom's passing in late June, too much cool & rainy weather, funerals and memorial services, a bad tooth and horrible RA flare - I don't feel like I got a Summer. Certainly not enough - so no fall leaves or pumpkins from me yet. I saw a funny post on FaceBook that said "Keep your Pumpkin Spice away from my Margarita" - ahahahaha - exactly how I feel! Today I'm sharing a butterfly birthday card!

I started with a white panel of card stock, and used makeup brushes to add three different colours of Catherine Pooler inks. Then I die cut the panel with the Butterfly Cover die by Pink & Main.


The butterfly wings each lift up and I added a glitter dot into the centre of each one for some sparkle. Then I outlined the die cut Celebrate with a gold gel pen.


Here is a peek at the inside:


Supplies:
Butterfly Cover Die - Pink & Main
White card stock
Catherine Pooler Inks
Makeup brushes
Glitter Dots - Elizabeth Craft Designs
Stitched Rectangle dies - Your Next Stamp
1067 Celebrate - Karen Burniston
Sakura gold gel pen
MISTI - My Sweet Petunia
Words inside - Letter it, Ranger

Thanks for stopping by today