Saturday, 20 July 2019

C4C493 Funny Coffee Card

Hello my crafty friends

It's Saturday and that means a new challenge at the Crazy4Challenges Blog. This month our hostess is Karen Ostergard! Donna K is joining us as our Guest Designer and you can find Donna's blog HERE.   Karen has a fun sketch for us this week:


I used this adorable Riley the Moose image and made a quick and easy card for my stash. The stamp was one that I coloured for the 30 Day Colouring Challenge I took part in on Instagram (Day 23) and I used a combination of Chameleon Color Tones and Color Tops as well as some coloured pencils. The Sentiment stamps are both Funny Bones stamps, also from Riley and Company but I believe the inside one is retired. Which is too bad - I quite like that one and have used it a number of times over the years.


This sketch is perfect for using up some little bits and pieces, which I was able to do here.


I think this will be fun to send to a coffee-loving friend as some Happy Mail.

Check out the C4C blog to see how the Crazies have been inspired by the challenge. We'd  love to see your take on it, so be sure to stop by the Crazy 4 Challenges blog and link up your creations. If you are uploading to an online gallery, please use the keyword C4C493.

Supplies:
Riley on Chair - Riley & Company
White and kraft card stock
Chameleon Color Tops
Chameleon Color Tone markers
Chameleon Colored Pencils
Stitched squares - Elizabeth Craft Designs
Patterned paper - Hello Happiness, Taylored Expressions
Decaf - Funny Bones, Riley & Company
1054 Rectangles Crosshatch - Karen Burniston
Stitched Scalloped rectangles - Your Next Stamp
Smart Ass Friend (retired) - Funny Bones, Riley & Company
Nuvo Crystal Drops

Thanks for stopping by today

Friday, 19 July 2019

Grandparents Day Photo Collage Pop Up Card

Hello my crafty friends

Today I'm sharing the card I made for my Mother-In-Law for Grandparent's Day. While that isn't until September, I learned the hard way to make this one early AND mark my calendar in late August to get it in the mail! Sadly, this is the first time that I won't be making my Mom a Grandparent's Day card ... I sure miss her.


I chose to only use two arms on the Photo Collage, rather than four, and built upon those with layers of rectangles. Each one is decorated with a kid stamp that resembles our five grandchildren. My Mother-In-Law will really enjoy this card! The stamps were coloured as part of a 30 Day Colouring Challenge I was participating in on Instagram (Day 24).


In order to avoid catch points, I die cut the 'love you' from the white semi-circle, saving the centres of the letters. After brushing some ink onto the letters, I inlaid the die cut back into the opening and put the white centres back in their spots. It lays nice and flat and that rectangle on the far right doesn't catch on it at all. Some GumDrops (enamel dots) were added where they wouldn't catch on anything and I like the sparkle they bring to the card. The ice cream also has some shimmer from my Wink of Stella brush pen.


I also have a short YouTube Video so you can see this card in action!


Supplies:
1098 Photo Collage Pop Up - Karen Burniston
Kid and Ice Cream stamps - The Scoop, Pink and Main
Magical Pastel Gumdrops - Your Next Stamp
Derwent Water Color Pencils
Water Brush
Sakura white gel pen
Kraft and white card stocks
Patterned paper - Paradise Beach, Echo Park (Old, from my stash)
Stitched rectangle dies - Your Next Stamp
Black fine point marker
Crayola marker
1057 Circles Crosshatch - Karen Burniston
1083 Word Set 9 Love - Karen Burniston

Thanks for stopping by today

Thursday, 18 July 2019

HELLO and YOU ARE LOVED cards.

Hello my crafty friends

When we were visiting Arizona this Spring, I sent my Mom a card every week to let her know I was thinking about her. Today I'm sharing two of those cards, both made with Project Life Journal Cards.


I liked the sentiment on this one with the repeated 'hello' and that one of them was gold foiled. I stamped 'A Note To Say' in the gold foiled sentiment area and added a die cut 'Hello'. Then I added two gold foiled butterflies to make it a little more feminine.


Inside I added a larger die cut Hello and a fan chair sticker. I wrote my note in the space beside the chair.


This second card uses three different journal cards. The card base is 4 x 6" then two coordinating 3 x 4" journal cards for decorating.


I added some glitter to the flowers on the top card and they are layered with foam tape.


Sadly, my Mom passed away and today is her funeral service. It will be at her church where she devoted many hours, and I am comforted by that. I wasn't going to have a blog post scheduled for today but these cards seemed appropriate. My Mom was the sweetest lady, she was loved by many and all of us will continue to miss her. I still can't believe she is gone. 😭

Supplies:
Project Life Journal Cards
Stickles
Fun foam
Corner Chomper
Pink, black and white card stocks
Card size  for You Are Loved card - 4 x 6" 
1052 Word Set 6 Summer (hello) - Karen Burniston
Words and large hello die - Pink & Main
Gold foiled butterfly stickers, and fan chair sticker - American Crafts
Wink of Stella

Thanks for stopping by today

Wednesday, 17 July 2019

Farm Birthday Pop-Up Card

Hello my crafty friends

Yesterday I shared a card that uses the new Train Pivot Panel as a generic pop up platform, and I was so excited about this idea that I made 3 more cards. Today I am sharing the second card and the remaining two will be shared here next week.

I kept the front nice and simple, with some western print patterned paper and this fun Riley the Moose stamp. While I am not crazy about how I coloured his face, I still just ADORE this Riley stamp.


Here is the card opened!


This is a standard tall A2 card, and while it looks like there is a lot of room for adding embellishments, if they are taller than 2" they will stick out the bottom of the card when it is closed. Using the rectangle dies worked well for this A2 card, but if you are going to try this technique, try making a longer card to give you a little more room for decorating.    


I thought you might like to see what the Train Pivot Panel looks like when it's attached inside the card. I cut it from kraft, then cut the top and bottom panels (here, the right and left sides) from patterned paper scraps and adhered them over the kraft to make them blend in a little better.


I also have a short YouTube video for you so you can see the card in action:

Supplies:
Kraft, white and grey card stock
Patterned paper - Giddy Up, Carta Bella
1106 Train Pivot Panel - Karen Burniston
1054 Rectangles Crosshatch - Karen Burniston
1094 Horse, Unicorn, Zebra - Karen Burniston
1097 Farm Edges - Karen Burniston
Stitched Rectangle dies - Your Next Stamp
Cloud stencil/mask - MFT Stamps
Sakura Black glaze pen
Paper Spring
Sakura white tel pen
1006 Nature Edges - Karen Burniston
1100 Howdy - Karen Burniston
Good Day to be Happy - Funny Bones, Riley & Company
Happy Birthday - Everyday Sayings - Riley and Company
1095 Tiny Accessories 3 - Karen Burniston
Wheat Riley - Riley and Company
Chameleon Color Tone markers
Chameleon Color Top markers
Chameleon Coloured Pencils
Black fine point sharpie
Stitched Nested Labels - Stampin' Up
1093 Cow and Goat - Karen Burniston

Thanks for stopping by today

Tuesday, 16 July 2019

Butterflies and Flowers - using the Train Pivot Panel!

Hello my crafty friends

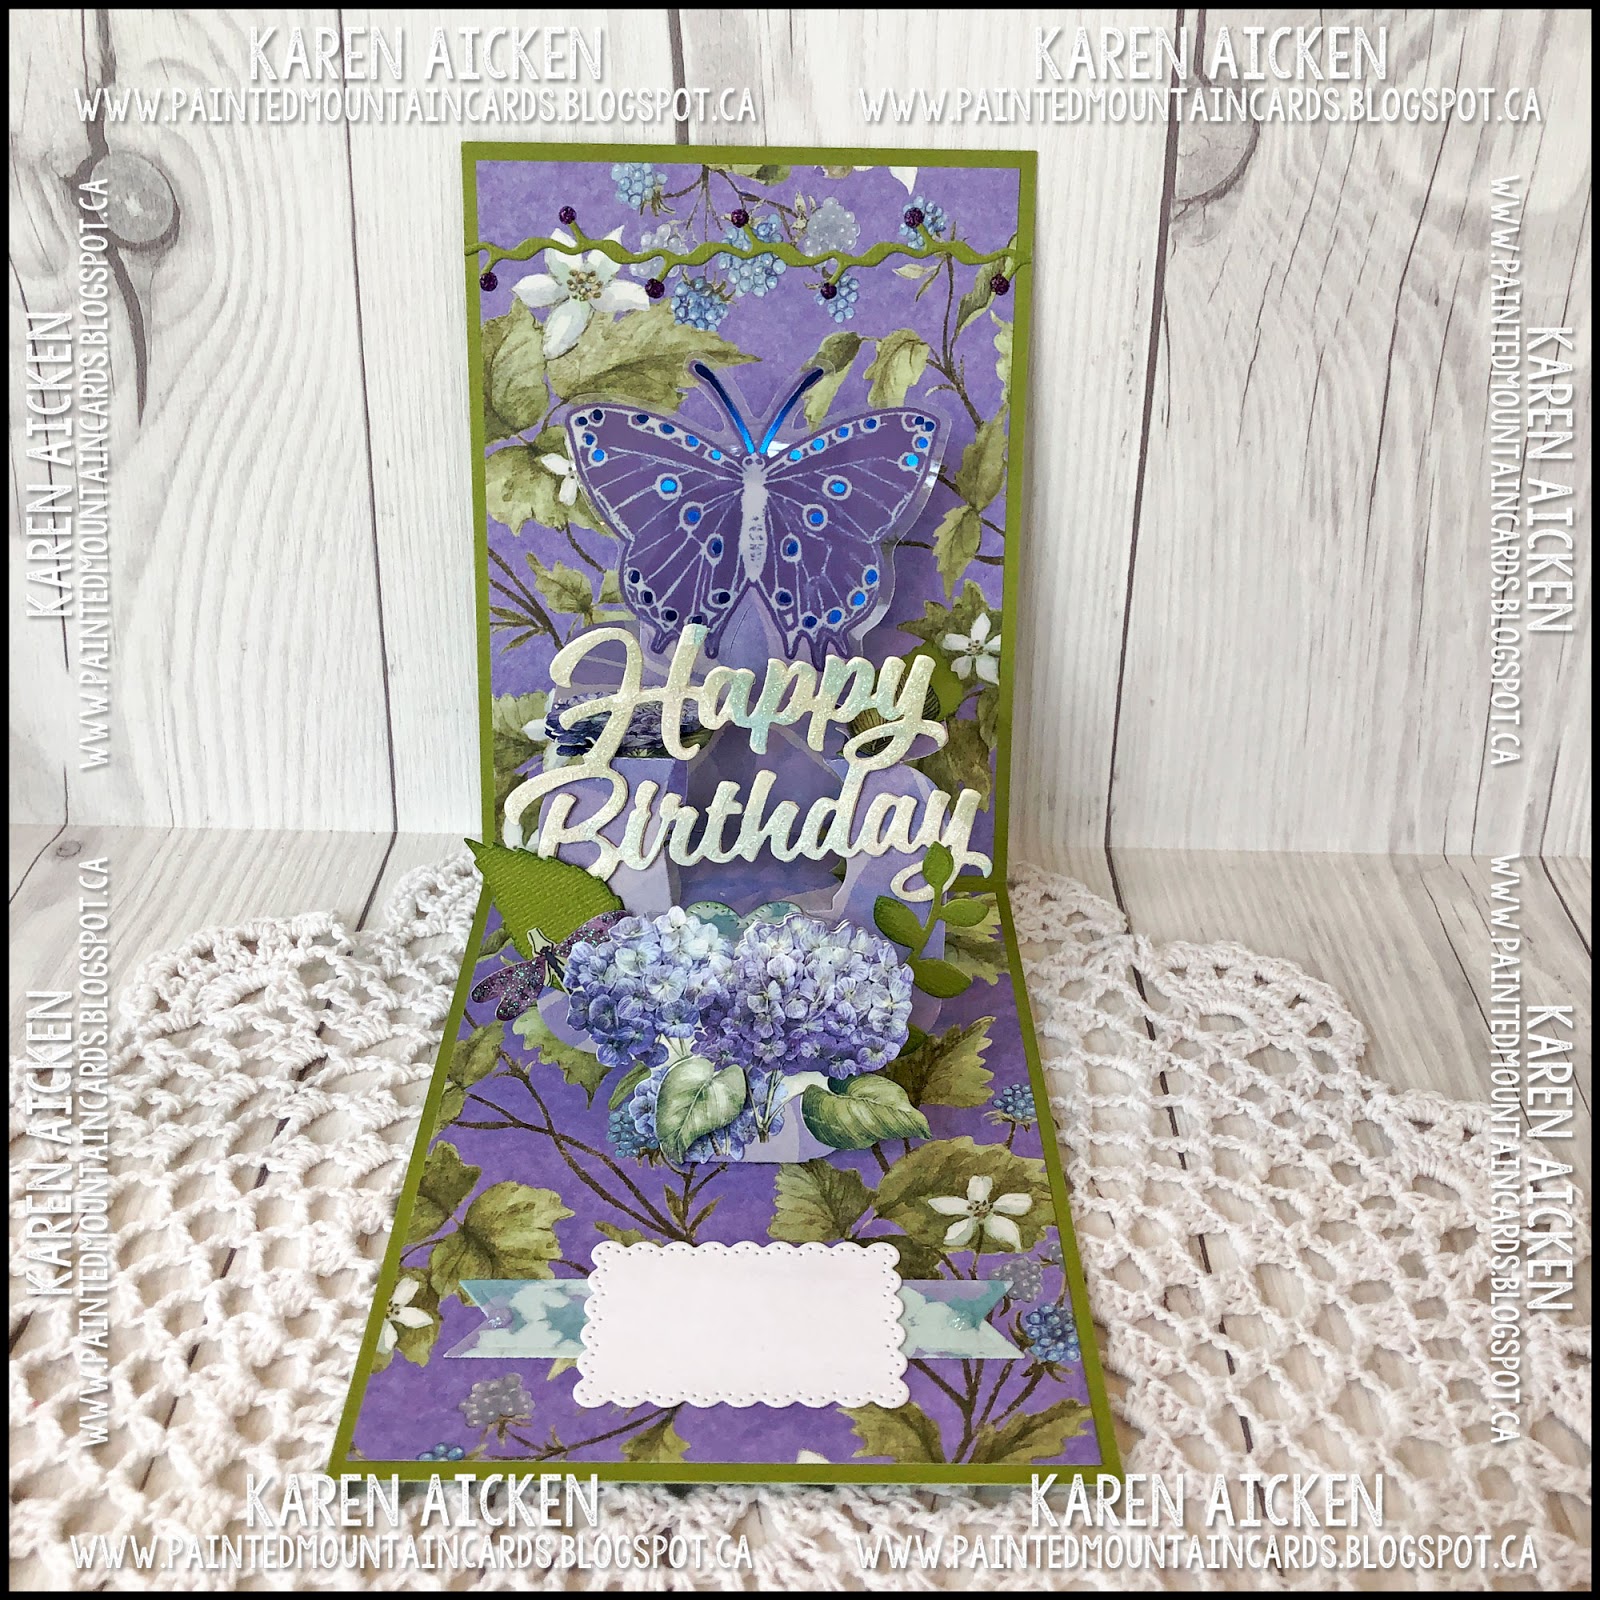
Today I'm sharing the Birthday Card I made for a special friend. I'm also sharing a new way to use the Train Pivot Panel Pop-Up!

I pulled out some older K & Company papers and embellishments and got to work. Here is the card front, with a pretty acetate frame, a 3-D floral sticker and the Hello from Word Set 6.


The leaves on the patterned paper are also pearlized so there is lots of shimmer and shine on the card.


Here is the inside! Hard to believe I used the new Train Pivot Panel for this card, right? I'm so excited about this idea that I have since made 3 more. One will be shared tomorrow and next week I have two more. I love showing you different ways to use your dies!! Scroll down to the end of my post to see what the card inside looked like before I started decorating.


I added a die cut border to the top edge, using Border Blends Party, then added some purple Nuvo Drops at the end of each of the 'twigs'.


Since the Happy Birthday is bridging a large open area I wanted it to be nice and sturdy. I die cut it three times and adhered them together. Easy peasy, because the Happy Birthday cuts as a single piece!


Thankfully, I remembered to take a quick picture before I started to decorate so I can share that with you all! While you can use this technique with any of the Pivot Panels, the fact that on the Train Pivot Panel the engine portion doesn't fold down to attach to the card interior, gives you a nice area to decorate!

Note, if you do a tall A2 card (which is the minimum size card), your decorative elements need to be a scant 2" tall or it will stick out the bottom of the card. :-)  So an A6 card (4-1/2" x 6") would work better, which is what this one is.


I also did a little YouTube video so you can see this card in action:


Supplies:
Green Bazzill card stock
Patterned paper - K & Company (old, from my stash)
1106 Train Pivot Panel - Karen Burniston
1030 Happy Birthday - Karen Burniston
Cream card stock
Acetate embellishment - K & Company (old, from my stash)
3-D Stickers - K & Company (old, from my stash)
1088 Heart Pivot Panel (stitched heart) - Karen Burniston
1059 Autumn Elements - Karen Burniston
Nuvo Glitter Drops
1091 Border Blends Party - Karen Burniston
White card stock
1104 Triple Flip (Scalloped rectangle and fish tail banner) - Karen Burniston
1052 Word Set 6 Summer (hello) - Karen Burniston

Card size - 4-1/2 x 6"

Thanks for stopping by today

Monday, 15 July 2019

Space Themed Photo Collage Card

Hello my crafty friends

Before I get to my card share today, I wanted to let you know that our Granddaughter did AMAZING at the hospital. She tolerated the new medication really well. They started it slowly, while reducing her present medication and they were able to up the dosage and send them home 3 days early! Olivia still has her pump, just running saline, until late next week. The cardiologist wants to run more tests before removing the pump and site ... but we are all feeling very encouraged and grateful!

For Masculine Card Monday here on my blog, I have a Space Themed card today!

While I still want to use the new Photo Collage Pop Up with the Rocket Pop Up, I got this card done and out of my system. The new Space Charms just crack me up and I am loving them. Here I added the alien inside the space ship - snipping off the hanging holes on both.  He is adhered onto the card front with a paper spring. The Popping Up To Say was cut from white card stock and I added colour with makeup blending brushes.


Inside I used the new Photo Collage with only 4 decorated arms. The space ship in the centre was cut apart and pieced onto the mechanism so it would still open and close. I added die cut words to each of the polaroid frames. I really wanted to show that you could use the Photo Collage Pop Up and still make a simpler card.


I have a short YouTube Video so you can see the card in action - for some reason I didn't have much luck photographing it but the details do show up better in the video.


Supplies:
Kraft, white, black, green, blue and orange card stocks
Patterned paper - Cartographer, Prima
1054 Rectangles Crosshatch - Karen Burniston
1098 Photo Collage Pop Up - Karen Burniston
1109 Space Charms - Karen Burniston
Black marker
Sakura white gel pen
Crayola marker
Nuvo Crystal Drops
1027 Word Set 4 Just a Note - Karen Burniston
1002 Word Set 1 Greetings (hello) - Karen Burniston
1042 Spinner Square Pop-Up (word bubble) - Karen Burniston
Stitched Nested Labels - Stampin' Up
Paper Spring

Thanks for stopping by today

Sunday, 14 July 2019

A Little Bird Told Me

Hello my crafty friends    

If you follow my blog you know that I donate about 25 birthday cards a month to the nursing home that my Mom was in. I'm also taking part in a 30 Day Colouring Challenge on Instagram and using some of the images I colour for the challenge for the birthday cards.

This cute party dog with birds was what I coloured for Day 1 of the challenge. I actually coloured two of them and got two cards made for the residents!


Here is a peek at the inside:


Here are both cards - I didn't have enough of the patterned paper to make two identical which I actually like better. I want the residents to feel special on their birthday's.


Supplies:
Stamp and die combo - Paw-Some, Taylored Expressions
Patterned paper - All About A Boy, Echo Park
White and Kraft card stocks
Chameleon Color Tone markers
Chameleon Color Tops
Zig Clean Colour Markers
Water brush
Sakura black glaze pen
Sakura white gel pen
Sakura gold gel pen
Blueprints #21 - MFT Stamps
Word Bubble - Let's Talk Edger 1, Taylored Expressions
Stitched Rectangle dies - Your Next Stamp
Nuvo Drops

Thanks for stopping by today

Saturday, 13 July 2019

Lynda Kanase Design Team Window Tri-Fold Card

Hello my crafty friends

Today is the day when Lynda Kanase's Design Team shares their projects. This month Lynda asked us to use her Window Box Impresslets set. This is an embossing folder that also die cuts the shutters/window at the same time it embosses the lovely stone background. It also comes with dies that you could use to fill a window box, but of course I had to do something a little different with the dies.


First of all, I used a very old paper collection from my stash. I wanted to show you that a new die set can breathe new life into older products you may have. I've also been itching to make another trifold card so you are looking at the first of three panels. I cut the window/shutters again from brown card stock (using a card stock shim really helps cut that window), snipped them out and adhered the brown over the patterned paper ones. Then I added a double layer of the sweet butterflies that are included in the set. Oh, and I added two small glitter dot stickers to look like handles or knobs to open the shutters.


The patterned paper is double sided, which is always fun when you are doing a trifold card. I added some stickers and printed embellishments from the same paper stack - then layered die cut flowers/vines and the butterfly over the printed label. I positioned the label on the second panel so that only the flowers show through the window.


When you open the second panel, the third and centre panel is revealed. I added another printed embellishment from the paper package, and stamped Happy on it. Then I stamped Birthday below and added a die cut butterfly - both the stamps and larger butterfly are also by Lynda Kanase.


I hope you will check out the rest of the Design Team's projects - their blogs are listed on the right. Lynda will have her project on her blog later this morning, and you can find her blog by clicking HERE.

Supplies:
Window Box Impresslits - Lynda Kanase
Spring Things (Butterfly) - Lynda Kanase
Spring Phrases stamps (Happy Birthday) - Lynda Kanase
Patterned paper - Kaisercraft - old, from my stash
Brown, off-white card stocks
Stitched scalloped rectangle die - Your Next Stamp
Nuvo Glitter Drops
Glitter Dots - Elizabeth Craft Designs

Thanks for stopping by today

C4C492 Holiday Spirits Triple Flip Card

Hello my crafty friends

It's Saturday and that means a new challenge at the Crazy4Challenges Blog. This month our hostess is Karen Ostergard! Donna K is joining us as our Guest Designer and you can find Donna's blog HERE.   This is Karen's challenge for the week:


Christmas in July. Create a Christmas / holiday themed card.

Note, this is my first post today. If you are looking for my Design Team Card for Lynda Kanase, scroll down as it will be available a little later this morning.

I used several new items from Karen Burniston's new release - the Triple Flip and the Happy Hour Charms. I pulled out this patterned paper stack to make my card, and saw this border image on one of the sheets. It was too perfect not to use so then I was off and running.


While it's hard to see in the photos, I die cut each of the cocktail glasses from a peachy foil card stock and I love how they catch the light. The drink portion of the dies were cut from white glitter paper for some holiday sparkle, and the tiny holly and poinsettias were fussy cut from a different paper in the stack.


When you pull on the tab, the three panels flip to the left and reveal the message "Naughty is the new Nice". Ahaha - so fun. I snipped the words from one of the journal cards in the paper stack to make them work with the Triple Flip die set.


Inside I added a matted journal card and a circle with a sticker greeting which is where we will sign our names.


I will also include a short YouTube video so you can see the card in action!


Check out the C4C blog to see how the Crazies have been inspired by the challenge. We'd  love to see your take on it, so be sure to stop by the Crazy 4 Challenges blog and link up your creations. If you are uploading to an online gallery, please use the keyword C4C492.

Supplies:
Blue, pink and white card stocks
1104 Triple Flip - Karen Burniston, shipping mid July 2019
Patterned paper - Recollections (2018)
1110 Happy Hour Charms - Karen Burniston, shipping mid July 2019
Foil card stock - Stampin' Up
Glitter card stock - Stampin' Up
Enamel snowflakes - Stampin' Up
1057 Circles Crosshatch - Karen Burniston
Merry Christmas sticker - the Paper Studio
Gold Glitter Dots - Elizabeth Craft Designs
Sakura gold gel pen

Thanks for stopping by today

Friday, 12 July 2019

Coffee & Cow Pop-Up Card!

Hello my crafty friends

I get such a kick out of the Funny Bones sentiment stamps at Riley and Company and have quite a few in my collection.  I have vowed to use them more in my card making so I can make someone else smile as well.  I used one on the front of my card today:


Inside I used Karen Burniston's Coffee Cup Pop-Up and added the new cow stamp from Riley and Company as well as another humorous sentiment.


The Border Blends make a fun border element and I like that I can cut them from different colours of card stock.  The ENJOY is from the new Enjoy The Ride die set.


The inside sentiment ties in the cow image - and makes me smile at the same time.


I have included a short YouTube video so you can see this card in action!


Supplies:
1040 Coffee Cup Pop-Up - Karen Burniston
Kraft, white and brown card stocks
Patterned paper - Simple Stories
Sakura pink glaze pen
1090 Border Blends Argyle - Karen Burniston
1103 Enjoy the Ride - Karen Burniston (shipping mid July 2019)
Distress Oxide Inks
Catherine Pooler Inks!
Water Brush
Sakura black blaze pen
Chameleon Grey Marker
1089 Rockin Rectangle (rectangles) - Karen Burniston
1042 Spinner Square Pop-Up (squares) - Karen Burniston
1011 Katherine Label Pop-Up (hearts) - Karen Burniston
A Yawn Is A Silent Scream - Riley & Company
Do Cows Moo? - Riley & Company
Basic Dress Up Cows, stamps and dies - Riley & Company

Card size - 4-1/2 x 5-1/2", fits in an A6 envelope

Thanks for stopping by today