Tuesday, 22 January 2019

Colour Challenge Card (CIC462)

Hello my crafty friends

Yesterday I received a phone call from my Mom's nursing home, that she had fallen. Thankfully she wasn't badly hurt, but she was shaken up and I'm not there to comfort her. I wanted to make a card to let her know I'm thinking about her and see that Your Next Stamp is sponsoring a colour challenge on the Cupcake Inspirations Blog.


This is a new-to-me challenge blog and I knew I could take advantage of the colour challenge for my Mom's card. While I did use mostly pink and white, I did need to add a little colour to those ADORABLE animals, which are part of the January release at Your Next Stamp.


I pulled out the YNS Sunburst Panel die - another one I get a lot of use from. I had a pad of Doodlebug patterned paper sitting on my stamping table (I'm such a fan) and so decided to use the pretty tone on tone pink paper for the background. Note, I kept all the little fall away pieces, as they have a stitched detail to them that will work for paper piecing this Sunburst Panel another time.

The 'hugs and kisses' was cut from a different paper in the stack, matted with white and tucked under the wonky circle.


Here is a look at the inside - it was the sentiment stamp on this set that made me giggle and add it to my shopping cart. I actually say this to one of my dogs all the time. Cooper is super cuddly ... Jasper not so much.


This card is on it's way to my Mom now, so I decided to just do a second blog post today and share it here too.

Supplies:
Wonky Circle dies - Your Next Stamp
Purrr-fect Friends stamps - Your Next Stamp
Dot stamp - Stamps by Judith
White and pink card stocks
Zig Clean Color Markers
Water Brush
Patterned paper - Doodlebug Designs
Sunburst Panel Die - Your Next Stamp
Stripe-Tastic Heart Dies - Your Next Stamp
Stitched Mini Scalloped Rectangle die - MFT Stamps
Sequins
Stickles
Copic Marker

Thanks for stopping by today

Shark Smiles Birthday Card

Hello my crafty friends

I have a fun card to share today, that I am entering into the Fun Friday Challenge #105 at Your Next Stamp. The challenge is: 'Lets See SMILES', and all the details can be found HERE.  I actually made this card back in November when I first received the Photo Booth Panel Die Set by Your Next Stamp, but I was busy posting holiday cards so saved this one for January. It was perfect for the challenge though, so I'm glad I waited to share.


I created the blue panel with Distress Oxide Inks and a spray bottle, and I like how the black card base makes the colours just POP. The SMILE comes with the Photo Booth Panel Die and it was cut from the centre fall-away panel, which was then adhered back into the opening. It works so well with the toothy grin on the shark!


This shark from The Stamps of Life was on my Wish List for months, so I was happy to finally be able to add it to my collection. It think it's going to be a lot of fun for making birthday cards for boys. I used the die on the front, and the stamps inside the card along with a stamped 'It's Your Birthday'.


I'm looking forward to more playtime with this fun Photo Booth die set, and the shark too.

Supplies:
Turquoise, white, black, grey and aqua card stocks
Photo Booth Panel die set - Your Next Stamp
Distress oxide inks
Shark Pudgie - the Stamps of Life
Sakura white gel pen
Sakura clear glaze pen
Sakura Stardust pen
Black fine point marker
Stampin' Up Blends and Copic markers
Birthday stamps - Lawn Fawn
Dashing rectangle dies - Elizabeth Craft Designs
MISTI
Birthday stamps inside - Ranger
Dots - Stamps by Judith

Thanks for stopping by today

Monday, 21 January 2019

Boy Balloon Card Duo

Hello my crafty friends

It's Masculine Card Monday here on my blog and I have a pair of birthday cards that would be perfect for boys.


On the first card I used vertical stitched panel dies to die cut the two panels for the card front, trimming away the far right edge so the inside patterned paper would show through when the card was closed.


Here is a peek at the inside ...


This second was has a double layer of those nice big Balloons, tied with bakers twine at the bottom.


Here is the inside of the second card ...


One of these cards will be donated to the my Mom's nursing home - I bring them a bag of 25 Birthday Cards each month. The other will be put aside for when our daughter's need cards for the grandkids to take to birthday parties.

Supplies:
White, turquoise and black card stocks
Patterned paper - Carta Bella
Big Balloon die - Our Daily Bread Designs (now called Divinity Designs)
Vertical Stitched Strip Dies - MFT Stamps
Happy Birthday die - Elizabeth Craft Designs
Bakers Twine
Fun Foam
Copic marker
Celebrate stamp - Ranger
Banner punch - Stampin' Up

Card size - 4 x 5-1/2,  fits in a 4 x 6" envelope

Thanks for stopping by today

Sunday, 20 January 2019

Heart Pivot Valentine Card - another Sneak Peek!

Hello my crafty friends

Welcome to another Sneak Peak of Karen Burniston's January 2019 Release. I combined a whole bunch of the new dies for this sweet card. First of all, I used the NEW Circle Tag Book for the cover. The Tag Book Pop-Up die set is hugely popular and this one uses the same design principle but with circles that pop-up instead of the tag shape. It is also a different size and I'm really liking it!.


The 'You're Sweet' is new and it goes perfectly with the new Ice Cream Sundae Pop-Up. I have some donut ideas to use with the saying as well. The little chick is from the new Easter Animals - and OMGosh both the new Animal sets are just ADORABLE. I also love this scalloped rectangle, which is from the Rockin' Rectangle.


Here is a peek at the inside, but there are no circles! Nope - Instead I used the new Heart Pivot Panel which fits really well inside the Circle Tag Book covers. I did have to trim a tiny sliver off of the top curve but that was probably how I lined it up when I adhered it to the inside covers.


I'm a huge heart fan - so I was pretty happy to see a Heart Pivot Panel in the release. Perfect timing for Valentine's Day cards, but also Anniversary, Sending Love, and other occasions as well.

One of the things I like best about the Pivot Panels is that they fold completely flat for mailing. Well, all of Karen Burnsiton's Pop-Ups fold flat for mailing but some have lots of bulk simply because of the number of card stock layers. Not so much with the pivot panels, especially when you glue everything flat and don't use foam tape. Of course if you are willing to add another stamp or can hand deliver your card - feel free to layer away! I like dimension on my cards, but there is a LOT of dimension with the Pivot Panels so I don't miss the foam tape when using them.


On the inner two hearts I added a pair of the cute chicks, each one holding a heart. Notice how their faces look different? Just by changing the height of the eyes & beak you can change up their look a little. The words come from the new Word Set 9 Love.

I also used one of the new Border Blends, which make fun borders from both the die cut and the negative pieces.


There are SO MANY great dies in the new release, which will be available for PRE-ORDER on the website starting January 21st (TOMORROW!). You can click on the preview below to see it larger.


Supplies:
1081 Circle Tag Book Pop-Up - Karen Burniston (available for PRE ORDER January 21/19)
1088 Heart Pivot Panels - Karen Burniston (available for PRE ORDER January 21/19)
Aqua, pink, white, black and yellow card stocks
1091 Border Blends Party - Karen Burniston (available for PRE ORDER January 21/19)
Heart patterned paper - Doodlebug Designs
Red patterned paper - Kaisercraft
1083 Word Set 9 Love - Karen Burniston (available for PRE ORDER January 21/19)
1074 Spring Animals - Karen Burniston (available for PRE ORDER January 21/19)
Black pen
Sakura white gel pen
1089 Rockin' Rectangle (oval and scalloped rectangle) - Karen Burniston (available for PRE ORDER January 21/19)
1087 You're Sweet - Karen Burniston (available for PRE ORDER January 21/19)
Copic marker
Wink of Stella
Stickles
Bakers Twine

Thanks for stopping by today

Saturday, 19 January 2019

C4C467 Sketch Birthday Cards

Hello my crafty friends

It's Saturday and that means there is a new challenge at the Crazy4Challenges Blog. I am the hostess for January 2019 and our Guest Designer is my friend and Design Teammate Kelly Booth. Since it's the third Saturday of the month, I have a sketch to share today.


I made a set of four cards for our daughters - the grandkids are always going to birthday parties! I used these cute stamps from Your Next Stamp, and also their Wonky Circle dies.


These Magical Ponies will be a hit with the girls - 7 year old girls love these ponies!


Here is a photo of all four cards together. Two of the cards feature the fun YNS Chameleons, and I chose not to add the fishtail banners from the sketch for those. I'm also adding these cards into the Fun Friday Challenge #105 at Your Next Stamp - "Let's See Smiles!". For all those details, click HERE.


Each of the cards is identical inside:


Check out the C4C blog to see how the Crazies have been inspired by the challenge. We'd  love to see your take on it, so be sure to stop by the Crazy 4 Challenges blog and link up your creations. If you are uploading to an online gallery, please use the keyword C4C467.

Supplies:
Wonky Circle dies - Your Next Stamp
Magical Ponies - Your Next Stamp
One in a Chameleon - Your Next Stamp
Copic markers
White, blue and black card stocks
Sakura black glaze pen
Patterned paper - Cloud 9
Wink of Stella
Bold Happy Birthday Word set die set - Your Next Stamps
Happy die - Lawn Fawn
Sakura sparkle gel pen
Stitched Fishtail Banner dies - MFT Stamps
Fun foam
MISTI - My Sweet Petunia
Dashing Rectangle dies - Elizabeth Craft Designs
Stamps inside - Birthday Banners, Stampin' Up
Nuvo Crystal Drops

Thanks for stopping by today

Friday, 18 January 2019

Lever Thank You Card and Flip-It Thank You Card

Hello my crafty friends

It's Fun Fold Friday here on my card today, and I have a pair of Thank You cards to share today that both use fun folds.


The first one is a Lever Card, using this pretty patterned paper I was trying to use up. I've had it for years and it's time! I added a die cut 'thanks' and a pretty paper flower.


The flowers had thick black half dome gems that were too thick for mailing. I popped them off and used the Nuvo Crystal drops instead.


The second fun fold card is a Flip-Its die set by Stephanie Barnard for Sizzix.


These pretty open flower dies from Stampin' Up make such a nice little accent! I'm going to enjoy them for sure.


I cut the second centre section again from white card stock, and adhered it to the back. That gave me lots of room to write a note down that section when I sent the card.


Supplies:
Patterned paper - Stampin' Up
Lever card and layering dies - Divinity Designs
White and black card stocks
Flowers - recollections
1002 Word Set 1 - Greetings (thanks) - Karen Burniston
Nuvo Crystal Drops

Triple Fancy Frame Flip-It's Stephanie Barnard Sizzix (Retired)
Yellow, black and white card stocks
Patterned paper - Stampin' Up
Petals and more dies - Stampin' Up
Black twine - Stampin' Up
Fishtail banner die - MFT Stamps
Sakura black glaze pen
Enamel Accents

Thanks for stopping by today

Thursday, 17 January 2019

Pop-Up Monkey Card

Hello my crafty friends

I'm so happy to share this card with you today. It was one of those times when I smiled the whole time I was making it. Not only is it creative and fun, I LOVE sharing different ways for you to use your dies. They are an investment, so if you can use them in more & different ways than they were intended, that makes the investment a better one.

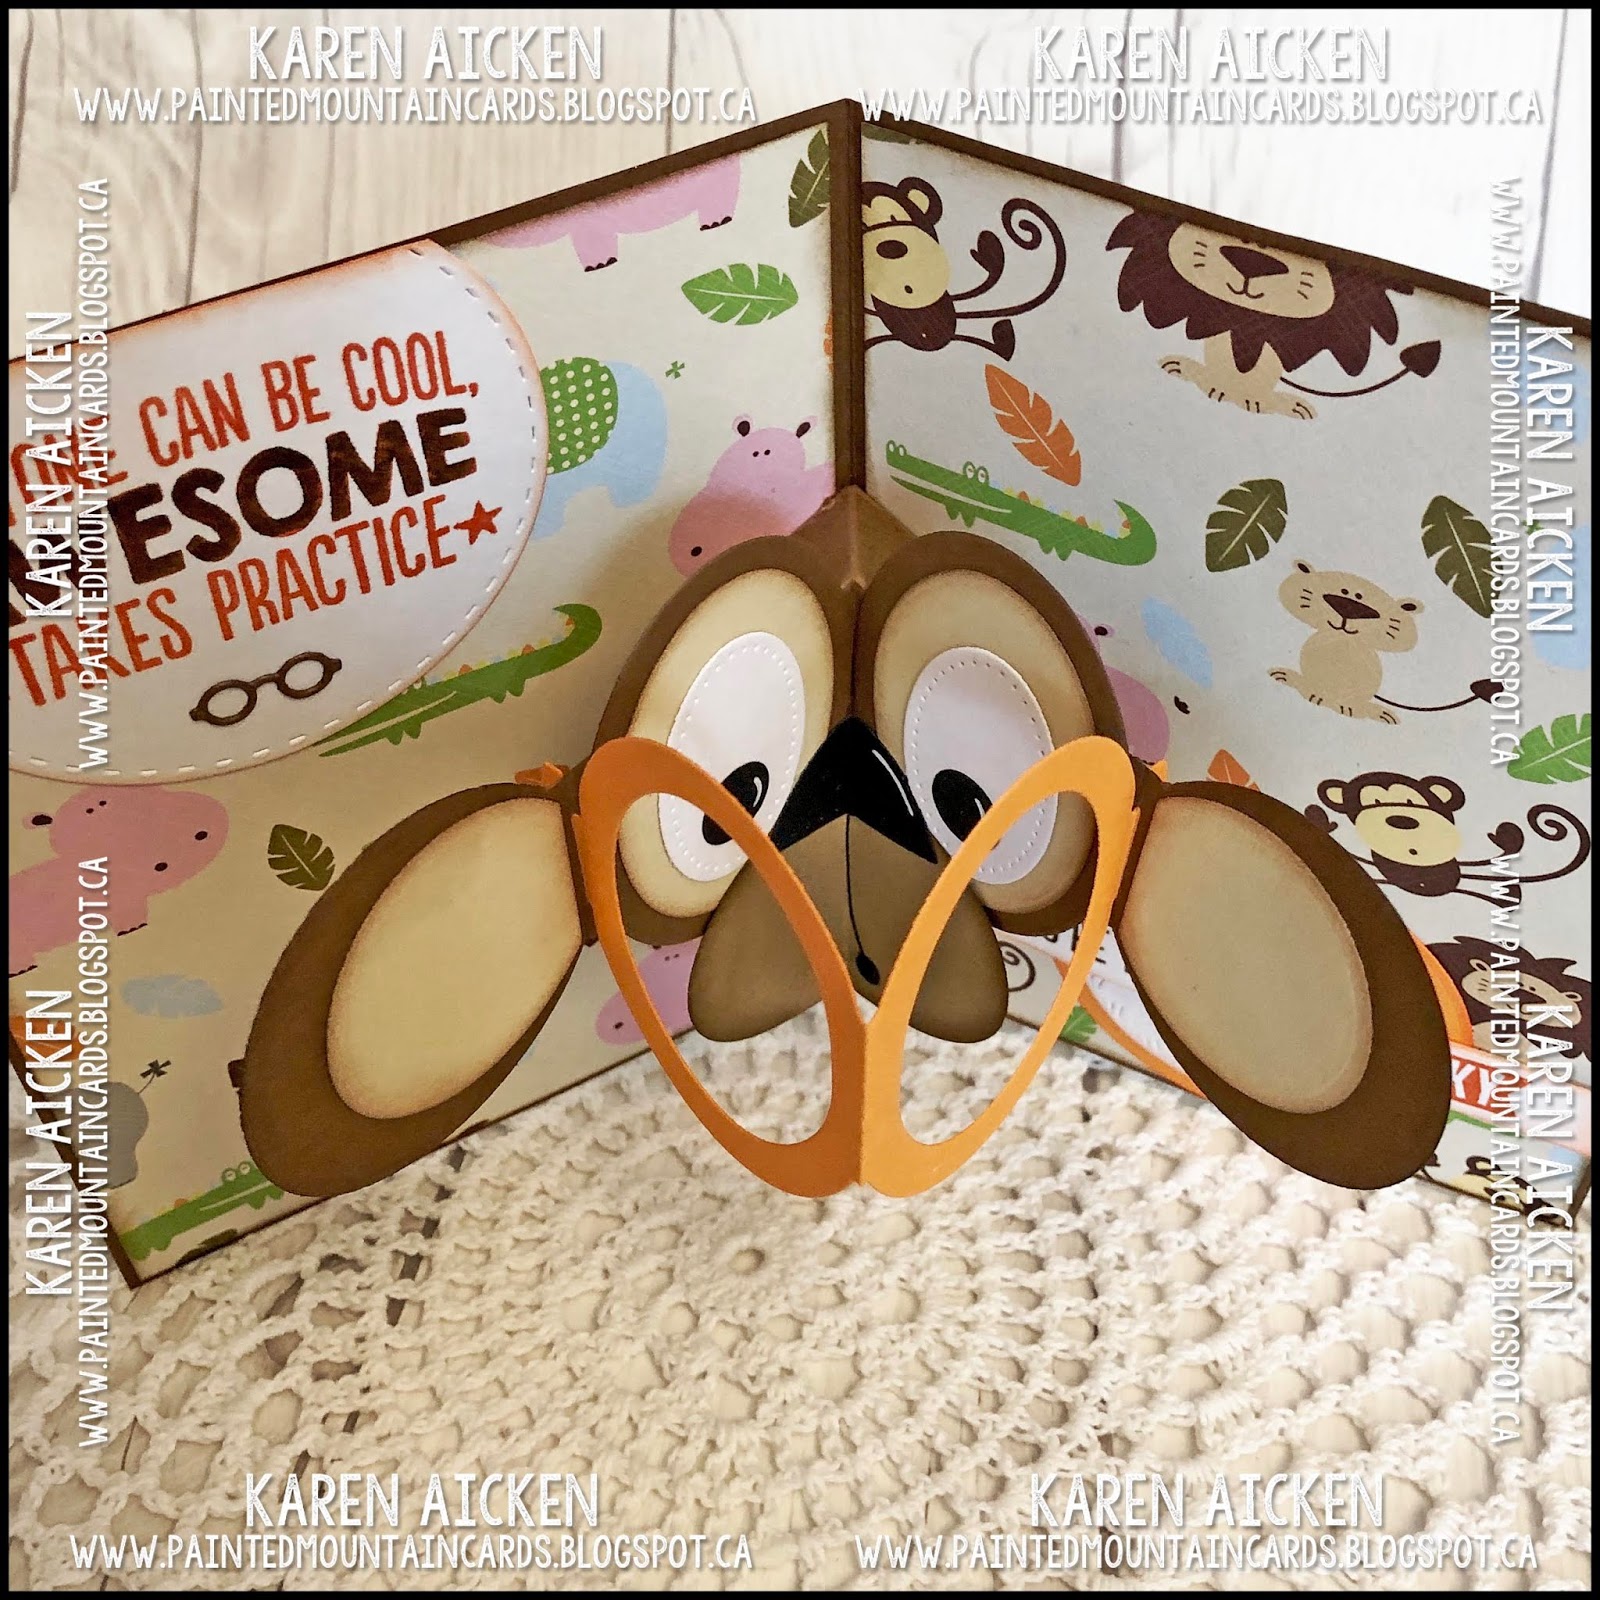
Let's start with the card front. Which was actually completed after the inside was finished, as I wanted to tie in the glasses. I used the Pop-Up frames from Karen Burniston's new Oval Frame Pop-Up. The new release will be available for pre-order on January 21st! Once the glasses were done, I used the tag reinforcement die from the new Circle Tag Pop-Up for the eyeballs. :-) Oh, and I hung onto one of the little black fall away circles which you will see again on the card interior.


When you open the card, you see this fun pop-up MONKEY!! See why I was smiling the whole time? I used the Partial Die cutting technique to change the outer ovals into circles (photos at the end of this post). Once the eyes and ears were completed, I added a horizontal oval for the muzzle. Hmmm ... do monkey's even have a muzzle? Whatever it's called - I'm sure you know what I mean.


The little nose is actually one of the stitched hillside pieces that are included with the Oval Frames Pop-Up. Turned upside down it worked perfectly. And there is that little black fall away circle for his mouth ... I wanted to mimic the monkey on the patterned paper.


I took lots of photos, because it's a new die set and people want to see what it looks like from different angles so they know if it will work for them. This is such a cool die set - there is so much dimension but it folds up completely flat for mailing. Even with a little foam tape!


I've had the stamps for a long time but they worked perfectly so I used them. I don't stop using something just because it's retired - I usually buy stamps and dies because I can use them for years, not because they are the latest thing.


I added a pair of die cut spectacles as well, and they came from the Tiny Accessories One die set. There is a new Tiny Accessories Two set being released this month that also has glasses - but I liked these ones better for my card. I have been using the TA2 on a lot of my sample cards though - it is just SWEET.


Below is a look at how it folds up.


 I took a couple of photos before I started assembling, to help you understand how I trimmed those outer ovals into circles. The cutting plate was placed even with the inner edge of the outside ovals so anything outside the cutting plate wouldn't cut. It's called "Partial Die Cutting" and there are lots of tutorials on the web if you want to know more.


This is what it looked like when I removed the cutting plate - you can see where the edge of the cutting plate was because the circle die didn't cut beyond that. Two quick scissor snips...


... and I had my rounded ears.


I hope I've inspired you to try something different with your dies!

There are SO MANY great dies in the new release, which will be available for PRE-ORDER on the website starting January 21st. You can click on the preview below to see it larger.


Supplies:
Patterned paper - stash
Brown, kraft, black, white and orange card stocks
1079 Oval Frames Pop-Up - Karen Burniston (Available for PRE ORDER on January 21 2019)
1081 Circle Tag Book Pop-Up (circles) - Karen Burniston (Available for PRE ORDER on January 21 2019)
1089 Rockin' Rectangle (oval) - Karen Burniston (Available for PRE ORDER on January 21 2019)
1046 Circle Charm Pop-Up (circles) - Karen Burniston
1047 Upsy Daisy Pop-Up (small circle) - Karen Burniston
Black marker
1034 Word Set 5 Royalty (banner) - Karen Burniston
Stamps - MFT (retired)
MISTI - My Sweet Petunia
1012 Snowman Twist Circle Pop-Up (Large stitched circle) - Karen Burniston
1057 Circles, Crosshatch - Karen Burniston
1025 Tiny Accessories One (glasses) - Karen Burniston

Card size - 4-1/2 x 6"


Thanks for stopping by today

Wednesday, 16 January 2019

Box Card with Castle, Princess and Dragon

Hello my crafty friends

One of the new dies in Karen Burniston's January 2019 Release is this Woven Basket Box Card die. It comes with flowers and a sprig to make a lovely bouquet, but of course I had to do something different with it. I chose to use it as a regular 'box card' and made a Birthday Card for a little Princess. Namely, our nephew's little girl who will be turning one soon.


I used a bunch of dies from previous releases, the Castle Pop-Up, the Knight and Dragon, the Princess and Mermaid and Word Set 5 Royalty. All the dies I used are listed in the Supplies below. I wanted to show you how well all of the KB dies work together - old and new releases work seamlessly!


Since Princesses need to sparkle, I used pretty glitter paper for the dress, crown, and also the turret flags and dragon's wings. I like how the two different greys for the woven part resemble bricks - this Woven Basket Box Card goes together so slick!


This is the back of the card, and where we will sign our names.


I hope I've shown you how to think outside the box (pun intended) to use this fun woven basket for more than just flowers. I also wanted to show you that you can fill it with a few items and still have a card with a lot of WOW. Not every box card needs to be stuffed full and take hours to complete. 


While it's a free-standing pop-up card, it still folds completely flat for mailing! Because I wanted some height to the castle and dragon, this one will fit in an A6 envelope and mail for a single stamp.


Here is one more look at the dragon - isn't he just the cutest?


There are SO MANY great dies in the new release, which will be available for PRE-ORDER on the website starting January 21st. You can click on the preview below to see it larger.


Supplies:
1080 Woven Basket Box Card - Karen Burniston (available for Pre-order on January 21 2019)
1036 Princess and Mermaid - Karen Burniston
1035 Knight and Dragon - Karen Burniston
1033 Castle Pop-Up - Karen Burniston
1034 Word Set 5 Royalty - Karen Burniston
1047 Upsy Daisy Pop-Up (banner) - Karen Burniston
1009 Twist Panel Pop-Up (scalloped rectangle) - Karen Burniston
Glitter paper - Stampin' Up
Pink, purple, green, kraft, grey and white card stocks
Black pen
Sakura white gel pen
Words - Stampin' Up


Thanks for stopping by today