Sunday, 18 February 2018

Christmas Centre Step Card

Good morning friends

I plan on working on our holiday cards throughout the year, so have one to share today. The cute panel was trimmed from a sheet of patterned paper, and the card base is a Centre Step card by Stephanie Barnard for Sizzix.


I added a die cut border on each 'arm', red snowflakes and glitter dots, and some glitter glue for holiday sparkle.


Into the holiday card stash with this one!

Supplies:
Red and white card stocks
Kind Sentiments Step-Up - Stephanie Barnard (Sizzix)
Patterned paper - Doodlebug
Fancy Double Scalloped Edge - Your Next Stamp
Joyous Season stamp - MFT Stamps
Ribbon - Stampin' Up
Stickles
Glitter Dots - Elizabeth Craft Designs

Thanks for stopping by today

Saturday, 17 February 2018

C4C422 - Sketch Challenge

Good morning friends

It's the third Saturday of the month, so that means it's a sketch challenge on the Crazy4Challenges blog. I'm the hostess this month, and Kristine Reynolds is our Guest Designer. You can find Kristine's blog HERE. and below is the sketch.


I had a completely different idea when I sat down to make my card, but I had just received this fun patterned paper in my Stampin' Up order. It was free ... one of the Sale-A-Bration items and I couldn't resist using the happy colours for my sketch card.


Before Christmas my talented friend Kelly Booth was getting ready for Creatavation demo for Chameleon (colouring tools), and she had shown me the adorable Chameleon image she was working on. I fell in love with it - and it turns out that Your Next Stamp is a Canadian company! Of course I placed my order right away. But I was busy with Christmas cards so I've finally had a chance to play with the stamp set.


Inside, I added the new Happy Birthday die by Karen Burniston. I told you you'd be seeing a lot of this die - I really like it.


Then, I got on a roll. I was watching a show on Netflix and just started cutting bright colours of card stock and patterned paper from my stash, and ended up making eight birthday cards for boys. I want to give our daughters a set of birthday cards as part of their Mother's Day gifts, and since they have boys they go to a lot of boy birthday parties. 

I'm likely just going to share this group shot, rather than individual pictures of each card.


Check out the C4C blog to see how the Crazies have been inspired by the challenge. We'd  love to see your take on it, so be sure to stop by the Crazy 4 Challenges blog and link up your creations. If you are uploading to an online gallery, please use the keyword C4C422.

Supplies:
Patterned paper - Stampin' Up SAB
Blueprints #21 - MFT Stamps
Red Soft Finish Card Stock
Happy Birthday stamp - Prickley Pear
Chameleon stamp - Your Next Stamp
Fun foam
Copic markers
Black Glaze Pen
Nuvo Crystal Drops

Thanks for stopping by today

Friday, 16 February 2018

Owl Double Z Fold Card

Good morning friends

It's Flip-It Friday here on my blog today, and I have a Double Z fold card to share. I love photographs, always have. They tell a story, and it's a story you can remember every time you look at the photo.

Last Spring & Summer we had a pair of Great Horned Owls in the back yard and we really enjoyed watching them as well their little one. I can still hear them at night, but they are much harder to see when it gets dark so early and gets light so late.

A few days ago I went outside with the dogs, and there in the tree - right on the other side of the fence - was a little Great Horned Owl! He stayed in the tree for quite awhile, and I enjoyed watching him. I wasn't worried about him with our dogs, as he was too little to attempt to carry them off.


I printed the photo from my phone, using the Instax SHARE printer and then added one of Lynda Kanase's Photo Frames. I love that you get to choose the colour of frame and can customize it with any of the words from any of her Picture This sets.

After adding the card stock frame & label to the photo, I adhered them both to her Seasonal Tag die.


The patterned paper has glossy embossed dots, and of course the photo is glossy as well. I like how they compliment each other.


For this card, I used the words from the I AM Phrases (frame and stamp set) as they were perfect for this amazing owl.


The words are fun to cut away from other projects, not just the frames. I'm going to get lots of use out of them!

Supplies:
Patterned paper - DCWV
White, brown and blue card stocks
Photo Frame, I Am Phrases (word dies) - Lynda Kanase (Sizzix)
Photo Frame, Seasonal Props (frame and label) - Lynda Kanase (Sizzix)
Seasonal Tag - Lynda Kanase (Sizzix)
Fun foam
Life Is stamp - Stampin' Up
Leaf dies - Stampin' Up
INSTAX Mini Share Printer
INSTAX Mini film
Silver Ribbon - Stampin' Up
Nuvo Crystal Drops

Thanks for stopping by today

Thursday, 15 February 2018

Pair of Birthday Candle Cards

Good morning friends

There is a new release at Prickley Pear Rubber Stamps, and I was lucky enough to get my hands on this fun border stamp and the coordinating scallop border dies. I made two birthday cards with the candle border stamp - I really like the curve to the border stamp and the die matches that curve. There is also a cool stencil feature in the scalloped border dies that allow you to have the letters for CONGRATS or  HAPPY BIRTHDAY on the scallops if you wish.


The candles were heat embossed with white, then I used diluted Distress Oxide inks to paint them. I love that you can use these inks on darker card stocks. I added a cupcake from Karen Burniston's Cupcake Pop-Up, and highlighted the stitched line on the border die with a white gel pen. I also cut the border a second time from the bright green card stock and added it below the teal one. The decorated panel was popped up with fun foam onto the white card base.


Inside I added the bold Happy Birthday, a new die by Karen Burniston.


For my second card, I used the same candle row and my MISTI to stamp 4 rows of candles onto a blended and spritzed Distress Oxide inked background. The Happy Birthday stamp comes with the birthday candles, and there is also a row of balloons and a row of flowers.


Last Mother's Day I gave our middle daughter a set of handmade birthday cards as they seemed to be going to a lot of birthday parties for their friends children. They were a big hit, so I plan on doing it again this year for both daughters. These two will be included in the stack.

Tips & Tricks:

I used my MISTI to line up the candle row stamp. The MISTI makes it so easy to do this without having to move the stamp. I just moved the card base up 4 squares on the grid with each stamping. This was the first time using this technique with Versamark ink and I wondered if the first stamped images would remain moist enough to grab the embossing powder. No problem at all!

After a couple of years of making other (mostly larger) card sizes, it seems I'm embracing the A2 size card again. You can expect to see a lot more A2 cards on my blog this year.


Supplies for Cupcake card:
Teal and bright green Soft Finish Card Stock - Elizabeth Craft Designs
White embossing powder
Scalloped Border dies - Prickley Pear Rubber Stamps
Scalloped Border stamps - Prickley Pear Rubber Stamps
1030 Happy Birthday die - Karen Burniston
1008 Cupcake Pop-Up - Karen Burniston
Dress Up Riley, Birthday stamps (Make A Wish) - Riley and Company
White card stock
Stickles
Distress Oxide Inks
Sakura white gel pen

Supplies for White Candle Row card:
Blueprints #29 (stitched rectangle) - MFT Stamps
Scalloped Border stamps - Prickley Pear Rubber Stamps
Fun foam
White card stock
Distress oxide inks
Teal and bright green Soft Finish Card Stock - Elizabeth Craft Designs
MISTI - My Sweet Petunia
Bakers Twine
Hooray stamp - MFT Stamps

Thanks for stopping by today

Wednesday, 14 February 2018

'Love Bear' Centre Step Card

Good morning friends

Happy Valentine's Day!

Today I'm sharing my final Valentine for 2018. I decided I wanted to play with this cute bear stamp & die from Stampin' Up, so stamped it with black on Kraft card stock and clear embossed it. I added a Top Hat, Bow and Monocle from Karen Burniston's Tiny Accessories 1 die set, which makes him such a dapper fellow!


Here is a peek at the inside:


Today is a special day, as we will be welcoming out of town guests for a couple of days. Looking forward to visiting with them for sure. 

Supplies:
Bear stamp and dies - BEAR HUGS, Stampin' Up
Kraft, black, white and red card stocks
Clear embossing powder - Stampin' Up
Copic markers
Zig Clean Colour Markers
Water brush
Kind Sentiments Step-Up die set - Stephanie Barnard (Sizzix)
Patterned paper - Stampin' Up
Nuvo Crystal Drops

Thanks for stopping by today

Tuesday, 13 February 2018

Paper Pro's February Challenge, Pop-Up Valentine

Good morning friends

It's time for the Paper Pro's monthly challenge, and for February Caz Counsell gave us the theme "Love".  So I made a Valentine!


The paper has metallic bits to it. :-)


Here is the card as it is opening ... you can see there is an adorable pig coming into view ...


But what is that? An owl? Something else is coming into view as the card continues to open.


When the card is fully open, the surprise is also fully revealed - a trio of Valentine critters! I have had this die & stamp set for over a year now, and these little critters just crack me up. I used Karen Burniston's new Spinner Square Pop-Up to create the animation.


I added a cut-part from the same paper stack. The stamped greeting image comes with the critters.

This is a casual challenge, with a varying number of participants each month. This month we have:

Karen Aicken (that's ME!)

Supplies:
1042 Spinner Square Pop-Up - Karen Burniston
Pink and white card stocks
Patterned paper - Recollections
Quick Critter dies and stamps - Taylored Expressions
1011 Katherine Label Pop-Up (hearts) - Karen Burniston
Blueprints #29 dies (tab) - MFT Stamps
Marvy LePlume II Markers

Card size - 5 x 5-1/2", fits in a 5 x 7 envelope

Thanks for stopping by today
SaveSave

Monday, 12 February 2018

Valentine Pig and Bird Scalloped Card Duo

Good morning friends

I'm back today with my second post of the day. I didn't want to hang onto the photos until next Valentine's, so am doing a couple of double posts to get them all shared. These two use that cute scalloped card base and stickers from stash.


The butterfly has a gold foil body & antenna, and the lip patterned paper has red foiled bits on it. So this card is nice and shiny!


This second card also uses stickers and patterned papers with foiled accents. For the front decorated panel, I cut a scalloped panel from black, and the open scalloped panel from the XOXO patterned paper. The black shows through the openings, which is a look I like.


I enjoy making Valentine cards (in case you hadn't noticed, ha ha) but will stop now until next year. I do have a couple more to share this week then I will move onto other themes.

Supplies:
Card, Scallop with Thanks Sentiments - Stephanie Barnard (Sizzix)
Black, pink and white card stocks
Patterned paper - Recollections
1042 Spinner Square Pop-Up (Square dies) - Karen Burniston
Stickers - Pebbles
Fun Foam
Resin heart sticker - Doodlebug

Thanks for stopping by today

Happily Popping Up To Say Hello ...

Good morning friends

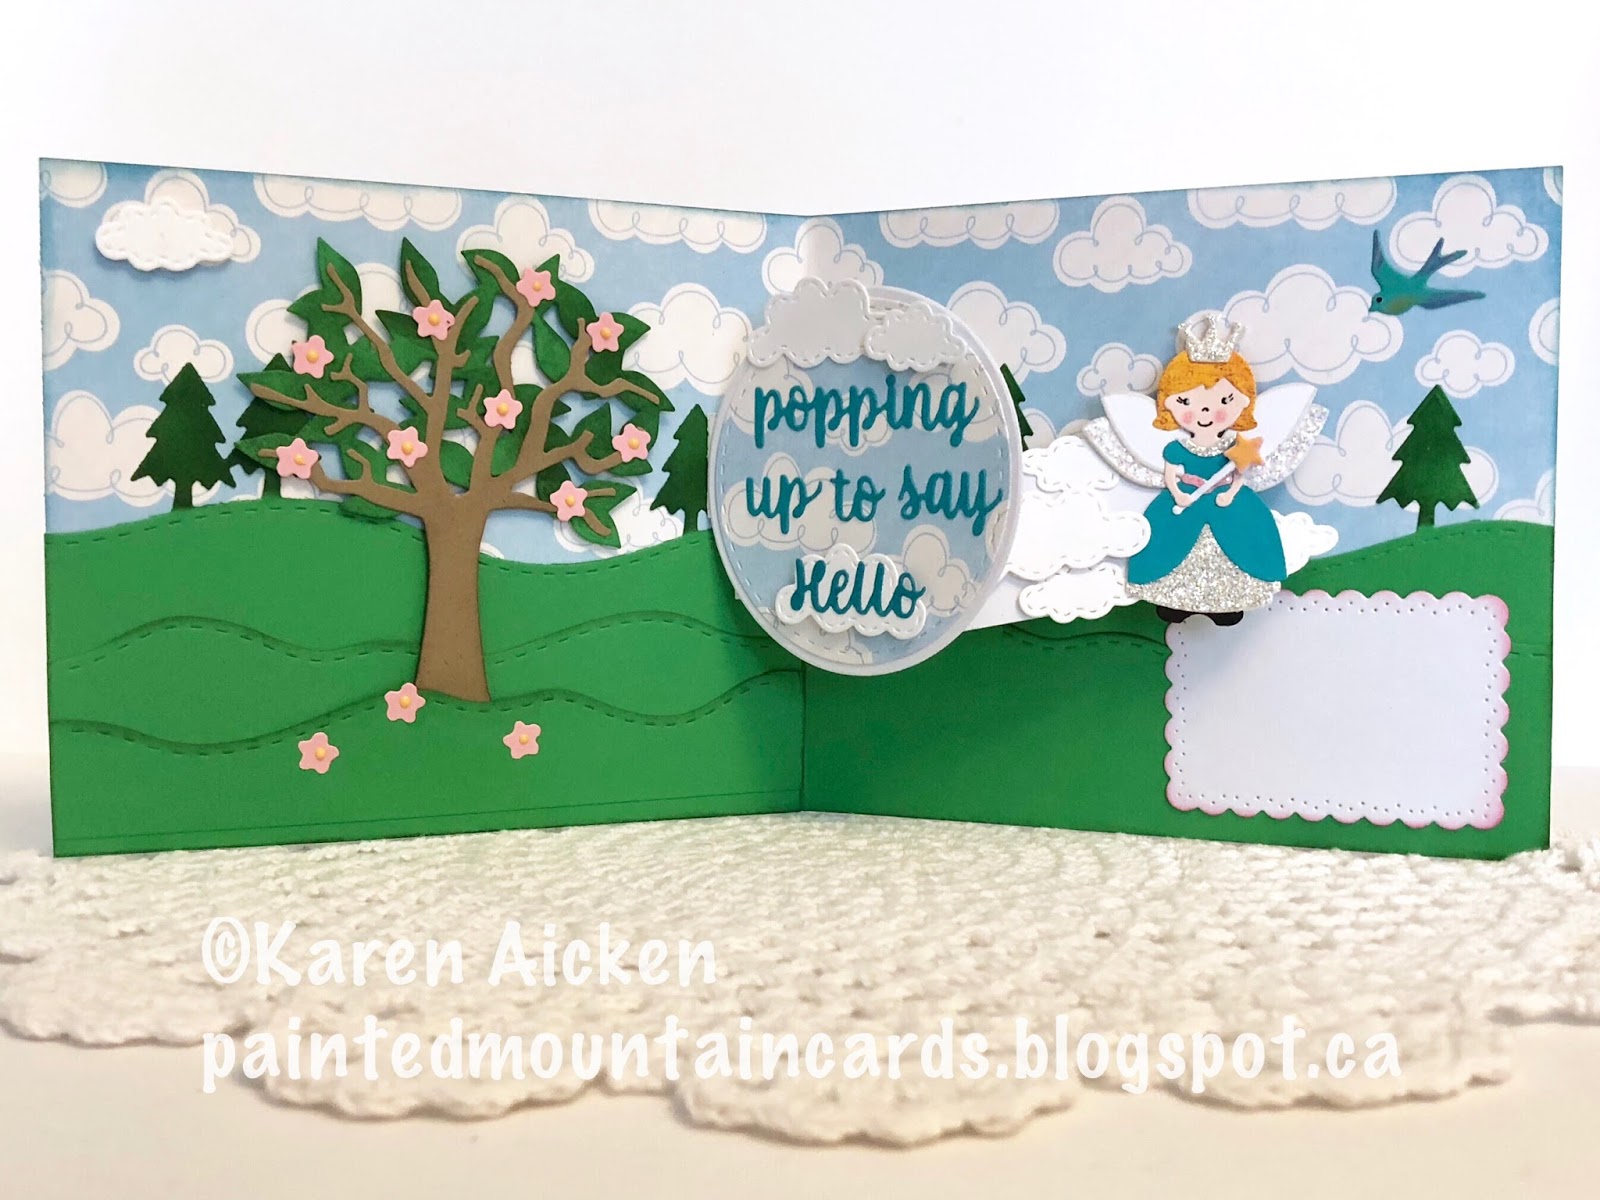
I had a lot of fun making this card using a bunch of dies from Karen Burniston's newest release. Both the tree edge and the bird dies are from the new Outdoor Scene. The Happily was trimmed away from the new Happily Ever After and adhered to the card front, and there is a popped up stitched cloud in the sky as well.


I used the new Spinner Square Pop-Up to create the fun inside, with a fairy princess made from the Princess and Mermaid die set.


The tree is from the Tree Pop-Up. I really like this tree, that it is only two pieces and it both cuts and assembles easily. On this one I added flowers, but they cut six at a time so it's easy to fill your tree with blooms.


For the Fairy Princess I cut her dress three times. Twice from white glittered card stock and once from white card stock. By turning two of the dresses upside down and off-setting, they created the wings I wanted and the rest of the princess was assembled then the wings adhered behind her. She would make a cute Tooth Fairy as well!


She spins up and hides behind the decorated circle as the card is closing or opening.


The font for the first four Word Set dies is the same, so it's easy to combine words from the different sets to create a custom greeting.

Supplies:
1036 Princess & Mermaid - Karen Burniston
Pink, white, teal, black and green card stocks
Glitter card stock - Stampin' Up
Copic markers
Wink of Stella
Black fine point marker
Signo white gel pen
Patterned paper - Echo Park
1042 Spinner Square Pop-Up - Karen Burniston
1045 Outdoor Scene - Karen Burniston
1006 Nature Edges - Karen Burniston
1027 Word Set 4 Just a Note - Karen Burniston
1002 Word Set 2 Greetings - Karen Burniston
1012 Snowman Twist Circle (circles) - Karen Burniston
1005 Tree Pop-Up - Karen Burniston
Coloured pencils - Prismacolor
1009 Twist Panel Pop-Up (scalloped rectangle) - Karen Burniston
Nuvo Crystal Ddrops
1032 Happily Ever After - Karen Burniston

Thanks for stopping by today

Sunday, 11 February 2018

Photo & Frame Valentine, and Love Banner Valentine

Good morning friends

I have two nearly identical cards to share today, using banner and photo frame dies/stamps by Sizzix designer Lynda Kanase. I was excited about this banner die, and ordered it a couple of weeks ago. I like that not only can you make quick banners/bunting with it, there are slits to easily insert an INSTAX Mini photo or gift card. There are also slits on the each outside edge to allow you to just pop the banners onto the string or cord. No fuss no muss. I also like the size, and that it works on a standard A2 card.


This Valentine is for our son and his girlfriend. They came to visit us and we all went out for Mexican food. I took this photo at the restaurant, and printed it from my iPhone using Fuji Film's Instax SHARE printer. Lynda's 'Lovely' photo frame die was used to cut the frame from patterned paper that matched the ones I wanted to use for the card. I like how easy it is to customize the frames!


The pretty arrows/heart cutaway is from the banner die set. All the words & symbols are interchangeable between the sets, which makes them even more customizable! I'm sure when our son opens the card they will be reminded of all the fun we had that night at the restaurant. They can slip the frame out of the banner piece when they are finished enjoying the card, and have a souvenir printed photo from their trip.


Here is a peek at the inside; both the flourish and the word stamp come with the Photo Frame, Lovely set.


For my second card, I basically re-created the same layout, choosing a different frame and adding a scrap of patterned paper and mason jar embellishment instead of the photo.


This time I used the Photo Frame, Travel for the frame. I backed the cutaway openings on the frame and banner with some dark patterned paper and adhered a doily behind the frame before adhering it to the banner panel.


Inside I used the arrow/heart cutaway on this scalloped rectangle - you can use them on lots of different projects - not just the frames! The little open heart die is also one of Lynda's; it comes with the Banner die set.


The patterned paper pad has gold foil elements as well, so i used a Cut-Apart as the greeting on this one.


I'm really having fun with these frame dies & stamps from the Picture This collection. I am working on another card using the frames, and will post that later next week.

Photo card Supplies:
Photo Frame, Lovely (dies and stamps) - Lynda Kanase (Sizzix)
INSTAX photo
INSTAX SHARE Printer - Fujifilm
Patterned paper - Recollections
Photo Banner die - Lynda Kanase (Sizzix)
Ribbon
Sequins
Stickles
Marvy Le Plume II markers
Black fine point marker

Card with Banner & Embellishments:
Patterned paper - Crate Paper
Photo Frame, Travel (frame) - Lynda Kanase (Sizzix)
Photo Banner die- Lynda Kanase (Sizzix)
Jar sticker - Recollections
Doily - Stampin' Up
Pink, white card stocks
Glossy Accents
Bakers Twine
Fun Foam
Stitched Mini Scallop Rectangle die - MFT Stamps
Cut apart - Reclections

Thanks for stopping by today

Saturday, 10 February 2018

Donut Pop-Up Valentine

Good morning friends

It's Saturday and that means a new challenge at the Crazy 4 Challenges blog. I am the hostess this month, and I'd like to thank Kristine Reynolds for agreeing to be our Guest Designer this month! You can find her blog HERE.  This is my challenge this week:   Valentine’s Day is right around the corner. Make your project reflect love or appreciation. Make a Valentine, Anniversary, Thinking of You or card showing support.

I made a Pop-Up Valentine, using some fun papers & stickers from my stash and a Cut-Apart for the card front.


I'm having issues with my water-mark app, as it appears to ignore any photo editing I do and  watermarks the original photo. So I'm going to have to find a new app to use. Meanwhile, it's hard to see in the photo but I went over each of the sprinkles with a glaze pen so they shine and catch the light.


This new Spinner Square Pop-Up by Karen Burniston is very cool - you can use it in both a side fold or a top fold card, and the spinner arm can be at the bottom or the top. Here I used a top fold with the spinner arm at the bottom.


A few more stickers highlighted with the glaze pen. The arrow has gold foil on it as well.


When the card is opened, you see the berries and the heart - and they spin back up behind the centre decorated square as the card is closing.


Here is a side view of the spinner arm.


Check out the C4C blog to see how the Crazies have been inspired by the challenge. We'd  love to see your take on it, so be sure to stop by the Crazy 4 Challenges blog and link up your creations. If you are uploading to an online gallery, please use the keyword C4C421.

Supplies:
White card stock
Patterned Paper -  Recollections
Donut Cut Apart - Carta Bella
1042 Spinner Square Pop-Up - Karen Burniston
Stickers - Pebbles
Sakura Glaze Pen

Card size - 5 x 5"


Thanks for stopping by today