Tuesday, 28 February 2017

Yay! It's your Birthday

Good morning friends

Today I have a birthday card to share, that I put in my Mom's Christmas Stocking. 


I used an older Sizzix Shaped Card front die for the pretty floral panel, and a Butterfly die by Stampin' Up.


Supplies:
White card stock
Patterned paper for panel - Basic Grey
Shaped front panel - Sizzix
Stitched oval die - My Favorite Things
Bakers twine 
Butterfly patterned paper - Pebbles
Words - Papertrey Ink
Stickles

Thanks for stopping by today

Monday, 27 February 2017

100th Birthday Pop-Up Card

Good morning friends

My son & Hannah are heading to England next month to celebrate her Grandma's 100th Birthday and I offered to make a card for this very special occasion.


The patterned paper has pearlized bits which catch the light. There is also pearlized purple card stock and a glittered embellishment on the front. The Happy Birthday dies are from the Happy Birthday Pop-Up by Karen Burniston.  I've had the number dies for years - it's always fun to use them to personalize a card.


Inside is a Pop-Up with Karen Burnsiton's Cake Pop-Up.


The flourish is an older Karen Burniston die, and I added pretty glittered flower stickers with gems on the cake and label.


Because the card is going to be hand delivered, it's a full 6 x 6".

Supplies:
Patterned paper and embellishments - K & COmpany
Cake Pop-Up, Pop it Ups - Karen Burniston (Elizabeth Craft Designs)
White card stock
Purple pearlized card stock
Silver card stock
gold card stock
Scalloped border die - MFT Stamps
Edge & Scroll die - Karen Burniston (Sizzix)
Seam binding
Number dies - Sizzix
Stitched Ovals
Purple card stock - Stampin' Up

Card size - 6 x 6"

Thanks for stopping by today

Sunday, 26 February 2017

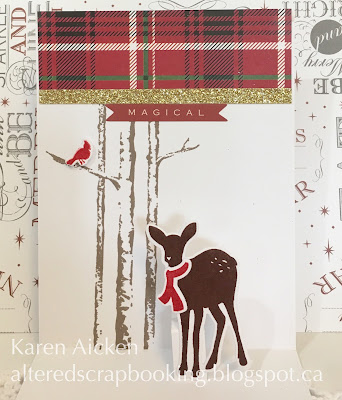
'All is Calm' Christmas Pop-Up Card

Good morning friends

Yes, I have a Christmas card to share today. I make so many cards for the holidays it's hard to get them all posted in December. I'll be sprinkling Christmas card posts throughout the year to catch up.

The idea for this card came to me on the drive home from Arizona last November. I always keep a notebook handy on those long drives so can make notes when inspiration strikes. I can't remember what exactly sparked the idea, but I believe it was the plaid with stark white possibly on a billboard?


Here is a look at the inside:


I used the little pop-up that comes with the Basket/Barrel Pop-Up to animate the deer. It's such a handy little die, and allows you to add a Pop-Up (or more than one) anywhere along the fold.


Finally, a side view so you can see the pop-up a little better. Love love love that sweet deer and bunny.


The card was watermarked with my old blog, but then didn't get posted there. I'm choosing not to re-do the photos with the Painted Mountain Watermark.

Supplies:
White card stock
Patterned paper - Recollections
Stamps and Dies - W Plus 9
Gold glitter paper - Stampin' Up
Clear double sided adhesive, 1/8" width - Elizabeth Craft Designs
Basket/Barrel Pop-Up, Pop it Ups - Karen Burniston (Elizabeth Craft Designs)
All is Calm stamp - Avery Elle
Magical banner embellishment- My Minds Eye


Thanks for stopping by today

Saturday, 25 February 2017

C4C-374 Thinking of you

Good morning friends


It's Saturday so that means a new challenge at the Crazy 4 Challenges Blog. Our February 2017 Hostess is Tammy Hershberger, and our Guest Designer is Lisa Henka. You can see Lisa's Blog HERE.  

Here is Tammy's' challenge:  "For today's challenge, I want you to "Use Your Words." Please make the sentiment the focal point of your card. Whether you choose to use a large sentiment, or maybe die-cut some words... whatever you decide, the words must be the focal point of your card."

Today's card shows a different way to use those large prints of patterned paper. I've actually made several of this type of card, which will be shared in the coming months. I started the card with this pretty shade of yellow card stock - it's the Soft Finish Card stock from Elizabeth Craft Designs. I love the colours, and that it is white on the reverse side.

I added a panel of patterned paper, then the beautiful calligraphy dies by Suzanne Cannon and a 3-d flower sticker that coordinates with the paper.


These word dies make such a statement on a card!


Inside you can see the rest of the printed paper inside the card. Since the card is 6" wide, I was able to use the whole 12" span of the patterned paper inside the card.


Finally a stitched label with a 3-d flower sticker as an area to write a note.


Check out the C4C blog to see how the Crazies have been inspired by the challenge. We'd  love to see your take on it, so be sure to stop by the Crazy 4 Challenges blog and link up your creations. If you are uploading to an online gallery, please use the keyword C4C374.

Supplies:

Buttercream Soft Finish Card Stock - Elizabeth Craft Designs
Patterned paper - K & Company
Thinking of You die, Suzanne Cannon - Elizabeth Craft Designs
White card stock
Clear double sided adhesive, 4" width - Elizabeth Craft Designs
Fine point tweezers - Elizabeth Craft Designs
Embellishments - K & Company
Stitched oval - MFT Stamps

Card size - 6 x 5" (Fits in a 5 x 7 envelope)


Thanks for stopping by today

Friday, 24 February 2017

Hello Pull Card

Good morning friends

It's Flip-It Friday here on my blog, and I have a simple Z fold card to share today. I used the Rectangle Pull Card by Karen Burniston for the card base, & some older and new dies too. One of my favourite parts about the Pop it Ups Pull Cards, is the notch that holds the card in the closed position.


When you pull the sides, the notch releases and the card opens to reveal the inside. Here I used layered stitched stars die cut from patterned paper. This card went to Sri Lanka, to a boy we sponsor through World Vision.


I've been adding some basic shape framelits to my supplies lately since I realized I did not have any leaves, hearts or stars. I did have the big Sizzix leaf dies and Sizzix primitive stars and hearts ... but no wafer thin dies in those shapes. The larger star dies on this card are new, but the smaller stars were fussy cut from coordinating patterned paper.

Supplies:
Patterned paper - My Minds Eye
White car stock
Stitched Star dies - The Stamps of Life
Hello die - My Favourite Things
Wink of Stella
Word stamp - Cornish Heritage Farms
Rectangle Pull Card, Pop it Ups - Karen Burniston (Elizabeth Craft Designs)

Card size - 5 x 6", which fits in a a 5 x 7" envelope

Thanks for stopping by today

Thursday, 23 February 2017

Love You Pop-Up Card

Good morning friends

I saw a video by Jennifer McGuire awhile ago where she die cut nesting hearts out of different colours of card stock then layered them back together alternating colours. I love hearts, but didn't have any heart wafer thin dies!!!  Luckily, Els had just released nesting hearts so I ordered the stitched ones and got to try the technique. I love that you get the look of multi layers without the bulk.

I die cut all 4 dies at once, holding them together with removable tape. I cut them from each of 4 shades of pink, then layered the hearts back together using the largest heart die in a solid colour as the base. I got four multi coloured heart die cuts, and used one of them on the front of today's card share. These are the three I have leftover for different projects.


And here is the front of my card!


The word dies are also new at Elizabeth Craft Designs, and I used the rest of an XOXO print patterned paper from my stash. I love using things up!


Karen Burniston recently gifted me with the Love Pop 'n Cut insert, and I had to try it out right away. LOVE it - thanks so much, Karen B!!


The heart patterned paper needed some colour, so I coloured some of the scribble hearts with a bright pink Copic marker, and added the little heart that falls out of the 'o' in Love.


Here is a side view so you can see the pop-up portion better. Yeah! I still love my Pop 'n Cuts and this Love insert is going to get a good work out. And not just for Valentine's Day.


Supplies:
Stitched heart dies - Elizabeth Craft Designs
Pink card stocks
White card stocks
Black card stock
Love Sentiment dies - Elizabeth Craft Designs
Patterned paper - We R Memory Keepers
Copics
Fine Point Tweezers - Elizabeth Craft Designs
Glitter Dots - Elizabeth Craft Designs
Scallop Border die - The Stamps Of Life

Thanks for stopping by today

Wednesday, 22 February 2017

Bright and Cheery Love Notes

Good morning friends

Today's share is a set of Love Notes that I put in my Mom's Christmas Stocking. She likes to send her Great Grandkids 'Happy Mail', and they love receiving Happy Mail. Win Win Win.


Oh how I love Doodlebug Designs. I used to do the artsy type of cards, all distressed and 'Tim Holtz style'. Then I became a Gramma and it was like flipping a switch. Now cute cards like this just make me happy.


Supplies:
White card stock
Patterned paper & Stickers - Echo Park
Stitched Rectangle dies - Elizabeth Craft Designs
Embellishments - Doodlebug Designs
Black Glaze Pen
Clear Glaze Pen
Bakers Twine

Card sizes - all, standard A2

Thanks for stopping by today

Tuesday, 21 February 2017

Floral Butterfly Birthday Card

Good morning friends

I'm on a roll these days, using older products from my stash. I figured I liked them enough to buy them initially, and it's just a shame that they sit gathering dust while I use only the new items that find their way into my craft room.

I wanted to make some flat birthday cards to have on hand, so I pulled out some older BigZ dies and got a few made made. I made two of many of the designs, but only photographed the single card. Here is one of them:


I still love the shape of these Stampin' Up butterflies. I added a Peel-Off border and penned the antenna with a gold gel pen. Also doodled some lines around the cut out shapes on the card edges with the same gold pen.


I like the shape that this card cuts, with the little 'brackets' out of each edge. Since I used double sided paper for the card base, I cut a smaller sheet of white card stock to line the inside and stamp a greeting. You may recognize the paper - it's the pattern I mistakenly purchased 30 of instead of 3 when on-line shopping a couple of years ago. I'm really whittling down that stack!


Supplies:
Patterned paper - Basic Grey
White card stock
Stitched Ovals - My Favorite Things
Pink patterned paper - Pebbles
Butterfly die - Stampin' Up
Pink card stock scraps
1134 - Peel-off Border - Elizabeth Craft Designs
Fine point tweezers - Elizabeth Craft Designs
Gold Metallic gel pen - Sakura
Words inside - My Favorite Things

Card size - A2


Thanks for stopping by today


Monday, 20 February 2017

Graphic Leaf Hugs Card

Good morning friends

I have a graphic style card to share today. The patterned paper on the front is actually a patterned A2 card. I picked up a package for a screaming deal (60 foiled & patterned cards and envelopes for $6??? No way I was going to pass them up).

I've been making cards for a very long time. Back in the day, there just wasn't any patterned paper to use on our cards. Even coloured card stock was dear, and I sure didn't 'waste' it by making a folded coloured card. No way ... you made a folded white card and adhered the coloured panel to the front only. Then came some patterned paper but it was slow to trickle up to Canada and you didn't just use it all willy nilly. No sir, you used it sparingly - to the point that if you were going to cover any of it up (gasp) with another panel, you would cut away that area of the patterned paper that would be hidden by the panel and save it to use for another card.

Times have changed, but my need to hoard pretty patterned paper has not. This lovely gold foiled patterned card was patterned front and back. Old habits kicked in and I used a stitched rectangle die to cut panels from the front and back so I could actually get TWO cards from a single patterned card. Sheesh.


Elizabeth Craft Designs has a new designer and some wonderful new dies - I picked up these leaves and the hugs die. Because you can't have enough hug dies.


But look! I actually used that second panel inside the card, covered some of it with the matted white panel and the world didn't come to a screeching halt.  I was much happier with the card having used the patterned card on the outside and inside, than if I'd just added the dies to the front of the patterned card.


Into my stash with this one.

Supplies:
A2 printed card - DCWV
Black card stock
Leaf dies- Elizabeth Craft Designs
Stitched Rectangle dies - Elizabeth Craft Designs
Love Sentiment dies- Elizabeth Craft Designs
White card stock

Thanks for stopping by today

Sunday, 19 February 2017

Birthday Pivot Card and Bonbon Box

Good morning friends

I'm happy to be a Guest Designer on the Elizabeth Craft Designs Blog today! I'm sharing a Birthday Card made with one of Krista Schneider's new line of stamps/dies and also a coordinating Bonbon box. Since I'm a visual learner, there are lots of photos in this post.


Let's get started making the Birthday card.

1.  From white card stock, die cut the largest Katie Label Pivot Decorator Die twice. Stamp and die cut two shrubs, the sweet table & chairs twice (only one shown), a single and a double tree, and the coffee shop. Note, I used an ink that is suitable for alcohol based markers.


2.  Using Pan Pastels and sponge daubers,  quickly swipe a ground line with green, then some cloud like swipes with blue. The images were coloured with Copic markers, then highlights added with a clear Glaze Pen. With the card as reference, adhere the coloured images to the labels using foam tape for dimension. On the left label, stamp CHEERS with black ink as shown.


3.  From Els' Stitched Hearts set, die cut the smallest stitched heart three times from 100# White Soft Finish Card Stock. Also die cut the second  smallest Stitched Fishtail Banner from the same White Soft Finish Card Stock, and the third smallest Stitched Fishtail Banner out of patterned card stock. Add one of the die cut 'table and chairs' to one of the stitched hearts with foam tape and set aside to use with the Bonbon Box.

4.  Centre the white Stitched Fishtail Banner over the patterned one and adhere together. Then score a vertical line one inch from the left edge. Stamp 'Wishing You A Colorful Day' centred between the score line and the fishtail edge, and colour with Copic markers.


Below is the front of the card. Because the patterned paper I wanted to use was not double sided and fairly lightweight, I adhered two sheets together before cutting my card.

5.  Cut your card base 8-1/2 x 6" and score in the centre at 4-1/4". Lay the Katie Label Pivot on the inside of your card, being sure your alignment nubs are directly over the score line. Use removable tape to hold in place while you run it through your die cutting machine. Gently fold the card so the inner label shapes pivot to the front and back when the card is opened and closed. Adhere a stitched heart to the lower right corner on the front of the card, and the decorated labels to the card base.


6.  Adhere the Stitched Fishtail Banner at the top right of the card as shown below, lining up the score line with the fold. Note, I used a wet adhesive on the left, and foam tape on the right of the Fishtail banner to give it some lift. Also, I felt the left side needed something else, so I cut a small yellow card stock scrap with the smallest Fish Tail Banner, trimmed it to size and adhered it as shown.

7.  Cut a strip of patterned paper 8" x 1-1/2" and score in the centre at 4" Adhere the outside edges of this strip to the outside edges of the card along the side edges only. You want the centre to be free as this creates another pop-up area and even more dimension to your card. Adhere one of the stitched hearts to the patterned paper strip, being careful to adhere it only to the strip and not the card base.


 Here is what the card looks like from above. You can see the foam tape on the Stitched Fishtail Banners, the way the Katie Label pivots, and the Pop-Up strip at the bottom edge. (Note, on another card, this Pop-Up strip would be a fun technique to add additional images to!)


And finally, this is the back of the card.


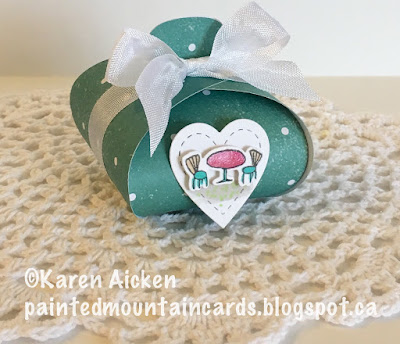
The Bonbon Box has quickly become a favourite of mine - it is easy to create and holds a little somethin' somethin'. You could quickly make multiples for a wedding or special occasion - and I think they will look wonderful on a table setting with your guests names attached. For this one, I cut it from coordinating patterned paper and wrapped the assembled box with seam binding.  Then I adhered the final stitched heart with the (adorable) table and chairs to the front.

Die cut the Bonbon box from patterned paper or card stock. Bring up and hold the two tabbed sides together and gently bring one slotted side over top of the tabs.  The tab will fit into that slot perfectly. This is a good time to add your goodies. Then bring the next slotted side up and over the tabs. Done! Decorate as desired.


I love that you can use matching papers to create a coordinating set!


I really enjoyed using these new stamps and the dies cut just beautifully.

Elizabeth Craft Designs Supplies:

Row Houses Stamps

Row Houses Dies 

Pan Pastels Kit #2

Bonbon Box

Katie Label Pivot Card

Stitched Fishtail Banners

Stitched Hearts

Best Wishes Clear Stamps

General Sentiments Clear Stamps

#100 Soft Finish Card Stock


Other Supplies:
Seam Binding
Copic Markers
Patterned paper - American Crafts
Glaze pen - Sakura
White card stock


Thanks for stopping by today

Saturday, 18 February 2017

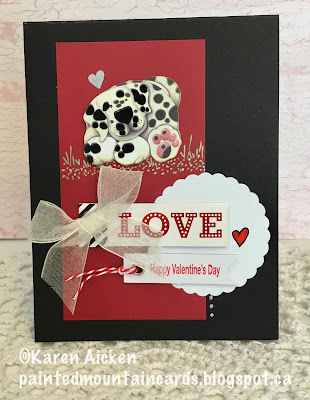
C4C-373 Valentine Sketch Card for Zachary

Good morning friends

It's Saturday so that means a new challenge at the Crazy 4 Challenges Blog. Our February 2017 Hostess is Tammy Hershberger, and our Guest Designer is Lisa Henka. You can see Lisa's Blog HERE.  

Here is Tammy's' sketch for this weeks' challenge:


It's a fun sketch, and one I'll likely use again. For my first attempt I made a Valentine for our Grandson Zachary. Zachary has decided his favourite colour is black. Love that kid.


The dog sticker has fuzzy bits on it, and I used a gel pen to doodle the grass and ground the sticker. 


Inside I added some hand lettering.


Check out the C4C blog to see how the Crazies have been inspired by the challenge. We'd  love to see your take on it, so be sure to stop by the Crazy 4 Challenges blog and link up your creations. If you are uploading to an online gallery, please use the keyword C4C373.

Supplies:
Black, red and white card stocks
Dog sticker and banners - Recollections
Sheer Ribbon
Bakers Twine
Metallic Gel Pens - Sakura
Scallop Circle - leftover piece on my stamping table
Staedtler fine point pens

Card size - A2

Thanks for stopping by today

Friday, 17 February 2017

Gold Butterfly Double Z Fold CardI

Good morning friends

It's Flip-It Friday here on my blog I have another Double Z fold card to share today. This one uses a lovely sheet of pearlized printed card stock and some gold card stock for shimmer and shine.


The butterflies were cut with an older Stampin' Up die, and the smaller ones are from an older Martha Stewart punch.  Of course I added gold Glitter Dots - they have been a staple in my card making for a couple of years now.


This is the first time I've added scallops outside the card base - but I quite like the look. Will try that again for sure.


I've had these gold Thinking of You Peel-Off's for awhile and they worked perfectly on the smaller sections.


There are three punched butterflies popped up near the inner fold, that are revealed when the card is opened. I really like how sturdy these cards are when displayed.


Supplies:
Patterned paper - K & Company
white card stock
Gold card stock - stash
Scalloped border die - MFT Stamps
Butterflies die - Stampin' Up
Small butterfly punch - Martha Stewart
Glitter Dots - Elizabeth Craft Designs
Fine Point Tweezers
Banner punch - Stampin' Up
2580 Gold Thinking of You Peel-Off's - Elizabeth Craft Designs
Gold gel pen - Sakura

Card size - 4-1/2 x 6-1/4", fits in a 5 x 7" envelope

Thanks for stopping by today