Tuesday, 16 November 2021

Mini Slimline Holiday Gnomies card


Hello! I'm back today with another card featuring some new products at Your Next Stamp. The Design Team is showcasing the new products over six days. This is day three of the showcase and prize details are lower down on my post.

This Mini Slimline Diagonal die is so fun, with the different sizes of openings. There are a couple of different Gnomie sets available at YNS and these Christmas ones are a great addition. I added mine over the new Holly Berry Circle Die. First I die cut the circle from white card stock, then die cut the Holly Berry Circle. It doesn't cut the outline, just the holly & berry openings and stitched line. You can get some fun looks with this die!


Inside I added some stencilling with the new Holiday Stripes Stencil and images from the Holiday Gnomies 

Comments left through November 21/21 at midnight EST will be entered in a draw to win a $25.00 YNS egift card.  1 winner will be pulled from comments left on Your Next Stamp Blog as well as the designer's blogs.  1 winner will be pulled from comments left on YNS Instagram and Designer's Instagram too.   The 2 winners will be announced on November 22/21  and will be posted on the Your Next Stamp Blog and the Instagram winner will be tagged there.


This blog uses affiliate links whenever possible. This means, that at no cost to you, if you make a purchase through one of my affiliate links that I may receive a small commission from your purchase. I only link products that I own, love and use for my card making!

Any supplies I'm unable to link are listed at the very bottom of my post    

Additional Supplies:
Burgundy and green card stocks - stash
Grey Copic marker

Monday, 15 November 2021

LaLa Llama Gift Card Holder and Dino-Mite Mini Slimline Christmas Card


Hello!  Today I have TWO cards to share today using fun new holiday products from Your Next Stamp.  The Design Team is showcasing the new products over six days. This is day two of the showcase and prize details are lower down on my post.

First up is a smaller card with matching envelope, and I turned it into a Gift Card Holder! 

I adore Llama images, so I was really happy when YNS came out with this La La Llama set. After inking the YNS Candy Cane Stencil using red ink on white card stock, I layered the panel onto the card front. The Llama was stamped and cut out using the coordinating die, then coloured with alcohol markers. There are gold and white gel pen highlights, as well as Wink of Stella for shimmer and shine. And of course the sparkly YNS Gumdrops! Everything that is available is linked below for you.


Here is a peek at the inside, where I adhered a leftover strip of the stencilled card stock at the top and bottom edges only. That made a sleeve for the gift card to slip into. When I saw I had another leftover strip of the stencilled candy cane card stock, I added it inside the card as well but glued it right down along the inside fold.


For my second card, I created a Mini Slimline card using the new Snowball stencil and the new Dino-Mite Holiday stamp set.


I added some Wink of Sella and sparkly Gumdrops for moe shimmer and shine and I think this is just a fun and unexpected holiday card!


Inside I added some more stencilling as well as two more stamps from the Dino-Mite Holiday stamp set.


Comments left through November 21/21 at midnight EST will be entered in a draw to win a $25.00 YNS egift card.  1 winner will be pulled from comments left on Your Next Stamp Blog as well as the designer's blogs.  1 winner will be pulled from comments left on YNS Instagram and Designer's Instagram too.   The 2 winners will be announced on November 22/21  and will be posted on the Your Next Stamp Blog and the Instagram winner will be tagged there.

This blog uses affiliate links whenever possible.This means, that at no cost to you, if you make a purchase through one of my affiliate links that I may receive a small commission from your purchase. I only link products that I own, love and use for my card making!

Any supplies I'm unable to link are listed at the very bottom of my post

Additional Supplies:
Shimmer Spray
Red mini card and envelope - Stampin' Up (retired)
Ohuhu alcohol markers
Dark green and burgundy card stock scraps

Hanukkah Pop Up Slimline Card

Hello! Today is the day the Design Team can start to share SNEAK PEEKS of Karen Burniston's NEW RELEASE!! We have all been having lots of fun creating with it - remember the Design Team is linked on the right side of my blog if you want to see what they have made as well. I have more details on the release below.

Today's card is a Slimline Pop Up card using the new Little Labels Pop Up, combined with the new Big Birthday Charms and Crosshatch Labels. I have a walkthrough of my card on YouTube:  


Inside is where I added the new Little Labels Pop Up (probably my favourite die from the new release) and created a Menorah Style card using the candles from the Big Birthday Charms.


The candles were cut from a rainbow holographic card stock with gold mirror card stock flames. This card has lots of sparkle and shine!


I used retired Hanukkah papers, stickers & cut aparts from my stash and since this package isn't available anymore I have linked some different Hanukkah products for you. Which I have also purchased 😊!


NEW RELEASE ITEMS will be available on November 22 and we will be celebrating with a Blog Hop (and prizes!). Here is a peek at the whole new release ❤️

This blog uses affiliate links whenever possible. This means, that at no cost to you, if you make a purchase through one of my affiliate links that I may receive a small commission from your purchase. I only link products that I own, love and use for my card making!

Supplies used that I'm unable to link are listed at the end of my post  
Supplies:
Mirri Rainbow Holographic - HunkyDory
Patterned paper, cut apart and stickers - Happy Hanukkah, Photo Play

Sunday, 14 November 2021

Sixteen Birthday Cards to Donate


Hello! Today I'm sharing a group of Birthday Cards I made to donate to my Mom's old nursing home.  I had been looking for something specific in my craft room and had to move this stack of 6x6" patterned papers to look under it. This paper stack was a sample pack of Stampin' Up papers that was a gift from a demonstrator many years ago. 

Since I can be easily distracted, ha ha, I decided to have another flip through it and pulled out a bunch of papers that I could use to make some quick Birthday Cards to donate.  First I cut matting layers from white card stock using the Matting Rectangle Die by Divinity Designs. Everything that is available is linked below for you.

I used my favourite card layout, cutting each 6x6" sheet down to 4 x 6". Setting aside the leftover 2 x 6" strips,  I cut  2" off of the bottom of each 4 x 6" piece. Because the papers are double sided, I was able to flip the 2 x 4" strips over to the reverse side, and then adhere it to the bottom of the matting rectangle leaving an even border on each side and the bottom edge. 

Then I simply adhered the remaining 4 x 4" piece at the top of the matting rectangle, leaving an even border on each side and the top edge. Those panels were adhered to my A2 card bases and then I was able to decorate the cards with a Divinity Designs Butterfly die and Penny Black Happy Birthday Die and metallic card stocks to finish them.


Those remaining 2 x 6" strips? I cut them each down to 2 x 5-1/4" and adhered two of them to each matting rectangle overlapping in the centre. Then those were added to card bases and decorated as above. I loved using so many of these old patterned papers up and getting cards for the nursing home!!


The insides were all done the same, with my Mini MISTI helping out with the multiple stamping.


This one patterned paper didn't lend well to the layouts above, so I decided to cut it down for a Mini Slimline Card.


Here is the inside of that final card, and I used blending brushes to add soft colour to that inside panel.


This blog uses affiliate links whenever possible. This means, that at no cost to you, if you make a purchase through one of my affiliate links that I may receive a small commission from your purchase. I only link products that I own, love and use for my card making!

Supplies:
Patterned paper - Old, retired from Stampin' Up
Tasteful Label dies - Stampin' Up (retired)
Green, burgundy, navy and peach card stocks - from my stash
Copper and silver mirror card stocks - Recollections
Happy Birthday stamp - unknown 
I have linked a different silver and gold mirror card stock, since the ones I used are unavailable

Saturday, 13 November 2021

Mini Slimline Card with Santa


Hello!  Today I'm sharing a Mini Slimline card for the holidays. I used some plaid patterned paper that I swear I ordered just last fall but it's already retired! Both the stickers and paper are from Photo Play and the snowflakes are an old Martha Stewart Punch. Since I can't link the stickers and paper, I found a different Christmas plaid package from Photo Play for you.


Here is a peek at the inside. I actually had added a round sentiment sticker inside, and since I'm never confident that the adhesive will hold on a sticker I usually add wet glue to the back for additional hold. Well when I looked at this finished card the next day I decided I really didn't like the sticker but no way it was going to come off. So I cut a scalloped frame using a die from Pinkfresh Studios (linked below) from both burgundy and white card stocks. After stamping the sentiment on the white inner portion, I adhered them both down over the sticker and liked the card a lot better.

This blog uses affiliate links whenever possible. This means, that at no cost to you, if you make a purchase through one of my affiliate links that I may receive a small commission from your purchase. I only link products that I own, love and use for my card making!

Supplies used that I'm unable to link are listed at the end of my post

Additional Supplies:
Burgundy card stock - stash
Patterned Paper - Flannel Shirt, Photo Play
Photo Play Mad for Plaid Christmas Stickers
Shimmer Spray
Snowflake punch - Martha Stewart punch
Sentiment inside - A Merry Hello, Stampin' Up (retired)

Thursday, 11 November 2021

Mini Slimline Sketch Card


Hello! The new Fun Friday Challenge at Your Next Stamp is a sketch challenge! There is a chance to win a prize as well - be sure to check out all the details below.


I used the YNS Mini Slimline dies and patterned paper from my stash. There were some unused border strips in the package, cut from one of the 12 x 12" papers so I added them where indicated on the sketch.  I HAD planned on using the new Llama stamps, but my DT package didn't arrive in time so instead I reached for the Crafty Cocktails instead. 


Finally, here is a peek at the inside:


Our challenges always come with 2 ways to win:

#1 – Would you like the chance to win a YNS stamp set? Leave a comment on the Your Next Stamp Blog by November 17th, 2021 at midnight EST to be entered in the random drawing. Want more entries in the drawing? Leave comments on YNS’ IG and FB pages too!

#2 – Would you like the chance to win a YNS store e-gift card? Play along with the challenge! Link up your creation at the bottom of the post on the YNS BLOG by November 25th, 2021 at midnight EST to be entered in the random drawing to win a $15.00 YNS gift certificate. If your creation contains YNS products and you are the random winner then you receive an extra $5.00. 

This blog uses affiliate links whenever possible. This means, that at no cost to you, if you make a purchase through one of my affiliate links that I may receive a small commission from your purchase. I only link products that I own, love and use for my card making!

Supplies used that I'm unable to link are listed at the end of my post.

Supplies:
Patterned paper - Holiday Bash, Recollections
Adhesive backed snowflakes - Stampin' Up (retired)

Hanukkah Pop Up Gift Card Holder Duo


Hello!  Today I'm sharing the Pop Up Gift Card Holders I made for the two grandkids who celebrate Hanukkah. I used a retired pop up die set by Lynda Kanase and Hanukkah papers & cut aparts from my stash. Anything that is available will be linked below for you and since this package isn't available I have linked some different Hanukkah products for you. Which I have also purchased 😊!


I have been using this Happy Hanukkah paper package for several years, and there are no more full sheets left. There was enough of the aqua print to die cut the interior of Ilai's card, but no piece big enough for Alma's. So I pulled out a Dreidels stencil and my I-Crafter blending brushes and created the panel inside. I love how it turned out!


The stitched label is a retired die set from Stampin Up and it fit perfectly as a place to sign our names. The envelopes are an A1 size and I stamped on the front to dress them up a little. 

This blog uses affiliate links whenever possible. This means, that at no cost to you, if you make a purchase through one of my affiliate links that I may receive a small commission from your purchase. I only link products that I own, love and use for my card making!

Supplies:
Tasteful Label dies - Stampin' Up (retired)
Pop Up Gift Card Holder - Lynda Kanase (retired)
Corner rounder
Darling Dreidels stamps  - Neat & Tangled
Patterned paper & cut apart - Happy Hanukkah, Photo Play

Wednesday, 10 November 2021

Faker Shaker Thanksgiving Card Trio

Hello!  Today I'm sharing three Thanksgiving cards in three different sizes but they all feature a faux shaker on the front. I've also heard them called Faker Shakers and I like that name better! I have a walkthrough of my cards on YouTube HERE: 

First up is the A2 sized card. All of the patterned paper and cut apart I used for these cards are from an older pad by Prima called Amber Moon. The cut aparts (or journal cards) were included in the paper pad - there were several sheets of them that just needed to be cut apart to use.

I have a video tutorial on creating a Faker Shaker HERE, if you are interested in more details.


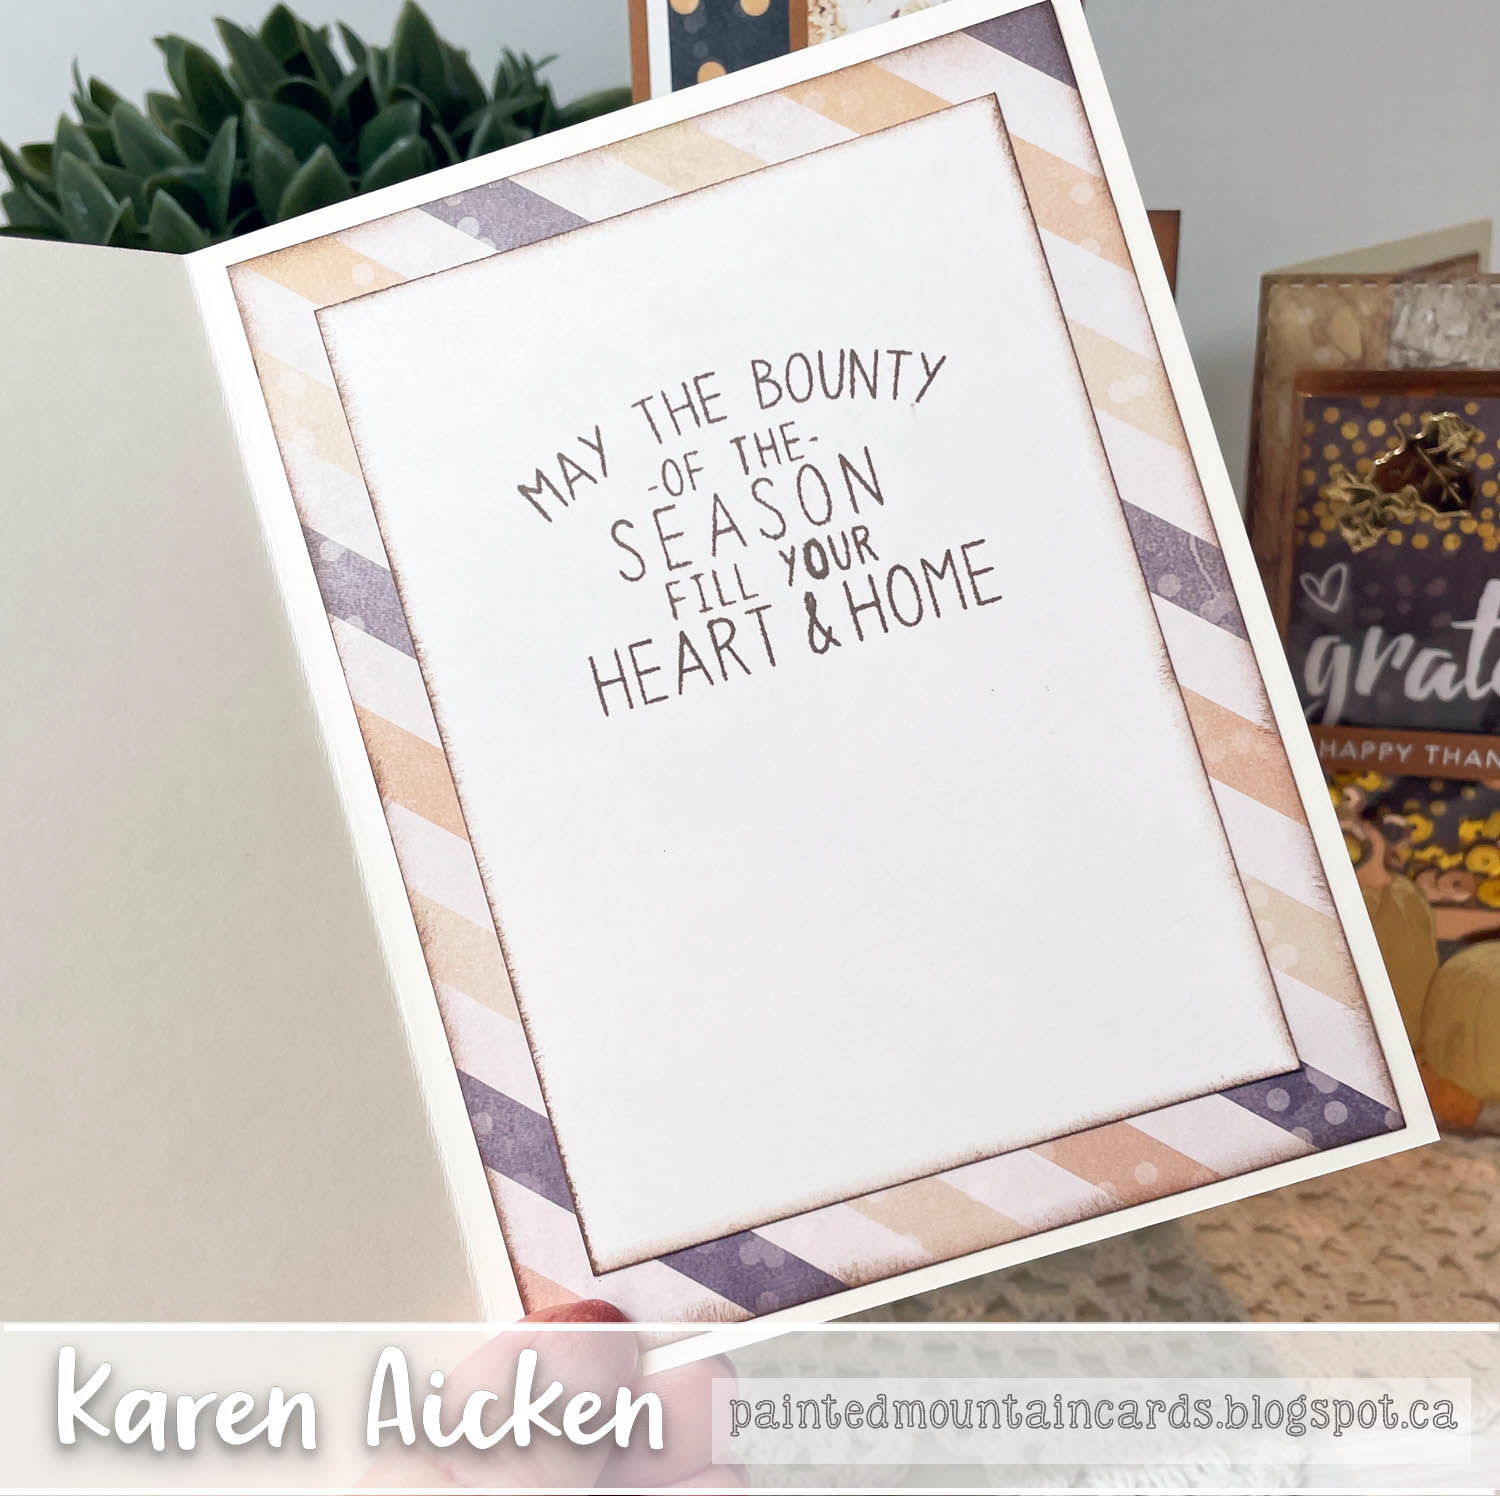
Here is the inside of the A2 card ...


Next up is the Mini Slimline card. The faux shaker was adhered to a copper mirror card stock mat, and the pumpkins & leaves were die cut from both gold and copper mirror card stocks as well. Lots of shimmer and shine on this one!


Here is the inside of the Mini Slimline.


Finally, here is the Slimline card, and I made it a Fold Flap Slimline.  The details on how to create a Fold Flap Slimline card are in the video if you are curious.


Here is the inside, where the stamped greeting block is hidden when the card is closed.


This blog uses affiliate links whenever possible. This means, that at no cost to you, if you make a purchase through one of my affiliate links that I may receive a small commission from your purchase. I only link products that I own, love and use for my card making!

Any supplies I'm unable to link are listed at the very bottom of my post

Supplies:
Small Cello Bags - stash
Sequins - stash
Patterned paper Amber Moon - Prima (retired)
MFT Stitched Mini Scallop Rectangles (retired)
Give Thanks - Reverse Confetti (retired)
Give Thanks - The Alleyway Stammps (retired)
Pumpkin dies - Elizabeth Craft Designs (retired)

Tuesday, 9 November 2021

Mini Slimline with Deer


Hello! I have been working on holiday cards and also USING some of my stash that I've had hanging around for far too long. In fact, this patterned paper is by Magenta and the date on it is 2003. Yes ... I've had it that long. I don't even know what to say, ha ha.

The deer? It was cut with my Cricut the first year I had it. I haven't used a Cricut machine in about 10 years so ... yeah ... another oldie. In one of my Christmas bins, there were 4 cards I likely started when I finished cutting and assembling the deer. I looked them and thought UG - my style (and supplies) have certainly evolved since then. The deer pieces easily popped off the cards, since the foam adhesive I had used was so old and I tossed the ugly card fronts and decided to repurpose the deer. 😊  I created a Slimline card using three of the deer  (I'll be sharing that one soon) and with the single leftover deer I made this Mini Slimline card.


Just a quick and simple card but I still like the festive feel. Here is a peek at the inside...


This blog uses affiliate links whenever possible. This means, that at no cost to you, if you make a purchase through one of my affiliate links that I may receive a small commission from your purchase. I only link products that I own, love and use for my card making!

Obviously, I'm unable to ink those older supplies which are no longer available, and the oatmeal speckled card stock is from my stash and about as old as the paper.