Friday, 30 December 2022

Pop Up Panel Gatefold Card for the New Year


Hello my crafty friends and welcome to Fun Fold Friday here on my blog.  I had stumbled on this type of card on Pinterest and wanted to check it out. Of course, it's by the talented Sam Calcott of Mixed Up Craft and I will link her tutorial at the end of my post. I like that it is a 5 x 7" size, it's a Gatefold (which is more interesting than a plain card front), and has this surprise pop up inside. Above is how the card would look as it came out of the envelope with a belly band holding it closed.


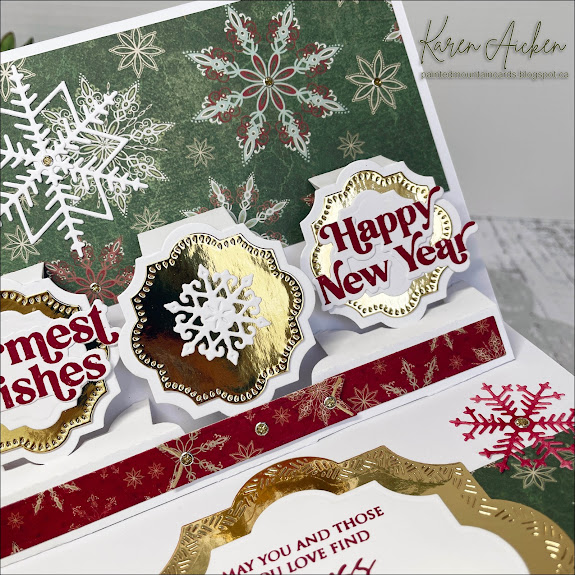
Below you can see I have slid off the belly band and you get a peek at what's inside. If you follow me, you know I rarely post things in the same order I make them. When I saw Sam's video I immediately made a Valentine card. I was happy with it and eager to make another one - thus the New Years card I'm sharing today.  I'll be sharing the Valentine's Card next month in the first of a series of New Fun Fold cards I'll be doing.


This is the card fully open! Now I didn't add all the layers that she did, not because I didn't like them but this card is heavy enough and I am always mindful of additional mailing costs. I was also going to do a video on what I changed and my thought process, but I am feeling burnt out from videos. They take a surprising amount of time and effort! I did cut my 5 x 7" card base to 5 x 6.25" as I was working with 6" patterned papers and that made it easier. 


The champagne bottle is adhered to the 'bendy' band with one of Sam's cardstock springs. I saw these back in November, and was intrigued enough to try one on a card that hasn't been shared yet. And I was hooked! You could also use a paper spring or Action Wobble for a similar effect, but I am loving being able to use up some of these scrap card stock strips I have hanging around.


Everything I used is from my stash - something I'll be doing a lot of in the coming year. I have lots of fabulous items in my craft room that I don't feel I have used enough - like this champagne bottle die - so I will be concentrating on doing that in 2023.


You can find Sam's beautiful cards and her tutorial HERE.

Additional Supplies
5 x 7" card and envelope
6 x 6" Patterned paper - Metallic Shimmer, Stampin' Up
Message in a Bottle Shaker die - Creative Expressions. I can't find this one to link for you, so I will link the Hero Arts set (which I also have)
Happy New Year - the Stamps of Life

This blog uses affiliate links whenever possible. This means, if you make a purchase through one of my affiliate links that you pay the same amount but I may receive a small commission from your purchase. I only link products that I own, love and use for my card making and not every link below is an affiliate one! 😊

Thursday, 29 December 2022

Winter Pop Up Birthday Card


Hello my crafty friends. This Birthday card has it all ... stencilling, Glimmer Foiling, stickers, die cutting, stamping and of course it's also a pop up card. 😊 I made it for my Sister In Law who celebrates a December Birthday.


The lovely blue snowflake background was reverse glimmer foiled using the solid plate and the leftover foil from doing different panel. Since the sentiments were gold foiled, I added plenty of gold peel off stickers, die cut the panel with a stitched rectangle die and added it to the stencilled card front.


Inside, I used the new Bam Box die set by Karen Burniston. As soon as you open the card, the Box pops up the Happy Birthday. So fun! 


There is more stencilling inside, a stamped sentiment and a gold foiled word on the left side.


Additional Supplies:
5 x 6.5 card & envelope - Michaels
White cardstock
White pearl cardstock
White matte glossy cardstock

This blog uses affiliate links whenever possible. This means, if you make a purchase through one of my affiliate links that you pay the same amount but I may receive a small commission from your purchase. I only link products that I own, love and use for my card making and not every link below is an affiliate one! 😊

Tuesday, 27 December 2022

5 x 7" Wintery Diamond Z Fold Card


Hello my crafty friends! I actually made this card last month and am just getting it shared now. It is a winter themed card though, and not Christmas. I had been really enjoying these Diamond Z Fold cards but thought I would take a break from them so that is why this one didn't get shared earlier. I expect I will continue to make these though as I think they are quite impressive. Maybe for Valentine's Day and Easter? 😊


I still have a fair bit left from that 'Magic of Winter' collection by Echo Park. This post makes EIGHTEEN projects created and I still have a couple finished that I will be sharing this month. I have more than enough for another bunch of cards, but I have put it away for now as I'm ready to work with some bright & happy colours again.


The ephemera and stickers are part of the collection and there is also a coordinating snowflake stencil. These were gifted to me by 
Scrap 'n Stamp Canada for our December 3rd Christmas Video Hop. You can check that out HERE.


There are a lot of tutorials online for this type of card, but I really liked the 5 x 7" version as then the diamonds are a nice size for decorating. I found a tutorial to link for you, but of course, she doesn't refer to it as a Diamond Z-Fold. 😂  I always find it funny when stampers come up with their own names for a popular fun fold, not realizing it makes it hard for people to find your blog or YouTube video when searching. Anyhow, her finished card is BEAUTIFUL, which is why I chose to share her tutorial.  NOTE:  I didn't add all the layering panels that are often shown in these cards, as they are heavy enough and with even more layers the card would require extra postage. Click HERE to see Heather's tutorial and card.

Additional Supplies:
5 x 7" card and envelope
White cardstock

This blog uses affiliate links whenever possible. This means, if you make a purchase through one of my affiliate links that you pay the same amount but I may receive a small commission from your purchase. I only link products that I own, love and use for my card making and not every link below is an affiliate one! 😊

Friday, 23 December 2022

Winter Bridge Card


Hello my crafty friends! This will be my last post until after Christmas, as I want to take a break from social media and spend time with our family. For those that celebrate - Merry Christmas!! For those that do not - Happy Winter! 

Now in my mind, those two words do not go together ... winter is my least favourite season and with the brutally cold temperatures we have endured this week, it just reinforces that dislike. However, the forecast is improving and Sunday should be a mild day. There is a large (natural) public skating pond behind our neighbours house. They always string up lights and put out stumps to sit on - so our family will be bringing their skates on Christmas Day! 

Willow, our rescue dog comes from Thailand. We were told that Thai rescue's usually STRONGLY OBJECT to their first winter. Yep - she is strongly objecting. She wasn't a fan of the snow, especially the snow on our back deck. She loves it out there and couldn't believe when it got covered in cold white stuff. But when the temperatures plummeted she decided she would just not potty again until Spring, thank you. 

We bundled her up in a warm dog coat and that helped until the temperatures plummeted again and then her feet would freeze before she could potty. So we hauled out the boots. We have had a variety of dogs in our lives in a variety of sizes. I still have all their coats & boots - so we found the boots that would fit her best and put them on her. She was even MORE unhappy, but she did at least potty! Such a sweetheart though - even though she thinks of the boots & coat as more of a punishment than a necessity, she stands nicely for me to put them on her ... once we catch her 😂. I am madly in love with this dog. She will be beside herself with joy when it's mild enough to go for a walk this weekend! 

Back to my card ... this one is a winter themed versus Christmas themed ... and is a Bridge Card. It folds flat for mailing but stands up for display. My hubby is always impressed at how sturdy they are!


I'm still playing with the "Magic of Winter" collection by Echo Park, which was sent to me by Scrap 'n Stamp Canada for our December 3rd Christmas Video Hop. You can check that out HERE.


The back is where we can write a personal message.


I have really had a lot of fun with this collection, making good use of the cut-aparts, stickers and embellishments as well as the patterned paper.

While I didn't do a tutorial, I can list the measurements I used for the base card. I plan on doing a video tutorial in the New Year when I have more time. The clock is kicking my butt this year!

Bridge Card Measurements:
Card Base - 9 x 5"
Score at 1.25,  2.5,  6.5  and 7.75" 
Fold as shown in the photo (mountain, valley, valley, mountain)
The bridge strip is 6.5 x 1"
You can add decorative papers as desired. 


Additional Supplies:
White cardstock
Various sequins - my stash
Card size - standard A2, 5.5 x 4.25"

This blog uses affiliate links whenever possible. This means, if you make a purchase through one of my affiliate links that you pay the same amount but I may receive a small commission from your purchase. I only link products that I own, love and use for my card making and not every link below is an affiliate one! 😊

Thursday, 22 December 2022

'Get Your Fat Pants Ready" Easel Card


Hello my crafty friends! I've been having fun creating Easel Cards lately, so I have another 5 x 7" one to share today. I got this humorous stamp set from Scrap 'n Stamp Canada and have been using it a fair bit as well. I have it linked below for you but it may now be retired. I went over all the details in my YouTube Video:


The patterned paper is an older pad from Michaels. This cute polar bear scene was actually just along the bottom edge of one of the 12 x 12" sheets in the package so I added it to the front of my Easel Card and used the top part for the decorative panels.


The 'bumper' was created with one of the border strips on a sheet from the package and is popped up with foam tape.


Additional Supplies:
5 x 7" card and envelope
Patterned paper - Holiday Bash, Recollections
Sentiment inside - Hero Arts (old)

This blog uses affiliate links whenever possible. This means, if you make a purchase through one of my affiliate links that you pay the same amount but I may receive a small commission from your purchase. I only link products that I own, love and use for my card making and not every link below is an affiliate one! 😊

Wednesday, 21 December 2022

Deer & Santa Lever Card


Hello my crafty friends. As I said in an earlier post, I haven't done much in the way of crafty shopping the past few months. Last month though, I picked up a few Funny Bones sentiments and these CUTE images from Divinity Designs. They are a Cut & Die Duo and since I have used the floral ones so much I couldn't resist these adorable images. There is this reindeer, a Santa and a Snowman in the set I chose but they also have a set with smaller images that include elves. It was a hard choice, but in the end it was the size of these ones that won me over.


The images are all pre coloured and on heavyweight cardstock. You die cut them with the included die (it cuts all three at once) and presto - almost instant embellishments. For this card I paired them with some older patterned paper and the Lever Card Die Set (also from Divinity Designs). That is one I have used a fair bit over the years. In fact, I just checked the Lever Card label on the right side of my blog, and I have made over 25 cards using it! 


I fussy cut a few flowers from a scrap of the floral patterned paper, and added Pops of Colour to the reindeer nose and the blooms. 


The sentiment is an older one from Lawn Fawn ... another set I use a lot.


Additional Supplies:
White cardstock
Card size - Standard A2 (4.25 x 5.5")

This blog uses affiliate links whenever possible. This means, if you make a purchase through one of my affiliate links that you pay the same amount but I may receive a small commission from your purchase. I only link products that I own, love and use for my card making and not every link below is an affiliate one! 😊

Tuesday, 20 December 2022

Three More Dog Themed Christmas Cards


Hello my crafty friends. Today I'm sharing three more holiday cards I made using a sheet of Cut Aparts. If you would like to see the video for the first three cards (which are fun folds) - click HERE

I added peppermint embellishments with glue dots, a few stickers from the coordinating 12 x 12" sheet, and glitter with a Wink of Stella pen.


Here is the inside of the first card ...


This second card is a Z-Fold card and I made it for our Grandson who likes to make pop up cards. 


When Zachary opened it, he thumped his hand to his forehead and giggled "Merry Woofmas?" He loved it!


The third card went into my stash ... I love how bright and cheerful this is. All of the card bases & matching envelopes are from Stampin' Up. They are 4.25 x 6.25", and probably sized for you to add a 4 x 6" photo to the front. 


... and the inside of the third card ...


Additional Supplies:
Patterned card & envelope, Santa Express - Stampin' Up
White cardstock
Christmas Scottie stamp and punch set - Stampin' Up

This blog uses affiliate links whenever possible. This means, if you make a purchase through one of my affiliate links that you pay the same amount but I may receive a small commission from your purchase. I only link products that I own, love and use for my card making and not every link below is an affiliate one! 😊

Monday, 19 December 2022

'Sip Sip Hooray' Pop Up Christmas Card


Hello my crafty friends!  Today's card has a simple shaker on the front and a pop up inside. I used some older patterned paper from my stash as well as the Sip Sip Hooray die that I've had for several years. I chose not to add the inside of the two 'O's into the openings, as I wanted a larger area to see the sequins inside. 


I haven't purchased a lot of crafting supplies the past few months, nor did I take advantage of the Black Friday or Cyber Monday sales. But in November I did order a few Funny Bones sentiments, as they make me smile. Today's card features one of them and I added it to a Crosshatch Banner on the Rockin' Rectangle - both dies by Karen Burniston.


I also added a wine bottle and glass from her Wine Charms set and a glittery holly sticker for a pop of colour.


I was happy with how this card turned out, and I know the people I made it for will enjoy it as well. Win win!


Additional Supplies:
Patterned paper - Reminisce, Christmas Wishes (6 x 6")
5 x 7" Card and envelope
Holly sticker. - stash
Sip Sip Hooray die - MFT Stamps
Sequins & filler - my stash
Jingle Bells - Riley & Company

This blog uses affiliate links whenever possible. This means, if you make a purchase through one of my affiliate links that you pay the same amount but I may receive a small commission from your purchase. I only link products that I own, love and use for my card making and not every link below is an affiliate one! 😊

Sunday, 18 December 2022

Little Label Pop Up Christmas Card Duo


Hello my crafty friends! I pulled out an older patterned paper pad for my card share today. These are the final two cards (of six) that I made with this paper pad and dies by Karen Burniston. I used the Little Labels Pop Up, one is a simpler version and the second one is 'stepped up'. I love how different the same die set can look!


I have all the details of these cards in my YouTube video:  


The first card uses blue mirror card stock for lots of shimmer and shine. The cute crosshatch banners behind the Merry Christmas are part of Karen Burniston's new release!


This second card has a simple front with patterned paper layers and a foiled sentiment.


Check out all the gold foil and layers on the inside! 


Even with all the layers, this card isn't very bulky and should mail for a single stamp. 😊


Additional Supplies:
Patterned paper - Holiday Wonder, Hobby Lobby (old, from my stash)
A7 Lacy Layers - Waffle Flower
5 x 7" Cards & Envelopes
Blue alcohol markers
Snowflake Mini Die Set - Divinity Designs
I'm linking a different blue mirror cardstock that I often use, as the other one isn't available

This blog uses affiliate links whenever possible. This means, if you make a purchase through one of my affiliate links that you pay the same amount but I may receive a small commission from your purchase. I only link products that I own, love and use for my card making and not every link below is an affiliate one! 😊