Thursday, 30 June 2022

Stencilled Birthday Card Trio (2nd Set)


Hello my crafty friends.  Today I'm sharing another set of cards created with Taylored Expressions Create In Quads - Birthday Layering Stencils. This is such a great concept and I love that you get to choose your own colours for perfect customization! I linked it below if you are curious, but basically it's a set of letter sized layering stencils that allow you to create four A2 panels at a time. You stencil one colour into the openings and when you lift off the stencil you have that colour on each of what will be the A2 panels. Repeat with the next stencil and colour and they all line up perfectly. The sets have different numbers of stencils (this one has three), so you just continue until you have used them all. 

This set has the streamer and confetti backgrounds, and also the large party hat and stack of gifts. There are coordinating dies available for the latter two, and you can see that I die cut the stencilled gift and layered it over the confetti background with foam tape. I could have left it as is - similar to the party hat  panel- and ended up with four card fronts, but I like the versatility of layering and that the colours all match if you do layer! Yep - I am a FAN!


I cut the panels down using different sizes of stitched A2 rectangles, added a little bling and stamped sentiments.

This blog uses affiliate links whenever possible. This means, that at no cost to you, if you make a purchase through one of my affiliate links that I may receive a small commission from your purchase. I only link products that I own, love and use for my card making!

Any supplies I'm unable to link are listed at the very bottom of my post.


Additional Supplies:
White card stock - Accent Opaque Digital Super Smooth (Amazon .ca)
Mustard cardstock - stash
Gem stickers - Stampendous (Old, from my stash)

Wednesday, 29 June 2022

Summery Platform Pop Up


Hello my crafty friends ... just a few more days until the 3rd annual Canada Day Video Hop! I am participating and am so excited to see what everyone created. There will be over $1000 in prizes up for grabs from our AMAZING sponsors, so be sure to mark your calendars for July 1 at 9am EST.

Today I'm sharing another Platform Pop Up card. While it looks OK in photos, this one is definitely better in real life when you can hold it in your hands. I used some ephemera from my stash and I love the gold foiling on it. I also added gold Peel-Off Border stickers and small butterflies cut from gold foil.

I had some light weight black card stock - maybe 65# - so I made the Platform Pop Up from that ... but it was NOT sturdy enough. So if you have the die, let me save you the trouble of using a lightweight card stock. I had to fiddle and create reinforcements up inside. Honestly, I would have been better off to just toss the base and cut another from a heavier card stock. But I persevered ...  Oh, and I spritzed the card base with Shimmer Spray, which also doesn't show up in the photos. 


The card folds up nice and flat for mailing, which I absolutely love.


One more look ... and you can see the gold Peel Off border stickers are along that fold inside as well. Just one of the foiled details you can see better in real life.

This blog uses affiliate links whenever possible. This means, that at no cost to you, if you make a purchase through one of my affiliate links that I may receive a small commission from your purchase. I only link products that I own, love and use for my card making!

Any supplies I'm unable to link are listed at the very bottom of my post.


Additional Supplies:
Ephemra - Jen Hadfield, American Crafts
65# black card stock - stash
White card stock - Accent Opaque Digital Super Smooth (Amazon .ca)
Gold Peel Off border sticker - Elizabeth Craft Designs (old, from my stash)  
Patterned paper (on the back) Hello Easter, Echo Park
Corner rounder
Shimmer Spray

Tuesday, 28 June 2022

Embossed Slimline Sympathy Card


Hello my crafty friends. Today I'm sharing a Slimline Sympathy Card using older products from my craft room and some new ones too! I couldn't resist this lovely Slimline embossing folder, and this was my first play with it. There is SO much detail and depth - I love it. 

Here I used rainbow holographic card stock, but I plan on doing a white-on-white one as well, using pearlized white card stock. I have some other ideas too! One of the newer items in my craft room are these Little Etched Butterflies from Paper Rose  - I linked them below for you. I have been looking for something like this for awhile and apparently I'm not alone as they seem to be constantly sold out at several different shops. They are gone as fast as they can be restocked! 

I stamped the sentiment and die cut it with Karen Burniston's Crosshatch Ovals - I love the embossed edge you get with the straight edged dies included in the set.


Here is a peek at the inside ...


This blog uses affiliate links whenever possible. This means, that at no cost to you, if you make a purchase through one of my affiliate links that I may receive a small commission from your purchase. I only link products that I own, love and use for my card making!

Any supplies I'm unable to link are listed at the very bottom of my post.


Additional Supplies:
Rainbow Holographic cardstock - Mirri Essentials, Hunky Dory
White card stock - Accent Opaque Digital Super Smooth (Amazon .ca)
Blue cardstock - stash

Monday, 27 June 2022

Canada Day Mini Slimline


Hello my crafty friends.  Today I'm sharing a Mini Slimline card for Canada Day, which is July 1st. Last week I shared a tutorial on adapting Karen Burniston's Triple Flip and I used two of the Photo Play Cut Aparts/Journal Cards for that one. They were cut from a 12 x 12" sheet, and this 4 x 6" one was left from that row so I decided to go ahead and get it on a card. I trimmed it down to 3.5" x 6" and it fills the entire front of my Mini Slimline card.

I added black glaze pen to the critters eyes & noses, some white enamel dots and then popped up the sentiment with foam tape. That was a sticker from the same package.


Inside I used Karen Burniston's new Short Crosshatch Rectangles and more of the Photo Play patterned paper & stickers. I penned the sentiment on another one of the crosshatch rectangles.


This blog uses affiliate links whenever possible. This means, that at no cost to you, if you make a purchase through one of my affiliate links that I may receive a small commission from your purchase. I only link products that I own, love and use for my card making!

Any supplies I'm unable to link are listed at the very bottom of my post.


Additional Supplies:
White enamel dots - All the Trimmings, Stampin' Up (retired)
Black and red fine point markers
White card stock - Accent Opaque Digital Super Smooth (Amazon .ca)

Saturday, 25 June 2022

Ice Cream Mini Slimline Card


Hello my crafty friends. When my Mom was a little girl, there was always a July parade in their town. Afterwards her dad, my Grampa, would take her to the drugstore for an ice cream soda. She continued the tradition with my brother and I, on a special day in July she would take us for ice cream. And I did that with our kids too - bringing my Mom along. We always made sure she had ice cream on that day. 

Now that she has passed, we continue the tradition - raising an ice cream cone to her in a toast and our grandkids think it's a great tradition! I also send my family ice cream themed cards to celebrate and here is the first one I made this year. The cute ice cream cones are from Karen Burniston's Sweet Treat Charms.


The new Short Crosshatch Rectangles have this sweet scalloped die included, so that is what I put on the inside. the Happy is an older stamp/die set from Lawn Fawn, and the July is Karen Burniston's new Mini Alpha. I love that it also has the shadow dies! 


This blog uses affiliate links whenever possible. This means, that at no cost to you, if you make a purchase through one of my affiliate links that I may receive a small commission from your purchase. I only link products that I own, love and use for my card making!

Any supplies I'm unable to link are listed at the very bottom of my post.


Additional Supplies:
Patterned paper - Doodlebug? (partial sheet leftover from a 12 x 12 sheet with no label left on it)
Various card stock scraps
White card stock - Accent Opaque Digital Super Smooth (Amazon .ca)
Flat Stickers - Dazzles

Friday, 24 June 2022

Two Thinking of You Z Fold Cards

Hello my crafty friends and welcome to Fun Fold Friday here on my blog. Today I'm sharing another pair of Z-Fold cards made using these printed cards & envelopes from Stampin' Up. The Thinking of You was cut from both silver and green mirrored card stocks ... I will link a couple of different green mirrored card stocks for you as the one I used is older from my stash.

The butterflies were copper heat embossed onto vellum, and I coloured the centres with a green & blue marker.


I left the insides blank so I can use them for a number of reasons. I realized recently that I have a ton of Birthday cards in my stash, a few sympathy cards - but no blank or general note cards to have on hand. Sometimes you need a quick card!  I think I will make a set with card bases, patterned paper etc - everything but the sentiments - to keep on hand. Then, I can quickly add the sentiment depending on what is needed.That will be my next project, as time allows. 😊


This blog uses affiliate links whenever possible. This means, that at no cost to you, if you make a purchase through one of my affiliate links that I may receive a small commission from your purchase. I only link products that I own, love and use for my card making!

Any supplies I'm unable to link are listed at the very bottom of my post.


Additional Supplies:
Patterned Paper, printed card & envelope - Hand Penned suite, Stampin' Up (retired)
White card stock - Accent Opaque Digital Super Smooth (Amazon .ca)
Polka dot dsp - The Paper Studio

Thursday, 23 June 2022

Four Rainbow Cards


Hello my crafty friends.  Today I'm sharing four cards made with the 'Rainbow of Happiness' bundle from Stampin' Up. Why four cards? Because the rainbow die cuts four arcs at a time, and I ran it through with four different patterned papers. Then I simply alternated the strips so I had 4 rainbows with each of the papers. Rather than make one card and hang onto those other pieces, I went ahead and made the four cards.  

I tried for MONTHS to resist purchasing this set. There really wasn't anything rainbow themed out there that applealed to me as much as this one, so when I found out it was retiring I caved and purchased it. (I also purchased a second bundle ... one with a greenhouse, which I is retiring as well).  The week after I received my package, Honey Bee came out with some really fun Rainbow items ... but ... I have these ones now, so I'm trying not to look too closely at the Honey Bee ones. 😂. Murphy's law, right?  I wait for months to purchase the set and once I finally do something I like even better comes on the market. Sheesh. 

No regrets though - I have lots of ideas for this set so lets start with my first cards. The 6 x 6" patterned paper I used is also Stampin' Up and also retired. I had intended on using a really bright rainbow palette, but when I was die cutting the rainbow pieces I spied this package on my desk and decided to use that instead. 

The first two cards are A2 in size, with popped up arcs over a stencilled panel and die cut clouds.  One card has Distress Stickles on the clouds and some bling and is for my stash. The second A2 card is nearly identical, but no glitter or bling and it will be donated to my Mom's old nursing home.


Here is the inside of the A2 cards ...


Card #3 is a Mini Slimline. I was hoping that the rainbow die would work for Slimlines and Mini Slimlines and it does! 


And finally, a shaker card. You know I had to. 😊. I cut strips of patterned paper from the leftover  pieces that the rainbows were also cut from and layered them side by side to create the card front. I did section each arc with foam tape even though the sequins are the same in each channel. That way sequins remain in the arcs, rather then sitting at the bottom.


Here is the inside of the shaker card. I guess I didn't take a photo of the Mini Slimline interior.


This blog uses affiliate links whenever possible. This means, that at no cost to you, if you make a purchase through one of my affiliate links that I may receive a small commission from your purchase. I only link products that I own, love and use for my card making!

Any supplies I'm unable to link are listed at the very bottom of my post.


Additional Supplies:
Rainbow of Happiness bundle - Stampin' Up
Patterned paper - 6 x 6" Brights, Stampin' Up (retired)
White card stock - Accent Opaque Digital Super Smooth (Amazon .ca)
Clouds - old, already cut and in a bin so they are ready to use.
Distress Stickles - Rock Candy, Ranger (discontinued)
Nevo shimmer pen Midas Touch

Wednesday, 22 June 2022

Bird, Flowers & Butterflies Pop Up Platform


Hello my crafty friends. Today I'm sharing another Platform Pop Up using some older ephemera from my stash. I thought this would be a neat card to send out for Happy Mail! I didn't do a YouTube video, but I do have a quick clip to show you the card opening and closing.   


The Platform Pop Up (linked below) is a pretty dynamic and versatile die and I am having SO much fun with it. I love how flat it folds for mailing but how beautifully it stands for display. I also really like that it's a fairly small footprint when it is on display. I can't wait to start using some of my holiday papers and ephemera to make some of these for Christmas!


I have had that ephemera package for a number of years, so I was happy to use some of the pieces up. The butterflies on the base were actually cut from a border strip of 5 butterflies. I added two on either side of the front rectangle, and the third one is at the top of the blooms, above of one of the butterflies that came in the package. 

I also added some pink glittery Peel Off border stickers, which have been in my stash forever.


This blog uses affiliate links whenever possible. This means, that at no cost to you, if you make a purchase through one of my affiliate links that I may receive a small commission from your purchase. I only link products that I own, love and use for my card making!

Any supplies I'm unable to link are listed at the very bottom of my post.


Additional Supplies:
Ephemra, Fly Free - Kaisercraft
White card stock - Accent Opaque Digital Super Smooth (Amazon .ca)
Glitter Peel off Border - Elizabeth Craft Designs
Circle Stickers - Stampendous

Tuesday, 21 June 2022

Bone Shaped Slimline Card


Hello my crafty friends.  So we did a thing. I didn't share this on my blog, but in early April we had to say goodbye to our Cooper dog. He had started to fail and after a bad weekend we took him to urgent care where they discovered an enlarged spleen, a mass on his liver and a few other things that had crept up. My sweet boy went to doggie heaven that day, and we went home with broken hearts.

Our 2nd dog (Jasper) was SO lonely and sad - he had never been an only dog before. And WE hadn't been a single dog household in many years. Once I felt I was ready, I started looking at different rescue groups and humane societies. Just to see. Lots and lots of large breed dogs, but with my RA a large dog is not physically manageable.

When we brought Cooper home 13 years ago - he was from Pawsitive Match Rescue Foundation so of course I was checking their website too. Mid May I noticed a dog there that sounded like she would fit right in with our family. We thought about it for a week, then finally filled out the application. It is quite the process, as they want potential adopters to be SURE - but we did all the steps and brought home our girl last weekend. We immediately changed her name to Willow and have been working to get this timid, sweet dog settled into our family. 

Willow's foster family did an amazing job with her, so I wanted to send them a Thank You. They had her for about three months, and I know they will be missing her - that feels like such a long time to foster a dog then send it off to it's forever home. So this is the card I came up with ... a bone shaped Slimline card using patterned paper from my stash. I fussy cut the dogs, then die cut the Thanks which is from Karen Burniston. Finally, some mirrored hearts for shimmer and shine. Oh, and the dogs noses and eyes got some glaze pen as well.


Since it was easier to write my personal message on the inside BEFORE adhering the front and back together, I didn't take a photo of the inside. I just added a few more of the fussy cut dog images from the patterned paper.

This blog uses affiliate links whenever possible. This means, that at no cost to you, if you make a purchase through one of my affiliate links that I may receive a small commission from your purchase. I only link products that I own, love and use for my card making!

Any supplies I'm unable to link are listed at the very bottom of my post.


Additional Supplies:
Patterned paper - Playful Pets, Stampin' Up (retired)
White card stock - Accent Opaque Digital Super Smooth (Amazon .ca)
Oval Set 1 dies - Dees Distinctively

Monday, 20 June 2022

Canada Day Triple Flip Card Adaptation


Hello my crafty friends.  One of my followers saw a post from 2019 where I created a single panel flip using Karen Burniston's Triple Flip die set and asked if I had a tutorial. At that point I did not, but today I'm sharing a tutorial on how to adapt the Triple Flip on YouTube:   


If you would like to see the snowflake panel card that inspired the tutorial, click HERE.

When you pull the arm to the right, the CANADA panel flips over to reveal a buffalo plaid moose and the rest of the sentiment "Our Home And Native Land".


Below is a peek at the inside, which I decorated with stickers. While the paper package is fairly new, I still added glue to the backs of the stickers to make sure they stayed down.


This blog uses affiliate links whenever possible. This means, that at no cost to you, if you make a purchase through one of my affiliate links that I may receive a small commission from your purchase. I only link products that I own, love and use for my card making!

Any supplies I'm unable to link are listed at the very bottom of my post.


Additional Supplies:
Corner Rounder - my stash
White card stock - Accent Opaque Digital Super Smooth (Amazon .ca)

Saturday, 18 June 2022

Foiled Butterfly Pop Up Card


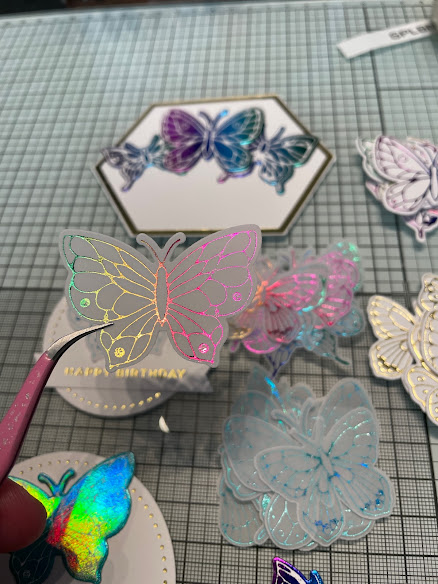
Hello my crafty friends.  Well I did it ... I jumped on the FOIL train. With both feet!!! And I don't know why I waited so long. Actually I do know why - I really didn't think I had room for another machine and then all the hot foil stamps too. However I did some sorting and moving things around and I am happy to share my first card created with the Spellbinders Glimmer Foiling system.

Of course I had to use both rainbow and gold foils, and butterflies! The hexagon frame was foiled in gold, and I foiled the Pinkfresh Studios Small Butterflies a couple of times on both white card stock and vellum. I did them in gold and also in the rainbow foil and tucked those into the container with all of the stencilled ones I made a couple of months ago. 

Here is a look at some of the foiled butterflies ❤️❤️❤️


Pulling out the solid hot foil plate, I was able to use the reverse of the rainbow foil for more butterflies - I love that with the solid plate there is no foil waste as you can use both the positive images and the negative as I did here. That solid plate is why I even considered buying the Glimmer Foil system because I know I just couldn't 'waste' all that pretty foil just doing the outlines. I also foiled a sentiment and cut it out with the coordinating dies.

The background was cut from patterned paper but then I used a texture cover plate from Pigment Craft Co ... it might be hard to see in the photos but there is a stitched pattern on the paper panel now. This is my first time using a Pigment Craft Co product and I am SO impressed with the quality and versatility of their items.  They are out of Saskatchewan Canada ❤️.


Inside I used the same patterned paper to cut the Pop Up Butterfly solid pieces, and purple mirror card stock for the detail layers. Again, the shine shows up SO much better in real life. 


This blog uses affiliate links whenever possible. This means, that at no cost to you, if you make a purchase through one of my affiliate links that I may receive a small commission from your purchase. I only link products that I own, love and use for my card making!

Any supplies I'm unable to link are listed at the very bottom of my post.


Additional Supplies:
White card stock - Accent Opaque Digital Super Smooth (Amazon .ca)
Shimmer spray
Stamp inside - Fiskars (old, from my stash)

Friday, 17 June 2022

Pop Up Card for Canada Day


Hello my crafty friends and welcome to Fun Fold Friday here on my blog. I'm sharing another card for Canada Day, this time it's a Pop Up using Karen Burniston's Little Labels Pop Up. I pulled out some stamps from Wild Whisper (a Canadian company) but it appears these ones are no longer available on their website. I didn't do YouTube video, but here is a quick clip to show the card opening and closing:   


I added the moose calf die cut to the left side and since I wanted a second one facing the other direction I cut it a second time then used my fingernail to sort of buff the rough edge of the underside so I could use the reverse side..  .


I really like the Little Labels Pop Up die set - and that it comes with so many different layering dies to decorate the Pop Up. The box platform across the bottom can be decorated any number of ways and here I used Karen Burniston's new Mini Alpha to spell out Canada Day. The included shadow dies are great for this alpha!


The scalloped border die that I used is many years old, but lots of companies have scalloped border dies so I will see if I can link a different one for you. They can easily be trimmed to the size you need. This card is a 6.5 x 5" card & envelope set that I got at Michaels. 
 I'll have to find a moose die to link as well!

This blog uses affiliate links whenever possible. This means, that at no cost to you, if you make a purchase through one of my affiliate links that I may receive a small commission from your purchase. I only link products that I own, love and use for my card making!

Any supplies I'm unable to link are listed at the very bottom of my post.


Additional Supplies:
Copic markers
Puffy Dots - Stampin' Up (retired)
Dot peg stamp - Stamps by Judith
White card stock - Accent Opaque Digital Super Smooth (Amazon .ca)
Strong & Free - Wild Whisper
No Place Like Home - Wild Whisper
Card & Envelope - Michaels (size 5 x 6.5")
Scallop Border - MFT (retired)
Moose die - Marianne Designs