Wednesday, 30 October 2024

Halloween Sheetload Cards


Since I like to work ahead on holiday cards and I had the bin of Halloween elements out anyhow - I decided to pull out a favourite Sheetload and make a batch of cards to have on hand for next year. The August 2021 Sheetload yields eight cards and I will need five of them for the grandkids. That leaves me three cards ahead to send to friends for Halloween 2025 😊

I pulled out some older Doodlebug patterned paper and got the card fronts all cut and assembled. Then I went through the elements and added the ones I thought worked with each card. Some got a punched white layer behind them so they would stand out more and most got a stamped sentiment.


Here is a peek the inside - I trimmed a strip of the patterned paper to add some colour inside, as well as a stamped sentiment.


Supplies used:
Patterned paper - Doodlebug Designs
3-D Stickers - old, from my stash
Label punch - Stampin' Up
Mini Strips Halloween, stamp and die - Taylored Expressions
Double Stitched Circle dies - Divinity Desigs
Resin stickers - Monster Bash - Stampin' Up
Sassy Pants Spooktacular - MFT Stamps

Thursday, 24 October 2024

Halloween Mini Slimline


When I was looking through my Halloween elements, I noticed that one package was almost gone - but these 3-D sparkly skull pieces were in it. I pulled all three out to make this card.

I cut the purple background using a die by Taylored Espressions then gave it a good spritz with shimmer spray. I added the 3-D skulls into the window openings and added a stamped sentiment. Then I pulled out an older package of resin stickers and added a crow above the sentiment.


Here is a peek at the inside where I wrapped holographic washi tape around the bottom edge and stamped the sentiment (in two parts). The resin sticker package also has the skull & crossbones in it so I added one inside. 


Supplies used:
Mini Slim Square Window Cutting Plate - Taylored Expressions
3-d Elements - old, from my stash
Resin crow & Skull/Crossbones - Stampin' Up (old)
Sassy Pants Spooktcular - MFT Stamps
Washi tape - old, from my stash
Shimmer Spray

Wednesday, 23 October 2024

Halloween Slimline Duo


I love making Halloween cards - and when I went through my bin to get this years ready to mail, I didn't have enough! Which surprised me as I usually have lots leftover at the end of October each year. I pulled out this Slimline paper pad,  found two panels that would work for Halloween and these are the cards I came up with.

I have had these 3-d elements in my stash for YEARS. I probably hoarded them for the first couple of years but I'm over that and have been making an effort to USE my supplies and not trying to make them last for the rest of my life. Ha.


Aren't these ones cute? The frogs came with the googly eyes - so fun. I added a stamped sentiment with thin foam tape to finish off the card front.


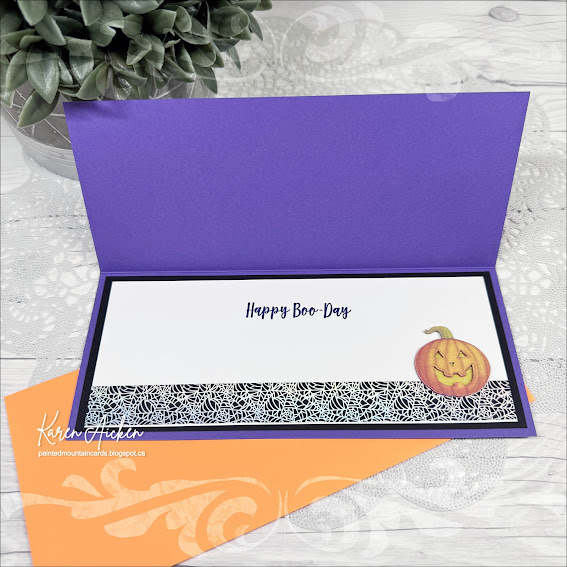
I stamped the sentiment on a white panel that had holographic washi tape wrapped around the bottom edge (another item from my stash) and added another pumpkin element. The panel was matted with black and added inside the card.


I chose a different package of elements for the second card, and added the die cut BOO instead of a stamped sentiment.


It's hard to see in the photo, but the purple BOO layer was sprayed with Shimmer Spray.


The inside was done the same as the first card ...


Supplies used:
Patterned paper panel - Slimline Paper Pack 'Enchanted Forest", Whimsy Stamps
3-d Elements - old, from my stash
BOO die - Photoplay
Shimmer Spray
Inside greetings - Papertrey Ink
Catherine Pooler coloured inks
Sponge dauber - Ranger
Washi tape - old, from my stash
Happy Boo day - Sassy Pants Spooktacular, MFT Stamps


Sunday, 20 October 2024

Sheetload Pop Up Birthday Card


I finished off another one of those July Sheetload of Cards** (that makes 7 finished out of 8) and I made it into a Pop Up birthday card for our daughter.  The front is pretty much the same as the others, I didn't add anything extra to it as all the fun is on the inside.

**I made all eight of the July Sheetload of cards, doing the fronts only. I wanted to take my time and finish off the insides for cards that I knew I would need coming up, rather than finish all eight at the same time. These ones will be for my stash and not donated to the nursing home as most of my Sheetload cards are.


The Lorna Label die set is a favourite of mine, and having these add ons make it even more so. This one uses the Happy Birthday Lorna Add-Ons. 😊

I still have one more card to finish off the inside ... but I haven't enjoyed this process as much as I thought I would. I think I'm just tired of the same card fronts and wish I had just finished them off all at once and been done. I'll likely leave that last one until the New Year now.


Supplies used:
Lorna Label Pop Up - Karen Burniston
Happy Birthday Lorna Add-Ons - Karen Burniston
Rectangles & Labels Crosshatch - Karen Burniston
Birthday/Belated Sentiments - Karen Burniston
Gold foil card stock - Recollections
Gold gel pen - stash
Birthday Wishes - Honey Bee Stamps
Banner punch - Stampin' Up
Patterned paper - Brianna, K & Company (old, from my stash)
Narrow gold foil tape - Amazon .ca
Gold foil paper - Recollections
Floral cluster die - Hand Penned, Stampin' Up
Stardust glitter pen - Sakura
Catherine Pooler coloured inks
Blending sponges - Tim Holtz
Stitched Scalloped circle nesting dies - Tutti Designs
5x7" card bases & envelopes - Ohuhu (Amazon .ca)
Vellum - Stampin' Up


Thursday, 17 October 2024

Birthday Tags


I love making tags, so pulled out these Topper Tag dies by Karen Burniston to make these Birthday tags for our daughter.  They looked so nice tied to the gifts, which had coordinating colours in the giftware.


I bought this birthday themed washi tape from Pinkfresh Studios last year (or the year before?) and added the whole role to panels of white card stock. You could also get coordinating dies to cut out the washi tape images as well as a coordinating stamp set that would also work with the dies. I didn't actually buy anything but the washi tape though and simply fussy cut the panels as needed.

Since there is some gold foiling on the washi tape, I added some narrow gold tape to the tags as well.


Supplies used:
Topper Tags - Karen Burniston
Narrow gold foil tape - Amazon .ca
Seam binding
Washi tape - Pinkfresh Studio


Tuesday, 15 October 2024

Fifth Set of Birthday Cards


Today I'm sharing the fifth & final set of Birthday Cards I made using a 6x6 paper pad & coordinating ephemera. You can see the first batch HERE, the 2nd set HEREthe 3rd set HERE and the 4th set HERE if you are curious! (So far, I've made 20 cards)

I took a couple of evenings, cutting down the papers in the pack to work with the June 2021 Sheetload of Cards (a favourite). 

Then I chose coordinating ephemera for each card and had everything stored together in a plastic bag. I know how busy things are going to get in the next couple of months, so I wanted to get a jump on my nursing home donation cards. That way I could just reach into the bag and pull out the pieces to quickly complete a couple of cards!


These ones are all the same inside, and I used an old Stampin' Up banner punch & some scraps to add a little colour inside.


I was able to use what was left in the paper package and the remaining ephemera for these cards. I love to use things up!


Supplies used:
Patterned paper - Let's Celebrate, Carta Bella (6x6")
Let's Celebrate Ephemera - Carta Bella
Sentiment inside - Lots of Birthday2Stamp, the Stamps of Life
Stickles glitter glue
Banner punch - Stampin' Up
Catherine Pooler coloured inks

Wednesday, 9 October 2024

Slimline Christmas Pop Up Card


I completely forgot to share a Christmas card in September! We ended up doing a camping trip down the Oregon coast, we've been busy since we got back and I'm having trouble finding time to get in my craft room. But this is the holiday card I made in September ... just a little late, ha ha.


I went with a Slimline card and the patterned paper is VERY sparkly. I've had the paper pad for a few years and there is also a coordinating ephemera pack that I used for the words on the front and the elements inside. The scene was at the bottom of a 12x12" sheet in the paper pad, and I thought it worked well for a Slimline.


The pop-up arms come from Karen Burniston's Mini Pops Pop Up and the signing block was die cut with her Rectangles & Labels set. 


The Canadian Thanksgiving is this coming weekend, and I didn't get a single card in the mail for it. Hoping I can dig out the extra Halloween cards I made last year and get those in the mail or I'll miss the boat on that occasion too! 

Supplies used:
Patterned paper  & Ephemera- Sugar Plum, My Minds Eye
Mini Pop Pop Up - Karen Burniston
Rectangle and Labels Crosshatch - Karen Burniston
Sentiment - Christmas Classics - Stampin' Up
Sakura stardust pen
Catherine Pooler coloured inks
Stickles glitter glue