Good morning friends
Yes, this is my second post today, but I wanted to share my latest project while I'm this excited.
This is a ScoreBoard die, which means it's designed to cut through heavy mat board, ScoreBoard and chipboard. I used chipboard and the covers are SO nice and sturdy.
I broke into this patterned paper stack that I have been hoarding for YEARS. I figure if I'm making something for myself, I can cut into it and still get to enjoy the pretty patterns. The label comes with the die. Anyhow, I added a letter sticker to the centre of the label and some bling, then some crackle paint. When it was dry I added glossy accents over the surface.
I also added a Stampin' Up word stamp to the lower right portion of the journal cover.
This is the cover flattened out ...
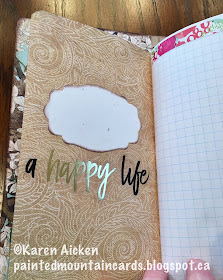
Inside I added a few stickers with gold accents. This one is on the inside front cover.
Look how pretty the three inserts look as the book is opened. I love things that coordinate!
As I said, there are three signatures in the book (signature = booklet) and I made them out of coordinating patterned paper for the covers, and a combination of grid and blank papers inside. Inside the cover of the first signature is another gold foiled sticker and a label. I didn't want to add a label to the front and cover up any of that pretty robin paper!
There are so many ideas rolling around in my head! This journal was actually made just to see how it all worked, so it's fairly basic. But I did add a paper bag into the first booklet - with the bottom cut off and folded in half it forms two pockets - one pocket on this page and the second further in the signature. That would be where I cut off the bottom. I have oodles of these bags, so I will be doing this again.
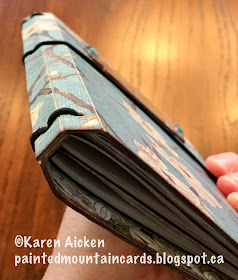
I actually stapled the signatures in the centre (bought myself a long armed stapler) instead of stitching them but I think I like the idea of the pages being unattached inside the cover as well. The elastic holds the pages in place and then you could just slide in a new page if you wanted to.
There is another sticker inside the back cover.
This photo shows the back of the first booklet (signature), and the front of the second. Oh how I love the prints on this paper.
There is a pretty sticker inside the front cover ...
.... and since the patterned paper is double sided, this is the print on the back cover.
The next photo shows the back of the second signature and the cover of the third.
I added a gold sticker inside the third cover. Hubby wanted to pick up some grid paper so I had him get some for me as well. I found it was quite thin ... apparently I'm a paper snob. So for the second and third booklets, I alternated 24 lb white printer paper with the grid paper. But I am going to need some heavier grid paper, or dot grid paper if they make such a thing.
Otherwise, I'll be buying other journals that have the paper I want and cutting them down to fit in my Faux Dori. (That is a term people use when using a Travellers Journal that isn't a Midori.)
The back cover of the 3rd booklet also has a sticker with some gold foil on it.
Yes, this is my second post today, but I wanted to share my latest project while I'm this excited.
Today's share has a lot of photos - fair warning. I am absolutely thrilled with my new Travellers Journal. Thrilled! At CHA in January, I met Eileen Hull when Karen B & Kelly stopped to say hello to her. She showed us her new Heartfelt Collection dies, and this one just blew me away. I was waiting somewhat impatiently for the on-line stores to get theirs in stock when I found out about a Facebook group "the Eileen Hull Fan Club". Which I promptly joined.
SO many talented people sharing their Travellers Journals etc there - and the different things you can do with this die. Just Wow. Anyhow, Eileen put two dies in her Etsy store and I was lucky enough to purchase one of them. It took about 10 days to reach me but I had to play as soon as I opened it. Below is the front of this first experiment/journal.
If you are unfamiliar with Travellers Journals, the biggest brand would be Midori. Beautiful leather covers and fabulous inserts. The cover is bound with elastics at the spine and you just slide your inserts under the elastic. You can swap them out as you want, add new ones when one is full, take it out to write in it then slide it back in. And there are as many ideas for using these as there are people. It's completely customizable!
This is a ScoreBoard die, which means it's designed to cut through heavy mat board, ScoreBoard and chipboard. I used chipboard and the covers are SO nice and sturdy.
I broke into this patterned paper stack that I have been hoarding for YEARS. I figure if I'm making something for myself, I can cut into it and still get to enjoy the pretty patterns. The label comes with the die. Anyhow, I added a letter sticker to the centre of the label and some bling, then some crackle paint. When it was dry I added glossy accents over the surface.
I also added a Stampin' Up word stamp to the lower right portion of the journal cover.
This is the cover flattened out ...
Inside I added a few stickers with gold accents. This one is on the inside front cover.
Look how pretty the three inserts look as the book is opened. I love things that coordinate!
As I said, there are three signatures in the book (signature = booklet) and I made them out of coordinating patterned paper for the covers, and a combination of grid and blank papers inside. Inside the cover of the first signature is another gold foiled sticker and a label. I didn't want to add a label to the front and cover up any of that pretty robin paper!
There are so many ideas rolling around in my head! This journal was actually made just to see how it all worked, so it's fairly basic. But I did add a paper bag into the first booklet - with the bottom cut off and folded in half it forms two pockets - one pocket on this page and the second further in the signature. That would be where I cut off the bottom. I have oodles of these bags, so I will be doing this again.
I actually stapled the signatures in the centre (bought myself a long armed stapler) instead of stitching them but I think I like the idea of the pages being unattached inside the cover as well. The elastic holds the pages in place and then you could just slide in a new page if you wanted to.
There is another sticker inside the back cover.
This photo shows the back of the first booklet (signature), and the front of the second. Oh how I love the prints on this paper.
There is a pretty sticker inside the front cover ...
.... and since the patterned paper is double sided, this is the print on the back cover.
The next photo shows the back of the second signature and the cover of the third.
Otherwise, I'll be buying other journals that have the paper I want and cutting them down to fit in my Faux Dori. (That is a term people use when using a Travellers Journal that isn't a Midori.)
The back cover of the 3rd booklet also has a sticker with some gold foil on it.
So that's it ... I hadn't decorated the pages or the spine or anything else on the journal, but even as it is I'm thrilled. I know what I'm going to use the first booklet for, and I'm thinking the second could be a gratitude journal.
Eventually I would like to make a Pop-Up book using Karen Burniston dies, and since Olivia loves journals (hmmmm - wonder where she got THAT from?) I would like to make her a Travellers Journal as well. With lots of pockets and tuck slots. But then I would have to make ones for the boys too ... which is where the long armed stapler will come in handy. I am going to have fun creating little booklets for them to draw in and having a long arm stapler will make them fast and easy.
And even MORE exciting news (it's a wonder I can sleep at all) -- my order of Karen Burniston's new dies has made it to Canada. The tracking doesn't say where in Canada, but at least we are in the same country now.
Let the mailbox stalking begin.
Supplies:
Journal ScoreBoards XL Die by Eileen Hull for Sizzix.
Patterned paper - K & Company
Chipboard
Elastic - 2mm
Glossy accents
Bling
and other goodies from my stash.
Thanks for stopping by today!


wonderful little album!
ReplyDeleteElma
wow this is awesome
ReplyDeleteBeautiful Journal Karen- that paper is to die for and wish I had nabbed some when it was out. Hard to believe this is your first one- so professional!
ReplyDelete