
Good morning friends
I'm happy to be a Guest Designer on the Elizabeth Craft Designs Blog today! I'm sharing a Birthday Card made with one of Krista Schneider's new line of stamps/dies and also a coordinating Bonbon box. Since I'm a visual learner, there are lots of photos in this post.

Let's get started making the Birthday card.
1. From white card stock, die cut the largest Katie Label Pivot Decorator Die twice. Stamp and die cut two shrubs, the sweet table & chairs twice (only one shown), a single and a double tree, and the coffee shop. Note, I used an ink that is suitable for alcohol based markers.

2. Using Pan Pastels and sponge daubers, quickly swipe a ground line with green, then some cloud like swipes with blue. The images were coloured with Copic markers, then highlights added with a clear Glaze Pen. With the card as reference, adhere the coloured images to the labels using foam tape for dimension. On the left label, stamp CHEERS with black ink as shown.

3. From Els' Stitched Hearts set, die cut the smallest stitched heart three times from 100# White Soft Finish Card Stock. Also die cut the second smallest Stitched Fishtail Banner from the same White Soft Finish Card Stock, and the third smallest Stitched Fishtail Banner out of patterned card stock. Add one of the die cut 'table and chairs' to one of the stitched hearts with foam tape and set aside to use with the Bonbon Box.
4. Centre the white Stitched Fishtail Banner over the patterned one and adhere together. Then score a vertical line one inch from the left edge. Stamp 'Wishing You A Colorful Day' centred between the score line and the fishtail edge, and colour with Copic markers.

Below is the front of the card. Because the patterned paper I wanted to use was not double sided and fairly lightweight, I adhered two sheets together before cutting my card.
5. Cut your card base 8-1/2 x 6" and score in the centre at 4-1/4". Lay the Katie Label Pivot on the inside of your card, being sure your alignment nubs are directly over the score line. Use removable tape to hold in place while you run it through your die cutting machine. Gently fold the card so the inner label shapes pivot to the front and back when the card is opened and closed. Adhere a stitched heart to the lower right corner on the front of the card, and the decorated labels to the card base.


6. Adhere the Stitched Fishtail Banner at the top right of the card as shown below, lining up the score line with the fold. Note, I used a wet adhesive on the left, and foam tape on the right of the Fishtail banner to give it some lift. Also, I felt the left side needed something else, so I cut a small yellow card stock scrap with the smallest Fish Tail Banner, trimmed it to size and adhered it as shown.
7. Cut a strip of patterned paper 8" x 1-1/2" and score in the centre at 4" Adhere the outside edges of this strip to the outside edges of the card along the side edges only. You want the centre to be free as this creates another pop-up area and even more dimension to your card. Adhere one of the stitched hearts to the patterned paper strip, being careful to adhere it only to the strip and not the card base.

Here is what the card looks like from above. You can see the foam tape on the Stitched Fishtail Banners, the way the Katie Label pivots, and the Pop-Up strip at the bottom edge. (Note, on another card, this Pop-Up strip would be a fun technique to add additional images to!)

And finally, this is the back of the card.

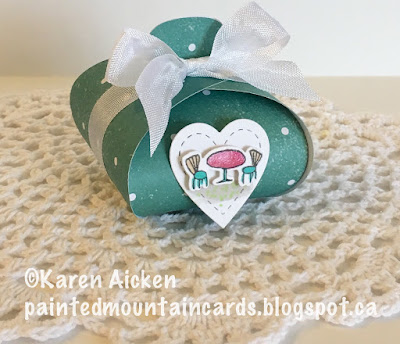
The Bonbon Box has quickly become a favourite of mine - it is easy to create and holds a little somethin' somethin'. You could quickly make multiples for a wedding or special occasion - and I think they will look wonderful on a table setting with your guests names attached. For this one, I cut it from coordinating patterned paper and wrapped the assembled box with seam binding. Then I adhered the final stitched heart with the (adorable) table and chairs to the front.
Die cut the Bonbon box from patterned paper or card stock. Bring up and hold the two tabbed sides together and gently bring one slotted side over top of the tabs. The tab will fit into that slot perfectly. This is a good time to add your goodies. Then bring the next slotted side up and over the tabs. Done! Decorate as desired.
I love that you can use matching papers to create a coordinating set!

I really enjoyed using these new stamps and the dies cut just beautifully.
Elizabeth Craft Designs Supplies:
Row Houses Stamps
Row Houses Dies
Pan Pastels Kit #2
Bonbon Box
Katie Label Pivot Card
Stitched Fishtail Banners
Stitched Hearts
Best Wishes Clear Stamps
General Sentiments Clear Stamps
#100 Soft Finish Card Stock
Other Supplies:
Seam Binding
Copic Markers
Patterned paper - American Crafts
Glaze pen - Sakura
White card stock
I'm happy to be a Guest Designer on the Elizabeth Craft Designs Blog today! I'm sharing a Birthday Card made with one of Krista Schneider's new line of stamps/dies and also a coordinating Bonbon box. Since I'm a visual learner, there are lots of photos in this post.

Let's get started making the Birthday card.

2. Using Pan Pastels and sponge daubers, quickly swipe a ground line with green, then some cloud like swipes with blue. The images were coloured with Copic markers, then highlights added with a clear Glaze Pen. With the card as reference, adhere the coloured images to the labels using foam tape for dimension. On the left label, stamp CHEERS with black ink as shown.

3. From Els' Stitched Hearts set, die cut the smallest stitched heart three times from 100# White Soft Finish Card Stock. Also die cut the second smallest Stitched Fishtail Banner from the same White Soft Finish Card Stock, and the third smallest Stitched Fishtail Banner out of patterned card stock. Add one of the die cut 'table and chairs' to one of the stitched hearts with foam tape and set aside to use with the Bonbon Box.
4. Centre the white Stitched Fishtail Banner over the patterned one and adhere together. Then score a vertical line one inch from the left edge. Stamp 'Wishing You A Colorful Day' centred between the score line and the fishtail edge, and colour with Copic markers.

Below is the front of the card. Because the patterned paper I wanted to use was not double sided and fairly lightweight, I adhered two sheets together before cutting my card.
5. Cut your card base 8-1/2 x 6" and score in the centre at 4-1/4". Lay the Katie Label Pivot on the inside of your card, being sure your alignment nubs are directly over the score line. Use removable tape to hold in place while you run it through your die cutting machine. Gently fold the card so the inner label shapes pivot to the front and back when the card is opened and closed. Adhere a stitched heart to the lower right corner on the front of the card, and the decorated labels to the card base.


6. Adhere the Stitched Fishtail Banner at the top right of the card as shown below, lining up the score line with the fold. Note, I used a wet adhesive on the left, and foam tape on the right of the Fishtail banner to give it some lift. Also, I felt the left side needed something else, so I cut a small yellow card stock scrap with the smallest Fish Tail Banner, trimmed it to size and adhered it as shown.
7. Cut a strip of patterned paper 8" x 1-1/2" and score in the centre at 4" Adhere the outside edges of this strip to the outside edges of the card along the side edges only. You want the centre to be free as this creates another pop-up area and even more dimension to your card. Adhere one of the stitched hearts to the patterned paper strip, being careful to adhere it only to the strip and not the card base.


And finally, this is the back of the card.

The Bonbon Box has quickly become a favourite of mine - it is easy to create and holds a little somethin' somethin'. You could quickly make multiples for a wedding or special occasion - and I think they will look wonderful on a table setting with your guests names attached. For this one, I cut it from coordinating patterned paper and wrapped the assembled box with seam binding. Then I adhered the final stitched heart with the (adorable) table and chairs to the front.
Die cut the Bonbon box from patterned paper or card stock. Bring up and hold the two tabbed sides together and gently bring one slotted side over top of the tabs. The tab will fit into that slot perfectly. This is a good time to add your goodies. Then bring the next slotted side up and over the tabs. Done! Decorate as desired.

I love that you can use matching papers to create a coordinating set!

I really enjoyed using these new stamps and the dies cut just beautifully.
Elizabeth Craft Designs Supplies:
Row Houses Stamps
Row Houses Dies
Pan Pastels Kit #2
Bonbon Box
Katie Label Pivot Card
Stitched Fishtail Banners
Stitched Hearts
Best Wishes Clear Stamps
General Sentiments Clear Stamps
#100 Soft Finish Card Stock
Other Supplies:
Seam Binding
Copic Markers
Patterned paper - American Crafts
Glaze pen - Sakura
White card stock
Thanks for stopping by today
such a wonderful card and box for a birthday!
ReplyDeleteElma
wow this is amazing Karen :)
ReplyDelete